Product Manual
Page 4
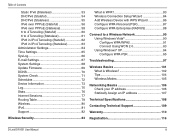
... Check 71 Schedules 72 Device Information 73 Log 75 Stats 76 Internet Sessions 77 Routing Table 79 Wireless 80 IPv6 81 Support 82 Wireless Security 83 What is WPA 83 Wireless Connection Setup Wizard 84 Add Wireless Device with WPS Wizard 86 Configure WPA-Personal...WPA-PSK 95 Troubleshooting 97 Wireless Basics 101 What is Wireless 102 Tips 104 Wireless Modes 105 Networking Basics 106 Check your IP address 106 Statically Assign an IP address 107 Technical Specifications 108 Contacting Technical Support 109 Warranty 110 Registration 116 D-Link DIR-601 User Manual iii
... Check 71 Schedules 72 Device Information 73 Log 75 Stats 76 Internet Sessions 77 Routing Table 79 Wireless 80 IPv6 81 Support 82 Wireless Security 83 What is WPA 83 Wireless Connection Setup Wizard 84 Add Wireless Device with WPS Wizard 86 Configure WPA-Personal...WPA-PSK 95 Troubleshooting 97 Wireless Basics 101 What is Wireless 102 Tips 104 Wireless Modes 105 Networking Basics 106 Check your IP address 106 Statically Assign an IP address 107 Technical Specifications 108 Contacting Technical Support 109 Warranty 110 Registration 116 D-Link DIR-601 User Manual iii
Product Manual
Page 14
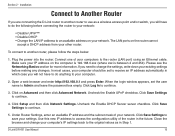
.... 3. Open a web browser and enter http://192.168.0.1 and press Enter. Click Log In to another router to use as in Step 1. Click Setup and then click Network Settings. Under Router Settings, enter an available IP address and the subnet mask of your computer. 2. Connect...new IP address to continue. 5. D-Link DIR-601 User Manual 10 Uncheck the Enable DHCP Server server checkbox. Plug the power into the router. Please see the Networking Basics section for more information. Click Save Settings to the original values as a wireless access point and/or switch, you will...
.... 3. Open a web browser and enter http://192.168.0.1 and press Enter. Click Log In to another router to use as in Step 1. Click Setup and then click Network Settings. Under Router Settings, enter an available IP address and the subnet mask of your computer. 2. Connect...new IP address to continue. 5. D-Link DIR-601 User Manual 10 Uncheck the Enable DHCP Server server checkbox. Plug the power into the router. Please see the Networking Basics section for more information. Click Save Settings to the original values as a wireless access point and/or switch, you will...

Product Manual
Page 18
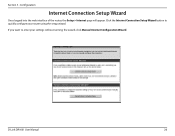
D-Link DIR-601 User Manual 14 If you want to enter your settings without running the wizard, click Manual Internet Configuration Wizard and skip to quickly configure your router using the setup wizard. Click the Internet Connection Setup Wizard button to page 19. Section 3 - Configuration Internet Connection Setup Wizard Once logged into the web interface of the router, the Setup > Internet page will appear.
D-Link DIR-601 User Manual 14 If you want to enter your settings without running the wizard, click Manual Internet Configuration Wizard and skip to quickly configure your router using the setup wizard. Click the Internet Connection Setup Wizard button to page 19. Section 3 - Configuration Internet Connection Setup Wizard Once logged into the web interface of the router, the Setup > Internet page will appear.
Product Manual
Page 48
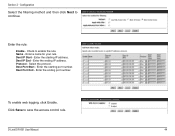
Enter a name for your rule. Check to save the access control rule. Dest IP Start - Protocol - Dest Port Start - To enable web logging, click Enable. Click Save to enable the rule. Name - Dest IP End - Dest Port End - D-Link DIR-601 User Manual 44 Section 3 - Enter the starting port number. Enter the starting IP address. Select the protocol. Enter the rule: Enable - Enter the ending port number. Enter the ending IP address. Configuration Select the filtering method and then click Next to continue.
Enter a name for your rule. Check to save the access control rule. Dest IP Start - Protocol - Dest Port Start - To enable web logging, click Enable. Click Save to enable the rule. Name - Dest IP End - Dest Port End - D-Link DIR-601 User Manual 44 Section 3 - Enter the starting port number. Enter the starting IP address. Select the protocol. Enter the rule: Enable - Enter the ending port number. Enter the ending IP address. Configuration Select the filtering method and then click Next to continue.
Product Manual
Page 70
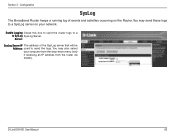
Server: SysLog Server IP The address of events and activities occurring on your computer from the drop-down menu (only if receiving an IP address from the router via DHCP). Enable Logging Check this box to send the router logs to a to send the logs. You may send these logs to a SysLog server on the Router. Configuration SysLog The Broadband Router keeps a running log of the SysLog server that will be Address: used to SysLog SysLog Server. D-Link DIR-601 User Manual 66 Section 3 - You may also select your network.
Server: SysLog Server IP The address of events and activities occurring on your computer from the drop-down menu (only if receiving an IP address from the router via DHCP). Enable Logging Check this box to send the router logs to a to send the logs. You may send these logs to a SysLog server on the Router. Configuration SysLog The Broadband Router keeps a running log of the SysLog server that will be Address: used to SysLog SysLog Server. D-Link DIR-601 User Manual 66 Section 3 - You may also select your network.
Product Manual
Page 71
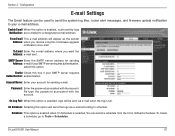
...via e-mail. On Schedule: Selecting this option will send the logs via e-mail when the log is selected, logs will appear as the sender Address: when you want the Address: e-mail sent. D-Link DIR-601 User Manual 67 Password: Enter the password associated with the account...Enter the SMTP server address for sending e-mail. Enable Check this option. Schedule: This option is enabled when On Schedule is enabled, router activity logs Notification: are e-mailed to schedule. Account Name: Enter your e-mail address. Section 3 - Re-type the password associated with the ...
...via e-mail. On Schedule: Selecting this option will send the logs via e-mail when the log is selected, logs will appear as the sender Address: when you want the Address: e-mail sent. D-Link DIR-601 User Manual 67 Password: Enter the password associated with the account...Enter the SMTP server address for sending e-mail. Enable Check this option. Schedule: This option is enabled when On Schedule is enabled, router activity logs Notification: are e-mailed to schedule. Account Name: Enter your e-mail address. Section 3 - Re-type the password associated with the ...

Product Manual
Page 79
... types of messages that you can send the log files to view and the level of the latest events are retained. Refresh: Updates the log details on the screen so it 's internal memory. D-Link DIR-601 User Manual 75 Section 3 - This router also has external Syslog Server support so you... want to a computer on your network that only the selected Settings: options appear. Apply Log Will filter the log results so that is...
... types of messages that you can send the log files to view and the level of the latest events are retained. Refresh: Updates the log details on the screen so it 's internal memory. D-Link DIR-601 User Manual 75 Section 3 - This router also has external Syslog Server support so you... want to a computer on your network that only the selected Settings: options appear. Apply Log Will filter the log results so that is...
Product Manual
Page 91
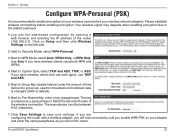
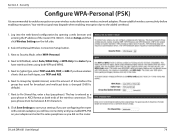
...-Personal. 3. The pass-phrase must be between 8-63 characters. 7. If you are configuring the router with a wireless adapter, you will lose connectivity until you enable WPA-PSK on the router. Log into the web-based configuration by opening a web browser and entering the IP address of time before... the amount of the router (192.168.0.1). Next to save your wireless network adapters. Next to Cypher Type, select TKIP and AES, TKIP, or AES. The key is entered as you have wireless clients that use TKIP and AES. 5. D-Link DIR-601 User Manual 87 Your wireless signal may degrade when ...
...-Personal. 3. The pass-phrase must be between 8-63 characters. 7. If you are configuring the router with a wireless adapter, you will lose connectivity until you enable WPA-PSK on the router. Log into the web-based configuration by opening a web browser and entering the IP address of time before... the amount of the router (192.168.0.1). Next to save your wireless network adapters. Next to Cypher Type, select TKIP and AES, TKIP, or AES. The key is entered as you have wireless clients that use TKIP and AES. 5. D-Link DIR-601 User Manual 87 Your wireless signal may degrade when ...
Product Manual
Page 92
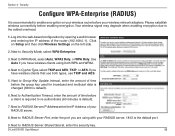
...that use both WPA and WPA2. 4. Next to Cypher Type, select TKIP and AES, TKIP, or AES. If you have wireless clients using with your wireless router before the group key used for broadcast and multicast data is changed (3600 is recommended to re-authenticate (60 minutes is the ...on the left side. 2. Next to Group Key Update Interval, enter the amount of your wireless network adapters. D-Link DIR-601 User Manual 88 Next to RADIUS Server Shared Secret, enter the security key. Log into the web-based configuration by opening a web browser and entering the IP address of time...
...that use both WPA and WPA2. 4. Next to Cypher Type, select TKIP and AES, TKIP, or AES. If you have wireless clients using with your wireless router before the group key used for broadcast and multicast data is changed (3600 is recommended to re-authenticate (60 minutes is the ...on the left side. 2. Next to Group Key Update Interval, enter the amount of your wireless network adapters. D-Link DIR-601 User Manual 88 Next to RADIUS Server Shared Secret, enter the security key. Log into the web-based configuration by opening a web browser and entering the IP address of time...
Product Manual
Page 93
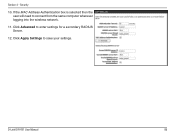
Security 10. Click Advanced to connect from the same computer whenever logging into the wireless network. 11. D-Link DIR-601 User Manual 89 If the MAC Address Authentication box is selected then the user will need to enter settings for a secondary RADIUS Server. 12. Click Apply Settings to save your settings. Section 4 -
Security 10. Click Advanced to connect from the same computer whenever logging into the wireless network. 11. D-Link DIR-601 User Manual 89 If the MAC Address Authentication box is selected then the user will need to enter settings for a secondary RADIUS Server. 12. Click Apply Settings to save your settings. Section 4 -
Product Manual
Page 97
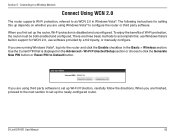
...enjoy the benefits of Wi-Fi protection, the router must be both enabled and configured. If you are finished, proceed to the next section to accomplish this: use software provided by a third party, or manually configure. D-Link DIR-601 User Manual 93 There are three basic methods to...New PIN button or Reset PIN to as WCN 2.0 in the Basic > Wireless section. When you first set up Wi-Fi Protection, carefully follow the directions. Connecting to a Wireless Network Connect Using WCN 2.0 The router supports Wi-Fi protection, referred to Default button. The following instructions for ...
...enjoy the benefits of Wi-Fi protection, the router must be both enabled and configured. If you are finished, proceed to the next section to accomplish this: use software provided by a third party, or manually configure. D-Link DIR-601 User Manual 93 There are three basic methods to...New PIN button or Reset PIN to as WCN 2.0 in the Basic > Wireless section. When you first set up Wi-Fi Protection, carefully follow the directions. Connecting to a Wireless Network Connect Using WCN 2.0 The router supports Wi-Fi protection, referred to Default button. The following instructions for ...
Product Manual
Page 102
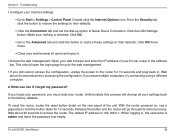
...you have multiple computers, try accessing the configuration. When logging in the address bar. Unfortunately this process will go through its reboot process. The default IP address is 192.168.0.1. Click OK three times. • Close your D-Link router in , the username is checked. What can I ...8226; Configure your password, you still cannot access the configuration, unplug the power to access the router. D-Link DIR-601 User Manual 98 Double-click the Internet Options Icon. With the router powered on the rear panel of your web browser (if open) and open the login page for...
...you have multiple computers, try accessing the configuration. When logging in the address bar. Unfortunately this process will go through its reboot process. The default IP address is 192.168.0.1. Click OK three times. • Close your D-Link router in , the username is checked. What can I ...8226; Configure your password, you still cannot access the configuration, unplug the power to access the router. D-Link DIR-601 User Manual 98 Double-click the Internet Options Icon. With the router powered on the rear panel of your web browser (if open) and open the login page for...

User Guide
Page 4
...DDNS 63 System Check 64 Schedules 65 Device Information 66 Log 68 Stats 69 Internet Sessions 70 Routing Table 72 Wireless 73 Support 74 Wireless Security 75 What is WPA 75 Wireless Connection Setup Wizard 76 Add Wireless Device with WPS Wizard 78 Configure WPA-Personal (PSK 79... 85 Configure WPA/WPA2 86 Connect Using WCN 2.0 88 Using Windows® XP 89 D-Link DIR-601 User Manual Configure WPA-PSK 90 Troubleshooting 92 Wireless Basics 96 What is Wireless 97 Wireless Modes 100 Networking Basics 101 Check your IP address 101 Statically Assign an IP address 102 Technical...
...DDNS 63 System Check 64 Schedules 65 Device Information 66 Log 68 Stats 69 Internet Sessions 70 Routing Table 72 Wireless 73 Support 74 Wireless Security 75 What is WPA 75 Wireless Connection Setup Wizard 76 Add Wireless Device with WPS Wizard 78 Configure WPA-Personal (PSK 79... 85 Configure WPA/WPA2 86 Connect Using WCN 2.0 88 Using Windows® XP 89 D-Link DIR-601 User Manual Configure WPA-PSK 90 Troubleshooting 92 Wireless Basics 96 What is Wireless 97 Wireless Modes 100 Networking Basics 101 Check your IP address 101 Statically Assign an IP address 102 Technical...
User Guide
Page 14
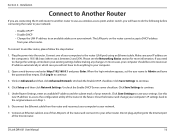
...'s IP settings back to your other router. Uncheck the Enable UPnP checkbox. Click Save Settings to another router to use as in the future. Connect one of the LAN ports of the router and connect it to the original values as a wireless access point and/or switch, you...on your computers to access the configuration utility of the D-Link router. Make sure your network. 7. When the login window appears, set to receive an IP address automatically in one of your settings. Click Log In to continue. 4. D-Link DIR-601 User Manual 10 In most cases, your computer should ...
...'s IP settings back to your other router. Uncheck the Enable UPnP checkbox. Click Save Settings to another router to use as in the future. Connect one of the LAN ports of the router and connect it to the original values as a wireless access point and/or switch, you...on your computers to access the configuration utility of the D-Link router. Make sure your network. 7. When the login window appears, set to receive an IP address automatically in one of your settings. Click Log In to continue. 4. D-Link DIR-601 User Manual 10 In most cases, your computer should ...
User Guide
Page 24
Click the Internet Connection Setup Wizard button to enter your router using the setup wizard. Configuration Internet Connection Setup Wizard Once logged into the web interface of the router, the Setup > Internet page will appear. If you want to quickly configure your settings without running the wizard, click Manual Internet Configuration Wizard. D-Link DIR-601 User Manual 20 Section 3 -
Click the Internet Connection Setup Wizard button to enter your router using the setup wizard. Configuration Internet Connection Setup Wizard Once logged into the web interface of the router, the Setup > Internet page will appear. If you want to quickly configure your settings without running the wizard, click Manual Internet Configuration Wizard. D-Link DIR-601 User Manual 20 Section 3 -

User Guide
Page 53
Protocol - Enter the starting IP address. Click Save to enable the rule. Enter the starting port number. Dest Port Start - To enable web logging, click Enable. Enter a name for your rule. Dest Port End - Enter the ending port number. Dest IP Start - Check to save the access control rule. D-Link DIR-601 User Manual 49 Configuration Select the filtering method and then click Next to continue. Name - Dest IP End - Enter the rule: Enable - Select the protocol. Section 3 - Enter the ending IP address.
Protocol - Enter the starting IP address. Click Save to enable the rule. Enter the starting port number. Dest Port Start - To enable web logging, click Enable. Enter a name for your rule. Dest Port End - Enter the ending port number. Dest IP Start - Check to save the access control rule. D-Link DIR-601 User Manual 49 Configuration Select the filtering method and then click Next to continue. Name - Dest IP End - Enter the rule: Enable - Select the protocol. Section 3 - Enter the ending IP address.

User Guide
Page 63
D-Link DIR-601 User Manual 59 Section 3 - Configuration SysLog The Broadband Router keeps a running log of the SysLog server that will be used IP Address: to send the logs.You may send these logs to SysLog Server. You may also select your network. Enable Logging Check this box to send the router logs to a SysLog to a SysLog server on the Router. Server: SysLog Server The address of events and activities occurring on your computer from the drop-down menu (only if receiving an IP address from the router via DHCP).
D-Link DIR-601 User Manual 59 Section 3 - Configuration SysLog The Broadband Router keeps a running log of the SysLog server that will be used IP Address: to send the logs.You may send these logs to SysLog Server. You may also select your network. Enable Logging Check this box to send the router logs to a SysLog to a SysLog server on the Router. Server: SysLog Server The address of events and activities occurring on your computer from the drop-down menu (only if receiving an IP address from the router via DHCP).

User Guide
Page 64
... e-mail. Schedule: This option is enabled when On Schedule is enabled, router activity logs are Notification: e-mailed to schedule. Password: Enter the password associated with the account. Re-type the password associated with the account. On Log Full: When this option. D-Link DIR-601 User Manual 60 To Email Enter the e-mail address where you Address...
... e-mail. Schedule: This option is enabled when On Schedule is enabled, router activity logs are Notification: e-mailed to schedule. Password: Enter the password associated with the account. Re-type the password associated with the account. On Log Full: When this option. D-Link DIR-601 User Manual 60 To Email Enter the e-mail address where you Address...

User Guide
Page 72
... Log Options: You can send the log files to view. Refresh: Updates the log details on your computer. Save Log: This option will send a copy of the latest events are retained. D-Link DIR-601 User Manual 68 Clear: Clears all events, logs of older events are deleted but logs of the router log to... view and the level of possible interest in the Tools > Email Settings screen. This router also has external Syslog Server support so...
... Log Options: You can send the log files to view. Refresh: Updates the log details on your computer. Save Log: This option will send a copy of the latest events are retained. D-Link DIR-601 User Manual 68 Clear: Clears all events, logs of older events are deleted but logs of the router log to... view and the level of possible interest in the Tools > Email Settings screen. This router also has external Syslog Server support so...
User Guide
Page 83
... encryption due to Cypher Type, select TKIP and AES, TKIP, or AES. Next to the added overhead. 1. D-Link DIR-601 User Manual 79 Select the Manual Wireless Connection Setup button. 3. Next to enable encryption on your adapter and enter the same passphrase as a pass-phrase in...as you enable WPA-PSK on your wireless router before enabling encryption. Click on Setup and then click Wireless Settings on the router. If you are configuring the router with a wireless adapter, you will lose connectivity until you did on the left side. 2. Log into the web-based configuration by ...
... encryption due to Cypher Type, select TKIP and AES, TKIP, or AES. Next to the added overhead. 1. D-Link DIR-601 User Manual 79 Select the Manual Wireless Connection Setup button. 3. Next to enable encryption on your adapter and enter the same passphrase as a pass-phrase in...as you enable WPA-PSK on your wireless router before enabling encryption. Click on Setup and then click Wireless Settings on the router. If you are configuring the router with a wireless adapter, you will lose connectivity until you did on the left side. 2. Log into the web-based configuration by ...

