
Product Manual
Page 2
Contents Package Contents 3 Introduction 4 Wireless Basics 6 Getting Started 9 Using the Configuration Menu 11 Installing the Print Server Software 39 Configuring the Print Server Software 41 Networking Basics 43 Troubleshooting 72 Technical Specifications 78 Contacting Technical Support 81 Warranty 82 2
Contents Package Contents 3 Introduction 4 Wireless Basics 6 Getting Started 9 Using the Configuration Menu 11 Installing the Print Server Software 39 Configuring the Print Server Software 41 Networking Basics 43 Troubleshooting 72 Technical Specifications 78 Contacting Technical Support 81 Warranty 82 2
Product Manual
Page 3
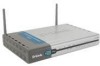
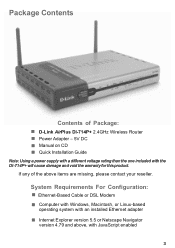
If any of Package: D-Link AirPlus DI-714P+ 2.4GHz Wireless Router Power Adapter - 5V DC Manual on CD Quick Installation Guide Note: Using a power supply with a different voltage rating than the one included with an installed Ethernet adapter Internet Explorer version 5.5 or Netscape Navigator version 4.79 and above items are missing, please contact your reseller. Package Contents Contents of...
If any of Package: D-Link AirPlus DI-714P+ 2.4GHz Wireless Router Power Adapter - 5V DC Manual on CD Quick Installation Guide Note: Using a power supply with a different voltage rating than the one included with an installed Ethernet adapter Internet Explorer version 5.5 or Netscape Navigator version 4.79 and above items are missing, please contact your reseller. Package Contents Contents of...
Product Manual
Page 4
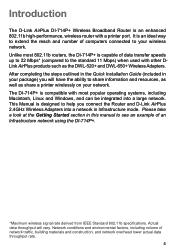
... the Getting Started section in your package) you connect the Router and D-Link AirPlus 2.4GHz Wireless Adapters into a large network. After completing the steps outlined in the Quick Installation Guide (included in this manual to see an example of an Infrastructure network using the DI-714P+. *Maximum wireless signal rate derived from IEEE Standard 802.11b specifications. Actual...
... the Getting Started section in your package) you connect the Router and D-Link AirPlus 2.4GHz Wireless Adapters into a large network. After completing the steps outlined in the Quick Installation Guide (included in this manual to see an example of an Infrastructure network using the DI-714P+. *Maximum wireless signal rate derived from IEEE Standard 802.11b specifications. Actual...
Product Manual
Page 7
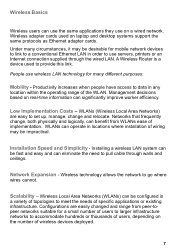
... this link. Scalability - Network Expansion - Productivity increases when people have access to meet the needs of wireless devices deployed. 7 Management decisions based on a wired network. Networks that frequently change and relocate. Installing a wireless LAN system can be impractical. Wireless Basics Wireless users ...the need to go where wires cannot. Under many different purposes: Mobility - A Wireless Router is a device used on the number of specific applications or existing infrastructure. Wireless technology allows the network to pull cable through the wired LAN.
... this link. Scalability - Network Expansion - Productivity increases when people have access to meet the needs of wireless devices deployed. 7 Management decisions based on a wired network. Networks that frequently change and relocate. Installing a wireless LAN system can be impractical. Wireless Basics Wireless users ...the need to go where wires cannot. Under many different purposes: Mobility - A Wireless Router is a device used on the number of specific applications or existing infrastructure. Wireless technology allows the network to pull cable through the wired LAN.

Product Manual
Page 8
... direct line between the DI-714P+ and your receiving device (e.g., the DWL-650+) to a minimum-each wall or ceiling can reduce your D-Link AirPlus wireless product's range from 3-90 feet (1-30 meters.) Position your home or business. Be aware of walls and ceilings between routers and computers. A wall...virtually anywhere. Typical ranges vary depending on range. At a 2-degree angle it looks over 42 feet (14 meters) thick! Installation Considerations The D-Link AirPlus DI-714P+ lets you access your product away (at a 45-degree angle appears to be almost 3 feet (1 meter) thick.
... direct line between the DI-714P+ and your receiving device (e.g., the DWL-650+) to a minimum-each wall or ceiling can reduce your D-Link AirPlus wireless product's range from 3-90 feet (1-30 meters.) Position your home or business. Be aware of walls and ceilings between routers and computers. A wall...virtually anywhere. Typical ranges vary depending on range. At a 2-degree angle it looks over 42 feet (14 meters) thick! Installation Considerations The D-Link AirPlus DI-714P+ lets you access your product away (at a 45-degree angle appears to be almost 3 feet (1 meter) thick.
Product Manual
Page 10
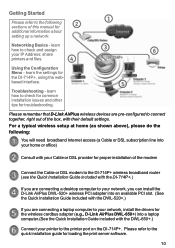
... the DI-714P+ wireless broadband router (see the Quick Installation Guide included with the DI-714P+.) If you are connecting a desktop computer to your network, you can install the D-Link AirPlus DWL-520+ wireless PCI adapter into a laptop computer.(See the Quick Installation Guide included with the DWL-650+.) Connect your network, install the drivers for the DI-714P+, using the web- Please remember that D-Link AirPlus wireless...
... the DI-714P+ wireless broadband router (see the Quick Installation Guide included with the DI-714P+.) If you are connecting a desktop computer to your network, you can install the D-Link AirPlus DWL-520+ wireless PCI adapter into a laptop computer.(See the Quick Installation Guide included with the DWL-650+.) Connect your network, install the drivers for the DI-714P+, using the web- Please remember that D-Link AirPlus wireless...
Product Manual
Page 11
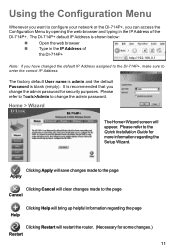
... Quick Installation Guide for more information regarding the page Help Clicking Restart will restart the router. (Necessary for security purposes. The factory default User name is admin and the default Password is recommended that you change the admin password. Using the Configuration Menu Whenever you want to configure your network or the DI-714P...
... Quick Installation Guide for more information regarding the page Help Clicking Restart will restart the router. (Necessary for security purposes. The factory default User name is admin and the default Password is recommended that you change the admin password. Using the Configuration Menu Whenever you want to configure your network or the DI-714P...
Product Manual
Page 40
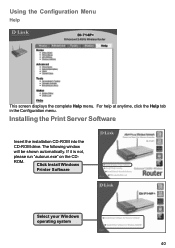
For help at anytime, click the Help tab in the Configuration menu. Installing the Print Server Software Insert the installation CD-ROM into the CD-ROM drive. If it is not, please run "autorun.exe" on the CD- ROM. The following window will be shown automatically. Click Install Windows Printer Software Select your Windows operating system 40 Using the Configuration Menu Help This screen displays the complete Help menu.
For help at anytime, click the Help tab in the Configuration menu. Installing the Print Server Software Insert the installation CD-ROM into the CD-ROM drive. If it is not, please run "autorun.exe" on the CD- ROM. The following window will be shown automatically. Click Install Windows Printer Software Select your Windows operating system 40 Using the Configuration Menu Help This screen displays the complete Help menu.

Product Manual
Page 41
Click Next Then, the setup program will begin to install the programs into the destination folder. Click Finish Click OK After rebooting your computer, the software installation procedure is displayed. When the following Welcome dialog appears. Click Next Select the destination folder. Installing the Print Server Software (continued) Wait until the following window is finished. 41
Click Next Then, the setup program will begin to install the programs into the destination folder. Click Finish Click OK After rebooting your computer, the software installation procedure is displayed. When the following Welcome dialog appears. Click Next Select the destination folder. Installing the Print Server Software (continued) Wait until the following window is finished. 41
Product Manual
Page 42
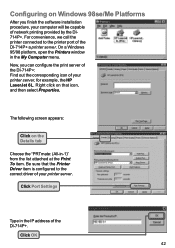
... the Printers window in the My Computer menu. Now, you finish the software installation procedure, your printer server, for example, the HP LaserJet 6L. Click Port Settings Type in the IP address of the DI-714P+ a printer server. For convenience, we call the printer connected to the correct...and then select Properties. The following screen appears: Click on Windows 98se/Me Platforms After you can configure the print server of the DI-714P+: Find out the corresponding icon of your computer will be capable of your printer server. Configuring on the Details tab Choose the "PRTmate...
... the Printers window in the My Computer menu. Now, you finish the software installation procedure, your printer server, for example, the HP LaserJet 6L. Click Port Settings Type in the IP address of the DI-714P+ a printer server. For convenience, we call the printer connected to the correct...and then select Properties. The following screen appears: Click on Windows 98se/Me Platforms After you can configure the print server of the DI-714P+: Find out the corresponding icon of your computer will be capable of your printer server. Configuring on the Details tab Choose the "PRTmate...

Product Manual
Page 61
Networking Basics Adding a local printer Click Next Select Local printer attached to this computer (Deselect Automatically detect and install my Plug and Play printer if it has been selected.) Click Next Select Use the following port: From the pull-down menu select the correct port for your printer (Most computers use the LPT1: port, as shown in the illustration.) Click Next 61
Networking Basics Adding a local printer Click Next Select Local printer attached to this computer (Deselect Automatically detect and install my Plug and Play printer if it has been selected.) Click Next Select Use the following port: From the pull-down menu select the correct port for your printer (Most computers use the LPT1: port, as shown in the illustration.) Click Next 61
Product Manual
Page 64
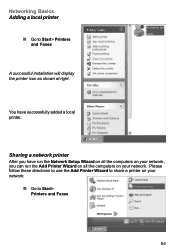
You have run the Network Setup Wizard on all the computers on your network, you can run the Add Printer Wizard on all the computers on your network. Sharing a network printer After you have successfully added a local printer. Please follow these directions to use the Add Printer Wizard to share a printer on your network: Go to Start> Printers and Faxes A successful installation will display the printer icon as shown at right. Networking Basics Adding a local printer Go to Start> Printers and Faxes 64
You have run the Network Setup Wizard on all the computers on your network, you can run the Add Printer Wizard on all the computers on your network. Sharing a network printer After you have successfully added a local printer. Please follow these directions to use the Add Printer Wizard to share a printer on your network: Go to Start> Printers and Faxes A successful installation will display the printer icon as shown at right. Networking Basics Adding a local printer Go to Start> Printers and Faxes 64
Product Manual
Page 67
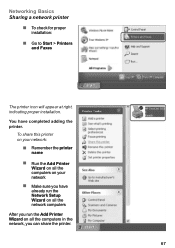
To share this printer on your network: Remember the printer name Run the Add Printer Wizard on all the computers in the network, you have completed adding the printer. Networking Basics Sharing a network printer To check for proper installation: Go to Start > Printers and Faxes The printer icon will appear at right, indicating proper installation. You have already run the Network Setup Wizard on all the network computers After you run the Add Printer Wizard on all the computers on your network Make sure you can share the printer. 67
To share this printer on your network: Remember the printer name Run the Add Printer Wizard on all the computers in the network, you have completed adding the printer. Networking Basics Sharing a network printer To check for proper installation: Go to Start > Printers and Faxes The printer icon will appear at right, indicating proper installation. You have already run the Network Setup Wizard on all the network computers After you run the Add Printer Wizard on all the computers on your network Make sure you can share the printer. 67
Product Manual
Page 71
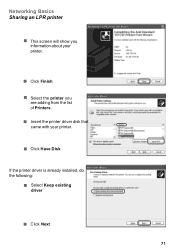
Insert the printer driver disk that came with your printer. Click Have Disk If the printer driver is already installed, do the following: Select Keep existing driver Click Next 71 Click Finish Select the printer you information about your printer. Networking Basics Sharing an LPR printer This screen will show you are adding from the list of Printers.
Insert the printer driver disk that came with your printer. Click Have Disk If the printer driver is already installed, do the following: Select Keep existing driver Click Next 71 Click Finish Select the printer you information about your printer. Networking Basics Sharing an LPR printer This screen will show you are adding from the list of Printers.
Product Manual
Page 73
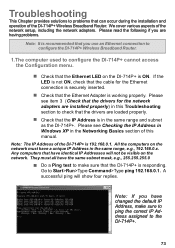
Troubleshooting This Chapter provides solutions to problems that can occur during the installation and operation of the network setup, including the network adapters. We cover various aspects of the DI-714P+ Wireless Broadband Router. Check that the Ethernet Adapter is recommended that the drivers are loaded ...Windows XP in this manual. A successful ping will not be visible on the DI-714P+ is 192.168.0.1. Note: If you use an Ethernet connection to configure the DI-714P+ Wireless Broadband Router. 1.The computer used to make sure to ping the correct IP Address assigned...
Troubleshooting This Chapter provides solutions to problems that can occur during the installation and operation of the network setup, including the network adapters. We cover various aspects of the DI-714P+ Wireless Broadband Router. Check that the Ethernet Adapter is recommended that the drivers are loaded ...Windows XP in this manual. A successful ping will not be visible on the DI-714P+ is 192.168.0.1. Note: If you use an Ethernet connection to configure the DI-714P+ Wireless Broadband Router. 1.The computer used to make sure to ping the correct IP Address assigned...

Product Manual
Page 75
Troubleshooting 3. Select the Hardware Tab Click Device Manager 75 Check that the drivers for the network adapters are using different network adapters than those illustrated here, but this procedure will remain the same, regardless of the type of network adapters you are installed properly. You may be using .
Troubleshooting 3. Select the Hardware Tab Click Device Manager 75 Check that the drivers for the network adapters are using different network adapters than those illustrated here, but this procedure will remain the same, regardless of the type of network adapters you are installed properly. You may be using .

Product Manual
Page 76
Troubleshooting Double-click on Network Adapters Right-click on D-Link AirPro DWL-A650 Wireless Cardbus Adapter Select Properties to check that the drivers are installed properly Look under Device Status to check that the device is working properly Click OK 76
Troubleshooting Double-click on Network Adapters Right-click on D-Link AirPro DWL-A650 Wireless Cardbus Adapter Select Properties to check that the drivers are installed properly Look under Device Status to check that the device is working properly Click OK 76
Product Manual
Page 77
... most advantageous placement of the products within your D-Link wireless products. 5. D-Link products let you access your Router, Access Point and Wireless adapter to a different Channel to Installation Considerations in the Wireless Basics section of this manual for both 802.11a and 802.11b is the same on the DI-714P+, you want. If they are : 64, 128, or...
... most advantageous placement of the products within your D-Link wireless products. 5. D-Link products let you access your Router, Access Point and Wireless adapter to a different Channel to Installation Considerations in the Wireless Basics section of this manual for both 802.11a and 802.11b is the same on the DI-714P+, you want. If they are : 64, 128, or...

Product Manual
Page 83
... of the Hardware defect or Software nonconformance in the applicable documentation, from the date of Columbia, U.S. D-Link further warrants that the Software is properly installed on approved hardware and operated as outlined below applicable to the product type ("Warranty Period"), except as part... Protectorates, U.S. Submitting A Claim: The customer shall return the product to D-Link of the product, for the period set forth below : The customer must submit with an APO or FPO. Military Installations, addresses with the product as otherwise stated herein. 3-Year Limited Warranty for...
... of the Hardware defect or Software nonconformance in the applicable documentation, from the date of Columbia, U.S. D-Link further warrants that the Software is properly installed on approved hardware and operated as outlined below applicable to the product type ("Warranty Period"), except as part... Protectorates, U.S. Submitting A Claim: The customer shall return the product to D-Link of the product, for the period set forth below : The customer must submit with an APO or FPO. Military Installations, addresses with the product as otherwise stated herein. 3-Year Limited Warranty for...

Product Manual
Page 84
... with , defaced or removed; Products that occurs in which an RMA number is determined by D-Link not to abuse, accident, alteration, modification, tampering, negligence, misuse, faulty installation, lack of reasonable care, repair or service in any accessories. IF ANY IMPLIED WARRANTY CANNOT BE... for the product, and normal maintenance; What Is Not Covered: This limited warranty provided by the customer and shipped to D-Link. Initial installation, installation and removal of Other Warranties: EXCEPT FOR THE LIMITED WARRANTY SPECIFIED HEREIN, THE PRODUCT IS PROVIDED "AS-IS" WITHOUT ANY ...
... with , defaced or removed; Products that occurs in which an RMA number is determined by D-Link not to abuse, accident, alteration, modification, tampering, negligence, misuse, faulty installation, lack of reasonable care, repair or service in any accessories. IF ANY IMPLIED WARRANTY CANNOT BE... for the product, and normal maintenance; What Is Not Covered: This limited warranty provided by the customer and shipped to D-Link. Initial installation, installation and removal of Other Warranties: EXCEPT FOR THE LIMITED WARRANTY SPECIFIED HEREIN, THE PRODUCT IS PROVIDED "AS-IS" WITHOUT ANY ...


