
Manual
Page 2
D-Link EasySmart Switch User Manual Table of Contents Table of Contents ...i About This Guide ...1 Terms/Usage...1 Copyright and Trademarks ...1 1 Product Introduction ...2 DGS-1100-05 ...2 Front Panel ...2 Rear Panel...2 DGS-1100-08 ...2 Front Panel ...3 Rear Panel...3 DGS-1100-08P...3 Front Panel ...3 Rear Panel...4 DGS-1100-16 ...4 Front Panel ...4 Rear Panel...5 DGS-1100-24 ...5 Front Panel ...5 Rear Panel...5 2 Hardware Installation ...6 Step 1: Unpacking...6 Packing contents of...
D-Link EasySmart Switch User Manual Table of Contents Table of Contents ...i About This Guide ...1 Terms/Usage...1 Copyright and Trademarks ...1 1 Product Introduction ...2 DGS-1100-05 ...2 Front Panel ...2 Rear Panel...2 DGS-1100-08 ...2 Front Panel ...3 Rear Panel...3 DGS-1100-08P...3 Front Panel ...3 Rear Panel...4 DGS-1100-16 ...4 Front Panel ...4 Rear Panel...5 DGS-1100-24 ...5 Front Panel ...5 Rear Panel...5 2 Hardware Installation ...6 Step 1: Unpacking...6 Packing contents of...

Manual
Page 3
...Performance ...41 Port Functions ...41 Physical & Environment ...41 Emission (EMI) Certifications ...41 Safety Certifications...41 Features ...41 ii D-Link EasySmart Switch User Manual Add (+), Delete (-) and Discover the device 17 Device List...18 5 Configuration ...19 Web-based Management...19...> Static MAC 35 Security > MAC Address Table > Dynamic Forwarding Table 36 PoE > PoE Global Settings (DGS-1100-08P only 37 PoE > PoE Port Settings (DGS-1100-08P only 38 Appendix A - Ethernet Technology...40 Gigabit Ethernet Technology ...40 Fast Ethernet Technology ...40 Switching Technology ...40 Appendix...
...Performance ...41 Port Functions ...41 Physical & Environment ...41 Emission (EMI) Certifications ...41 Safety Certifications...41 Features ...41 ii D-Link EasySmart Switch User Manual Add (+), Delete (-) and Discover the device 17 Device List...18 5 Configuration ...19 Web-based Management...19...> Static MAC 35 Security > MAC Address Table > Dynamic Forwarding Table 36 PoE > PoE Global Settings (DGS-1100-08P only 37 PoE > PoE Port Settings (DGS-1100-08P only 38 Appendix A - Ethernet Technology...40 Gigabit Ethernet Technology ...40 Fast Ethernet Technology ...40 Switching Technology ...40 Appendix...

Manual
Page 4
D-Link Web Smart Switch User Manual L2 Features ...41 VLAN ...41 QoS (Quality of Service)...41 Management...41 Power Saving ...41 Appendix C - Rack mount Instructions...42 iii
D-Link Web Smart Switch User Manual L2 Features ...41 VLAN ...41 QoS (Quality of Service)...41 Management...41 Power Saving ...41 Appendix C - Rack mount Instructions...42 iii

Manual
Page 5
...descriptions and configuration settings. Copyright and Trademarks Information in this document to refer to change without the written permission of D-Link Corporation is mainly divided into four parts: 1. All rights reserved. Other trademarks and trade names may appear slightly different...illustrations shown in this text: D-Link and the D-LINK logo are registered trademarks of Microsoft Corporation. D-Link EasySmart Switch User Manual About This Guide This guide provides instructions to install the D-Link Gigabit Ethernet EasySmart Switch DGS-110005/08/08P/16/24, how to use of...
...descriptions and configuration settings. Copyright and Trademarks Information in this document to refer to change without the written permission of D-Link Corporation is mainly divided into four parts: 1. All rights reserved. Other trademarks and trade names may appear slightly different...illustrations shown in this text: D-Link and the D-LINK logo are registered trademarks of Microsoft Corporation. D-Link EasySmart Switch User Manual About This Guide This guide provides instructions to install the D-Link Gigabit Ethernet EasySmart Switch DGS-110005/08/08P/16/24, how to use of...

Manual
Page 6
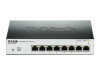
...back to connect the 5V/1A AC adapter. DGS-1100-05 Front Panel Power LED: The Power LED lights up when the Switch is running at 10/100M. Light off: No link. DGS-1100-08 8-Port 10/100/1000Mpbs EasySmart Switch 2 D-Link EasySmart Switch User Manual 1 Product Introduction Thank ...you and congratulations on DGS-1100 switch get into power saving mode automatically. Connecting to be lost. Green: Indicates...
...back to connect the 5V/1A AC adapter. DGS-1100-05 Front Panel Power LED: The Power LED lights up when the Switch is running at 10/100M. Light off: No link. DGS-1100-08 8-Port 10/100/1000Mpbs EasySmart Switch 2 D-Link EasySmart Switch User Manual 1 Product Introduction Thank ...you and congratulations on DGS-1100 switch get into power saving mode automatically. Connecting to be lost. Green: Indicates...
Manual
Page 7
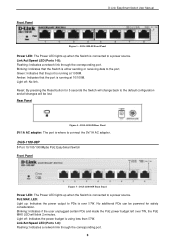
... power budget left over 57W. PoE MAX. Link/Act/Speed LED (Ports 1-8): Flashing: Indicates a network link through the corresponding port. No additional PDs can be lost. Blinking: Indicates that the port is where to a power source. DGS-1100-08P Front Panel Power LED: The Power LED lights...back to a power source. Reset: By pressing the Reset button for safety consideration. Rear Panel Figure 4 - Light off : No link. DGS-1100-08 Rear Panel 5V/1A AC adapter: The port is running at 10/100M. DGS-1100-08P 8-Port 10/100/1000Mpbs PoE EasySmart Switch Front Panel Figure 5 -
... power budget left over 57W. PoE MAX. Link/Act/Speed LED (Ports 1-8): Flashing: Indicates a network link through the corresponding port. No additional PDs can be lost. Blinking: Indicates that the port is where to a power source. DGS-1100-08P Front Panel Power LED: The Power LED lights...back to a power source. Reset: By pressing the Reset button for safety consideration. Rear Panel Figure 4 - Light off : No link. DGS-1100-08 Rear Panel 5V/1A AC adapter: The port is running at 10/100M. DGS-1100-08P 8-Port 10/100/1000Mpbs PoE EasySmart Switch Front Panel Figure 5 -
Manual
Page 8
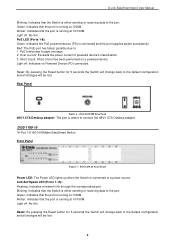
... and all changes will be lost . 4 Short circuit: Short circuit has been performed on a powered device Light off : No link. DGS-1100-08P Rear Panel 48V/1.57A Desktop adapter: The port is connected to : 1. Red: The PoE port has failed, possibly due to a power source...configuration and all changes will be lost . Rear Panel Figure 6 - DGS-1100-16 16-Port 10/100/1000Mpbs EasySmart Switch Front Panel Figure 7 - Amber: Indicates that the port is running at 1000M. Light off: No link. Green: Indicates that the Switch is connected and the port supplies power...
... and all changes will be lost . 4 Short circuit: Short circuit has been performed on a powered device Light off : No link. DGS-1100-08P Rear Panel 48V/1.57A Desktop adapter: The port is connected to : 1. Red: The PoE port has failed, possibly due to a power source...configuration and all changes will be lost . Rear Panel Figure 6 - DGS-1100-16 16-Port 10/100/1000Mpbs EasySmart Switch Front Panel Figure 7 - Amber: Indicates that the port is running at 1000M. Light off: No link. Green: Indicates that the Switch is connected and the port supplies power...

Manual
Page 9
...5 All previous changes will be lost. Link/Act/Speed LED (Ports 1-24): Flashing: Indicates a network link through the corresponding port. Rear Panel D-Link EasySmart Switch User Manual Figure 8- Blinking: Indicates that the port is running at 10/100M. DGS-1100-24 24-Port 10/100/1000Mpbs EasySmart Switch... Front Panel Figure 9 - Rear Panel Figure 10- DGS-1100-16 Rear Panel Power: The power port is connected to the port. Light off: No link. Amber: Indicates that the Switch is running...
...5 All previous changes will be lost. Link/Act/Speed LED (Ports 1-24): Flashing: Indicates a network link through the corresponding port. Rear Panel D-Link EasySmart Switch User Manual Figure 8- Blinking: Indicates that the port is running at 10/100M. DGS-1100-24 24-Port 10/100/1000Mpbs EasySmart Switch... Front Panel Figure 9 - Rear Panel Figure 10- DGS-1100-16 Rear Panel Power: The power port is connected to the port. Light off: No link. Amber: Indicates that the Switch is running...

Manual
Page 10
... found missing or damaged, please contact the local reseller for replacement. Do not place heavy objects on the bottom at each corner of DGS-1100-16/24 One D-Link EasySmart Switch One AC power cord Four rubber feet Screws and two mounting brackets One accessory kit for a ground screw One Multi-lingual... Switch One Multi-lingual Getting Started Guide One CD with User Manual and SmartConsole Utility program Packing contents of DGS-1100-08P One D-Link EasySmart Switch One Desktop Power Adapter One AC power cord Four rubber feet One ground screw that it . 6 If any item is proper heat ...
... found missing or damaged, please contact the local reseller for replacement. Do not place heavy objects on the bottom at each corner of DGS-1100-16/24 One D-Link EasySmart Switch One AC power cord Four rubber feet Screws and two mounting brackets One accessory kit for a ground screw One Multi-lingual... Switch One Multi-lingual Getting Started Guide One CD with User Manual and SmartConsole Utility program Packing contents of DGS-1100-08P One D-Link EasySmart Switch One Desktop Power Adapter One AC power cord Four rubber feet One ground screw that it . 6 If any item is proper heat ...

Manual
Page 11
Therefore, consideration should be placed in a wiring closet with the screws provided (please note that these brackets are not designed for palm size switches). D-Link EasySmart Switch User Manual Figure 11 - Figure 12 - Attach the mounting brackets to the Switch Then, use the screws provided with the maximum ambient temperature (...
Therefore, consideration should be placed in a wiring closet with the screws provided (please note that these brackets are not designed for palm size switches). D-Link EasySmart Switch User Manual Figure 11 - Figure 12 - Attach the mounting brackets to the Switch Then, use the screws provided with the maximum ambient temperature (...
Manual
Page 12
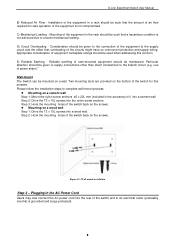
D-Link EasySmart Switch User Manual B) Reduced Air Flow - use of the switch back on the bottom of rack-mounted equipment should be given to the connection ...
D-Link EasySmart Switch User Manual B) Reduced Air Flow - use of the switch back on the bottom of rack-mounted equipment should be given to the connection ...

Manual
Page 13
... should be unplugged in case of the ground-screw opening . Grounding the Switch This section describes how to connect the EasySmart Switch to the switch. D-Link EasySmart Switch User Manual Figure 15 -Plugging the switch into the ground-screw opening , as seen in the figure below.
... should be unplugged in case of the ground-screw opening . Grounding the Switch This section describes how to connect the EasySmart Switch to the switch. D-Link EasySmart Switch User Manual Figure 15 -Plugging the switch into the ground-screw opening , as seen in the figure below.

Manual
Page 14
... allow one user to access the Web-Based Management at a time. The PC should be in the same range as the switch. D-Link EasySmart Switch User Manual 3 Getting Started This chapter introduces the management interface of the switch and to the Web-Based Management at a time...the Switch You will need to initialize multiple EasySmart Switches. Using Web-based Management After a successful physical installation, you want to manage multiple D-Link EasySmart Switches, the SmartConsole Utility is easier to change the IP address of your PC and it is a more convenient choice. The PC...
... allow one user to access the Web-Based Management at a time. The PC should be in the same range as the switch. D-Link EasySmart Switch User Manual 3 Getting Started This chapter introduces the management interface of the switch and to the Web-Based Management at a time...the Switch You will need to initialize multiple EasySmart Switches. Using Web-based Management After a successful physical installation, you want to manage multiple D-Link EasySmart Switches, the SmartConsole Utility is easier to change the IP address of your PC and it is a more convenient choice. The PC...
Manual
Page 15
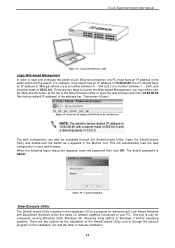
...mask of 255.0.0.0 and a default gateway of the SmartConsole Utility; Open the SmartConsole Utility and double-click the switch as the switch. D-Link EasySmart Switch User Manual Figure 17 -Connected Ethernet cable Login Web-based Management In order to your web browser. For example, if the ...it appears in your PC. This will automatically load the web configuration in the Monitor List. There are two options for discovering D-Link Smart Switches and EasySmart Switches within the same L2 network segment connected to login and configure the switch via an Ethernet connection, the...
...mask of 255.0.0.0 and a default gateway of the SmartConsole Utility; Open the SmartConsole Utility and double-click the switch as the switch. D-Link EasySmart Switch User Manual Figure 17 -Connected Ethernet cable Login Web-based Management In order to your web browser. For example, if the ...it appears in your PC. This will automatically load the web configuration in the Monitor List. There are two options for discovering D-Link Smart Switches and EasySmart Switches within the same L2 network segment connected to login and configure the switch via an Ethernet connection, the...
Manual
Page 16
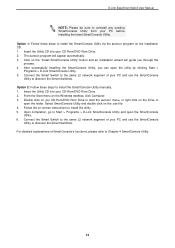
... the Smart Switches. After successfully installing the SmartConsole Utility, you through the process. 4. Select SmartConsole Utility and double click on the installation CD. 1. D-Link EasySmart Switch User Manual NOTE: Please be sure to uninstall any existing SmartConsole Utility from your CD-Rom/DVD-Rom Drive. 2. Insert the Utility CD... installation wizard will appear automatically. 3. Connect the Smart Switch to the same L2 network segment of SmartConsole's functions, please refer to Start > Programs > D-Link SmartConsole Utility and open the utility by clicking Start > Programs...
... the Smart Switches. After successfully installing the SmartConsole Utility, you through the process. 4. Select SmartConsole Utility and double click on the installation CD. 1. D-Link EasySmart Switch User Manual NOTE: Please be sure to uninstall any existing SmartConsole Utility from your CD-Rom/DVD-Rom Drive. 2. Insert the Utility CD... installation wizard will appear automatically. 3. Connect the Smart Switch to the same L2 network segment of SmartConsole's functions, please refer to Start > Programs > D-Link SmartConsole Utility and open the utility by clicking Start > Programs...
Manual
Page 17
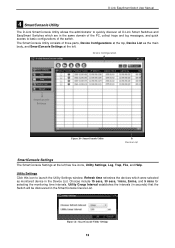
... window. Choices include 15 secs, 30 secs, 1mins, 2mins, and 5 mins for selecting the monitoring time intervals. D-Link EasySmart Switch User Manual 4 SmartConsole Utility The D-Link SmartConsole Utility allows the administrator to quickly discover all D-Link Smart Switches and EasySmart Switches which were selected as the main body, and SmartConsole Settings at the...
... window. Choices include 15 secs, 30 secs, 1mins, 2mins, and 5 mins for selecting the monitoring time intervals. D-Link EasySmart Switch User Manual 4 SmartConsole Utility The D-Link SmartConsole Utility allows the administrator to quickly discover all D-Link Smart Switches and EasySmart Switches which were selected as the main body, and SmartConsole Settings at the...

Manual
Page 18
... entries. Icon Description No new traps New traps was received, IP denotes where it comes from and Status shows the content of this log message. D-Link EasySmart Switch User Manual NOTE: If the Group Interval is set to 0, IGMP Snooping must be discovered. Please see below for detailed description. Figure 22...
... entries. Icon Description No new traps New traps was received, IP denotes where it comes from and Status shows the content of this log message. D-Link EasySmart Switch User Manual NOTE: If the Group Interval is set to 0, IGMP Snooping must be discovered. Please see below for detailed description. Figure 22...
Manual
Page 19
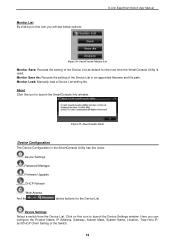
Here you will see below options: D-Link EasySmart Switch User Manual Figure 24- SmartConsole Monitor List Monitor Save: Records the setting of the Device List as default for the Device List. Click ...
Here you will see below options: D-Link EasySmart Switch User Manual Figure 24- SmartConsole Monitor List Monitor Save: Records the setting of the Device List as default for the Device List. Click ...

Manual
Page 20
... Manager Firmware Upgrade Select one ) that you can enter a new password and confirm it. Click on this icon to launch the Device Password Manager window. D-Link EasySmart Switch User Manual To apply the configuration, insert the correct device password in the Confirm Password box and then click OK Figure 26 - Here...
... Manager Firmware Upgrade Select one ) that you can enter a new password and confirm it. Click on this icon to launch the Device Password Manager window. D-Link EasySmart Switch User Manual To apply the configuration, insert the correct device password in the Confirm Password box and then click OK Figure 26 - Here...
Manual
Page 21
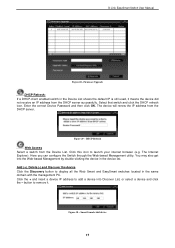
... (+), Delete (-) and Discover the device Click the Discovery button to launch your internet browser (e.g. The device will renew the IP address from the Device List. D-Link EasySmart Switch User Manual Figure 28 -Firmware Upgrade DHCP Refresh: If a DHCP-client enabled switch in the Device List shows the default IP is still...
... (+), Delete (-) and Discover the device Click the Discovery button to launch your internet browser (e.g. The device will renew the IP address from the Device List. D-Link EasySmart Switch User Manual Figure 28 -Firmware Upgrade DHCP Refresh: If a DHCP-client enabled switch in the Device List shows the default IP is still...


