Manual
Page 4
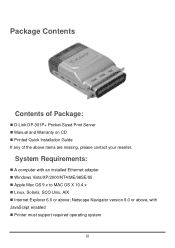
System Requirements: „ A computer with JavaScript enabled „ Printer must support required operating system iii Package Contents Contents of Package: „ D-Link DP-301P+ Pocket-Sized Print Server „ Manual and Warranty on CD „ Printed Quick Installation Guide If any of the above ; Netscape Navigator version 6.0 or above, with an installed Ethernet adapter „ Windows Vista/XP/2000/NT4/ME/98SE/95 „ Apple Mac OS 9.x to MAC OS X 10.4.x „ Linux, Solaris, SCO Unix, AIX „ Internet Explorer 6.0 or above items are missing, please contact your reseller.
System Requirements: „ A computer with JavaScript enabled „ Printer must support required operating system iii Package Contents Contents of Package: „ D-Link DP-301P+ Pocket-Sized Print Server „ Manual and Warranty on CD „ Printed Quick Installation Guide If any of the above ; Netscape Navigator version 6.0 or above, with an installed Ethernet adapter „ Windows Vista/XP/2000/NT4/ME/98SE/95 „ Apple Mac OS 9.x to MAC OS X 10.4.x „ Linux, Solaris, SCO Unix, AIX „ Internet Explorer 6.0 or above items are missing, please contact your reseller.

Manual
Page 6
... protocol for the details. See also the "Using The PS-Wizard" chapter in this manual for networks without Windows-compatible machines. 2 PS-Wizard is very portable and inexpensive compared to a PC-based print server, and Print Server connects to users. The DP-301P+ offers extraordinary flexibility, operating with all major network operating systems and protocols: „ TCP...
... protocol for the details. See also the "Using The PS-Wizard" chapter in this manual for networks without Windows-compatible machines. 2 PS-Wizard is very portable and inexpensive compared to a PC-based print server, and Print Server connects to users. The DP-301P+ offers extraordinary flexibility, operating with all major network operating systems and protocols: „ TCP...

Manual
Page 14
The compatibility list is a sample network using the DP-301P+. For a list of printers that allows users to easily configure and manage multiple print queues through TCP/IP. Even if it is not included in the list, your printer may be compatible with the DP-301P+, please see the Appendix in Web-based management feature that are compatible with the DP-301P+. 10 in this manual. The DP-301P+ has a built- Getting Started Below is not comprehensive.
The compatibility list is a sample network using the DP-301P+. For a list of printers that allows users to easily configure and manage multiple print queues through TCP/IP. Even if it is not included in the list, your printer may be compatible with the DP-301P+, please see the Appendix in Web-based management feature that are compatible with the DP-301P+. 10 in this manual. The DP-301P+ has a built- Getting Started Below is not comprehensive.

Manual
Page 15
... Insert the Installation CD-ROM into your computer in PDF format for step-by-step instructions of the print server Installation. • View Manual - click to launch Acrobat Reader for the viewing and printing of the print server. • Install Acrobat Reader - The content of a useful software program - click to preview the User's Guide in the... the Installation CD-ROM includes: y View Quick Installation Guide - click to complete further settings for detailed information of PDF files in PDF format for the print server, such as: -
... Insert the Installation CD-ROM into your computer in PDF format for step-by-step instructions of the print server Installation. • View Manual - click to launch Acrobat Reader for the viewing and printing of the print server. • Install Acrobat Reader - The content of a useful software program - click to preview the User's Guide in the... the Installation CD-ROM includes: y View Quick Installation Guide - click to complete further settings for detailed information of PDF files in PDF format for the print server, such as: -

Manual
Page 21
Print Server: This field allows you to manually discover the connected print server and to do further configuration of the print server that is selected from the list. 17
Print Server: This field allows you to manually discover the connected print server and to do further configuration of the print server that is selected from the list. 17

Manual
Page 23
... following window. Select from manufacturer list: Check this option, "Show currently installed drivers", to check if the same printer driver already existed for you to manually select your printer from manufacturer list", to select printer driver: 1. Have Disk: Click Have Disk button to continue. 3. Show current installed drivers: You may try...
... following window. Select from manufacturer list: Check this option, "Show currently installed drivers", to check if the same printer driver already existed for you to manually select your printer from manufacturer list", to select printer driver: 1. Have Disk: Click Have Disk button to continue. 3. Show current installed drivers: You may try...

Manual
Page 24
... the selection of the printer in the field "Network Printer Name" and enable this printer as the default printer by checking the box "Use this manual) will ask you are allowed to continue.
... the selection of the printer in the field "Network Printer Name" and enable this printer as the default printer by checking the box "Use this manual) will ask you are allowed to continue.
Manual
Page 26
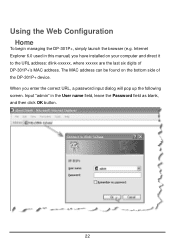
Using the Web Configuration Home To begin managing the DP-301P+, simply launch the browser (e.g. The MAC address can be found on your computer and direct it to the URL address: dlink-xxxxxx, where xxxxxx are the last six digits of the DP-301P+ device. Input "admin" in this manual) you enter the correct URL, a password input dialog will pop up the following screen. When you have installed on the bottom side of DP-301P+'s MAC address. Internet Explorer 6.0 used in the User name field, leave the Password field as blank, and then click OK button. 22
Using the Web Configuration Home To begin managing the DP-301P+, simply launch the browser (e.g. The MAC address can be found on your computer and direct it to the URL address: dlink-xxxxxx, where xxxxxx are the last six digits of the DP-301P+ device. Input "admin" in this manual) you enter the correct URL, a password input dialog will pop up the following screen. When you have installed on the bottom side of DP-301P+'s MAC address. Internet Explorer 6.0 used in the User name field, leave the Password field as blank, and then click OK button. 22

Manual
Page 29
For more information, please refer to work correctly. NOTE: PJL (Printer Job Language) has certain job requirements that must be met to your printer's manual. Port Settings In this field, you to abandon. 25 Once you have changed the settings in each option, click Apply Settings to store the settings, or Cancel to select the PJL Printer setting (Yes or No). It also allows you can assign the Port Name for the print server, and the description for the Printer port.
For more information, please refer to work correctly. NOTE: PJL (Printer Job Language) has certain job requirements that must be met to your printer's manual. Port Settings In this field, you to abandon. 25 Once you have changed the settings in each option, click Apply Settings to store the settings, or Cancel to select the PJL Printer setting (Yes or No). It also allows you can assign the Port Name for the print server, and the description for the Printer port.

Manual
Page 30
...in each option, click Apply Settings to store the settings, or Cancel to abandon. 26 Once you should not need to change any of print server. When you choose Manually Assign, you have changed the settings in the following boxes, including IP Address, Subnet Mask, and Default Gateway. TCP/IP This field ...allows you configure the local network settings of the settings here to get print server up and running. SETUP > LAN Setup The LAN Setup screen allows you to assign IP address in manual or automatic method.
...in each option, click Apply Settings to store the settings, or Cancel to abandon. 26 Once you should not need to change any of print server. When you choose Manually Assign, you have changed the settings in the following boxes, including IP Address, Subnet Mask, and Default Gateway. TCP/IP This field ...allows you configure the local network settings of the settings here to get print server up and running. SETUP > LAN Setup The LAN Setup screen allows you to assign IP address in manual or automatic method.

Manual
Page 34
If not, try the last way (Have Disk). 2. Click Next> button to continue. 30 After done the selection of printer driver, click Next> button to continue when you find a desired driver. Select from manufacturer list: Check this option, "Select from manufacturer list", to manually select your printer from drop-down menus by brand and model.
If not, try the last way (Have Disk). 2. Click Next> button to continue. 30 After done the selection of printer driver, click Next> button to continue when you find a desired driver. Select from manufacturer list: Check this option, "Select from manufacturer list", to manually select your printer from drop-down menus by brand and model.

Manual
Page 36
... the selection of the printer in the field "Network Printer Name" and enable this printer as the default printer by checking the box "Use this manual) will ask you done the verification and configuration in this printer as the following window, click Next> button to confirm your selection again in the...
... the selection of the printer in the field "Network Printer Name" and enable this printer as the default printer by checking the box "Use this manual) will ask you done the verification and configuration in this printer as the following window, click Next> button to confirm your selection again in the...

Manual
Page 60
Select the second option, Create a new port, and highlight Standard TCP/IP Port from the PRINTER SERVER STATUS of the print server (e.g. 10.62.31.15 used in this manual), which can be filled in. Click Next. Type the IP address of the print server's Web configuration, and then the Port Name will automatically be referred from the pull-down menu. Click Next 56
Select the second option, Create a new port, and highlight Standard TCP/IP Port from the PRINTER SERVER STATUS of the print server (e.g. 10.62.31.15 used in this manual), which can be filled in. Click Next. Type the IP address of the print server's Web configuration, and then the Port Name will automatically be referred from the pull-down menu. Click Next 56

Manual
Page 71
Click Next 67 Type the IP address of the print server (e.g. 10.62.31.15 used in this manual), which can be referred from the PRINTER SERVER STATUS of the print server's Web configuration, and then the Port Name will automatically be filled in.
Click Next 67 Type the IP address of the print server (e.g. 10.62.31.15 used in this manual), which can be referred from the PRINTER SERVER STATUS of the print server's Web configuration, and then the Port Name will automatically be filled in.

Manual
Page 84
Type the IP address of the print server (e.g. 10.62.31.15 used in this manual), which can be checked from the PRINTER SERVER STATUS of the print server's Web configuration, and then the Port Name will automatically be filled in. Click Next 80
Type the IP address of the print server (e.g. 10.62.31.15 used in this manual), which can be checked from the PRINTER SERVER STATUS of the print server's Web configuration, and then the Port Name will automatically be filled in. Click Next 80

Manual
Page 102
dlink-1D6FA3 in the path if you know it; Click OK. 98 otherwise, click Browse. Type in this manual). At the following screen, browse for the printer port and highlight the port (e.g.
dlink-1D6FA3 in the path if you know it; Click OK. 98 otherwise, click Browse. Type in this manual). At the following screen, browse for the printer port and highlight the port (e.g.

Manual
Page 118
The last step is to select manufacturer) pull-down menu, and the printer model from the sub-list. You can manually select the name of the printer manufacturer from the list. If a printer has not been detected automatically, select the model from the Generic (click to confirm your printer configuration. Click Forward to modify the configuration. 114 Click Apply button to confirm or Back button to continue. 9.
The last step is to select manufacturer) pull-down menu, and the printer model from the sub-list. You can manually select the name of the printer manufacturer from the list. If a printer has not been detected automatically, select the model from the Generic (click to confirm your printer configuration. Click Forward to modify the configuration. 114 Click Apply button to confirm or Back button to continue. 9.

Manual
Page 125
Click the Add button to exit the Printer Browser window and implement the new setting. 121 also be manually selected in the Print Using drop-down menu by brand and model.
Click the Add button to exit the Printer Browser window and implement the new setting. 121 also be manually selected in the Print Using drop-down menu by brand and model.

Manual
Page 128
...are basically the same. The setup procedures for the sake of reference. 124 To implement the setting, click Add button. Or manually select the printer-maker from the Print Using drop-down menu, and then select the printer model from the scroll-down list, or select Generic PostScrip Printer option from... the Print Using drop-down menu if the model is able to detect the printer and may automatically select the correct printer...
...are basically the same. The setup procedures for the sake of reference. 124 To implement the setting, click Add button. Or manually select the printer-maker from the Print Using drop-down menu, and then select the printer model from the scroll-down list, or select Generic PostScrip Printer option from... the Print Using drop-down menu if the model is able to detect the printer and may automatically select the correct printer...
Manual
Page 139
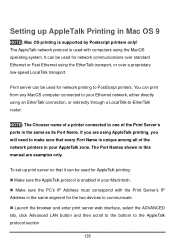
... Address in your Ethernet network, either directly using the EtherTalk transport, or over a proprietary low-speed LocalTalk transport. Setting up print server so that every Port Name is supported by Postscript printers only! If you will need to -EtherTalk router. The Port Names shown... printers in this manual are using the MacOS operating system. It can be used for AppleTalk printing: „ Make sure the AppleTalk protocol is the same as its Port Name. To set up AppleTalk Printing in Mac OS 9 NOTE: Mac OS printing is unique among all of the Print Server's ports is enabled...
... Address in your Ethernet network, either directly using the EtherTalk transport, or over a proprietary low-speed LocalTalk transport. Setting up print server so that every Port Name is supported by Postscript printers only! If you will need to -EtherTalk router. The Port Names shown... printers in this manual are using the MacOS operating system. It can be used for AppleTalk printing: „ Make sure the AppleTalk protocol is the same as its Port Name. To set up AppleTalk Printing in Mac OS 9 NOTE: Mac OS printing is unique among all of the Print Server's ports is enabled...