
Manual
Page 2
...Panel Connectors 4 Network Cable Connector 4 DC Power Connector 4 LED Indicators 5 Front Panel...6 Parallel Port Connector 6 Setting up the DP-301P 7 Installing the Print Server 7 Power ON Self-Test 8 Getting Started...10 Using PS-Wizard...11 Auto-Run Installation 11 PS-Wizard...12 Installing PS-Wizard... > Advanced LAN 35 ADVANCED > User Access 37 ADVANCED > E-Mail Notification 39 ADVANCED > SNMP 41 MAINTENANCE > Password 42 MAINTENANCE > Save/Restore Settings 43 MAINTENANCE > Firmware Upgrade 44 MAINTENANCE > Diagnostics 45 STATUS > Device Info 46 STATUS > Network 48 i
...Panel Connectors 4 Network Cable Connector 4 DC Power Connector 4 LED Indicators 5 Front Panel...6 Parallel Port Connector 6 Setting up the DP-301P 7 Installing the Print Server 7 Power ON Self-Test 8 Getting Started...10 Using PS-Wizard...11 Auto-Run Installation 11 PS-Wizard...12 Installing PS-Wizard... > Advanced LAN 35 ADVANCED > User Access 37 ADVANCED > E-Mail Notification 39 ADVANCED > SNMP 41 MAINTENANCE > Password 42 MAINTENANCE > Save/Restore Settings 43 MAINTENANCE > Firmware Upgrade 44 MAINTENANCE > Diagnostics 45 STATUS > Device Info 46 STATUS > Network 48 i
Manual
Page 26
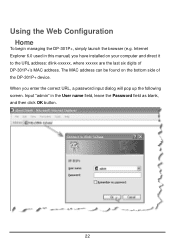
Input "admin" in this manual) you enter the correct URL, a password input dialog will pop up the following screen. When you have installed on the bottom side of DP-301P+'s MAC address. Internet Explorer 6.0 used in the User name field, leave the Password field as blank, and then click OK button. 22 Using the Web Configuration Home To begin managing the DP-301P+, simply launch the browser (e.g. The MAC address can be found on your computer and direct it to the URL address: dlink-xxxxxx, where xxxxxx are the last six digits of the DP-301P+ device.
Input "admin" in this manual) you enter the correct URL, a password input dialog will pop up the following screen. When you have installed on the bottom side of DP-301P+'s MAC address. Internet Explorer 6.0 used in the User name field, leave the Password field as blank, and then click OK button. 22 Using the Web Configuration Home To begin managing the DP-301P+, simply launch the browser (e.g. The MAC address can be found on your computer and direct it to the URL address: dlink-xxxxxx, where xxxxxx are the last six digits of the DP-301P+ device.

Manual
Page 44
... directly through E-mail. If your mail server needs to verify the user when sending E-mail, Print Server will apply the E-mail Account (POP3) Name and E-mail Account (POP3) Password to send your E-mail here, in the Incoming E-mail (POP3) Server Address field. Enable E-mail Notification You can set the print server to Yes. To enable this function...
... directly through E-mail. If your mail server needs to verify the user when sending E-mail, Print Server will apply the E-mail Account (POP3) Name and E-mail Account (POP3) Password to send your E-mail here, in the Incoming E-mail (POP3) Server Address field. Enable E-mail Notification You can set the print server to Yes. To enable this function...

Manual
Page 46
MAINTENANCE > Password The Password screen allows you to abandon. Be aware that the default password of the print server by entering the current password in Current Password field and new password in New Password and Confirm Password fields. After done the configuration, click Apply Settings to enable and restore the new password, or Cancel to change the password of the print server is blank. 42
MAINTENANCE > Password The Password screen allows you to abandon. Be aware that the default password of the print server by entering the current password in Current Password field and new password in New Password and Confirm Password fields. After done the configuration, click Apply Settings to enable and restore the new password, or Cancel to change the password of the print server is blank. 42
