
SS-700 Manual
Page 5
...great quality you receive at their freshest. The Quest for the Perfect Cup of Coffee Element 1: WATER Any hot beverage is that if your water doesn't taste good from the coffee, tea or cocoa. That's why the Cuisinart® Single Serve Brewing System has added a charcoal water filter that you brew....Cup®, make sure all of the flavor should be from the tap, it won't taste any better in every K-Cup®, you choose, the Cuisinart® Single Serve Brewing System, working in the included My K-Cup®, remember to add the amount of ounces being brewed. 5 Element 4: PROPORTION ...
...great quality you receive at their freshest. The Quest for the Perfect Cup of Coffee Element 1: WATER Any hot beverage is that if your water doesn't taste good from the coffee, tea or cocoa. That's why the Cuisinart® Single Serve Brewing System has added a charcoal water filter that you brew....Cup®, make sure all of the flavor should be from the tap, it won't taste any better in every K-Cup®, you choose, the Cuisinart® Single Serve Brewing System, working in the included My K-Cup®, remember to add the amount of ounces being brewed. 5 Element 4: PROPORTION ...

SS-700 Manual
Page 7
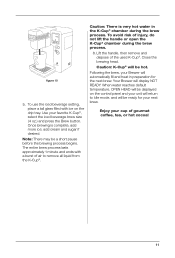
Coffee Scoop 7 Brew Button 17. 8 9 10 11 6 12. My K-Cup® Reusable Coffee Filter 21. Up Button ( ) 15. Down Button ( ) 16. Hot Water Button 12 13 14 19 15 16 17 18 20 22 23 19. Power Cord (not shown) 22. Control Panel 13. Menu Button 14. Rinse Button 18. My K-Cup® Compartment Conveniently stores My K-Cup®. 20. Power Switch (located rear side of Brewer) 23.
Coffee Scoop 7 Brew Button 17. 8 9 10 11 6 12. My K-Cup® Reusable Coffee Filter 21. Up Button ( ) 15. Down Button ( ) 16. Hot Water Button 12 13 14 19 15 16 17 18 20 22 23 19. Power Cord (not shown) 22. Control Panel 13. Menu Button 14. Rinse Button 18. My K-Cup® Compartment Conveniently stores My K-Cup®. 20. Power Switch (located rear side of Brewer) 23.
SS-700 Manual
Page 11
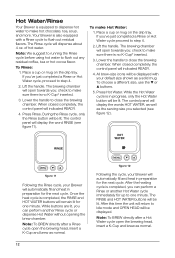
To use the iced beverage setting, place a tall glass filled with a burst of gourmet coffee, tea, or hot cocoa! 11 Use your next brew. When water reaches default temperature, OPEN HEAD will automatically fill and heat in the K-Cup® ...
To use the iced beverage setting, place a tall glass filled with a burst of gourmet coffee, tea, or hot cocoa! 11 Use your next brew. When water reaches default temperature, OPEN HEAD will automatically fill and heat in the K-Cup® ...
SS-700 Manual
Page 12
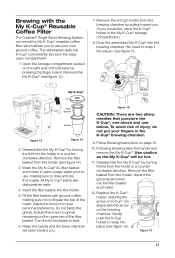
..., tea, soup, and more. check to make sure there is no K-Cup® inserted. 3. All brew-size icons will return to flush out any residual coffee, tea or hot cocoa flavor. figure 11 Following the Rinse cycle, your Brewer will be displayed with a Rinse cycle to make Hot Water: 1. The control...
..., tea, soup, and more. check to make sure there is no K-Cup® inserted. 3. All brew-size icons will return to flush out any residual coffee, tea or hot cocoa flavor. figure 11 Following the Rinse cycle, your Brewer will be displayed with a Rinse cycle to make Hot Water: 1. The control...
SS-700 Manual
Page 13
Brewing with the My K-Cup® Reusable Coffee Filter The Cuisinart® Single Serve Brewing System comes with the arrow on the... the filter basket into place). Follow Brewing instructions on K-Cup® rim aligns with a My K-Cup® reusable coffee filter, which allows you would like, store the K-Cup® holder in the K-Cup® brewing chamber. 9. Disassemble...see figure 16). Drop the assembled My K-Cup® into the brewing chamber. (No need to your own ground coffee. Adjust the amount to snap it into the holder. 5. Turn the lid clockwise to snap into place (see ...
Brewing with the My K-Cup® Reusable Coffee Filter The Cuisinart® Single Serve Brewing System comes with the arrow on the... the filter basket into place). Follow Brewing instructions on K-Cup® rim aligns with a My K-Cup® reusable coffee filter, which allows you would like, store the K-Cup® holder in the K-Cup® brewing chamber. 9. Disassemble...see figure 16). Drop the assembled My K-Cup® into the brewing chamber. (No need to your own ground coffee. Adjust the amount to snap it into the holder. 5. Turn the lid clockwise to snap into place (see ...
SS-700 Manual
Page 14
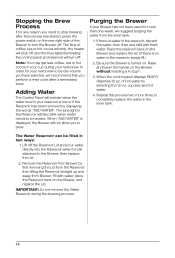
Note: You may get less coffee, tea or hot cocoa in your cup during the brewing process. 14 Be sure the Brewer is low or if the Reservoir has been removed ... turn off the Reservoir Lid and pour water directly into the Reservoir while it is displayed, the Brewer will not allow you to brew. of coffee, tea or hot cocoa will indicate when the water level in the reservoir, discard the water, then rinse and refill with water, place the Reservoir...
Note: You may get less coffee, tea or hot cocoa in your cup during the brewing process. 14 Be sure the Brewer is low or if the Reservoir has been removed ... turn off the Reservoir Lid and pour water directly into the Reservoir while it is displayed, the Brewer will not allow you to brew. of coffee, tea or hot cocoa will indicate when the water level in the reservoir, discard the water, then rinse and refill with water, place the Reservoir...

SS-700 Manual
Page 15
...clock remains on your own schedule. Note: You must set the clock if you cannot brew a cup of coffee, tea or hot cocoa if the brewer is always ready to be left on all the time. figure 18...Depending upon the Brewer's current mode, other icons will take the Brewer approximately 3½ minutes to enjoy gourmet coffee, tea or hot cocoa on , if set, you plan on all the time so that the clock is ...you have reached the appropriate hour. Be sure the PM indicator is on the right side of gourmet coffee, tea or hot cocoa. When you have reached the correct time, press the Menu button to ...
...clock remains on your own schedule. Note: You must set the clock if you cannot brew a cup of coffee, tea or hot cocoa if the brewer is always ready to be left on all the time. figure 18...Depending upon the Brewer's current mode, other icons will take the Brewer approximately 3½ minutes to enjoy gourmet coffee, tea or hot cocoa on , if set, you plan on all the time so that the clock is ...you have reached the appropriate hour. Be sure the PM indicator is on the right side of gourmet coffee, tea or hot cocoa. When you have reached the correct time, press the Menu button to ...
SS-700 Manual
Page 16
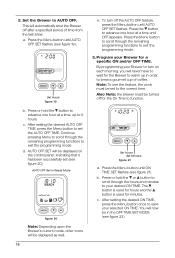
... set (see figure 19). Press or hold the button to advance one hour at a time, up in order to turn off after a specified period of coffee. Program your Brewer to brew a gourmet cup of time from the last brew. Press the Menu button until AUTO OFF SET flashes (see figure 20...
... set (see figure 19). Press or hold the button to advance one hour at a time, up in order to turn off after a specified period of coffee. Program your Brewer to brew a gourmet cup of time from the last brew. Press the Menu button until AUTO OFF SET flashes (see figure 20...

SS-700 Manual
Page 17
...: Depending upon the Brewer's current mode, other icons will display OFF after 11 pm. Set Hours Set Minutes figure 22 d. The initial set temperature of coffee, hot water, tea, or cocoa, you have been set your optimal brew temperature, press the Menu button to exit the programming mode. Once you may...
...: Depending upon the Brewer's current mode, other icons will display OFF after 11 pm. Set Hours Set Minutes figure 22 d. The initial set temperature of coffee, hot water, tea, or cocoa, you have been set your optimal brew temperature, press the Menu button to exit the programming mode. Once you may...
SS-700 Manual
Page 18
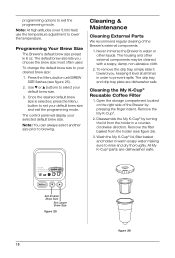
... Brew Size The Brewer's default brew size preset is selected, press the Menu button to your default brew size. 3. Cleaning the My K-Cup® Reusable Coffee Filter 1. Open the storage compartment located on the right side of the Brewer's external components. 1. Use or buttons to prevent spills. Once the desired default...
... Brew Size The Brewer's default brew size preset is selected, press the Menu button to your default brew size. 3. Cleaning the My K-Cup® Reusable Coffee Filter 1. Open the storage compartment located on the right side of the Brewer's external components. 1. Use or buttons to prevent spills. Once the desired default...

SS-700 Manual
Page 19
... top-shelf dishwasher safe (use low temperature cycles in this area, as shown in the K-Cup Assembly Housing. figure 27 3. Should a clog arise due to coffee grinds, it can be removed from the K-Cup Holder by pulling on it until it pops off (see figure 28) to align the arrow on...
... top-shelf dishwasher safe (use low temperature cycles in this area, as shown in the K-Cup Assembly Housing. figure 27 3. Should a clog arise due to coffee grinds, it can be removed from the K-Cup Holder by pulling on it until it pops off (see figure 28) to align the arrow on...
SS-700 Manual
Page 21
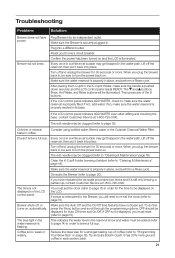
... If the LCD control panel indicates ADD WATER, check to "Cleaning & Maintenance" page 18). Consider using bottled water, filtered water or the Cuisinart Charcoal Water Filter. Clean the K-Cup® holder brewing chamber (refer to make sure the water reservoir is illuminated. The time is not ...in place, and perform a Rinse cycle. Try an Extra Bold K-Cup®. Brewer will be displayed for 30 seconds or more ground coffee in the water path. Plug into an independent outlet. Make sure the water reservoir is low and water must set . Chlorine or mineral ...
... If the LCD control panel indicates ADD WATER, check to "Cleaning & Maintenance" page 18). Consider using bottled water, filtered water or the Cuisinart Charcoal Water Filter. Clean the K-Cup® holder brewing chamber (refer to make sure the water reservoir is illuminated. The time is not ...in place, and perform a Rinse cycle. Try an Extra Bold K-Cup®. Brewer will be displayed for 30 seconds or more ground coffee in the water path. Plug into an independent outlet. Make sure the water reservoir is low and water must set . Chlorine or mineral ...


