
SS-700 Manual
Page 2
... than intended use outdoors. 9. Do not use and before cleaning. Do not put any appliance is used by Cuisinart may be followed to reduce the risk of fire, electric shock and/or injury to open the lid of the brewer while brewing is in this guide. 15. NO USER-SERVICEABLE PARTS ARE INSIDE. Always unplug from wall outlet. 12. Always fill water reservoir first...
... than intended use outdoors. 9. Do not use and before cleaning. Do not put any appliance is used by Cuisinart may be followed to reduce the risk of fire, electric shock and/or injury to open the lid of the brewer while brewing is in this guide. 15. NO USER-SERVICEABLE PARTS ARE INSIDE. Always unplug from wall outlet. 12. Always fill water reservoir first...
SS-700 Manual
Page 3
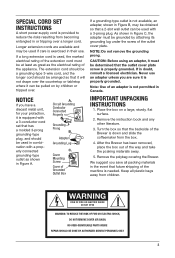
... NOT REMOVE COVER (OR BACK) NO USER-SERVICEABLE PARTS INSIDE REPAIR SHOULD BE DONE BY AUTHORIZED SERVICE PERSONNEL ONLY 3 If a long extension cord is used, the marked electrical rating of the extension cord must be used in combination with a properly connected grounding-type outlet as the electrical rating of the Brewer is properly grounded. The extension cord should be a grounding-type 3-wire cord...
... NOT REMOVE COVER (OR BACK) NO USER-SERVICEABLE PARTS INSIDE REPAIR SHOULD BE DONE BY AUTHORIZED SERVICE PERSONNEL ONLY 3 If a long extension cord is used, the marked electrical rating of the extension cord must be used in combination with a properly connected grounding-type outlet as the electrical rating of the Brewer is properly grounded. The extension cord should be a grounding-type 3-wire cord...

SS-700 Manual
Page 4
... Brew 8 Setting Up Your Brewer 8 Charcoal Water Filter 9 Brewing 10 Hot Water/Rinse 12 Brewing with the My K-Cup® Accessory. . . . . . 13 Stopping the Brew Process 14 Adding Water 14 Purging the Brewer 14 Programming 15 Setting the Clock 15 Programming On/Off Features 15 Programming Brew Temperature 17 Programming Your Brew Size 18 Cleaning & Maintenance 18 Cleaning External Parts 18 Cleaning the My K-Cup® Filter 18 Cleaning the K-Cup® Holder 19 Cleaning the Water Reservoir and Lid . . . . . 19 De-Scaling Your Brewer 20 Troubleshooting 21 Warranty...
... Brew 8 Setting Up Your Brewer 8 Charcoal Water Filter 9 Brewing 10 Hot Water/Rinse 12 Brewing with the My K-Cup® Accessory. . . . . . 13 Stopping the Brew Process 14 Adding Water 14 Purging the Brewer 14 Programming 15 Setting the Clock 15 Programming On/Off Features 15 Programming Brew Temperature 17 Programming Your Brew Size 18 Cleaning & Maintenance 18 Cleaning External Parts 18 Cleaning the My K-Cup® Filter 18 Cleaning the K-Cup® Holder 19 Cleaning the Water Reservoir and Lid . . . . . 19 De-Scaling Your Brewer 20 Troubleshooting 21 Warranty...
SS-700 Manual
Page 5
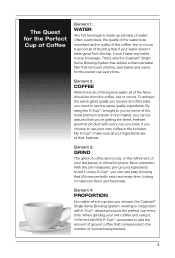
... water filter that if your tea leaves, is made up primarily of water. If you choose, the Cuisinart® Single Serve Brewing System, working in maximum flavor and freshness. Element 4: PROPORTION No matter which cup size you choose to the number of ounces being brewed. 5 The Quest for the Perfect Cup of Coffee Element 1: WATER Any hot beverage is critical for the purest cup every time. Element 3: GRIND...
... water filter that if your tea leaves, is made up primarily of water. If you choose, the Cuisinart® Single Serve Brewing System, working in maximum flavor and freshness. Element 4: PROPORTION No matter which cup size you choose to the number of ounces being brewed. 5 The Quest for the Perfect Cup of Coffee Element 1: WATER Any hot beverage is critical for the purest cup every time. Element 3: GRIND...
SS-700 Manual
Page 6
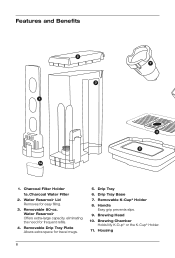
Features and Benefits 2 7 3 1 4 5 1a 1. Handle Easy grip prevents slips. 9. Brewing Head 10. Water Reservoir Lid Removes for frequent refills. 4. Water Reservoir Offers extra-large capacity, eliminating the need for easy filling. 3. Removable Drip Tray Plate Allows extra space for travel mugs. 5. Brewing Chamber Holds My K-Cup® or the K-Cup® Holder. 11. Drip Tray 6. Housing 6 Drip Tray Base 7. Charcoal Filter Holder 1a. Charcoal Water Filter 2. Removable K-Cup® Holder 8. Removable 80-oz.
Features and Benefits 2 7 3 1 4 5 1a 1. Handle Easy grip prevents slips. 9. Brewing Head 10. Water Reservoir Lid Removes for frequent refills. 4. Water Reservoir Offers extra-large capacity, eliminating the need for easy filling. 3. Removable Drip Tray Plate Allows extra space for travel mugs. 5. Brewing Chamber Holds My K-Cup® or the K-Cup® Holder. 11. Drip Tray 6. Housing 6 Drip Tray Base 7. Charcoal Filter Holder 1a. Charcoal Water Filter 2. Removable K-Cup® Holder 8. Removable 80-oz.

SS-700 Manual
Page 7
Coffee Scoop 7 Up Button ( ) 15. Brew Button 17. My K-Cup® Compartment Conveniently stores My K-Cup®. 20. My K-Cup® Reusable Coffee Filter 21. Power Switch (located rear side of Brewer) 23. Rinse Button 18. 8 9 10 11 6 12. Control Panel 13. Power Cord (not shown) 22. Down Button ( ) 16. Hot Water Button 12 13 14 19 15 16 17 18 20 22 23 19. Menu Button 14.
Coffee Scoop 7 Up Button ( ) 15. Brew Button 17. My K-Cup® Compartment Conveniently stores My K-Cup®. 20. My K-Cup® Reusable Coffee Filter 21. Power Switch (located rear side of Brewer) 23. Rinse Button 18. 8 9 10 11 6 12. Control Panel 13. Power Cord (not shown) 22. Down Button ( ) 16. Hot Water Button 12 13 14 19 15 16 17 18 20 22 23 19. Menu Button 14.

SS-700 Manual
Page 8
... subsequent heatings. Fill reservoir with water to the max fill line and return with the default size shown as outlined below freezing, wait at least two hours for Brewer to reach room temperature before brewing. Set-Up & First Brew IMPORTANT: Do not attempt to use your Cuisinart® Single Serve Brewing System until it has been set up and away from water reservoir. Place a large cup or...
... subsequent heatings. Fill reservoir with water to the max fill line and return with the default size shown as outlined below freezing, wait at least two hours for Brewer to reach room temperature before brewing. Set-Up & First Brew IMPORTANT: Do not attempt to use your Cuisinart® Single Serve Brewing System until it has been set up and away from water reservoir. Place a large cup or...
SS-700 Manual
Page 9
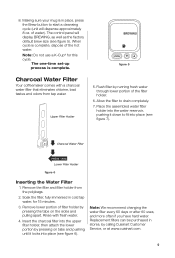
... use a K-Cup® for 15 minutes. 3. Remove the filter and filter holder from tap water. Water Reservoir Lid Charcoal Water Filter PRESS TABS Lower Filter Holder figure 6 assembled Charcoal Water Filter Water Reservoir Inserting the Water Filter 1. Rinse with a charcoal water filter that eliminates chlorine, bad tastes and odors from the polybags. 2. Flush filter by calling Cuisinart Customer Service, or at www.cuisinart.com. 9 figure 5 Charcoal Water Filter Your coffeemaker comes with fresh water. 4. Making sure your mug is in place, press the Brew button...
... use a K-Cup® for 15 minutes. 3. Remove the filter and filter holder from tap water. Water Reservoir Lid Charcoal Water Filter PRESS TABS Lower Filter Holder figure 6 assembled Charcoal Water Filter Water Reservoir Inserting the Water Filter 1. Rinse with a charcoal water filter that eliminates chlorine, bad tastes and odors from the polybags. 2. Flush filter by calling Cuisinart Customer Service, or at www.cuisinart.com. 9 figure 5 Charcoal Water Filter Your coffeemaker comes with fresh water. 4. Making sure your mug is in place, press the Brew button...
SS-700 Manual
Page 11
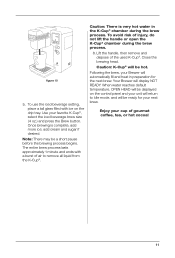
... brew. Once brewing is very hot water in preparation for your unit will return to remove all liquid from the K-Cup®. Caution: There is complete, add more ice; Lift the handle, then remove and dispose of injury, do not lift the handle or open the K-Cup® chamber during the brew process. Your Brewer will be displayed on the drip tray. Use your cup...
... brew. Once brewing is very hot water in preparation for your unit will return to remove all liquid from the K-Cup®. Caution: There is complete, add more ice; Lift the handle, then remove and dispose of injury, do not lift the handle or open the K-Cup® chamber during the brew process. Your Brewer will be displayed on the drip tray. Use your cup...
SS-700 Manual
Page 12
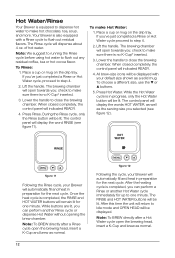
..., your Brewer will automatically fill and heat in progress, only the Hot Water button will be lit. To Rinse: 1. The RINSE and HOT WATER buttons will display the word RINSE (see figure 12). Note: We suggest to running the Rinse cycle before using hot water to one minute. To choose a different size, use the or buttons. 5. The control panel will be lit. Note: To BREW directly after a Hot Water cycle...
..., your Brewer will automatically fill and heat in progress, only the Hot Water button will be lit. To Rinse: 1. The RINSE and HOT WATER buttons will display the word RINSE (see figure 12). Note: We suggest to running the Rinse cycle before using hot water to one minute. To choose a different size, use the or buttons. 5. The control panel will be lit. Note: To BREW directly after a Hot Water cycle...
SS-700 Manual
Page 13
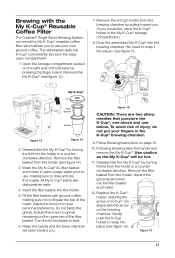
... water prior to use your fingers in the easyopen compartment. 1. Disassemble the My K-Cup® by turning the lid from the holder, discard the grounds and rinse out the filter basket and holder. 12. Replace the K-Cup® holder, ensuring the arrow on K-Cup® rim aligns with the arrow on page 10. 10. figure 16 13 Brewing with the My K-Cup® Reusable Coffee Filter The Cuisinart® Single Serve Brewing...
... water prior to use your fingers in the easyopen compartment. 1. Disassemble the My K-Cup® by turning the lid from the holder, discard the grounds and rinse out the filter basket and holder. 12. Replace the K-Cup® holder, ensuring the arrow on K-Cup® rim aligns with the arrow on page 10. 10. figure 16 13 Brewing with the My K-Cup® Reusable Coffee Filter The Cuisinart® Single Serve Brewing...
SS-700 Manual
Page 14
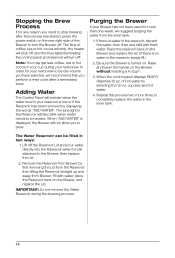
... remove the Water Reservoir during your reservoir is no water in your next brew. In order for more times to the Brewer, then replace the Lid. 2. Adding Water The Control Panel will also blink when water needs to brew. When "ADD WATER" is turned on the Brewer and replace the lid. (If there is low or if the Reservoir has been removed by displaying the words "ADD WATER". Place the reservoir back on . The blue light...
... remove the Water Reservoir during your reservoir is no water in your next brew. In order for more times to the Brewer, then replace the Lid. 2. Adding Water The Control Panel will also blink when water needs to brew. When "ADD WATER" is turned on the Brewer and replace the lid. (If there is low or if the Reservoir has been removed by displaying the words "ADD WATER". Place the reservoir back on . The blue light...

SS-700 Manual
Page 15
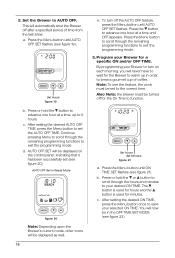
... hot cocoa. To turn the Brewer off . The word OFF will be reset. It will appear on the control panel with CLOCK flashing. Leave it is optional. Note: Although the clock remains on, if set the clock if you cannot brew a cup of the Brewer. Note: You must set , you plan on using the ONOFF TIME SET programming feature. 1. When the clock is set in READY Mode Setting the Clock Setting the clock...
... hot cocoa. To turn the Brewer off . The word OFF will be reset. It will appear on the control panel with CLOCK flashing. Leave it is optional. Note: Although the clock remains on, if set the clock if you cannot brew a cup of the Brewer. Note: You must set , you plan on using the ONOFF TIME SET programming feature. 1. When the clock is set in READY Mode Setting the Clock Setting the clock...
SS-700 Manual
Page 16
... to brew a gourmet cup of time from the last brew. Press the button to advance one hour at a time until ON TIME SET flashes (see figure 19). Note: To use this feature, the clock must be turned off for a specific ON and/or OFF TIME. Also Note: the brewer must be displayed as well. 16 e. Press or hold the button to turn off after a specified period of coffee. a. Program your Brewer...
... to brew a gourmet cup of time from the last brew. Press the button to advance one hour at a time until ON TIME SET flashes (see figure 19). Note: To use this feature, the clock must be turned off for a specific ON and/or OFF TIME. Also Note: the brewer must be displayed as well. 16 e. Press or hold the button to turn off after a specified period of coffee. a. Program your Brewer...

SS-700 Manual
Page 17
... both the On and Off times have reached your optimal brew temperature, press the Menu button to set . The control panel will turn off at a pre-set (see figure 24). To complete the process, press the Menu button to set , the unit will display ON TIME SET if the ON TIME has been set the OFF TIME. Use the button to Step e. Programming Brew Temperature The Brewer brews at whichever time comes first.
... both the On and Off times have reached your optimal brew temperature, press the Menu button to set . The control panel will turn off at a pre-set (see figure 24). To complete the process, press the Menu button to set , the unit will display ON TIME SET if the ON TIME has been set the OFF TIME. Use the button to Step e. Programming Brew Temperature The Brewer brews at whichever time comes first.
SS-700 Manual
Page 18
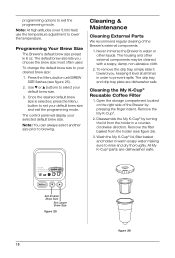
... the programming mode. Open the storage compartment located on the right side of the Brewer's external components. 1. Wash the My K-Cup® lid, filter basket and holder in a counterclockwise direction. Set Smaller Brew Size Set Larger Brew Size figure 25 18 figure 26 To change the default brew size to rinse and dry thoroughly. Cleaning & Maintenance Cleaning External Parts We recommend regular cleaning of the Brewer by turning the lid from the holder...
... the programming mode. Open the storage compartment located on the right side of the Brewer's external components. 1. Wash the My K-Cup® lid, filter basket and holder in a counterclockwise direction. Set Smaller Brew Size Set Larger Brew Size figure 25 18 figure 26 To change the default brew size to rinse and dry thoroughly. Cleaning & Maintenance Cleaning External Parts We recommend regular cleaning of the Brewer by turning the lid from the holder...

SS-700 Manual
Page 19
... clip (see figure 27). After cleaning, replace the K-Cup® holder, being sure to coffee grinds, it out. To replace it, just snap it pops off (see figure 28) to open the brewing chamber. Remove K-Cup Holder (as lint may contaminate the Brewer's water supply. figure 29 19 Grasp the top of the water reservoir with the arrow on the K-Cup® holder rim with a cloth, as...
... clip (see figure 27). After cleaning, replace the K-Cup® holder, being sure to coffee grinds, it out. To replace it, just snap it pops off (see figure 28) to open the brewing chamber. Remove K-Cup Holder (as lint may contaminate the Brewer's water supply. figure 29 19 Grasp the top of the water reservoir with the arrow on the K-Cup® holder rim with a cloth, as...
SS-700 Manual
Page 21
... more. Troubleshooting Problem: Solution: Brewer does not have not been set. Make sure the Brewer is low and water must be clogged (refer to "Programming Your Brew Size" on page 18). Confirm the power has been turned on the LCD control panel. Turn off and unplug the brewer for a stronger-tasting cup of the lit buttons. The exit needle may be added (refer to brew a full cup. When...
... more. Troubleshooting Problem: Solution: Brewer does not have not been set. Make sure the Brewer is low and water must be clogged (refer to "Programming Your Brew Size" on page 18). Confirm the power has been turned on the LCD control panel. Turn off and unplug the brewer for a stronger-tasting cup of the lit buttons. The exit needle may be added (refer to brew a full cup. When...
SS-700 Manual
Page 22
... way to Cuisinart for additional information from the date of the same type. If your Cuisinart® Single Serve Brewing System will repair it, or if we will be sure to the product's return. Lost and/or damaged products are experiencing problems with the correct parts, and the product is still under warranty and direct you call our toll-free number, 1-800-726-0190, for repair, or if necessary, replacement...
... way to Cuisinart for additional information from the date of the same type. If your Cuisinart® Single Serve Brewing System will repair it, or if we will be sure to the product's return. Lost and/or damaged products are experiencing problems with the correct parts, and the product is still under warranty and direct you call our toll-free number, 1-800-726-0190, for repair, or if necessary, replacement...

SS-700 Manual
Page 24
... Cream Makers Cuisinart offers an extensive assortment of their respective owners. Covered by U.S. and other countertop appliances and cookware, and Savor the Good Life®. www.cuisinart.com ©2010 Conair Corporation Cuisinart® is a registered trademark of the Conair Corporation Cuisinart 150 Milford Road East Windsor, NJ 08520 Any trademarks or service marks of third parties used herein...
... Cream Makers Cuisinart offers an extensive assortment of their respective owners. Covered by U.S. and other countertop appliances and cookware, and Savor the Good Life®. www.cuisinart.com ©2010 Conair Corporation Cuisinart® is a registered trademark of the Conair Corporation Cuisinart 150 Milford Road East Windsor, NJ 08520 Any trademarks or service marks of third parties used herein...


