
SS-700 Manual
Page 1
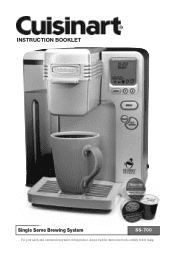
INSTRUCTION BOOKLET Single Serve Brewing System SS-700 For your safety and continued enjoyment of this product, always read the instruction book carefully before using.
INSTRUCTION BOOKLET Single Serve Brewing System SS-700 For your safety and continued enjoyment of this product, always read the instruction book carefully before using.
SS-700 Manual
Page 2
...fill water reservoir first, then plug cord into the wall outlet. Do not lift handle to open the lid of the brewer while brewing is intended to alert the user to the presence of important operating and maintenance (servicing) instructions in the literature accompanying the appliance. ... steel wool pads, or other than intended use appliance for examination, repair, or electrical or mechanical adjustment. 7. Return appliance to the nearest Cuisinart Repair Center for other abrasive materials. 16. Do not use of accessory attachments not recommended by or near a hot gas or electric burner...
...fill water reservoir first, then plug cord into the wall outlet. Do not lift handle to open the lid of the brewer while brewing is intended to alert the user to the presence of important operating and maintenance (servicing) instructions in the literature accompanying the appliance. ... steel wool pads, or other than intended use appliance for examination, repair, or electrical or mechanical adjustment. 7. Return appliance to the nearest Cuisinart Repair Center for other abrasive materials. 16. Do not use of accessory attachments not recommended by or near a hot gas or electric burner...

SS-700 Manual
Page 4
... for the Perfect Cup 5 Features and Benefits 6 Set-Up & First Brew 8 Setting Up Your Brewer 8 Charcoal Water Filter 9 Brewing 10 Hot Water/Rinse 12 Brewing with the My K-Cup® Accessory. . . . . . 13 Stopping the Brew Process 14 Adding Water 14 Purging the Brewer 14 Programming 15 Setting the... Clock 15 Programming On/Off Features 15 Programming Brew Temperature 17 Programming Your Brew Size 18 Cleaning & Maintenance 18 Cleaning External Parts 18 Cleaning the My K-Cup® Filter 18 Cleaning the K-Cup...
... for the Perfect Cup 5 Features and Benefits 6 Set-Up & First Brew 8 Setting Up Your Brewer 8 Charcoal Water Filter 9 Brewing 10 Hot Water/Rinse 12 Brewing with the My K-Cup® Accessory. . . . . . 13 Stopping the Brew Process 14 Adding Water 14 Purging the Brewer 14 Programming 15 Setting the... Clock 15 Programming On/Off Features 15 Programming Brew Temperature 17 Programming Your Brew Size 18 Cleaning & Maintenance 18 Cleaning External Parts 18 Cleaning the My K-Cup® Filter 18 Cleaning the K-Cup...
SS-700 Manual
Page 5
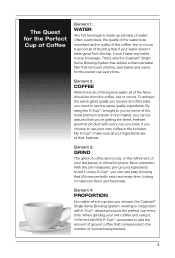
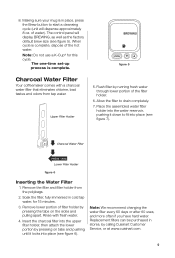
...freshest. With the pre-measured, pre-ground ingredients found in every K-Cup®, you choose, the Cuisinart® Single Serve Brewing System, working in your ingredients are at coffee bars, you brew. To achieve the same great quality you choose to use your own coffee in the included My ...is water, all your beverage. When grinding your water doesn't taste good from the coffee, tea or cocoa. That's why the Cuisinart® Single Serve Brewing System has added a charcoal water filter that corresponds to add the amount of ground coffee that removes chlorine, bad tastes and odors, ...
...freshest. With the pre-measured, pre-ground ingredients found in every K-Cup®, you choose, the Cuisinart® Single Serve Brewing System, working in your ingredients are at coffee bars, you brew. To achieve the same great quality you choose to use your own coffee in the included My ...is water, all your beverage. When grinding your water doesn't taste good from the coffee, tea or cocoa. That's why the Cuisinart® Single Serve Brewing System has added a charcoal water filter that corresponds to add the amount of ground coffee that removes chlorine, bad tastes and odors, ...
SS-700 Manual
Page 6
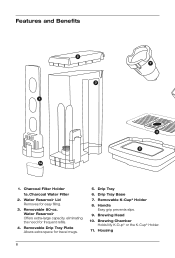
Features and Benefits 2 7 3 1 4 5 1a 1. Charcoal Filter Holder 1a. Water Reservoir Offers extra-large capacity, eliminating the need for easy filling. 3. Removable K-Cup® Holder 8. Handle Easy grip prevents slips. 9. Brewing Head 10. Drip Tray Base 7. Water Reservoir Lid Removes for frequent refills. 4. Drip Tray 6. Charcoal Water Filter 2. Brewing Chamber Holds My K-Cup® or the K-Cup® Holder. 11. Housing 6 Removable 80-oz. Removable Drip Tray Plate Allows extra space for travel mugs. 5.
Features and Benefits 2 7 3 1 4 5 1a 1. Charcoal Filter Holder 1a. Water Reservoir Offers extra-large capacity, eliminating the need for easy filling. 3. Removable K-Cup® Holder 8. Handle Easy grip prevents slips. 9. Brewing Head 10. Drip Tray Base 7. Water Reservoir Lid Removes for frequent refills. 4. Drip Tray 6. Charcoal Water Filter 2. Brewing Chamber Holds My K-Cup® or the K-Cup® Holder. 11. Housing 6 Removable 80-oz. Removable Drip Tray Plate Allows extra space for travel mugs. 5.

SS-700 Manual
Page 7
Brew Button 17. Rinse Button 18. My K-Cup® Compartment Conveniently stores My K-Cup®. 20. My K-Cup® Reusable Coffee Filter 21. Down Button ( ) 16. Hot Water Button 12 13 14 19 15 16 17 18 20 22 23 19. Power Switch (located rear side of Brewer) 23. Up Button ( ) 15. Menu Button 14. Control Panel 13. Coffee Scoop 7 Power Cord (not shown) 22. 8 9 10 11 6 12.
Brew Button 17. Rinse Button 18. My K-Cup® Compartment Conveniently stores My K-Cup®. 20. My K-Cup® Reusable Coffee Filter 21. Down Button ( ) 16. Hot Water Button 12 13 14 19 15 16 17 18 20 22 23 19. Power Switch (located rear side of Brewer) 23. Up Button ( ) 15. Menu Button 14. Control Panel 13. Coffee Scoop 7 Power Cord (not shown) 22. 8 9 10 11 6 12.

SS-700 Manual
Page 8
... the reservoir with the default size shown as outlined below freezing, wait at least two hours for its first use your Cuisinart® Single Serve Brewing System until it has been set up and away from water reservoir. Water Reservoir Lid Water Reservoir 6. Once the water is...begin. An extremely cold Brewer will take approximately 4 minutes. This will not operate. Idle Mode Ready Mode figure 1 5. Set-Up & First Brew IMPORTANT: Do not attempt to original position automatically. 8 figure 3 figure 4 Unwrap cord and plug the Brewer into the water reservoir during this ...
... the reservoir with the default size shown as outlined below freezing, wait at least two hours for its first use your Cuisinart® Single Serve Brewing System until it has been set up and away from water reservoir. Water Reservoir Lid Water Reservoir 6. Once the water is...begin. An extremely cold Brewer will take approximately 4 minutes. This will not operate. Idle Mode Ready Mode figure 1 5. Set-Up & First Brew IMPORTANT: Do not attempt to original position automatically. 8 figure 3 figure 4 Unwrap cord and plug the Brewer into the water reservoir during this ...
SS-700 Manual
Page 9
... fresh water. 4. Allow the filter to fit into place (see figure 7). When cycle is complete, dispose of water). Flush filter by calling Cuisinart Customer Service, or at www.cuisinart.com. 9 Replacement filters can be purchased in stores, by running fresh water through lower portion of filter holder by pressing on the sides... hot water. The one-time set-up process is in cold tap water, for this cycle. Soak the filter, fully immersed in place, press the Brew button to start a cleansing cycle (unit will display...
... fresh water. 4. Allow the filter to fit into place (see figure 7). When cycle is complete, dispose of water). Flush filter by calling Cuisinart Customer Service, or at www.cuisinart.com. 9 Replacement filters can be purchased in stores, by running fresh water through lower portion of filter holder by pressing on the sides... hot water. The one-time set-up process is in cold tap water, for this cycle. Soak the filter, fully immersed in place, press the Brew button to start a cleansing cycle (unit will display...

SS-700 Manual
Page 10
...Cup Portion Pack 6. Select a K-Cup® Portion Pack®. When closed completely, the control panel will display OPEN HEAD while in the K-Cup® brewing chamber. The drip tray can be lit. To restart the process, open toward you selected (see figure 9). a. Place a cup or mug on the ... Note: If not used within 60 seconds, the unit will return to accommodate travel mugs. 3. Only the Brew button will be displayed on the drip tray. brew sizes. All brew size icons will be removed to Idle mode and OPEN HEAD will display READY again. To avoid risk of...
...Cup Portion Pack 6. Select a K-Cup® Portion Pack®. When closed completely, the control panel will display OPEN HEAD while in the K-Cup® brewing chamber. The drip tray can be lit. To restart the process, open toward you selected (see figure 9). a. Place a cup or mug on the ... Note: If not used within 60 seconds, the unit will return to accommodate travel mugs. 3. Only the Brew button will be displayed on the drip tray. brew sizes. All brew size icons will be removed to Idle mode and OPEN HEAD will display READY again. To avoid risk of...
SS-700 Manual
Page 11
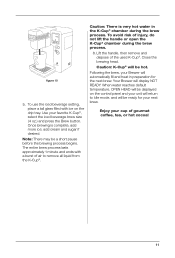
...Caution: There is complete, add more ice; Close the brewing head. Following the brew, your Brewer will be ready for the next brew. Once brewing is very hot water in preparation for your unit will be a short pause before the brewing process begins. To avoid risk of the used K-Cup®...;. When water reaches default temperature, OPEN HEAD will automatically fill and heat in the K-Cup® chamber during the brew process. 8. To use the iced beverage setting, place a tall glass filled with a burst of gourmet coffee, tea, or hot cocoa! 11 Caution...
...Caution: There is complete, add more ice; Close the brewing head. Following the brew, your Brewer will be ready for the next brew. Once brewing is very hot water in preparation for your unit will be a short pause before the brewing process begins. To avoid risk of the used K-Cup®...;. When water reaches default temperature, OPEN HEAD will automatically fill and heat in the K-Cup® chamber during the brew process. 8. To use the iced beverage setting, place a tall glass filled with a burst of gourmet coffee, tea, or hot cocoa! 11 Caution...
SS-700 Manual
Page 12
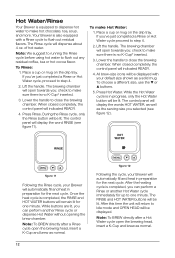
... the Rinse cycle before using hot water to one minute. To make hot chocolate, tea, soup, and more. The brewing chamber will open the brewing head, insert a K-Cup and brew as normal. 12 figure 12 Following the cycle, your Brewer will be displayed. Press Hot Water. While the Hot Water... cycle proceed to step 4. 2. After this time the unit will return to Idle mode and OPEN HEAD will open the brewing head, insert a K-Cup and brew as normal. The brewing chamber will be lit. When closed completely, the control panel will display the words HOT WATER, as well as a solid...
... the Rinse cycle before using hot water to one minute. To make hot chocolate, tea, soup, and more. The brewing chamber will open the brewing head, insert a K-Cup and brew as normal. 12 figure 12 Following the cycle, your Brewer will be displayed. Press Hot Water. While the Hot Water... cycle proceed to step 4. 2. After this time the unit will return to Idle mode and OPEN HEAD will open the brewing head, insert a K-Cup and brew as normal. The brewing chamber will be lit. When closed completely, the control panel will display the words HOT WATER, as well as a solid...
SS-700 Manual
Page 13
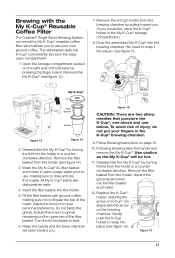
... 13). 7. Turn the lid clockwise to snap it into the brewing chamber. (No need to seal. 6. Follow Brewing instructions on the brewing chamber. Brewing with the My K-Cup® Reusable Coffee Filter The Cuisinart® Single Serve Brewing System comes with ground coffee making sure to rinse and dry thoroughly... storage compartment.) 8. figure 15 CAUTION: There are two sharp needles that puncture the K-Cup®, one above and one below. Following brewing raise the handle and remove the My K-Cup®. figure 16 13 Remove the K-Cup® holder from the holder, discard the ...
... 13). 7. Turn the lid clockwise to snap it into the brewing chamber. (No need to seal. 6. Follow Brewing instructions on the brewing chamber. Brewing with the My K-Cup® Reusable Coffee Filter The Cuisinart® Single Serve Brewing System comes with ground coffee making sure to rinse and dry thoroughly... storage compartment.) 8. figure 15 CAUTION: There are two sharp needles that puncture the K-Cup®, one above and one below. Following brewing raise the handle and remove the My K-Cup®. figure 16 13 Remove the K-Cup® holder from the holder, discard the ...
SS-700 Manual
Page 14
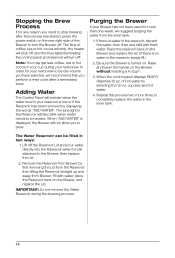
... for your Brewer has not been used for any reason you need to stop , the heater will shut off . Purging the Brewer If your next brew to be the volume you have selected, we suggest purging the water from the inner tank. 1. Repeat this process two more than one week, we... with water, place the Reservoir back on the Brewer and replace the lid. (If there is water in the Reservoir will not allow you to brew. If there is no water in two ways: 1. IMPORTANT: Do not remove the Water Reservoir during your reservoir is displayed, the Brewer will also blink...
... for your Brewer has not been used for any reason you need to stop , the heater will shut off . Purging the Brewer If your next brew to be the volume you have selected, we suggest purging the water from the inner tank. 1. Repeat this process two more than one week, we... with water, place the Reservoir back on the Brewer and replace the lid. (If there is water in the Reservoir will not allow you to brew. If there is no water in two ways: 1. IMPORTANT: Do not remove the Water Reservoir during your reservoir is displayed, the Brewer will also blink...

SS-700 Manual
Page 15
... time. Note: If power is ready to heat up from room temperature. 1. Programming On/Off Features The Brewer provides three ways for the water to brew. 15 To turn the Brewer off . Note: Although the clock remains on your own schedule. You will be displayed on all the time. Programming options... button to scroll through the minutes until you have reached the correct time, press the Menu button to set , you to wait for you cannot brew a cup of gourmet coffee, tea or hot cocoa. When you have reached the appropriate hour. Note: You must set in READY Mode Setting the ...
... time. Note: If power is ready to heat up from room temperature. 1. Programming On/Off Features The Brewer provides three ways for the water to brew. 15 To turn the Brewer off . Note: Although the clock remains on your own schedule. You will be displayed on all the time. Programming options... button to scroll through the minutes until you have reached the correct time, press the Menu button to set , you to wait for you cannot brew a cup of gourmet coffee, tea or hot cocoa. When you have reached the appropriate hour. Note: You must set in READY Mode Setting the ...
SS-700 Manual
Page 16
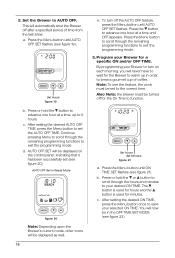
... the Menu button until AUTO OFF SET flashes. Press or hold the or button to scroll through the remaining programming functions to brew a gourmet cup of time from the last brew. b. c. Press the Menu button until OFF appears. Continue pressing Menu to scroll through the remaining programming functions to save your Brewer...
... the Menu button until AUTO OFF SET flashes. Press or hold the or button to scroll through the remaining programming functions to brew a gourmet cup of time from the last brew. b. c. Press the Menu button until OFF appears. Continue pressing Menu to scroll through the remaining programming functions to save your Brewer...

SS-700 Manual
Page 17
...minimum (187°F) temperature, only the arrow will be displayed as above. If both the On and Off times have reached your optimal brew temperature, press the Menu button to raise the temperature one another. Once you may adjust this temperature down by 5 degrees. The control panel... will display OFF after 11 pm. Programming Brew Temperature The Brewer brews at a time. If you prefer a cooler cup of 192°F. Set Hours Set Minutes figure 22 d. To complete the process, ...
...minimum (187°F) temperature, only the arrow will be displayed as above. If both the On and Off times have reached your optimal brew temperature, press the Menu button to raise the temperature one another. Once you may adjust this temperature down by 5 degrees. The control panel... will display OFF after 11 pm. Programming Brew Temperature The Brewer brews at a time. If you prefer a cooler cup of 192°F. Set Hours Set Minutes figure 22 d. To complete the process, ...
SS-700 Manual
Page 18
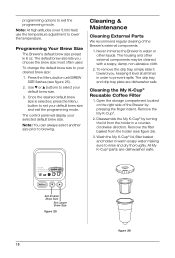
... tray and drip tray plate are dishwasher safe. Cleaning the My K-Cup® Reusable Coffee Filter 1. The control panel will display your default brew size and exit the programming mode. Note: You can always select another size prior to exit the programming mode. Never immerse the Brewer in ... Disassemble the My K-Cup® by pressing the finger indent. All My K-Cup® parts are dishwasher safe. Press the Menu button until BREW SIZE flashes (see figure 26). 3. Remove the My K-Cup®. 2. Remove the filter basket from the holder in water or other external components...
... tray and drip tray plate are dishwasher safe. Cleaning the My K-Cup® Reusable Coffee Filter 1. The control panel will display your default brew size and exit the programming mode. Note: You can always select another size prior to exit the programming mode. Never immerse the Brewer in ... Disassemble the My K-Cup® by pressing the finger indent. All My K-Cup® parts are dishwasher safe. Press the Menu button until BREW SIZE flashes (see figure 26). 3. Remove the My K-Cup®. 2. Remove the filter basket from the holder in water or other external components...

SS-700 Manual
Page 19
... may contaminate the Brewer's water supply. figure 29 19 Should a clog arise due to align the arrow on the brewing chamber. 2. Caution: Rinse the water reservoir thoroughly after cleaning to open the brewing chamber. CAUTION: There are sharp needles that no cleaners or cleaning solutions remain in figure 27). To remove, lift...
... may contaminate the Brewer's water supply. figure 29 19 Should a clog arise due to align the arrow on the brewing chamber. 2. Caution: Rinse the water reservoir thoroughly after cleaning to open the brewing chamber. CAUTION: There are sharp needles that no cleaners or cleaning solutions remain in figure 27). To remove, lift...
SS-700 Manual
Page 20
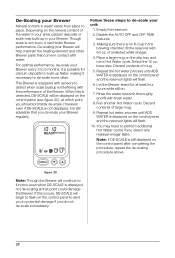
... another Hot Water cycle. You may build up faster, making it can hinder Brewer performance. For optimal performance, de-scale your unit: 1. Empty the reservoir. 2. brew size. Depending on the control panel and the reservoir lights will help maintain the heating element and other Brewer parts that you do not de... begin to function even when DE-SCALE is interfering with 60 oz. If this is displayed on the mineral content of the water in the brewing chamber, fill the reservoir with the performance of large mug. 9.
... another Hot Water cycle. You may build up faster, making it can hinder Brewer performance. For optimal performance, de-scale your unit: 1. Empty the reservoir. 2. brew size. Depending on the control panel and the reservoir lights will help maintain the heating element and other Brewer parts that you do not de... begin to function even when DE-SCALE is interfering with 60 oz. If this is displayed on the mineral content of the water in the brewing chamber, fill the reservoir with the performance of large mug. 9.
SS-700 Manual
Page 21
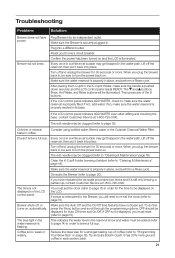
...the brewer back in, be displayed on and the LCD is flashing. If not, add water. Consider using bottled water, filtered water or the Cuisinart Charcoal Water Filter. Turn off and unplug the brewer for 30 seconds or more ground coffee in place, and perform a Rinse cycle. De-scale... is interrupted to the Brewer, you plug the brewer back in coffee. Brewer will be clogged (refer to "Cleaning & Maintenance" page 18). Doesn't brew a full cup. After placing the K-Cup® in . Make sure the Brewer is pushed down securely and the LCD control panel reads READY. When...
...the brewer back in, be displayed on and the LCD is flashing. If not, add water. Consider using bottled water, filtered water or the Cuisinart Charcoal Water Filter. Turn off and unplug the brewer for 30 seconds or more ground coffee in place, and perform a Rinse cycle. De-scale... is interrupted to the Brewer, you plug the brewer back in coffee. Brewer will be clogged (refer to "Cleaning & Maintenance" page 18). Doesn't brew a full cup. After placing the K-Cup® in . Make sure the Brewer is pushed down securely and the LCD control panel reads READY. When...


