User Guide
Page 2
...2005 All rights reserved. No part of this document is subject to change without the written permission of Creative Technology Ltd. Copyright © 2005 Creative Technology Ltd. in any form or by any means, electronic or mechanical, including photocopying and recording, for... any purpose without notice and does not represent a commitment on the part of Creative Technology Ltd. The Creative logo, Zen and Creative MediaSource are registered trademarks of Microsoft Corporation. Intel and Pentium are registered trademarks of Intel Corporation. Information in...
...2005 All rights reserved. No part of this document is subject to change without the written permission of Creative Technology Ltd. Copyright © 2005 Creative Technology Ltd. in any form or by any means, electronic or mechanical, including photocopying and recording, for... any purpose without notice and does not represent a commitment on the part of Creative Technology Ltd. The Creative logo, Zen and Creative MediaSource are registered trademarks of Microsoft Corporation. Intel and Pentium are registered trademarks of Intel Corporation. Information in...
User Guide
Page 3
... 5 Zen Vision - Side Views 8 Zen Vision - Top and Bottom Views 10 Turning Zen Vision On and Off 12 Selecting Options 12 Navigating Menus 14 Inserting a Memory Card 15 Connecting Your Player to a TV 18 Locking Zen Vision 21 Main Applications 22 Transferring and Managing Content 25 About Content Types 25 Getting Content 25 Transferring Content 26 Synchronizing Content 30 Managing...
... 5 Zen Vision - Side Views 8 Zen Vision - Top and Bottom Views 10 Turning Zen Vision On and Off 12 Selecting Options 12 Navigating Menus 14 Inserting a Memory Card 15 Connecting Your Player to a TV 18 Locking Zen Vision 21 Main Applications 22 Transferring and Managing Content 25 About Content Types 25 Getting Content 25 Transferring Content 26 Synchronizing Content 30 Managing...
User Guide
Page 4
Using Zen Vision as a Removable Disk 48 Changing the Amount of Hard Disk Space in Removable Disk Mode 51 Stopping Zen Vision Properly 52 Adjusting Your Player's Settings 53 Date and Time 53 Information 53 Audio Settings 54 Photo and Video Settings 56 Setting Preferences 57 Theme 59 Language 59 Resetting Zen Vision 59 Frequently Asked Questions 60 Safety Advice 66 General Specifications 67
Using Zen Vision as a Removable Disk 48 Changing the Amount of Hard Disk Space in Removable Disk Mode 51 Stopping Zen Vision Properly 52 Adjusting Your Player's Settings 53 Date and Time 53 Information 53 Audio Settings 54 Photo and Video Settings 56 Setting Preferences 57 Theme 59 Language 59 Resetting Zen Vision 59 Frequently Asked Questions 60 Safety Advice 66 General Specifications 67
User Guide
Page 5
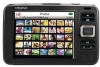
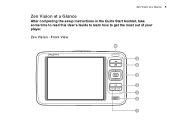
Front View 1 2 3 4 5 6 7 8 Zen Vision at a Glance 5 Zen Vision at a Glance After completing the setup instructions in the Quick Start booklet, take some time to read this User's Guide to learn how to get the most out of your player. Zen Vision -
Front View 1 2 3 4 5 6 7 8 Zen Vision at a Glance 5 Zen Vision at a Glance After completing the setup instructions in the Quick Start booklet, take some time to read this User's Guide to learn how to get the most out of your player. Zen Vision -
User Guide
Page 6
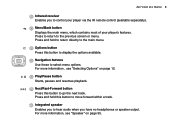
Zen Vision at a Glance 6 1 Infrared receiver Enables you have no headphones or speaker output. Press and hold to return directly to the main menu. 3 Options button Press .... 5 Play/Pause button Starts, pauses and resumes playback. 6 Next/Fast-Forward button Press this button to select menu options. Press to return to control your player via the IR remote control (available separately). 2 Menu/Back button Displays the main menu, which contains most of your...
Zen Vision at a Glance 6 1 Infrared receiver Enables you have no headphones or speaker output. Press and hold to return directly to the main menu. 3 Options button Press .... 5 Play/Pause button Starts, pauses and resumes playback. 6 Next/Fast-Forward button Press this button to select menu options. Press to return to control your player via the IR remote control (available separately). 2 Menu/Back button Displays the main menu, which contains most of your...
User Guide
Page 7
...your use, contact Customer Support Services. 8 Previous/Rewind button Press this button to go the previous track. If, however, you are in ) Zen Vision at a Glance 7 NOTE In the process of Liquid Crystal Display (LCD) manufacturing, instances of fixed spots may appear and are considered acceptable if ...CD-ROM/DVD-ROM drive, with the region that you notice fixed spots on your document is in , and with the language that your Creative Zen Vision LCD interfering with industry standards and based on a particular colour, such as, white or red. Press and hold this button to move ...
...your use, contact Customer Support Services. 8 Previous/Rewind button Press this button to go the previous track. If, however, you are in ) Zen Vision at a Glance 7 NOTE In the process of Liquid Crystal Display (LCD) manufacturing, instances of fixed spots may appear and are considered acceptable if ...CD-ROM/DVD-ROM drive, with the region that you notice fixed spots on your document is in , and with the language that your Creative Zen Vision LCD interfering with industry standards and based on a particular colour, such as, white or red. Press and hold this button to move ...

User Guide
Page 9
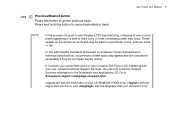
For more information, see "Connecting Your Player to a TV" on the power outlet if necessary. Turn on page 18. 4 DC IN 5V jack To charge Zen™ Vision's battery, connect one end of Zen Vision's power adapter to this port, and the other end to this slot. For more information, see "Inserting a Memory Card" on page 15. 2 Headphone jack Connect earphones to this jack. 3 A/V Out jack To conveniently view videos or photos stored in your player, connect your TV set to a power outlet. Zen Vision at a Glance 9 1 Compact Flash memory card slot Insert a memory card into this jack.
For more information, see "Connecting Your Player to a TV" on the power outlet if necessary. Turn on page 18. 4 DC IN 5V jack To charge Zen™ Vision's battery, connect one end of Zen Vision's power adapter to this port, and the other end to this slot. For more information, see "Inserting a Memory Card" on page 15. 2 Headphone jack Connect earphones to this jack. 3 A/V Out jack To conveniently view videos or photos stored in your player, connect your TV set to a power outlet. Zen Vision at a Glance 9 1 Compact Flash memory card slot Insert a memory card into this jack.
User Guide
Page 10
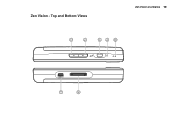
Top and Bottom Views Zen Vision at a Glance 10 1 2 3 4 5 7 6 Zen Vision -
Top and Bottom Views Zen Vision at a Glance 10 1 2 3 4 5 7 6 Zen Vision -
User Guide
Page 11
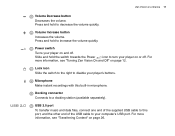
...end of the USB cable to decrease the volume quickly. 2 Volume Increase button Increases the volume. Zen Vision at a Glance 11 1 Volume Decrease button Decreases the volume. For more information, see "Turning Zen Vision On and Off" on or off . Press and hold the switch towards the Power icon to... increase the volume quickly. 3 Power switch Turns your player on page 12. 4 Lock icon Slide the switch to the right to...
...end of the USB cable to decrease the volume quickly. 2 Volume Increase button Increases the volume. Zen Vision at a Glance 11 1 Volume Decrease button Decreases the volume. For more information, see "Turning Zen Vision On and Off" on or off . Press and hold the switch towards the Power icon to... increase the volume quickly. 3 Power switch Turns your player on page 12. 4 Lock icon Slide the switch to the right to...
User Guide
Page 12
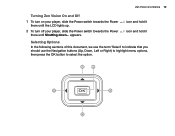
Zen Vision at a Glance 12 Turning Zen Vision On and Off 1 To turn on your player, slide the Power switch towards the Power there until the LCD lights up. 2 To turn off your player, slide the Power switch towards the Power there until Shutting down... icon and hold it icon and hold it Selecting Options In the following sections of this document, we use the term 'Select' to indicate that you should use the Navigation buttons (Up, Down, Left or Right) to highlight menu options, then press the OK button to select the option. 1 2 5 3 4 appears.
Zen Vision at a Glance 12 Turning Zen Vision On and Off 1 To turn on your player, slide the Power switch towards the Power there until the LCD lights up. 2 To turn off your player, slide the Power switch towards the Power there until Shutting down... icon and hold it icon and hold it Selecting Options In the following sections of this document, we use the term 'Select' to indicate that you should use the Navigation buttons (Up, Down, Left or Right) to highlight menu options, then press the OK button to select the option. 1 2 5 3 4 appears.
User Guide
Page 13
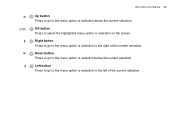
Zen Vision at a Glance 13 1 Up button Press to go to the menu option or selection above the current selection. 2 OK button Press to select the highlighted menu option or selection on the screen. 3 Right button Press to go to the menu option or selection to the right of the current selection. 4 Down button Press to go to the menu option or selection below the current selection. 5 Left button Press to go to the menu option or selection to the left of the current selection.
Zen Vision at a Glance 13 1 Up button Press to go to the menu option or selection above the current selection. 2 OK button Press to select the highlighted menu option or selection on the screen. 3 Right button Press to go to the menu option or selection to the right of the current selection. 4 Down button Press to go to the menu option or selection below the current selection. 5 Left button Press to go to the menu option or selection to the left of the current selection.

User Guide
Page 14
Now Playing 1 of 4 12 qw as zx Caps Shift 345 er t dfg cvb Accents Space 678 yu i hjk nm, Clear Bkspc 90 op l .? Symbols OK Zen Vision at a Glance 14 Navigating Menus Press the Up or Down navigation button to move vertically in a menu. Menu Music Library Photos Videos FM Radio Microphone ...
Now Playing 1 of 4 12 qw as zx Caps Shift 345 er t dfg cvb Accents Space 678 yu i hjk nm, Clear Bkspc 90 op l .? Symbols OK Zen Vision at a Glance 14 Navigating Menus Press the Up or Down navigation button to move vertically in a menu. Menu Music Library Photos Videos FM Radio Microphone ...
User Guide
Page 15
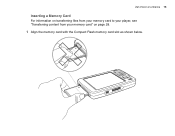
Zen Vision at a Glance 15 Inserting a Memory Card For information on transferring files from your memory card to your player, see "Transferring content from your memory card" on page 28. 1 Align the memory card with the Compact Flash memory card slot as shown below.
Zen Vision at a Glance 15 Inserting a Memory Card For information on transferring files from your memory card to your player, see "Transferring content from your memory card" on page 28. 1 Align the memory card with the Compact Flash memory card slot as shown below.
User Guide
Page 16
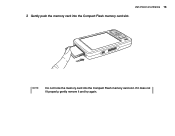
NOTE Do not force the memory card into the Compact Flash memory card slot. Zen Vision at a Glance 16 2 Gently push the memory card into the Compact Flash memory card slot. If it does not fit properly, gently remove it and try again.
NOTE Do not force the memory card into the Compact Flash memory card slot. Zen Vision at a Glance 16 2 Gently push the memory card into the Compact Flash memory card slot. If it does not fit properly, gently remove it and try again.
User Guide
Page 17
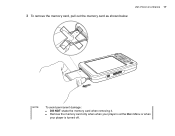
NOTE To avoid permanent damage: ■ DO NOT shake the memory card when removing it. ■ Remove the memory card only when when your player is at a Glance 17 3 To remove the memory card, pull out the memory card as shown below. Zen Vision at the Main Menu or when your player is turned off .
NOTE To avoid permanent damage: ■ DO NOT shake the memory card when removing it. ■ Remove the memory card only when when your player is at a Glance 17 3 To remove the memory card, pull out the memory card as shown below. Zen Vision at the Main Menu or when your player is turned off .
User Guide
Page 18
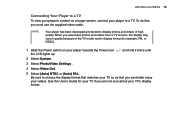
... it there until 2 Select System. 3 Select Photo/Video Settings . 4 Select Video Out. 5 Select (Auto) NTSC or (Auto) PAL. Zen Vision at a Glance 18 Connecting Your Player to a TV To view your player's content on your TV's display format. To do this, you can better enjoy your videos. When you are not sure about...in quality because of high quality. See the User's Guide for example, PAL or NTSC). 1 Slide the Power switch on a larger screen, connect your player to choose the display format that matches your TV so as that you must use the supplied video cable. Be sure to a TV.
... it there until 2 Select System. 3 Select Photo/Video Settings . 4 Select Video Out. 5 Select (Auto) NTSC or (Auto) PAL. Zen Vision at a Glance 18 Connecting Your Player to a TV To view your player's content on your TV's display format. To do this, you can better enjoy your videos. When you are not sure about...in quality because of high quality. See the User's Guide for example, PAL or NTSC). 1 Slide the Power switch on a larger screen, connect your player to choose the display format that matches your TV so as that you must use the supplied video cable. Be sure to a TV.
User Guide
Page 19
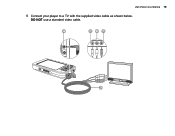
Zen Vision at a Glance 19 6 Connect your player to a TV with the supplied video cable as shown below. DO NOT use a standard video cable. 1 2 3 4 COMP IN L AUDIO R 5
Zen Vision at a Glance 19 6 Connect your player to a TV with the supplied video cable as shown below. DO NOT use a standard video cable. 1 2 3 4 COMP IN L AUDIO R 5
User Guide
Page 20
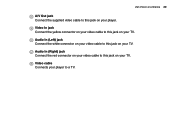
Zen Vision at a Glance 20 1 A/V Out jack Connect the supplied video cable to this jack on your player. 2 Video In jack Connect the yellow connector on your video cable to this jack on your TV. 3 Audio In (Left) jack Connect the white connector on your video cable to this jack on your TV. 4 Audio In (Right) jack Connect the red connector on your video cable to this jack on your TV. 5 Video cable Connects your player to a TV.
Zen Vision at a Glance 20 1 A/V Out jack Connect the supplied video cable to this jack on your player. 2 Video In jack Connect the yellow connector on your video cable to this jack on your TV. 3 Audio In (Left) jack Connect the white connector on your video cable to this jack on your TV. 4 Audio In (Right) jack Connect the red connector on your video cable to this jack on your TV. 5 Video cable Connects your player to a TV.
User Guide
Page 21
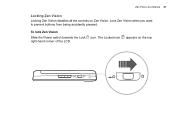
The Locked icon appears on Zen Vision. To lock Zen Vision Slide the Power switch towards the Lock right-hand corner of the LCD. icon. Lock Zen Vision when you want to prevent buttons from being accidently pressed. Zen Vision at a Glance 21 Locking Zen Vision Locking Zen Vision disables all the controls on the top
The Locked icon appears on Zen Vision. To lock Zen Vision Slide the Power switch towards the Lock right-hand corner of the LCD. icon. Lock Zen Vision when you want to prevent buttons from being accidently pressed. Zen Vision at a Glance 21 Locking Zen Vision Locking Zen Vision disables all the controls on the top
User Guide
Page 22
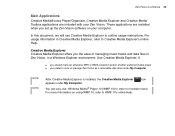
... Explorer icon appears under My Computer. For more information on your Zen Vision. These applications are included with your computer. Zen Vision at a Glance 22 Main Applications Creative MediaSource Player/Organizer, Creative Media Explorer and Creative Media Toolbox applications are installed when you set up the Zen Vision software on using WMP 10, refer to import or transfer music. For...
... Explorer icon appears under My Computer. For more information on your Zen Vision. These applications are included with your computer. Zen Vision at a Glance 22 Main Applications Creative MediaSource Player/Organizer, Creative Media Explorer and Creative Media Toolbox applications are installed when you set up the Zen Vision software on using WMP 10, refer to import or transfer music. For...


