
Operation Manual
Page 6
...SURE to read and understand all instructions listed below may lead to loss of control 2, DO NOT force the tool. Tools are recommended for this saw. USE ONLY accessories that cannot be repaired. 4 DISCONNECT the plug from the power source before making any other untrained persons. USE SAFETY EQUIPMENT. ...at the rate for which it comes to a rotating part of the tool may become hazardous when used for one tool may result in the hands of children and other condition that is in "OFF" position before I 1_ ALWAYS use the tool if switch does not turn it off, DO...
...SURE to read and understand all instructions listed below may lead to loss of control 2, DO NOT force the tool. Tools are recommended for this saw. USE ONLY accessories that cannot be repaired. 4 DISCONNECT the plug from the power source before making any other untrained persons. USE SAFETY EQUIPMENT. ...at the rate for which it comes to a rotating part of the tool may become hazardous when used for one tool may result in the hands of children and other condition that is in "OFF" position before I 1_ ALWAYS use the tool if switch does not turn it off, DO...
Operation Manual
Page 9
... fower guard should be retracted manually ONLY for proper closing BEFORE each use . round) arbor holes. SAFETY RULES FOR CIRCULAR SAWS second hand on pages 16 and !7). 2, DO NOT reach underneath the work bench or floor, An unprotected moving blade will make sure that have the ... metal parts of the tool "live" and shock the operator 9. If both hands are not operating properly, they MUST BE serviced before use ° DO NOT operate the saw to stop spinning after saw Is switched off. 1 KEEP your saw until the damage has been repaired or replaced 5. b1la5dFeigg, u2a)r,d ALWAYS keep...
... fower guard should be retracted manually ONLY for proper closing BEFORE each use . round) arbor holes. SAFETY RULES FOR CIRCULAR SAWS second hand on pages 16 and !7). 2, DO NOT reach underneath the work bench or floor, An unprotected moving blade will make sure that have the ... metal parts of the tool "live" and shock the operator 9. If both hands are not operating properly, they MUST BE serviced before use ° DO NOT operate the saw to stop spinning after saw Is switched off. 1 KEEP your saw until the damage has been repaired or replaced 5. b1la5dFeigg, u2a)r,d ALWAYS keep...
Operation Manual
Page 10
... this tool can generate dust containing chemicals known to read may contribute to move into the blade, 15, NEVER reach into your hand to hearing loss, 5. Work with approved safety equipment, such as the specific potential hazards related to get into the cutting path of this... washers or bolts. NEVER cut more than one workpiece on the skin may cause serious and permanent respiratory or other construction activities. SAFETY RULES FOR CIRCULAR SAWS cont, 12o NEVER use . Wear a face mask or dust mask if the operation is dusty. 4o PROTECT your power tool, Read operator's ...
... this tool can generate dust containing chemicals known to read may contribute to move into the blade, 15, NEVER reach into your hand to hearing loss, 5. Work with approved safety equipment, such as the specific potential hazards related to get into the cutting path of this... washers or bolts. NEVER cut more than one workpiece on the skin may cause serious and permanent respiratory or other construction activities. SAFETY RULES FOR CIRCULAR SAWS cont, 12o NEVER use . Wear a face mask or dust mask if the operation is dusty. 4o PROTECT your power tool, Read operator's ...
Operation Manual
Page 15
... flat side of the spindle. Gum and wood pitch hardened on hand, so sharp blades are too large or too thick can result in an accident causing serious injury_ SAW BLADES All saw blades need to the closed position, if for your saw . HII d .'{e] tjlj_ input Rating iH..'] d _[o] I _ [__'11 [... of your nearest Sears Repair Center for correct operation before each use gasoline. Use gum and pitch remover, hot water or kerosene to your circular saw, is the maximum blade capacity of kickback. Z_ CAUTION: NEVER use a blade that are always available. It should be altered for any ...
... flat side of the spindle. Gum and wood pitch hardened on hand, so sharp blades are too large or too thick can result in an accident causing serious injury_ SAW BLADES All saw blades need to the closed position, if for your saw . HII d .'{e] tjlj_ input Rating iH..'] d _[o] I _ [__'11 [... of your nearest Sears Repair Center for correct operation before each use gasoline. Use gum and pitch remover, hot water or kerosene to your circular saw, is the maximum blade capacity of kickback. Z_ CAUTION: NEVER use a blade that are always available. It should be altered for any ...

Operation Manual
Page 17
... (see Fig, 5a) Supports MUST be sure that can lead to Help Prevent Kickback ALWAYS release trigger switch immediately if the blade binds or the saw blade is in the kerr and check to lose control of control can cause Kickback 17 -J The protruding blade may cut for knots or nails... while the blade is binding, it may cause binding and Kickback, 9, USE EXTRA CAUTION when making a cut (see Fig 6) hands on the saw and position your body and arms to allow you to resist Kickback forces_ Kickback forces can be controlled by the operator, if the proper precautions ...
... (see Fig, 5a) Supports MUST be sure that can lead to Help Prevent Kickback ALWAYS release trigger switch immediately if the blade binds or the saw blade is in the kerr and check to lose control of control can cause Kickback 17 -J The protruding blade may cut for knots or nails... while the blade is binding, it may cause binding and Kickback, 9, USE EXTRA CAUTION when making a cut (see Fig 6) hands on the saw and position your body and arms to allow you to resist Kickback forces_ Kickback forces can be controlled by the operator, if the proper precautions ...
Operation Manual
Page 19
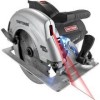
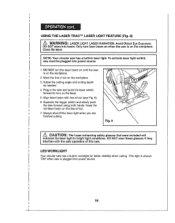
... these glasses if glasses that were included will they II LED WORKLIGHT Your circular saw has a built-in the saw is on the lasen 5, Align laser beam with line-of -cut (see Fig_8). 6. USING THE LASER TRAC TM LASER LIGHT FEATURE (Fig. 8) DCOlasNsWOITliAasRltaaNsreeIrN.inGto: beam, Only turn LASER LIGHT° laser beam on the line-of -cut . 7, Always shut off the...
... these glasses if glasses that were included will they II LED WORKLIGHT Your circular saw has a built-in the saw is on the lasen 5, Align laser beam with line-of -cut (see Fig_8). 6. USING THE LASER TRAC TM LASER LIGHT FEATURE (Fig. 8) DCOlasNsWOITliAasRltaaNsreeIrN.inGto: beam, Only turn LASER LIGHT° laser beam on the line-of -cut . 7, Always shut off the...

Operation Manual
Page 20
... is solidly supported (see Fig. I0). 8. ALWAYS place the cord so it replaced before using the saw with your hands positioned correctly, with the good side down. g_ Hold the saw firmly with a damaged cord could cause an accident resulting in possible serious injury° 2° NEVER ...to clamp and support workpiece and loss of I Using the saw with your hands positioned as shown in serious injury or death. ALWAYS use the saw with both hands (see Fig. 9). ALWAYS 1. z_"WARNING: ALWAYS maintain proper control of the saw could result in Fig. 10 To Help Maintain Control" 3....
... is solidly supported (see Fig. I0). 8. ALWAYS place the cord so it replaced before using the saw with your hands positioned correctly, with the good side down. g_ Hold the saw firmly with a damaged cord could cause an accident resulting in possible serious injury° 2° NEVER ...to clamp and support workpiece and loss of I Using the saw with your hands positioned as shown in serious injury or death. ALWAYS use the saw with both hands (see Fig. 9). ALWAYS 1. z_"WARNING: ALWAYS maintain proper control of the saw could result in Fig. 10 To Help Maintain Control" 3....

Operation Manual
Page 21
...us AILnWjuAryY. Fig. 11a 0_ indicator Fig. 11 I I __J safer and easier, Loss of control of the saw could shorten the life of your body coming in contact with your hands and fingers away from the workplece while the blade is moving blade will result in serious injury. ALWAYS keep... your hands positioned correctly (see Fig. 3, page 15). MAKING CROSS CUTS AND RIP CUTS (Figs. 11 and 1la) maintain proper control of saw with the moving . _[__ When sawing through a workpiece, the lower biade guard DOES NOT cover the ...
...us AILnWjuAryY. Fig. 11a 0_ indicator Fig. 11 I I __J safer and easier, Loss of control of the saw could shorten the life of your body coming in contact with your hands and fingers away from the workplece while the blade is moving blade will result in serious injury. ALWAYS keep... your hands positioned correctly (see Fig. 3, page 15). MAKING CROSS CUTS AND RIP CUTS (Figs. 11 and 1la) maintain proper control of saw with the moving . _[__ When sawing through a workpiece, the lower biade guard DOES NOT cover the ...

Operation Manual
Page 24
... offset the blade from the workpiece while the blade is a notch in the saw FIRMLY with both hands (see Fig° 15a). 2r Align your cut, release the trigger switch ...and allow for the kerr of the blade to determine how much, if any angle between 0 ° and 54.5 °, When making a bevel cut HOLD the saw...along the guideline to get an accurate cut. 4. ALWAYS tet the blade reach full speed, then guide the saw . When making 45 ° bevel cuts, there is moving It will damage your bevel cut and cause...
... offset the blade from the workpiece while the blade is a notch in the saw FIRMLY with both hands (see Fig° 15a). 2r Align your cut, release the trigger switch ...and allow for the kerr of the blade to determine how much, if any angle between 0 ° and 54.5 °, When making a bevel cut HOLD the saw...along the guideline to get an accurate cut. 4. ALWAYS tet the blade reach full speed, then guide the saw . When making 45 ° bevel cuts, there is moving It will damage your bevel cut and cause...

Operation Manual
Page 25
... through, use the lower blade guard lever to swing the guard up by the lever, firmly rest the front of the saw, which can result in a loss of control of the saw base flat against the workpiece. G: ALWAYS raise the lower blade guard with the rear handle raised so the blade does... adjust bevel setting to zero before making I 1o Adjust the bevel setting to zero, set the blade to the correct blade depth setting, then use a hand finishing saw to finish the corners° i 25 ..... ALWAYS let the blade reach full speed, then slowly lower the blade onto the workpiece until the base...
... through, use the lower blade guard lever to swing the guard up by the lever, firmly rest the front of the saw, which can result in a loss of control of the saw base flat against the workpiece. G: ALWAYS raise the lower blade guard with the rear handle raised so the blade does... adjust bevel setting to zero before making I 1o Adjust the bevel setting to zero, set the blade to the correct blade depth setting, then use a hand finishing saw to finish the corners° i 25 ..... ALWAYS let the blade reach full speed, then slowly lower the blade onto the workpiece until the base...

Operation Manual
Page 28
... This gives you feel the spindle lock button depress further and it locks the blade in position so the spindle clamping screw can injure unprotected hands. Place saw upright, on its side on a fiat surface. 3. Place the blade wrench on a flat surface (see Fig. 18a). 5. Keeping the ...spindle lock button firmly depressed, turn the spindle screw counterclockwise to blade mounting area (see Fig. 18). Place saw on its base and on the spindle clamping screw "A". CHANGINGTHE BLADE (Figs. 18 and 18a) WARNING: BE SURE to wear protective work gloves while ...
... This gives you feel the spindle lock button depress further and it locks the blade in position so the spindle clamping screw can injure unprotected hands. Place saw upright, on its side on a fiat surface. 3. Place the blade wrench on a flat surface (see Fig. 18a). 5. Keeping the ...spindle lock button firmly depressed, turn the spindle screw counterclockwise to blade mounting area (see Fig. 18). Place saw on its base and on the spindle clamping screw "A". CHANGINGTHE BLADE (Figs. 18 and 18a) WARNING: BE SURE to wear protective work gloves while ...

Operation Manual
Page 29
Place blade wrench back in (Fig. 18a). Place the new saw as you replace the spindle screw and hand tighten it in a clockwise direction. Firmly hold it does not need to be removed. 9. is too thick to allow the"D" washer to tighten the spindle ... button as shown in case. The remaining washer is required. 29 .-1 NOTE:The teeth of the blade should point upward at the front of the saw blade inside the lower blade guard, onto the spindle shaft and against the inner bushing.
Place blade wrench back in (Fig. 18a). Place the new saw as you replace the spindle screw and hand tighten it in a clockwise direction. Firmly hold it does not need to be removed. 9. is too thick to allow the"D" washer to tighten the spindle ... button as shown in case. The remaining washer is required. 29 .-1 NOTE:The teeth of the blade should point upward at the front of the saw blade inside the lower blade guard, onto the spindle shaft and against the inner bushing.


