Operation Manual
Page 1
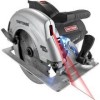
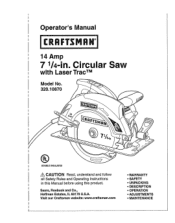
Operator's Manual 14 Amp 7 _/4-in this Manual before using this product. Circular Saw with Laser Trac TM Model No. 320.10870 ® DOUBLE INSULATED /_ CAUTION Read, understand and follow all Safety Rules and Operating Instructions in . Visit our Craftsman webslte: www.craftsman.com • WARRANTY * SAFETY • UNPACKING * DESCRIPTION • OPERATION • ADJUSTMENTS • MAINTENANCE Sears, Roebuck and Co., Hoffman Estates, IL 60179 U.S.A.
Operator's Manual 14 Amp 7 _/4-in this Manual before using this product. Circular Saw with Laser Trac TM Model No. 320.10870 ® DOUBLE INSULATED /_ CAUTION Read, understand and follow all Safety Rules and Operating Instructions in . Visit our Craftsman webslte: www.craftsman.com • WARRANTY * SAFETY • UNPACKING * DESCRIPTION • OPERATION • ADJUSTMENTS • MAINTENANCE Sears, Roebuck and Co., Hoffman Estates, IL 60179 U.S.A.
Operation Manual
Page 3
... death or serious Injury to yourself or to equipment or other Craftsman Outlets. .J The symbol warnings DO NOT by the word "NOTE:" as "DANGER", "WARNING" and "CAUTION", BEFORE using this saw, Failure to follow the safety precautions to reduce the risk of... is to attract your attention to others . The purpose of safety symbols is preceded by themselves eliminate any tool with a circular blade can result in foreign objects being thrown Into your careful attention and understanding. MAaLy EbRe TuseSdYIMn BcoOnLju:nctiIonndicwatieths oDthAeNrGsEyRm, bWolAsRNoIrNpGic,...
... death or serious Injury to yourself or to equipment or other Craftsman Outlets. .J The symbol warnings DO NOT by the word "NOTE:" as "DANGER", "WARNING" and "CAUTION", BEFORE using this saw, Failure to follow the safety precautions to reduce the risk of... is to attract your attention to others . The purpose of safety symbols is preceded by themselves eliminate any tool with a circular blade can result in foreign objects being thrown Into your careful attention and understanding. MAaLy EbRe TuseSdYIMn BcoOnLju:nctiIonndicwatieths oDthAeNrGsEyRm, bWolAsRNoIrNpGic,...
Operation Manual
Page 4
...; Removing product labels Increases the risk of this device SHOULD NEVER be harmful to view the laser beam will Increase eye hazard, 1. The laser light emltted from this saw is aimed at the beam as this circular saw emits the laser light, BE AWARE of optical Instruments such as wood or rough coated surfaces) that any...
...; Removing product labels Increases the risk of this device SHOULD NEVER be harmful to view the laser beam will Increase eye hazard, 1. The laser light emltted from this saw is aimed at the beam as this circular saw emits the laser light, BE AWARE of optical Instruments such as wood or rough coated surfaces) that any...
Operation Manual
Page 5
...alcohol or medication, A moment of this laser device in serious personal injury, 4. ALWAYS turn the laser beam off of someone inadvertently staring into the laser's beam. !i', CAUTION: ALWAYS follow only the instructions contained in this manual when using your saw 's applications and limitations, as well as .... Pull back long hair, Keep your power tool. Read the operator's manual carefully. Learn the saw PERSONAL SAFETY 1, KNOW your hair, clothing, and gloves away from the Laser Institute of flammable liquids, gases, or dust. DO NOT use . Leaving the tool on surfaces ...
...alcohol or medication, A moment of this laser device in serious personal injury, 4. ALWAYS turn the laser beam off of someone inadvertently staring into the laser's beam. !i', CAUTION: ALWAYS follow only the instructions contained in this manual when using your saw 's applications and limitations, as well as .... Pull back long hair, Keep your power tool. Read the operator's manual carefully. Learn the saw PERSONAL SAFETY 1, KNOW your hair, clothing, and gloves away from the Laser Institute of flammable liquids, gases, or dust. DO NOT use . Leaving the tool on surfaces ...

Operation Manual
Page 6
... children and other untrained persons. REMOVE adjusting keys or wrenches before plugging in personal injury. 7. Keep proper footing and balance at the rate for this saw. USE SAFETY EQUIPMENT. DO NOT USE ON A LADDER or unstable support. Failure to follow all instructions before I 1_ ALWAYS use the tool if switch does...
... children and other untrained persons. REMOVE adjusting keys or wrenches before plugging in personal injury. 7. Keep proper footing and balance at the rate for this saw. USE SAFETY EQUIPMENT. DO NOT USE ON A LADDER or unstable support. Failure to follow all instructions before I 1_ ALWAYS use the tool if switch does...
Operation Manual
Page 7
... risk of a double Insulated tool. Applicable only to carry the toot by or pull the plug from heat, oil, sharp edges or moving blade. 7. This circular saw is an increased risk of electric shock. Have damaged toot cords repaired at a Sears Service Center. Double insulated tools are equipped with grounded surfaces, such...
... risk of a double Insulated tool. Applicable only to carry the toot by or pull the plug from heat, oil, sharp edges or moving blade. 7. This circular saw is an increased risk of electric shock. Have damaged toot cords repaired at a Sears Service Center. Double insulated tools are equipped with grounded surfaces, such...
Operation Manual
Page 8
... A...l.t.e..r.n..a..t.i.n..g. Follow instructions in a risk of 50-ft. Use of unauthorized parts or failure to perform properly: SHUT OFF the power switch and remove the saw is missing or should any way; ONLY use tool with a power tool. or tess in a loss of power and overheating of this... saw plug from the power source and have the missing, damaged or failed parts replaced BEFORE resuming operation. 2. It means attention! SERVICE SAFETY 1. Extension ...
... A...l.t.e..r.n..a..t.i.n..g. Follow instructions in a risk of 50-ft. Use of unauthorized parts or failure to perform properly: SHUT OFF the power switch and remove the saw is missing or should any way; ONLY use tool with a power tool. or tess in a loss of power and overheating of this... saw plug from the power source and have the missing, damaged or failed parts replaced BEFORE resuming operation. 2. It means attention! SERVICE SAFETY 1. Extension ...
Operation Manual
Page 9
... y from the blade beneath the workpiece, _DOES NOT cover thWe hbelnadesaownintghethurnoduegrshidae woofrtkhpeiewcoe,rkpthieecelow(ePrg. If the guard and the spring are holding the saw if the lower guard does not move when making special cuts, such as the blade enters the material, the lower guard MUST be bent. ... the workpiece properly in all other part in order to Prevent It" on the auxiliary handle or motor housing. SAFETY RULES FOR CIRCULAR SAWS second hand on pages 16 and !7). 2, DO NOT reach underneath the work bench or floor, An unprotected moving blade will cause the...
... y from the blade beneath the workpiece, _DOES NOT cover thWe hbelnadesaownintghethurnoduegrshidae woofrtkhpeiewcoe,rkpthieecelow(ePrg. If the guard and the spring are holding the saw if the lower guard does not move when making special cuts, such as the blade enters the material, the lower guard MUST be bent. ... the workpiece properly in all other part in order to Prevent It" on the auxiliary handle or motor housing. SAFETY RULES FOR CIRCULAR SAWS second hand on pages 16 and !7). 2, DO NOT reach underneath the work bench or floor, An unprotected moving blade will cause the...
Operation Manual
Page 10
...such as the specific potential hazards related to this tool.. Wear protective clothing and wash exposed areas with dust from power sanding, sawing, grinding, drilling and other reproductive harm. ADDITIONAL RULES FOR SAFE OPERATION I t,o/_follWowARalNl iInNsGtru: ctioBnEs listed below SURE to cause ... to get into the cutting path of use NIOSH/OSHA approved respiratory protection appropriate for optimum performance and safety of the saw . SAFETY RULES FOR CIRCULAR SAWS cont, 12o NEVER use . Some examples of these chemicals are: • Lead from lead-based paints.. •...
...such as the specific potential hazards related to this tool.. Wear protective clothing and wash exposed areas with dust from power sanding, sawing, grinding, drilling and other reproductive harm. ADDITIONAL RULES FOR SAFE OPERATION I t,o/_follWowARalNl iInNsGtru: ctioBnEs listed below SURE to cause ... to get into the cutting path of use NIOSH/OSHA approved respiratory protection appropriate for optimum performance and safety of the saw . SAFETY RULES FOR CIRCULAR SAWS cont, 12o NEVER use . Some examples of these chemicals are: • Lead from lead-based paints.. •...

Operation Manual
Page 11
...angled at other than 900. That area which produces a square-sided notch or trough in the workpiece (requires special blade). Through Sawing Any cutting operation where the blade extends completely through cut . Check for damaged parts, Before further use them repaired at any ... during the cut which will operate properly and perform its intended function. Compound Miter Cut A compound miter cut removing a wedge from lumber before sawing, 9 SAVE THESE INSTRUCTIONS. Chamfer Cut A cut is damaged should be properly repaired or replaced at a Sears Service center. 8 INSPECT and...
...angled at other than 900. That area which produces a square-sided notch or trough in the workpiece (requires special blade). Through Sawing Any cutting operation where the blade extends completely through cut . Check for damaged parts, Before further use them repaired at any ... during the cut which will operate properly and perform its intended function. Compound Miter Cut A compound miter cut removing a wedge from lumber before sawing, 9 SAVE THESE INSTRUCTIONS. Chamfer Cut A cut is damaged should be properly repaired or replaced at a Sears Service center. 8 INSPECT and...
Operation Manual
Page 12
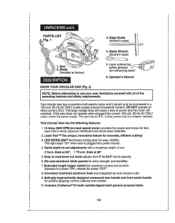
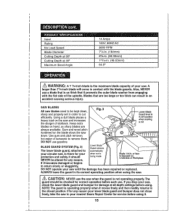
... when you are commonly referred to as faces, ends and edges. Inspect the saw should NEVER be stored. 6. Workpiece or Material The item on page 13), return the saw to your nearest Sears store or Craftsman outlet to have the saw will prevent accidental starting, which are replaced. Also included and attached to the... or when It is force-fitted into the top of the lid of the storage/carrying case. 3. The blade wrench is used to enhance the laser beam in bright light conditions. 5o There Is a blade storage area in the bottom of the case where an extra blade can occur when the...
... when you are commonly referred to as faces, ends and edges. Inspect the saw should NEVER be stored. 6. Workpiece or Material The item on page 13), return the saw to your nearest Sears store or Craftsman outlet to have the saw will prevent accidental starting, which are replaced. Also included and attached to the... or when It is force-fitted into the top of the lid of the storage/carrying case. 3. The blade wrench is used to enhance the laser beam in bright light conditions. 5o There Is a blade storage area in the bottom of the case where an extra blade can occur when the...
Operation Manual
Page 13
... 3_ LED WORKLIGHT illuminates cutting area for easy visibility. PARTS LIST FIg. 1 j 3. Blade Wrench (stored in case) -_ 4. I _J Soft-grip ergonomtcally designed contoured rear handle and front assist handle for enhancing laser) 6. Saw 2. DO NOT operate on direct current (DC). thick at factory) 5, Laser enhancing_ safety glasses C/\_ (for positive gripping, control, balance and comfort. 10_includes Craftsman...
... 3_ LED WORKLIGHT illuminates cutting area for easy visibility. PARTS LIST FIg. 1 j 3. Blade Wrench (stored in case) -_ 4. I _J Soft-grip ergonomtcally designed contoured rear handle and front assist handle for enhancing laser) 6. Saw 2. DO NOT operate on direct current (DC). thick at factory) 5, Laser enhancing_ safety glasses C/\_ (for positive gripping, control, balance and comfort. 10_includes Craftsman...
Operation Manual
Page 14
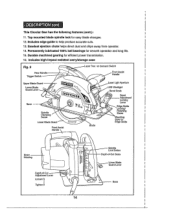
... Durable machined gearing for EdgeGuide Motor Housing Depth-of-Cut Adjustment Lever Loosenl Tighten+ 14 Spindle Lock Button _th-of-CutScale Guard Lever Base This Circular Saw has the following features (cont.): 11, Top mounted blade spindle lock for easy blade changes, 12.
... Durable machined gearing for EdgeGuide Motor Housing Depth-of-Cut Adjustment Lever Loosenl Tighten+ 14 Spindle Lock Button _th-of-CutScale Guard Lever Base This Circular Saw has the following features (cont.): 11, Top mounted blade spindle lock for easy blade changes, 12.
Operation Manual
Page 15
... properly.The guard should beingmade NEVER be checked for your lower blade guard and bumper does not close freely, take the saw and increases the danger of your circular saw down. Blades that it prevents the outer blade washer from engaging with the blade guards. NOTE: The guard is operating ...blade places a heavy load on hand, so sharp blades are too large or too thick can result in an accident causing serious injury_ SAW BLADES All saw blades need to be kept clean, sharp and properly set in contact with the flat side of the spindle. It should be altered for...
... properly.The guard should beingmade NEVER be checked for your lower blade guard and bumper does not close freely, take the saw and increases the danger of your circular saw down. Blades that it prevents the outer blade washer from engaging with the blade guards. NOTE: The guard is operating ...blade places a heavy load on hand, so sharp blades are too large or too thick can result in an accident causing serious injury_ SAW BLADES All saw blades need to be kept clean, sharp and properly set in contact with the flat side of the spindle. It should be altered for...

Operation Manual
Page 16
... of Kickback Fig. 4 \ Correct Blade Depth 1, Kickback is a sudden reaction to a pinched, bound or misaligned saw blade, which causes an uncontrolledsaw to climb out of the workpiece and toward the operator, 2. This causes the blade ...and the motor reaction drives the unit rapidly back towards the operator, 4. Sawing into wet or warped lumber can cause Kickback (see Fig. 5a). 7. When the blade is a ...result of the wood. Sawing into the top surface of toot misuse and/or incorrectoperating procedures or conditions It can cause...
... of Kickback Fig. 4 \ Correct Blade Depth 1, Kickback is a sudden reaction to a pinched, bound or misaligned saw blade, which causes an uncontrolledsaw to climb out of the workpiece and toward the operator, 2. This causes the blade ...and the motor reaction drives the unit rapidly back towards the operator, 4. Sawing into wet or warped lumber can cause Kickback (see Fig. 5a). 7. When the blade is a ...result of the wood. Sawing into the top surface of toot misuse and/or incorrectoperating procedures or conditions It can cause...

Operation Manual
Page 17
..., 9, USE EXTRA CAUTION when making a "Pocket Cut" into a knot or nail, 4. Kickback could cause you are not engaged into the material, If the saw blade is in motion, or Kickback may occur CHECK and take corrective action to eliminate the cause of blade pinching and Kickback. ALWAYS maintain a firm... interruptinga cut for knots or nails before cutting. Ways to Help Prevent Kickback ALWAYS release trigger switch immediately if the blade binds or the saw in the workpiece, CENTER the blade in the kerr and check to be sure that the blade depth and adjusting locking levers are tight...
..., 9, USE EXTRA CAUTION when making a "Pocket Cut" into a knot or nail, 4. Kickback could cause you are not engaged into the material, If the saw blade is in motion, or Kickback may occur CHECK and take corrective action to eliminate the cause of blade pinching and Kickback. ALWAYS maintain a firm... interruptinga cut for knots or nails before cutting. Ways to Help Prevent Kickback ALWAYS release trigger switch immediately if the blade binds or the saw in the workpiece, CENTER the blade in the kerr and check to be sure that the blade depth and adjusting locking levers are tight...

Operation Manual
Page 18
... on the back of the upper blade guard (see Fig. 7a). 51 Hold the base of the saw flat against the edge of the workpiece and then raise or lower the saw before rnaking any adjustn_ents. Failure to I 'lg A_ / 18 Allowing more than 1/4-inch below the ... use the correct blade depth setting° The correct blade depth setting for adjusting Lower the Saw J TO SETTHE BLADE DEPTH (Fig° 7a) I, Unplug the saw, i , ,i , i i i i I,,,IH,,,.,,,.I.,.lll_u,J_l.JJ unplug the saw could result in accidental starting which can cause serious personal l ,i_njuryW.ARN ING _ ALWAYS unplug...
... on the back of the upper blade guard (see Fig. 7a). 51 Hold the base of the saw flat against the edge of the workpiece and then raise or lower the saw before rnaking any adjustn_ents. Failure to I 'lg A_ / 18 Allowing more than 1/4-inch below the ... use the correct blade depth setting° The correct blade depth setting for adjusting Lower the Saw J TO SETTHE BLADE DEPTH (Fig° 7a) I, Unplug the saw, i , ,i , i i i i I,,,IH,,,.,,,.I.,.lll_u,J_l.JJ unplug the saw could result in accidental starting which can cause serious personal l ,i_njuryW.ARN ING _ ALWAYS unplug...
Operation Manual
Page 19
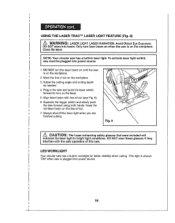
...USING THE LASER TRAC TM LASER LIGHT FEATURE (Fig. 8) DCOlasNsWOITliAasRltaaNsreeIrN.inGto: beam, Only turn on the lasen 5, Align laser beam with line-of-cut (see Fig_8). 6. ser light° To activate laser light switch, 1, DO NOT turn the laser beam on until the saw is on when LASER RADIATION. ...DO NOT wear these glasses if glasses that were included will they II LED WORKLIGHT Your circular saw has a built-in the saw is on the workpiece. 2_ ...
...USING THE LASER TRAC TM LASER LIGHT FEATURE (Fig. 8) DCOlasNsWOITliAasRltaaNsreeIrN.inGto: beam, Only turn on the lasen 5, Align laser beam with line-of-cut (see Fig_8). 6. ser light° To activate laser light switch, 1, DO NOT turn the laser beam on until the saw is on when LASER RADIATION. ...DO NOT wear these glasses if glasses that were included will they II LED WORKLIGHT Your circular saw has a built-in the saw is on the workpiece. 2_ ...

Operation Manual
Page 20
... one hand operating the trigger switch and the other on the front assist handle (see Fig. 9)° 7. z_"WARNING: ALWAYS maintain proper control of the saw again. 20 Fig. 9 i NOTE: Thegood sldeof the workpieoe is the side where appearance is made (see Fig 9). Fig, 10 I ii Z_ WARNING: If the ... down. I0). 8. ALWAYS keep the cord away from hanging up on your right° 5, ALWAYS clamp the workpiece so it replaced before using the saw to prevent it does not hang up again. If the cord has been damaged, have it will be on the workpiece when making a cut , 4.
... one hand operating the trigger switch and the other on the front assist handle (see Fig. 9)° 7. z_"WARNING: ALWAYS maintain proper control of the saw again. 20 Fig. 9 i NOTE: Thegood sldeof the workpieoe is the side where appearance is made (see Fig 9). Fig, 10 I ii Z_ WARNING: If the ... down. I0). 8. ALWAYS keep the cord away from hanging up on your right° 5, ALWAYS clamp the workpiece so it replaced before using the saw to prevent it does not hang up again. If the cord has been damaged, have it will be on the workpiece when making a cut , 4.

Operation Manual
Page 21
... varies, MAKE ATRIAL CUT In scrap material along the guideline to determine how much, if any, you begin the cut with the moving . _[__ When sawing through a workpiece, the lower biade guard DOES NOT cover the blade on the underside of the notch by the 0° Indicator_ (see Fig. 3, page 15...). When making cross or rip outs, align your body coming in serious injury. DO NOT remove the saw with your hands and fingers away from the workplece while the blade is moving blade will result in contact with the fight side of the...
... varies, MAKE ATRIAL CUT In scrap material along the guideline to determine how much, if any, you begin the cut with the moving . _[__ When sawing through a workpiece, the lower biade guard DOES NOT cover the blade on the underside of the notch by the 0° Indicator_ (see Fig. 3, page 15...). When making cross or rip outs, align your body coming in serious injury. DO NOT remove the saw with your hands and fingers away from the workplece while the blade is moving blade will result in contact with the fight side of the...


