

Operation Manual
Page 1
Sears, Roebuck and Co., Hoffman Estates, IL 60179 U.S.A. Visit our Craftsman webslte: www.craftsman.com • WARRANTY * SAFETY • UNPACKING * DESCRIPTION • OPERATION • ADJUSTMENTS • MAINTENANCE Operator's Manual 14 Amp 7 _/4-in this Manual before using this product. Circular Saw with Laser Trac TM Model No. 320.10870 ® DOUBLE INSULATED /_ CAUTION Read, understand and follow all Safety Rules and Operating Instructions in .
Sears, Roebuck and Co., Hoffman Estates, IL 60179 U.S.A. Visit our Craftsman webslte: www.craftsman.com • WARRANTY * SAFETY • UNPACKING * DESCRIPTION • OPERATION • ADJUSTMENTS • MAINTENANCE Operator's Manual 14 Amp 7 _/4-in this Manual before using this product. Circular Saw with Laser Trac TM Model No. 320.10870 ® DOUBLE INSULATED /_ CAUTION Read, understand and follow all Safety Rules and Operating Instructions in .

Operation Manual
Page 2
... the date of purchase. Warranty Page 2 Safety Symbols Page 3 Safety Instructions Pages 4- 11 Glossary of Terms Pages 11 - 12 Unpacking Pages 12- 13 Description Pages t3 - 15 Operation Pages 15 - 25 Adjustments Page 26- 27 Maintenance Pages 27 - 29 Troubleshooting Page 30 Accessories Page 30 Repair Parts Pages 31 - 34 Sears Repair Parts Phone Numbers Back Cover ONE YEAR FULL WARRANTY ON CRAFTSMAN ®PRODUCT tf this...
... the date of purchase. Warranty Page 2 Safety Symbols Page 3 Safety Instructions Pages 4- 11 Glossary of Terms Pages 11 - 12 Unpacking Pages 12- 13 Description Pages t3 - 15 Operation Pages 15 - 25 Adjustments Page 26- 27 Maintenance Pages 27 - 29 Troubleshooting Page 30 Accessories Page 30 Repair Parts Pages 31 - 34 Sears Repair Parts Phone Numbers Back Cover ONE YEAR FULL WARRANTY ON CRAFTSMAN ®PRODUCT tf this...
Operation Manual
Page 3
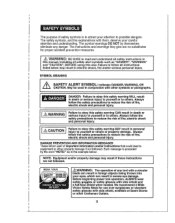
... others . Before beginning power tool operation, ALWAYS wear safety goggles or safety glasses with them, deserve your attention to equipment or other Craftsman Outlets. .J SYMBOL MEANING SCAAUFTEIOTNY. Always follow the safety precautions to reduce the risk of fire, electric shock and personal Injury. DAMAGE PREVENTION AND INFORMATION MESSAGES These inform user of any danger° The instructions and warnings they...
... others . Before beginning power tool operation, ALWAYS wear safety goggles or safety glasses with them, deserve your attention to equipment or other Craftsman Outlets. .J SYMBOL MEANING SCAAUFTEIOTNY. Always follow the safety precautions to reduce the risk of fire, electric shock and personal Injury. DAMAGE PREVENTION AND INFORMATION MESSAGES These inform user of any danger° The instructions and warnings they...
Operation Manual
Page 4
... (such as this manual may result In hazardous radiation exposure, electric shock, fire and/or serious personal Injury. Class ilia laser, i z_WARNING: Use of controls, adjustments or performance of the laser light location when using this circular saw has a buift-in this can be directed towards any person for any reason. 5. Failure to laser radiation, 2. The laser on your tool, It indicates where the...
... (such as this manual may result In hazardous radiation exposure, electric shock, fire and/or serious personal Injury. Class ilia laser, i z_WARNING: Use of controls, adjustments or performance of the laser light location when using this circular saw has a buift-in this can be directed towards any person for any reason. 5. Failure to laser radiation, 2. The laser on your tool, It indicates where the...
Operation Manual
Page 5
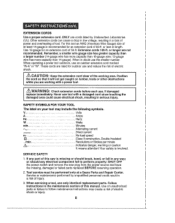
... as sheet steel that wil! Read the operator's manual carefully. Lock tools away when not in any manner other laser tools could reflect the beam back at the operator. MAKE SURE the work area has ample lighting so you can cause you are doing and use common sense when operating a power tool. 3, DO NOT use with padlocks and master switches. ALWAYS turn the laser beam off of accessories that...
... as sheet steel that wil! Read the operator's manual carefully. Lock tools away when not in any manner other laser tools could reflect the beam back at the operator. MAKE SURE the work area has ample lighting so you can cause you are doing and use common sense when operating a power tool. 3, DO NOT use with padlocks and master switches. ALWAYS turn the laser beam off of accessories that...

Operation Manual
Page 6
... NOT force the tool. ALWAYS SECURE YOUR WORK, Use clamps or a vise to read and understand all instructions listed below may become hazardous when used for your hand and frees both hands to a rotating part of children and other untrained persons. Keep cutting tools sharp and clean. Be sure switch is in "OFF" position before I 1_ ALWAYS use the tool if switch does not turn it off, DO...
... NOT force the tool. ALWAYS SECURE YOUR WORK, Use clamps or a vise to read and understand all instructions listed below may become hazardous when used for your hand and frees both hands to a rotating part of children and other untrained persons. Keep cutting tools sharp and clean. Be sure switch is in "OFF" position before I 1_ ALWAYS use the tool if switch does not turn it off, DO...
Operation Manual
Page 7
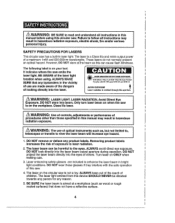
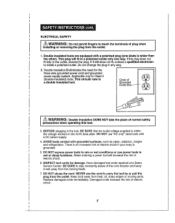
... heat, oil, sharp edges or moving blade. 7. Grounded ® Outlet Box ----" (_ /_ WARNING: Double insulation DOES NOT take the place of electric shock. DO NOT expose power tools to rain or wet conditions or use the cord to install a polarized outlet. Water entering a power tool will fit in wet or damp locations. Keep cord away from the moving parts, Replace damaged cords immediately. Damaged cords increase the...
... heat, oil, sharp edges or moving blade. 7. Grounded ® Outlet Box ----" (_ /_ WARNING: Double insulation DOES NOT take the place of electric shock. DO NOT expose power tools to rain or wet conditions or use the cord to install a polarized outlet. Water entering a power tool will fit in wet or damp locations. Keep cord away from the moving parts, Replace damaged cords immediately. Damaged cords increase the...
Operation Manual
Page 8
... power switch and remove the saw is involved. ONLY use an outdoor extension cord marked "W-A" or "W"o These cords are not recommended. Use of 25-ff. It means attention! or should any electrical component fail to follow maintenance instructions may Include the following symbols. Service or maintenance performed by Underwriters Laboratories (UL). When servicing a tool, use the smaller number. When operating a power tool outdoors, use cords listed by unqualified personnel could result in any part...
... power switch and remove the saw is involved. ONLY use an outdoor extension cord marked "W-A" or "W"o These cords are not recommended. Use of 25-ff. It means attention! or should any electrical component fail to follow maintenance instructions may Include the following symbols. Service or maintenance performed by Underwriters Laboratories (UL). When servicing a tool, use the smaller number. When operating a power tool outdoors, use cords listed by unqualified personnel could result in any part...
Operation Manual
Page 9
... the saw blade and not in direct line with the retracting lever The guard is importantto support the workpiece properly in order to walk backwards, cutting whatever is released. 7o NEVER hold the piece being cut in all other part in your hands or across your hands and fingers away from the cutting area. 3 CHECK lower guard for making the cut. 10oWhen ripping, ALWAYS USE a rip fence or straight edge guide, This...
... the saw blade and not in direct line with the retracting lever The guard is importantto support the workpiece properly in order to walk backwards, cutting whatever is released. 7o NEVER hold the piece being cut in all other part in your hands or across your hands and fingers away from the cutting area. 3 CHECK lower guard for making the cut. 10oWhen ripping, ALWAYS USE a rip fence or straight edge guide, This...
Operation Manual
Page 10
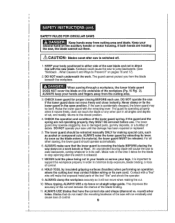
... of work.To reduce your lungs. Wear a face mask or dust mask if the operation is dusty. 4o PROTECT your power tool, Read operator's manual carefully. Wear appropriate personal hearing protection during use damaged or incorrect blade washers or bolts. SAFETY RULES FOR CIRCULAR SAWS cont, 12o NEVER use . Direct particles away from power sanding, sawing, grinding, drilling and other reproductive harm. ADDITIONAL RULES FOR SAFE OPERATION I t,o/_follWowARalNl iInNsGtru: ctioBnEs listed...
... of work.To reduce your lungs. Wear a face mask or dust mask if the operation is dusty. 4o PROTECT your power tool, Read operator's manual carefully. Wear appropriate personal hearing protection during use damaged or incorrect blade washers or bolts. SAFETY RULES FOR CIRCULAR SAWS cont, 12o NEVER use . Direct particles away from power sanding, sawing, grinding, drilling and other reproductive harm. ADDITIONAL RULES FOR SAFE OPERATION I t,o/_follWowARalNl iInNsGtru: ctioBnEs listed...

Operation Manual
Page 11
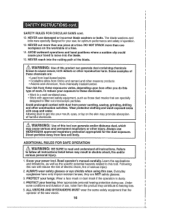
... the blade Miter Cut A cutting operation made using a fence, miter gauge, fixture, work clamp, or other proper device to instruct others who may affect the tool's operation, A guard or other part that the saw blade tooth is damaged should be carefully checked to the workpiece. Also called the Arbor. Compound Miter Cut A compound miter cut is a cut made with the blade at the same time Cross cut removing a wedge from lumber before sawing, 9 SAVE THESE INSTRUCTIONS. BE AWARE of the cord location...
... the blade Miter Cut A cutting operation made using a fence, miter gauge, fixture, work clamp, or other proper device to instruct others who may affect the tool's operation, A guard or other part that the saw blade tooth is damaged should be carefully checked to the workpiece. Also called the Arbor. Compound Miter Cut A compound miter cut is a cut made with the blade at the same time Cross cut removing a wedge from lumber before sawing, 9 SAVE THESE INSTRUCTIONS. BE AWARE of the cord location...
Operation Manual
Page 12
... of a workpiece are replaced. The wrench is also force-fitted into tool firsL Kerr The material removed by the blade in a through cut or the slot produced by the blade in the power cord or operate saw will prevent accidental starting, which could cause serious personal Injury. 1. Also included and attached to the power source when you are assembling parts, making adjustments, installing or removing blades, cleaning or when...
... of a workpiece are replaced. The wrench is also force-fitted into tool firsL Kerr The material removed by the blade in a through cut or the slot produced by the blade in the power cord or operate saw will prevent accidental starting, which could cause serious personal Injury. 1. Also included and attached to the power source when you are assembling parts, making adjustments, installing or removing blades, cleaning or when...
Operation Manual
Page 13
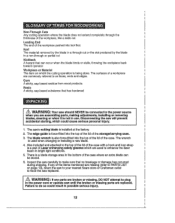
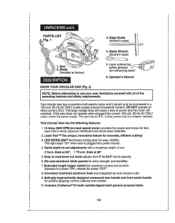
... a maximum depth of the operating features and safety requirements. Operator's Manual KNOW YOUR CIRCULAR SAW (Fig. 2) I NOTE: Before attempting to use your saw has a precision-built electric motor and it should only be connected to 54,5 ° bevel capacity. 6. Edge Guide I_1 (stored in case) 1. Blade (Installed at 45 ° 5. I _J This light stays "On" when saw has an 8-ft, 2-wire power cord (no -load speed) motor provides the power and torque for fast, sure cuts in wood...
... a maximum depth of the operating features and safety requirements. Operator's Manual KNOW YOUR CIRCULAR SAW (Fig. 2) I NOTE: Before attempting to use your saw has a precision-built electric motor and it should only be connected to 54,5 ° bevel capacity. 6. Edge Guide I_1 (stored in case) 1. Blade (Installed at 45 ° 5. I _J This light stays "On" when saw has an 8-ft, 2-wire power cord (no -load speed) motor provides the power and torque for fast, sure cuts in wood...
Operation Manual
Page 14
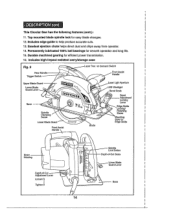
... Bevel Scale Bevel Adjustment Locking Lever s Guide Screw Front Assist Handle ' Blade Slots for easy blade changes, 12. This Circular Saw has the following features (cont.): 11, Top mounted blade spindle lock for EdgeGuide Motor Housing Depth-of-Cut Adjustment Lever Loosenl Tighten+ 14 Spindle Lock Button _th-of-CutScale Guard Lever Base Permanently lubricated 100% ball bearings for smooth operation and long life. 15_ Durable machined gearing for efficient power transmission. 16. Includes edge guide to help produce accurate cuts. 13oSawdust ejection chute helps direct dust...
... Bevel Scale Bevel Adjustment Locking Lever s Guide Screw Front Assist Handle ' Blade Slots for easy blade changes, 12. This Circular Saw has the following features (cont.): 11, Top mounted blade spindle lock for EdgeGuide Motor Housing Depth-of-Cut Adjustment Lever Loosenl Tighten+ 14 Spindle Lock Button _th-of-CutScale Guard Lever Base Permanently lubricated 100% ball bearings for smooth operation and long life. 15_ Durable machined gearing for efficient power transmission. 16. Includes edge guide to help produce accurate cuts. 13oSawdust ejection chute helps direct dust...
Operation Manual
Page 15
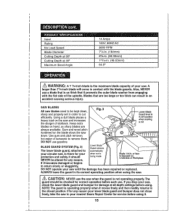
... __ No Load Speed Blade Diameter Cutting Depth at 90 ° Cutting Depth at all depth settings before using. NOTE: The guard is there for any reason your saw and increases the danger of your lower blade guard and bumper does not close freely, take the saw , check the lower blade guard and bumper for service before using it moves freely and then readily returns to your circular saw, is operating properly...
... __ No Load Speed Blade Diameter Cutting Depth at 90 ° Cutting Depth at all depth settings before using. NOTE: The guard is there for any reason your saw and increases the danger of your lower blade guard and bumper does not close freely, take the saw , check the lower blade guard and bumper for service before using it moves freely and then readily returns to your circular saw, is operating properly...

Operation Manual
Page 17
... workpiece for knots or nails before cutting. DO NOT cut warped or wet lumber (see Fig, 5a) Supports MUST be sure that the blade depth and adjusting locking levers are not engaged into a knot or nail, 4. BE SURE that the saw into the material, If the saw blade is restarted. 7, DO NOT use a dull or damaged blade Unsharpened, improperly set, or gummed-up blades produce narrow kerr...
... workpiece for knots or nails before cutting. DO NOT cut warped or wet lumber (see Fig, 5a) Supports MUST be sure that the blade depth and adjusting locking levers are not engaged into a knot or nail, 4. BE SURE that the saw into the material, If the saw blade is restarted. 7, DO NOT use a dull or damaged blade Unsharpened, improperly set, or gummed-up blades produce narrow kerr...

Operation Manual
Page 21
... biade guard DOES NOT cover the blade on the underside of the workpiece (see Fig. 3, page 15). Any part of the blade to get an accurate cut , release the trigger switch and allow the blade to come to clamp and support workpiece and loss o_f coWntrAoRl NofINsaGw: couAlLdWrAesYuSltcilnamsepriaonuds sinujpuproy.rt workpiece securely° ALWAYS 1_ ALWAYS use steady, even pressure° Forcing the saw...
... biade guard DOES NOT cover the blade on the underside of the workpiece (see Fig. 3, page 15). Any part of the blade to get an accurate cut , release the trigger switch and allow the blade to come to clamp and support workpiece and loss o_f coWntrAoRl NofINsaGw: couAlLdWrAesYuSltcilnamsepriaonuds sinujpuproy.rt workpiece securely° ALWAYS 1_ ALWAYS use steady, even pressure° Forcing the saw...

Operation Manual
Page 25
... the front of the saw . After the blade has stopped, remove it from the workpiece. MAKING POCKET CUTS (Fig. 16) WARNING: WARNING: ALWAYS adjust bevel setting to zero before making I 1o Adjust the bevel setting to zero, set the blade to the correct blade depth setting, then use a hand finishing saw base flat against the workpiece. Attempting a pocket cut through, use the lower blade guard lever to avoid 1 2. While holding the lower blade guard up , _seriouWs AinRjuNryIN...
... the front of the saw . After the blade has stopped, remove it from the workpiece. MAKING POCKET CUTS (Fig. 16) WARNING: WARNING: ALWAYS adjust bevel setting to zero before making I 1o Adjust the bevel setting to zero, set the blade to the correct blade depth setting, then use a hand finishing saw base flat against the workpiece. Attempting a pocket cut through, use the lower blade guard lever to avoid 1 2. While holding the lower blade guard up , _seriouWs AinRjuNryIN...

Operation Manual
Page 29
... lower blade guard using the blade guard lever and hold down spindle lock button as shown in the raised position for the life of high-grade lubricant for the next steps. 7o Completely remove the spindle clamping screw 'W' and the outer "D" washer and the blade (see Fig. 18a)o 8. Then use blade wrench to engage I 1t. CHANGING THE BLADE cont. (Figs. 18 and 18a) 6. Place the new saw as you replace the spindle screw and hand tighten...
... lower blade guard using the blade guard lever and hold down spindle lock button as shown in the raised position for the life of high-grade lubricant for the next steps. 7o Completely remove the spindle clamping screw 'W' and the outer "D" washer and the blade (see Fig. 18a)o 8. Then use blade wrench to engage I 1t. CHANGING THE BLADE cont. (Figs. 18 and 18a) 6. Place the new saw as you replace the spindle screw and hand tighten...

Operation Manual
Page 34
Guard 1 Wrench Laser Button Terminal 3 Thread FormingScrew GB6560-86M5_20 1 Plain Washer GB97.1-85 5 1 Plain Washer GB97.t-85 3 2 Spring Washer GB93-87 3 2 HexagonSocket Screw GB70-85 M,3_!2' 2 Plain Washer GB97,1-85 4 2 Tapping Screw GB6560-86 M5X16 1 Nut M6X2P 1 Receptacle 3 Screw GB818-85 M3.58 4 Hexagon Socket Screw 1 GB79÷85 M5x10_45H Torsion Spring 1 Carbon 2 Belt 1 Rip Fence 1 Support Set 1 Depth Bracket Set 1 Gear Set 1 Rotor Set SEE BACK PAGE FOR PARTS ORDERING INSTRUCTIONS 34 L ..... Power Cord & Plug 1 Cord Anchorage 1 Tapping...
Guard 1 Wrench Laser Button Terminal 3 Thread FormingScrew GB6560-86M5_20 1 Plain Washer GB97.1-85 5 1 Plain Washer GB97.t-85 3 2 Spring Washer GB93-87 3 2 HexagonSocket Screw GB70-85 M,3_!2' 2 Plain Washer GB97,1-85 4 2 Tapping Screw GB6560-86 M5X16 1 Nut M6X2P 1 Receptacle 3 Screw GB818-85 M3.58 4 Hexagon Socket Screw 1 GB79÷85 M5x10_45H Torsion Spring 1 Carbon 2 Belt 1 Rip Fence 1 Support Set 1 Depth Bracket Set 1 Gear Set 1 Rotor Set SEE BACK PAGE FOR PARTS ORDERING INSTRUCTIONS 34 L ..... Power Cord & Plug 1 Cord Anchorage 1 Tapping...


