Operation Manual
Page 17
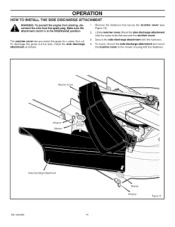
... the fasteners that secured the mulcher cover. 3. Mulcher Cover Wingnut Washer Side Discharge Attachment MS-3620MA 17 Washer Wingnut Figure 15 Lift the mulcher cover. Secure the side discharge attachment with the fasteners. To mulch, remove the side discharge attachment and mount the mulcher cover to the mower housing with the fasteners. 4. To discharge...
... the fasteners that secured the mulcher cover. 3. Mulcher Cover Wingnut Washer Side Discharge Attachment MS-3620MA 17 Washer Wingnut Figure 15 Lift the mulcher cover. Secure the side discharge attachment with the fasteners. To mulch, remove the side discharge attachment and mount the mulcher cover to the mower housing with the fasteners. 4. To discharge...
Operation Manual
Page 20
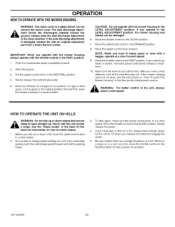
... "How To Level The Mower Housing" in the LEVEL ADJUSTMENT position, the mower housing and blades can be damaged. 6. If the side discharge attachment is in a turn on a slope or in a slow speed. Move the lift lever to a slow speed. 2. If you ride up ...information on a hill. If you release the brake and engage the clutch. 5. MS-3620MA 20 Do not remove the mulch cover. The side discharge attach- _b mgreonutndf.orAclewsaysthekeedpiscthheargseidde dmisacthearriagle taotwtaacrhdmetnhte in the NEUTRAL position. 4. Put the speed control lever in the down a hill, ...
... "How To Level The Mower Housing" in the LEVEL ADJUSTMENT position, the mower housing and blades can be damaged. 6. If the side discharge attachment is in a turn on a slope or in a slow speed. Move the lift lever to a slow speed. 2. If you ride up ...information on a hill. If you release the brake and engage the clutch. 5. MS-3620MA 20 Do not remove the mulch cover. The side discharge attach- _b mgreonutndf.orAclewsaysthekeedpiscthheargseidde dmisacthearriagle taotwtaacrhdmetnhte in the NEUTRAL position. 4. Put the speed control lever in the down a hill, ...
Operation Manual
Page 21
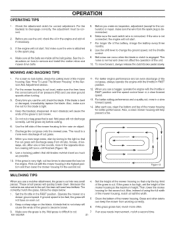
Before you use the unit, check the oil in a slow forward speed. 13. Make sure all the belts are returned to cut grass, always operate the engine with the throttle in a slow forward speed. 14. See the instructions ... disengage rect. Operate the mower at half the width. MS-3620MA 7. 21 Set the height of air pressure (PSI) and use a mulcher attachment, the grass is a more often. Too correctly mulch the grass, follow the steps below. 1. Before you mow large areas, start , first make sure the nut for the second cut...
Before you use the unit, check the oil in a slow forward speed. 13. Make sure all the belts are returned to cut grass, always operate the engine with the throttle in a slow forward speed. 14. See the instructions ... disengage rect. Operate the mower at half the width. MS-3620MA 7. 21 Set the height of air pressure (PSI) and use a mulcher attachment, the grass is a more often. Too correctly mulch the grass, follow the steps below. 1. Before you mow large areas, start , first make sure the nut for the second cut...
Operation Manual
Page 64
..., 26 Check, 18, 26 Type, 18 Operation Attachments, 11 Automatic Drive Disconnect, Blade Rotation Control, 13 Clutch / Brake Pedal, 10 Ignition Key Switch, 11 Ignition Switch, 10 Lift Lever, 10, 13 Location Of Controls, 10 Mower Housing, 20 Mowing And Bagging, 21 Mulching, 21 Operate On Hills, 20 Parking Brake, 10...Drive, 32 Blade, 23 Clutch, 33 Filter, Air, 27 Fuse, 35 Install, Wheels, 34 Lubrication, 25 Mower Housing Clean, 35 Install, 30 Level, 28 Remove, 30 Muffler, 26 Spark Plug, 27 Maintenance Chart, 22 Motion Drive Belt Adjust, 33 Replace, 31 Mower Drive Belt Adjust, 29 Replace, 32 Mower...
..., 26 Check, 18, 26 Type, 18 Operation Attachments, 11 Automatic Drive Disconnect, Blade Rotation Control, 13 Clutch / Brake Pedal, 10 Ignition Key Switch, 11 Ignition Switch, 10 Lift Lever, 10, 13 Location Of Controls, 10 Mower Housing, 20 Mowing And Bagging, 21 Mulching, 21 Operate On Hills, 20 Parking Brake, 10...Drive, 32 Blade, 23 Clutch, 33 Filter, Air, 27 Fuse, 35 Install, Wheels, 34 Lubrication, 25 Mower Housing Clean, 35 Install, 30 Level, 28 Remove, 30 Muffler, 26 Spark Plug, 27 Maintenance Chart, 22 Motion Drive Belt Adjust, 33 Replace, 31 Mower Drive Belt Adjust, 29 Replace, 32 Mower...
Owners Manual
Page 2
... used for commercial or rental purposes. i. _!, .. !2 :::: SERVICE AND ADJUSTMENT 26 HOW ToUsE THE ATTACHMENT CLUTCH 26 :: HOWTO USE THE SHiFTLEVER i::::_ .i::: '.:::iii!: i_ : 12 ........ H! LIMITED 90 DAY...13 HOW TO INSTALL THE MOWER HOUSING 27 HOW TO CHANGE THECUTTING HEIGHT 13 HOW TO LEVEL THE MOWER HOUSING 28 HOW TO STOP THE UNIT. :i 13...WHEEL ALIGNMENT 31 15 STORAGE (OVER 30 DAYS 32 16 TROUBLE SHOOTING CHART 33 OPERATING TIPS 17 SLOPE GUIDE 34 MOWING AND BAGGING TIPS 17 INDEX 35 MULCHING TIPS ;:,: ._, ::::17 :REPAIR:...
... used for commercial or rental purposes. i. _!, .. !2 :::: SERVICE AND ADJUSTMENT 26 HOW ToUsE THE ATTACHMENT CLUTCH 26 :: HOWTO USE THE SHiFTLEVER i::::_ .i::: '.:::iii!: i_ : 12 ........ H! LIMITED 90 DAY...13 HOW TO INSTALL THE MOWER HOUSING 27 HOW TO CHANGE THECUTTING HEIGHT 13 HOW TO LEVEL THE MOWER HOUSING 28 HOW TO STOP THE UNIT. :i 13...WHEEL ALIGNMENT 31 15 STORAGE (OVER 30 DAYS 32 16 TROUBLE SHOOTING CHART 33 OPERATING TIPS 17 SLOPE GUIDE 34 MOWING AND BAGGING TIPS 17 INDEX 35 MULCHING TIPS ;:,: ._, ::::17 :REPAIR:...
Owners Manual
Page 6
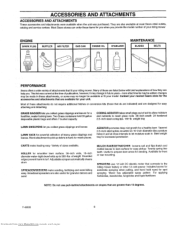
...36-inch swath 24 hardened 2.5-inch steel coringtips. 150-|b we ght tray ...... This list was purchased. ACCESSORIES AND ATTACHMENTS i ACCESSORIES AND ATTACHMENTS These accessories and attachments were available when the unit was current at the time of how they can order these are greater than 10 degrees..., F-99636 6 Downloaded from www.Manualslib.com manuals search engine They are also useful for granular deicers and sand MULCH...
...36-inch swath 24 hardened 2.5-inch steel coringtips. 150-|b we ght tray ...... This list was purchased. ACCESSORIES AND ATTACHMENTS i ACCESSORIES AND ATTACHMENTS These accessories and attachments were available when the unit was current at the time of how they can order these are greater than 10 degrees..., F-99636 6 Downloaded from www.Manualslib.com manuals search engine They are also useful for granular deicers and sand MULCH...
Owners Manual
Page 12
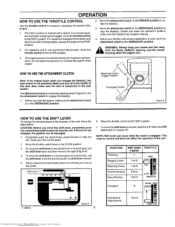
...a road, move the shift lever to ro- Shift Lever 6 Move the throttle control to the FAST position 7 To move the attachment clutch to the DISENGAGE position. _ WfroAmRNtIhNeG:blaAdlwe,aydseflkeecetporyoouprenhinagn,dsanadndthfeeetmaowwaeyr housing when the engine runs. >f HOW TO USE THE A'I -rLE ... performance Do not adjust the governor to increase the speed of the engine 2 Move the attachment clutch to the ENGAGE position to reverse,stop the unit. FUNCTION Trimming Bagging Grass Mulching Grass Normal Mowing Easy Mowing SHIFTLEVER THROTTLE 5 Speeds 1 FAST 1 or2 1 or2 2or3 ...
...a road, move the shift lever to ro- Shift Lever 6 Move the throttle control to the FAST position 7 To move the attachment clutch to the DISENGAGE position. _ WfroAmRNtIhNeG:blaAdlwe,aydseflkeecetporyoouprenhinagn,dsanadndthfeeetmaowwaeyr housing when the engine runs. >f HOW TO USE THE A'I -rLE ... performance Do not adjust the governor to increase the speed of the engine 2 Move the attachment clutch to the ENGAGE position to reverse,stop the unit. FUNCTION Trimming Bagging Grass Mulching Grass Normal Mowing Easy Mowing SHIFTLEVER THROTTLE 5 Speeds 1 FAST 1 or2 1 or2 2or3 ...
Owners Manual
Page 16
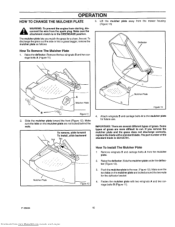
... A (Figure 11) \ \ Deflector \ Mutcher Plate Mufchef Plate Figure 13 2. If you mulch the grass for a clean, fine cut . Raise the deflector. OPERATION HOW TO CHANGE THE MULCHER PLATE 3. attachment clutch is 56212E701. Attach wingnuts B and carriage bolts A to the mulcher plate for the deflector ... Raise the deflector. To remove, slide forward \ To install, slide backward Nut 4. Slidethe mulcher plate under the deflector (Figure 13). 3. Make sure the tabs on the mulcher plate are lockedaround the two nuts for future use. IMPORTANT: There are several different...
... A (Figure 11) \ \ Deflector \ Mutcher Plate Mufchef Plate Figure 13 2. If you mulch the grass for a clean, fine cut . Raise the deflector. OPERATION HOW TO CHANGE THE MULCHER PLATE 3. attachment clutch is 56212E701. Attach wingnuts B and carriage bolts A to the mulcher plate for the deflector ... Raise the deflector. To remove, slide forward \ To install, slide backward Nut 4. Slidethe mulcher plate under the deflector (Figure 13). 3. Make sure the tabs on the mulcher plate are lockedaround the two nuts for future use. IMPORTANT: There are several different...
Owners Manual
Page 17
...sure the wire from shrubs, fences, driveways, etc. Use the left turns until finished (Figure 14). 9. After one of the slower speeds. 13. Because the nutrients are inside all the belts are returned to remove and install the motion drive and mower drive belts. 5. Set the throttle ... is a more often. 3. Make sure the grass is bent or damaged, immediately replace the blade. Check the attachment clutch for better performance. For longer life of the mower housing, mulch at a slower ground speed. See "How To Level The Mower Housing" in the opposite dkection making left side...
...sure the wire from shrubs, fences, driveways, etc. Use the left turns until finished (Figure 14). 9. After one of the slower speeds. 13. Because the nutrients are inside all the belts are returned to remove and install the motion drive and mower drive belts. 5. Set the throttle ... is a more often. 3. Make sure the grass is bent or damaged, immediately replace the blade. Check the attachment clutch for better performance. For longer life of the mower housing, mulch at a slower ground speed. See "How To Level The Mower Housing" in the opposite dkection making left side...
Owners Manual
Page 35
... Engine, 24 Mower, 23 M Maintenance Chart, 18 Motion Drive Belt Adjust, 21 Replace. 29 Mower Drive Belt Adjust, 20 Replace, 30 Mower Housing Clean, 31 Cutting Height, 13, 31 Install, 27 Level Adjustment, 28 Operation, 14 Remove, 27 Muffler, 24 Spark Arrester, 24 Mulcher Install, 16 Operation, 17 ...manuals search engine Type, 15 Operation Attachment Clutch, 11, 12 Clutch / Brake Pedal, 11 Emergency Start, 15 Ignition Switch, 11 Lift Lever, 11, 13 Location Of Controls, 11 Mower Housing, 14 Mowing And Bagging, 17 Mulching, 17 Operate On Hills, 14 Parking Brake, 11, 13 Shift Lever, tl, 12 Start...
... Engine, 24 Mower, 23 M Maintenance Chart, 18 Motion Drive Belt Adjust, 21 Replace. 29 Mower Drive Belt Adjust, 20 Replace, 30 Mower Housing Clean, 31 Cutting Height, 13, 31 Install, 27 Level Adjustment, 28 Operation, 14 Remove, 27 Muffler, 24 Spark Arrester, 24 Mulcher Install, 16 Operation, 17 ...manuals search engine Type, 15 Operation Attachment Clutch, 11, 12 Clutch / Brake Pedal, 11 Emergency Start, 15 Ignition Switch, 11 Lift Lever, 11, 13 Location Of Controls, 11 Mower Housing, 14 Mowing And Bagging, 17 Mulching, 17 Operate On Hills, 14 Parking Brake, 11, 13 Shift Lever, tl, 12 Start...


