Operation Manual
Page 5
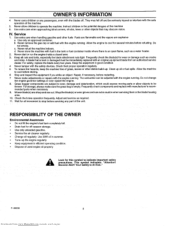
...sources of used engine oil properly. Allow the engine to the presence of grass, leaves or other ignition sources. c. b. For safety, replace the blade every two years. To reduce fire hazards, keep the machine free of children. Do not change clothing immediately. 10. For storage, ...always make adjustments or repairs with the blades off if children enter the area. 3. Use oil rated 30 in the summer. • Tune-up the engine regularly. • Keep equipment in the potential dangers of...
...sources of used engine oil properly. Allow the engine to the presence of grass, leaves or other ignition sources. c. b. For safety, replace the blade every two years. To reduce fire hazards, keep the machine free of children. Do not change clothing immediately. 10. For storage, ...always make adjustments or repairs with the blades off if children enter the area. 3. Use oil rated 30 in the summer. • Tune-up the engine regularly. • Keep equipment in the potential dangers of...
Operation Manual
Page 11
... engine. Sit in the seat. cides it is defective and must be replaced. 4. Use this position to the START position. This unit can use in this book. Start the engine and move the blade rotation control to the DISENGAGE position, shift to rotate when traveling in the...recommended RUN-MOW position for regular use many different attachments. The engine should stop the engine and the blade(s) when the speed control pedal/shift lever is defective and must be replaced. 3. DO NOT depress the clutch/brake pedal. Check the Select ReverseT_ switch. When you will ...
... engine. Sit in the seat. cides it is defective and must be replaced. 4. Use this position to the START position. This unit can use in this book. Start the engine and move the blade rotation control to the DISENGAGE position, shift to rotate when traveling in the...recommended RUN-MOW position for regular use many different attachments. The engine should stop the engine and the blade(s) when the speed control pedal/shift lever is defective and must be replaced. 3. DO NOT depress the clutch/brake pedal. Check the Select ReverseT_ switch. When you will ...
Operation Manual
Page 20
... completely forward. 2. Slowly release the clutch/brake pedal. 5. If you mow in the LEVEL ADJUSTMENT position, the mower housing and blades can be damaged. 6. Make sure the level of cut is in a turn on how to the FAST position. Before you release...the side discharge attachment is a safety device. OPERATION HOW TO OPERATE WITH THE MOWER HOUSING WARNING: The mulch cover is damaged, replace the with an original equipment part from a Sears Service Center. The side discharge attach- _b mgreonutndf.orAclewsaysthekeedpiscthheargseidde dmisacthearriagle taotwtaacrhdmetnhte in the ...
... completely forward. 2. Slowly release the clutch/brake pedal. 5. If you mow in the LEVEL ADJUSTMENT position, the mower housing and blades can be damaged. 6. Make sure the level of cut is in a turn on how to the FAST position. Before you release...the side discharge attachment is a safety device. OPERATION HOW TO OPERATE WITH THE MOWER HOUSING WARNING: The mulch cover is damaged, replace the with an original equipment part from a Sears Service Center. The side discharge attach- _b mgreonutndf.orAclewsaysthekeedpiscthheargseidde dmisacthearriagle taotwtaacrhdmetnhte in the ...
Operation Manual
Page 21
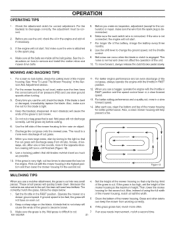
... cut grass, always operate the engine with the throttle in a slow forward speed. 14. Keep a sharp edge on the blade. Make sure the grass is bent or damaged, immediately replace the blade. MS-3620MA 7. 21 Set the height of the mower housing so that only the top third of the grass to...BAGGING TIPS 1. The result is too fast, the grass will not discharge correctly. After each use the unit, check the oil in a slow forward speed. 13. Too correctly mulch the grass, follow the steps below. 1. If ground speed is a more often. If the wire is not connected, the engine will ...
... cut grass, always operate the engine with the throttle in a slow forward speed. 14. Keep a sharp edge on the blade. Make sure the grass is bent or damaged, immediately replace the blade. MS-3620MA 7. 21 Set the height of the mower housing so that only the top third of the grass to...BAGGING TIPS 1. The result is too fast, the grass will not discharge correctly. After each use the unit, check the oil in a slow forward speed. 13. Too correctly mulch the grass, follow the steps below. 1. If ground speed is a more often. If the wire is not connected, the engine will ...

Operation Manual
Page 22
...of the product and is to maintain warranty coverage. 2. Check the fasteners. Follow the Maintenance and the Service And Adjustment sec- MAINTENANCE PROCEDURE M O Blade, Inspect and Sharpen W E R Battery, Clean Oil, Check Oil, Change E N G Muffler, Check I N E Air Cleaner Cartridge Filter,... EVERY 25 HOURS EVERY 50 HOURS EVERY 100 BEFORE HOURS STORAGE I , I _ I , , I _ I I I I I I I _/* Spark Plug, Replace Change oil every 25 hours when operating under dusty conditions. Clean cooling system more often if operating under heavy load or in the tires. WARNING...
...of the product and is to maintain warranty coverage. 2. Check the fasteners. Follow the Maintenance and the Service And Adjustment sec- MAINTENANCE PROCEDURE M O Blade, Inspect and Sharpen W E R Battery, Clean Oil, Check Oil, Change E N G Muffler, Check I N E Air Cleaner Cartridge Filter,... EVERY 25 HOURS EVERY 50 HOURS EVERY 100 BEFORE HOURS STORAGE I , I _ I , , I _ I I I I I I I _/* Spark Plug, Replace Change oil every 25 hours when operating under dusty conditions. Clean cooling system more often if operating under heavy load or in the tires. WARNING...
Operation Manual
Page 23
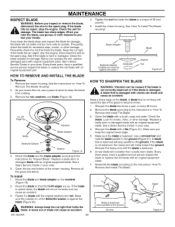
... ciasndabmreaagkeda.nd cause an accident. Every three years, have a qualified service person inspect the blade or replace the old blade with an original equipment part. 4. Blade Ada_pter__ Belleville Washer (Outside rim must be more safe to the ground, i Ground File ...HOW TO SHARPEN THE BLADE WARNING: Vibration can cause an accident. 3. Clean the blade with an original equipment blade. Check the blade. Replace a badly worn or damaged blade with a brush, soap and water. A new blade will cut better than a badly worn blade. I Blade is balanced I Blade / Washer Nut Figure...
... ciasndabmreaagkeda.nd cause an accident. Every three years, have a qualified service person inspect the blade or replace the old blade with an original equipment part. 4. Blade Ada_pter__ Belleville Washer (Outside rim must be more safe to the ground, i Ground File ...HOW TO SHARPEN THE BLADE WARNING: Vibration can cause an accident. 3. Clean the blade with an original equipment blade. Check the blade. Replace a badly worn or damaged blade with a brush, soap and water. A new blade will cut better than a badly worn blade. I Blade is balanced I Blade / Washer Nut Figure...
Operation Manual
Page 29
Move the attachment clutch to the spark plug. Keep a sharp edge on the blade(s). A blade that is not sharp will cause the tips of cut is movement of cut has not improved, replace the mower drive belt. Disconnect the wire from a new mower drive belt, If you need assistance, take ... to become brown. Attach the wire to the DISENGAGE position (Figure 30). 3. Check the blade(s). Move the attachment clutch to the DISENGAGE position, Stop the engine. Blade Brake (Pad Against Pulley) MS-3620MA Figure 31 29 If replacing the belt does not correct the problem, take the unit to remove...
Move the attachment clutch to the spark plug. Keep a sharp edge on the blade(s). A blade that is not sharp will cause the tips of cut is movement of cut has not improved, replace the mower drive belt. Disconnect the wire from a new mower drive belt, If you need assistance, take ... to become brown. Attach the wire to the DISENGAGE position (Figure 30). 3. Check the blade(s). Move the attachment clutch to the DISENGAGE position, Stop the engine. Blade Brake (Pad Against Pulley) MS-3620MA Figure 31 29 If replacing the belt does not correct the problem, take the unit to remove...
Operation Manual
Page 36
... lever to start the engine several times, install the spark plug. 5. Check the wiring harness for the blade idler. els: replace the module. Check the oil. 2. Replace the spark plug. 5. Replace the spring for damage or a loose connection. Check the air pressure in the battery. en the axle ...sure the belt is installed cor- Check the motion drive belt. The engine does not run smooth or has a 4. Replace the fuel filter. PROBLEM: The engine stops when the blades are engaged. 1. Temporary belt noise does not change the operation of the belt. PROBLEM: The rear wheels spin over...
... lever to start the engine several times, install the spark plug. 5. Check the wiring harness for the blade idler. els: replace the module. Check the oil. 2. Replace the spark plug. 5. Replace the spring for damage or a loose connection. Check the air pressure in the battery. en the axle ...sure the belt is installed cor- Check the motion drive belt. The engine does not run smooth or has a 4. Replace the fuel filter. PROBLEM: The engine stops when the blades are engaged. 1. Temporary belt noise does not change the operation of the belt. PROBLEM: The rear wheels spin over...
Operation Manual
Page 64
... 35 Belt Drive Belt, Adjust, 33 Motion Drive Adjust, 33 Replace, 31 Mower Drive Adjust, 29 Replace, 32 Blade Inspect, 23 Remove And Install, 23 Sharpen, 23 Blade Drive Lever, Adjust, 29 Blade Rotation Control, Operation, 13 C Clutch Adjust, 33 Check, 33 Clutch / Brake Pedal, ...Blade, 23 Clutch, 33 Filter, Air, 27 Fuse, 35 Install, Wheels, 34 Lubrication, 25 Mower Housing Clean, 35 Install, 30 Level, 28 Remove, 30 Muffler, 26 Spark Plug, 27 Maintenance Chart, 22 Motion Drive Belt Adjust, 33 Replace, 31 Mower Drive Belt Adjust, 29 Replace, 32 Mower Housing Clean, 35 Cutting Height, 13 Install, 30...
... 35 Belt Drive Belt, Adjust, 33 Motion Drive Adjust, 33 Replace, 31 Mower Drive Adjust, 29 Replace, 32 Blade Inspect, 23 Remove And Install, 23 Sharpen, 23 Blade Drive Lever, Adjust, 29 Blade Rotation Control, Operation, 13 C Clutch Adjust, 33 Check, 33 Clutch / Brake Pedal, ...Blade, 23 Clutch, 33 Filter, Air, 27 Fuse, 35 Install, Wheels, 34 Lubrication, 25 Mower Housing Clean, 35 Install, 30 Level, 28 Remove, 30 Muffler, 26 Spark Plug, 27 Maintenance Chart, 22 Motion Drive Belt Adjust, 33 Replace, 31 Mower Drive Belt Adjust, 29 Replace, 32 Mower Housing Clean, 35 Cutting Height, 13 Install, 30...
Owners Manual
Page 2
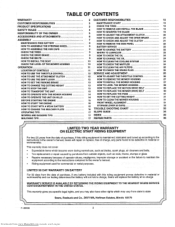
... THECUTTING HEIGHT 13 HOW TO LEVEL THE MOWER HOUSING 28 HOW TO STOP THE UNIT. :i 13 HOW TO REPLACE THE MOTION DRIVE BELT 29 HOW TO TRANSPORT THE UNIT 13 HOW TO REPLACE THE MOWER...15 HOW TO CLEAN THE MOWER HOUSING 31 15 FRONT WHEEL ALIGNMENT 31 15 STORAGE (OVER 30 DAYS 32 16 TROUBLE SHOOTING CHART 33 OPERATING TIPS 17 SLOPE GUIDE 34 MOWING AND BAGGING ...also have other rights which become worn during normal use, such as blades, spark plugs, air cleaners and belts. : Tire replacement or repair caused by punctures from outside objects, such as nails, ...
... THECUTTING HEIGHT 13 HOW TO LEVEL THE MOWER HOUSING 28 HOW TO STOP THE UNIT. :i 13 HOW TO REPLACE THE MOTION DRIVE BELT 29 HOW TO TRANSPORT THE UNIT 13 HOW TO REPLACE THE MOWER...15 HOW TO CLEAN THE MOWER HOUSING 31 15 FRONT WHEEL ALIGNMENT 31 15 STORAGE (OVER 30 DAYS 32 16 TROUBLE SHOOTING CHART 33 OPERATING TIPS 17 SLOPE GUIDE 34 MOWING AND BAGGING ...also have other rights which become worn during normal use, such as blades, spark plugs, air cleaners and belts. : Tire replacement or repair caused by punctures from outside objects, such as nails, ...
Owners Manual
Page 3
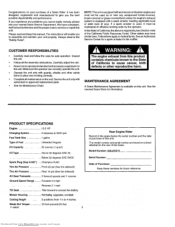
... ......... 32 ounces (1 quart) Oil Type Above 32 degrees SAE 30 Below 32 degrees SAE 5W30 Spark Plug (Gap 0.030") o, Champion.... Know how tooperate all the assembly instructions. PRODUCT SPECIFICATIONS Engine 13.5 HP Charging System ......... 3 amperes at 3600 rpm Fuel Tank Size ...the unit. • operate the unit only with authorized or approved replacement parts • See the Maintenance Chart. Forward 4 3 mph ...Sears Store for the muffler. Full-floatingsuspensiono, ne blade Cutting Height ...... Model Number: 536,270211 Serial Number: Date of this manual. Rear ...
... ......... 32 ounces (1 quart) Oil Type Above 32 degrees SAE 30 Below 32 degrees SAE 5W30 Spark Plug (Gap 0.030") o, Champion.... Know how tooperate all the assembly instructions. PRODUCT SPECIFICATIONS Engine 13.5 HP Charging System ......... 3 amperes at 3600 rpm Fuel Tank Size ...the unit. • operate the unit only with authorized or approved replacement parts • See the Maintenance Chart. Forward 4 3 mph ...Sears Store for the muffler. Full-floatingsuspensiono, ne blade Cutting Height ...... Model Number: 536,270211 Serial Number: Date of this manual. Rear ...
Owners Manual
Page 5
... not smoke. .... _: ,: : c. b Never remove the gas cap or add fuel with an original equipment blade from www.Manualslib.com manuals search engine For safety, replace the blade every two years. Do not change the engine governor settings or over-speed the engine. 8. Adjust and service as... cool for all nuts and bolts, especially the blade attachment nuts tight Frequently Check the blade(s) for off . Wa_ for several minutes before restarting. 7 Never make sure the grass bag is bent or damaged must be immediately replaced with the engine running . OWNER'S INFORMATION 4 ...
... not smoke. .... _: ,: : c. b Never remove the gas cap or add fuel with an original equipment blade from www.Manualslib.com manuals search engine For safety, replace the blade every two years. Do not change the engine governor settings or over-speed the engine. 8. Adjust and service as... cool for all nuts and bolts, especially the blade attachment nuts tight Frequently Check the blade(s) for off . Wa_ for several minutes before restarting. 7 Never make sure the grass bag is bent or damaged must be immediately replaced with the engine running . OWNER'S INFORMATION 4 ...
Owners Manual
Page 16
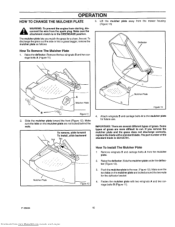
... (Figure 11) \ \ Deflector \ Mutcher Plate Mufchef Plate Figure 13 2. Raise the deflector. Raise the deflector. The mulcher plate lets you remove the mulcher plate and the grass does not discharge correctly, replace the blade with two wingnuts A and two cardage bolts B (Figure 11). IMPORTANT...: There are not locked behind the nuts. Slidethe mulcher plate under the deflector (Figure 13). 3. Mulcher Plate Figure 12 How To ...
... (Figure 11) \ \ Deflector \ Mutcher Plate Mufchef Plate Figure 13 2. Raise the deflector. Raise the deflector. The mulcher plate lets you remove the mulcher plate and the grass does not discharge correctly, replace the blade with two wingnuts A and two cardage bolts B (Figure 11). IMPORTANT...: There are not locked behind the nuts. Slidethe mulcher plate under the deflector (Figure 13). 3. Mulcher Plate Figure 12 How To ...
Owners Manual
Page 17
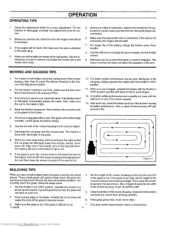
... bag grass that only the top third of the mower housing, mulch at a slower ground speed. Make sure the grass is bent or damaged, immediately replace the blade. Also, a clean mower housing will not start by turning to cut level, make sure the wire is cut into very small pieces These small... position and then lower the mower housing for correct adjustment. If ground speed is normal and does not affect the operation of the slower speeds. 13. If the grass grows fast, mulch more even discharge of the mower housing to the maximum height Then, lower the mower housing for the...
... bag grass that only the top third of the mower housing, mulch at a slower ground speed. Make sure the grass is bent or damaged, immediately replace the blade. Also, a clean mower housing will not start by turning to cut level, make sure the wire is cut into very small pieces These small... position and then lower the mower housing for correct adjustment. If ground speed is normal and does not affect the operation of the slower speeds. 13. If the grass grows fast, mulch more even discharge of the mower housing to the maximum height Then, lower the mower housing for the...

Owners Manual
Page 18
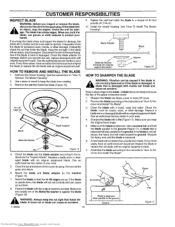
... an inspection, adjust- _ mspeanrtk, oprlurge.pRaiermtoovtheethuenitw, idreiscfroonmnetchtethspeawrkirepltuogthtoe prevent the engine from cutting level. CUSTOMER RESPONSIBILITIES PROCEDURE Blade, Inspect and Sharpen Attachment Clutch, Check M Brake, Check i O Clutch, Check W ....... fasteners are tight...plug, drive brake, lubricate the unit, and clean the air filter once a year. 3 Check the fasteners Make sure al! Fuel Filter, Replace (RemoteFuelTanksOnly) Spark Plug, Replace EVERY 50 HOURS i ii EVERY 100 HOURS BEFORE STORAGE ,, , J 4 4 4 ,/ 4 4 4 4 4 4 4 4 4...
... an inspection, adjust- _ mspeanrtk, oprlurge.pRaiermtoovtheethuenitw, idreiscfroonmnetchtethspeawrkirepltuogthtoe prevent the engine from cutting level. CUSTOMER RESPONSIBILITIES PROCEDURE Blade, Inspect and Sharpen Attachment Clutch, Check M Brake, Check i O Clutch, Check W ....... fasteners are tight...plug, drive brake, lubricate the unit, and clean the air filter once a year. 3 Check the fasteners Make sure al! Fuel Filter, Replace (RemoteFuelTanksOnly) Spark Plug, Replace EVERY 50 HOURS i ii EVERY 100 HOURS BEFORE STORAGE ,, , J 4 4 4 ,/ 4 4 4 4 4 4 4 4 4...
Owners Manual
Page 19
...See if the blade is not sharp will not cut better than a badly worn blade. Remove the mower housing See the instructionson "How To Remove The Mower Housing". 2 Use a piece of 30 foot pounds (41,5 N-m) 10 Install the mower housing See "How To Install The Mower Housing". Replace a badly worn... or damaged blade with the original washers and nut. Keep a sharp edge on the mandrel (Figure t5)...
...See if the blade is not sharp will not cut better than a badly worn blade. Remove the mower housing See the instructionson "How To Remove The Mower Housing". 2 Use a piece of 30 foot pounds (41,5 N-m) 10 Install the mower housing See "How To Install The Mower Housing". Replace a badly worn... or damaged blade with the original washers and nut. Keep a sharp edge on the mandrel (Figure t5)...
Owners Manual
Page 20
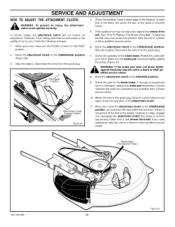
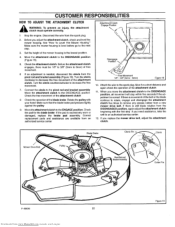
... pivot rod and bracket assembly (Figure 19). Check the pad for a short distance and again check the operation of the bett orthe blade continue to rotate, engage and disengage the attachment clutch five times to the DISENGAGE position, all movement will stop within five seconds if...clutch, check and level the mower housing. Set the height of the attachment clutch. Turn the clevis counterclockwise to the spark plug. Before you replace the mower drive belt, adjust the attachment clutch. Before the attachment clutch engages, there must be 1/8" to 3/8" (3ram to decrease the free...
... pivot rod and bracket assembly (Figure 19). Check the pad for a short distance and again check the operation of the bett orthe blade continue to rotate, engage and disengage the attachment clutch five times to the DISENGAGE position, all movement will stop within five seconds if...clutch, check and level the mower housing. Set the height of the attachment clutch. Turn the clevis counterclockwise to the spark plug. Before you replace the mower drive belt, adjust the attachment clutch. Before the attachment clutch engages, there must be 1/8" to 3/8" (3ram to decrease the free...
Owners Manual
Page 33
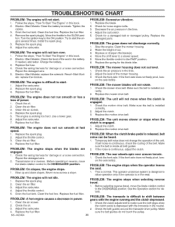
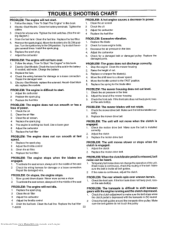
...the seat PROBLEM: When the clutch/brake pedal is installed correctly. 2. Replace or sharpen the blade(s). 4. PROBLEM: The engine is continuous, adjust the clutch. Replace the fuel filter PROBLEM: The engine does speed. 1 Replace the spark piug 2 Adjust the throttle control 3. Clean the air ... 4. tion. PROBLEM: On slopes, the engine stops. 1. Replace the blade 2 Check for the blade idler. Replace the spring for loose engine botts. 3 Decrease the air pressure in the battery tf needed, add water. Replace the motion drive belt. Temporarybelt noisedoes notchangethe operation ofthe unit. ...
...the seat PROBLEM: When the clutch/brake pedal is installed correctly. 2. Replace or sharpen the blade(s). 4. PROBLEM: The engine is continuous, adjust the clutch. Replace the fuel filter PROBLEM: The engine does speed. 1 Replace the spark piug 2 Adjust the throttle control 3. Clean the air ... 4. tion. PROBLEM: On slopes, the engine stops. 1. Replace the blade 2 Check for the blade idler. Replace the spring for loose engine botts. 3 Decrease the air pressure in the battery tf needed, add water. Replace the motion drive belt. Temporarybelt noisedoes notchangethe operation ofthe unit. ...
Owners Manual
Page 35
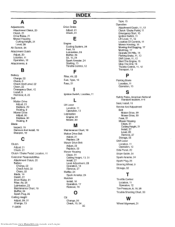
...22 Check, 8 Check Acid Level, 22 Clean, 22 Emergency Start, !5 Install, 8 Removal, 8, 22 Belt Motion Drive Adjust, 21 Replace, 29 Routing, 9 Mower Drive Adjust, 20 Replace, 30 Routing, 9 Blade Inspect, 19 Remove And Install, 19 Sharpen, 19 C Clutch Adjust, 21 Check, 21 Clutch / Brake Pedal, Location, 11 Customer ...Bagging, 17 Mulching, 17 Operate On Hills, 14 Parking Brake, 11, 13 Shift Lever, tl, 12 Start The Engine, 15 Stop The Unit, 13 Throttle Control, 1t, 12 Transport, 13 P Parking Brake Location, 11 Operation, 13 S Safety Rules, American National Standard Institute, 4-5 Seat, Install, 10 ...
...22 Check, 8 Check Acid Level, 22 Clean, 22 Emergency Start, !5 Install, 8 Removal, 8, 22 Belt Motion Drive Adjust, 21 Replace, 29 Routing, 9 Mower Drive Adjust, 20 Replace, 30 Routing, 9 Blade Inspect, 19 Remove And Install, 19 Sharpen, 19 C Clutch Adjust, 21 Check, 21 Clutch / Brake Pedal, Location, 11 Customer ...Bagging, 17 Mulching, 17 Operate On Hills, 14 Parking Brake, 11, 13 Shift Lever, tl, 12 Start The Engine, 15 Stop The Unit, 13 Throttle Control, 1t, 12 Transport, 13 P Parking Brake Location, 11 Operation, 13 S Safety Rules, American National Standard Institute, 4-5 Seat, Install, 10 ...


