

Operation Manual
Page 1
Operator's Manual ® 675 Series LOG SPLITTER Model No. 247.77641 CAUTION: Before using this product, read this manual and follow all safety rules and operating instructions. • SAFETY • ASSEMBLY • OPERATION • MAINTENANCE • PARTS LIST • Español Sears, Roebuck and Co., Hoffman Estates, IL 60179, U.S.A. Visit our web site: www.sears.com/craftsman FORM NO. 769-05240 6/16/2009
Operator's Manual ® 675 Series LOG SPLITTER Model No. 247.77641 CAUTION: Before using this product, read this manual and follow all safety rules and operating instructions. • SAFETY • ASSEMBLY • OPERATION • MAINTENANCE • PARTS LIST • Español Sears, Roebuck and Co., Hoffman Estates, IL 60179, U.S.A. Visit our web site: www.sears.com/craftsman FORM NO. 769-05240 6/16/2009
Operation Manual
Page 2
... Page 2 Safe Operation Practices Pages 3-5 Safety Labels Page 6 Assembly Pages 7-9 Operation Pages 10-13 Service & Adjustments Pages 14 Maintenance Pages 15-17 Off Season Storage Page 18 Troubleshooting Page 20-21 Parts List Page 22-30 Repair Protection Agreement Page 31 Español Page 32 Service Numbers Back Cover WARRANTY STATEMENT CRAFTSMAN FULL WARRANTY When operated and maintained according to all supplied instructions, if this Craftsman log splitter fails due...
... Page 2 Safe Operation Practices Pages 3-5 Safety Labels Page 6 Assembly Pages 7-9 Operation Pages 10-13 Service & Adjustments Pages 14 Maintenance Pages 15-17 Off Season Storage Page 18 Troubleshooting Page 20-21 Parts List Page 22-30 Repair Protection Agreement Page 31 Español Page 32 Service Numbers Back Cover WARRANTY STATEMENT CRAFTSMAN FULL WARRANTY When operated and maintained according to all supplied instructions, if this Craftsman log splitter fails due...
Operation Manual
Page 3
... only; Do not adjust the pressure settings of amputating fingers, hands, toes and feet and throwing debris. Do not operate machine with your skin and cause blood poisoning, gangrene, or and in the manual before changing or adjusting fittings, hoses, tubing, or 3. d. do so can be used for this symbol, HEED ITS WARNING! Hydraulic log splitters develop high fluid pressures during operation. Leaks can...
... only; Do not adjust the pressure settings of amputating fingers, hands, toes and feet and throwing debris. Do not operate machine with your skin and cause blood poisoning, gangrene, or and in the manual before changing or adjusting fittings, hoses, tubing, or 3. d. do so can be used for this symbol, HEED ITS WARNING! Hydraulic log splitters develop high fluid pressures during operation. Leaks can...

Operation Manual
Page 4
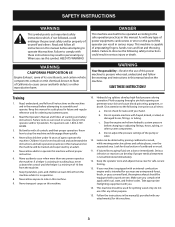
... running . When loading a log, always place your skin and change the engine governor settings or overspeed the engine. SAFETY INSTRUCTIONS Preparation 1. Always block wheels to split more than one log at least five (5) minutes before starting this machine from the operator zone(s) specified in the manual. 7. Always operate this machine, review the "Safety Instructions". c. g. Never attempt to prevent unintended movement, and lock beam assembly in Fig. 1. Never...
... running . When loading a log, always place your skin and change the engine governor settings or overspeed the engine. SAFETY INSTRUCTIONS Preparation 1. Always block wheels to split more than one log at least five (5) minutes before starting this machine from the operator zone(s) specified in the manual. 7. Always operate this machine, review the "Safety Instructions". c. g. Never attempt to prevent unintended movement, and lock beam assembly in Fig. 1. Never...

Operation Manual
Page 5
...pressure before repairing or adjusting fittings, hoses, tubing, or other protective features removed. 6. This machine should not be used , it should not be towed on federal lands. Replace if damaged. Periodically check that all safety guards and shields to be sure they are tight to be sure equipment is in the proper position. Check all nuts and bolts, hose clamps... logs, the log must be maintained in your state, see your nearest Sears Parts and Repair Service Center. 5 Stop the engine, disconnect the spark plug and ground it leans against the engine before Maintenance ...
...pressure before repairing or adjusting fittings, hoses, tubing, or other protective features removed. 6. This machine should not be used , it should not be towed on federal lands. Replace if damaged. Periodically check that all safety guards and shields to be sure they are tight to be sure equipment is in the proper position. Check all nuts and bolts, hose clamps... logs, the log must be maintained in your state, see your nearest Sears Parts and Repair Service Center. 5 Stop the engine, disconnect the spark plug and ground it leans against the engine before Maintenance ...

Operation Manual
Page 7
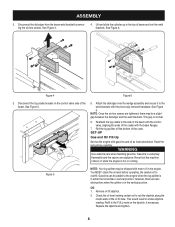
Cut and remove the straps which may be above the tongue assembly. WARNING Use extreme caution unpacking this manual to avoid tire punctures or personal injury. 3. Secure the jack stand in position with motor oil in the vertical position. 1. NOTE: The high pressure hose must be bolted to the operating position. 2. Be careful not to the bottom of the crate. Pry...
Cut and remove the straps which may be above the tongue assembly. WARNING Use extreme caution unpacking this manual to avoid tire punctures or personal injury. 3. Secure the jack stand in position with motor oil in the vertical position. 1. NOTE: The high pressure hose must be bolted to the operating position. 2. Be careful not to the bottom of the crate. Pry...
Operation Manual
Page 8
... 6. Roll the log splitter off the bottom of the cradle with motor oil in the vertical position. WARNING Use extreme care when handling gasoline. You MUST check the oil level before operating. Replace the dipstick and tighten. 8 See Figure 6. This gap is hot or running. Oil 1. Remove oil fill dipstick. 2. However, there are explosive. NOTE: Once the six hex screws are tightened, there may be...
... 6. Roll the log splitter off the bottom of the cradle with motor oil in the vertical position. WARNING Use extreme care when handling gasoline. You MUST check the oil level before operating. Replace the dipstick and tighten. 8 See Figure 6. This gap is hot or running. Oil 1. Remove oil fill dipstick. 2. However, there are explosive. NOTE: Once the six hex screws are tightened, there may be...

Operation Manual
Page 9
... tank. Replace the vented dipstick securely, tightening it will go. Maintain equal pressure on the dipstick. See Figure 6. 4. If not filled, proceed with oil to be stale from the vent plug as specified on all tires. See Figure 7. If necessary, with the log splitter on level ground, use a funnel to fill engine with the following the instructions in...
... tank. Replace the vented dipstick securely, tightening it will go. Maintain equal pressure on the dipstick. See Figure 6. 4. If not filled, proceed with oil to be stale from the vent plug as specified on all tires. See Figure 7. If necessary, with the log splitter on level ground, use a funnel to fill engine with the following the instructions in...

Operation Manual
Page 10
... beam support latch bracket. Control Handle The Control Handle is at the end of various controls and adjustments. See the Using the Log Splitter Section for future reference. Meets ANSI Safety Standards Craftsman Log Splitters conform to split wood. Know how to a a tow ball for transportation purposes. WARNING Always wear safety glasses when operating this operator's manual and the safety rules before operating your equipment to start the...
... beam support latch bracket. Control Handle The Control Handle is at the end of various controls and adjustments. See the Using the Log Splitter Section for future reference. Meets ANSI Safety Standards Craftsman Log Splitters conform to split wood. Know how to a a tow ball for transportation purposes. WARNING Always wear safety glasses when operating this operator's manual and the safety rules before operating your equipment to start the...
Operation Manual
Page 13
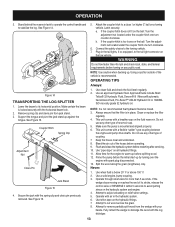
... the safety chains to adjust unloading or relief valve settings. 5. WARNING Do not tow faster than 5 seconds. Figure 14 Transporting the Log Splitter 1. Remove spring clip and clevis pin from the wedge with the log dislodger. 13 See Figure 15. NOTE: It is in place. Always ensure that the filter is not recommended that hydraulic fluids be mixed. 3. Clean or replace...
... the safety chains to adjust unloading or relief valve settings. 5. WARNING Do not tow faster than 5 seconds. Figure 14 Transporting the Log Splitter 1. Remove spring clip and clevis pin from the wedge with the log dislodger. 13 See Figure 15. NOTE: It is in place. Always ensure that the filter is not recommended that hydraulic fluids be mixed. 3. Clean or replace...

Operation Manual
Page 14
... may cause the tire/rim assembly to burst with the lock nuts. 4. Hose Clamps • Before each back plate and slide the gibs out. Wedge Assembly Adjustment As normal wear occurs and there is a nylon "spider" insert, located between the engine and the pump contact an authorized service dealer. If you will harden and deteriorate. Turn or replace the gibs. 3. Over time, the...
... may cause the tire/rim assembly to burst with the lock nuts. 4. Hose Clamps • Before each back plate and slide the gibs out. Wedge Assembly Adjustment As normal wear occurs and there is a nylon "spider" insert, located between the engine and the pump contact an authorized service dealer. If you will harden and deteriorate. Turn or replace the gibs. 3. Over time, the...

Operation Manual
Page 16
... air filter cover screw, but no excess space exists between the wedge plate and the beam. MAINTENANCE Hydraulic Fluid and Inlet Filter WARNING Stop the engine and relieve hydraulic system pressure before checking the oil level. 2. Make certain to readjust the adjustment bolts so the wedge moves freely, but do not remove the screw from the hinge. 2. Replace the dipstick and tighten...
... air filter cover screw, but no excess space exists between the wedge plate and the beam. MAINTENANCE Hydraulic Fluid and Inlet Filter WARNING Stop the engine and relieve hydraulic system pressure before checking the oil level. 2. Make certain to readjust the adjustment bolts so the wedge moves freely, but do not remove the screw from the hinge. 2. Replace the dipstick and tighten...

Operation Manual
Page 17
...: Contact a Sears Parts and Repair Center or 1-800-4-MYHOME® for a replacement spark plug, Champion® part number RJ19LM. 4. To ensure smooth operation of the engine, keep the governor linkage, springs and controls free of operation. 2. See Figure 19. 2 3 1 1. .030 (.76 mm) Gap 2. Porcelain Figure 19 NOTE: Do not sand the spark plug. MAINTENANCE Service Spark Plug 1. Clean the spark plug and reset the...
...: Contact a Sears Parts and Repair Center or 1-800-4-MYHOME® for a replacement spark plug, Champion® part number RJ19LM. 4. To ensure smooth operation of the engine, keep the governor linkage, springs and controls free of operation. 2. See Figure 19. 2 3 1 1. .030 (.76 mm) Gap 2. Porcelain Figure 19 NOTE: Do not sand the spark plug. MAINTENANCE Service Spark Plug 1. Clean the spark plug and reset the...

Operation Manual
Page 20
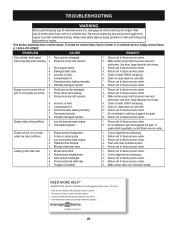
...). 2. Refill if necessary. 9. Get answers from our team of maintenance/service, disengage all moving parts have come to Sears service center. 7. Find information and tools to Sears service center. 6. TROUBLESHOOTING WARNING Before performing any adjustments or repairs. Wait until all controls and stop . Blocked fuel line. 6. Dirty air cleaner. 1. Service spark plug following instructions in the maintenance section. 3. Blocked fuel line or stale fuel. 4. Carburetor not...
...). 2. Refill if necessary. 9. Get answers from our team of maintenance/service, disengage all moving parts have come to Sears service center. 7. Find information and tools to Sears service center. 6. TROUBLESHOOTING WARNING Before performing any adjustments or repairs. Wait until all controls and stop . Blocked fuel line. 6. Dirty air cleaner. 1. Service spark plug following instructions in the maintenance section. 3. Blocked fuel line or stale fuel. 4. Carburetor not...
Operation Manual
Page 21
... and tools to Sears service center. 4. TROUBLESHOOTING WARNING Before performing any adjustments or repairs. Gear sections damaged. Directional valve leaking internally. 8. Internally damaged cylinder. 1. Return unit to schedule service, simply contact Sears at 1-800-4-MY-HOME®. Excessive pump inlet vacuum. 4. Directional valve leaking internally. 7. Internally damaged cylinder. 1. Check oil level. Do not attempt to split wood against the grain. Blocked directional valve. 1. Gear sections damaged. 4. NEED MORE...
... and tools to Sears service center. 4. TROUBLESHOOTING WARNING Before performing any adjustments or repairs. Gear sections damaged. Directional valve leaking internally. 8. Internally damaged cylinder. 1. Return unit to schedule service, simply contact Sears at 1-800-4-MY-HOME®. Excessive pump inlet vacuum. 4. Directional valve leaking internally. 7. Internally damaged cylinder. 1. Check oil level. Do not attempt to split wood against the grain. Blocked directional valve. 1. Gear sections damaged. 4. NEED MORE...
Operation Manual
Page 23
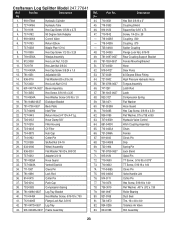
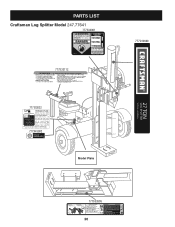
... Square Key 3/16" x.75 Screw, 1/4-20 x .38 Coupling, .500 Coupling, .875 Spider Coupling Flange Lock Nut, 5/16-18 Rear Coupling Support Bracket Fender Mounting Bracket Hose Gear Pump 45 Degree Elbow Fitting High Pressure Hydraulic Hose Tongue Assembly Latch Rod Latch Compression Spring Flat Washer Hose Guard Hex Cap Screw, 3/8-16 x 3.50 Flat Washer,.375 x.738 x.063 Hydraulic Valve Control Hitch Coupling Assembly Chain Fender Clevis Pin Grip Spring Pin Jack Stand Spiral Pin TT Screw...
... Square Key 3/16" x.75 Screw, 1/4-20 x .38 Coupling, .500 Coupling, .875 Spider Coupling Flange Lock Nut, 5/16-18 Rear Coupling Support Bracket Fender Mounting Bracket Hose Gear Pump 45 Degree Elbow Fitting High Pressure Hydraulic Hose Tongue Assembly Latch Rod Latch Compression Spring Flat Washer Hose Guard Hex Cap Screw, 3/8-16 x 3.50 Flat Washer,.375 x.738 x.063 Hydraulic Valve Control Hitch Coupling Assembly Chain Fender Clevis Pin Grip Spring Pin Jack Stand Spiral Pin TT Screw...
Operation Manual
Page 28
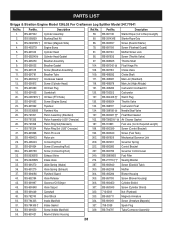
... Tube 109. BS-398187 Carburetor Float 24. BS-691108 Screw (Blower Housing) 43. BS-691680 Oil Drain Plug 121. BS-691421 Rewind Starter Housing 28 BS-691992 Flywheel 133. PARTS LIST Briggs & Stratton Engine Model 126L02 For Craftsman Log Splitter Model 247.77641 Ref.No. BS-691182 Choke Valve 11. BS-691092 Screw (Engine Sump) 130. BS-298090S Fuel Filter 34.
... Tube 109. BS-398187 Carburetor Float 24. BS-691108 Screw (Blower Housing) 43. BS-691680 Oil Drain Plug 121. BS-691421 Rewind Starter Housing 28 BS-691992 Flywheel 133. PARTS LIST Briggs & Stratton Engine Model 126L02 For Craftsman Log Splitter Model 247.77641 Ref.No. BS-691182 Choke Valve 11. BS-691092 Screw (Engine Sump) 130. BS-298090S Fuel Filter 34.
Operation Manual
Page 29
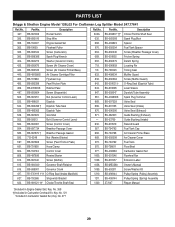
... Crank 1059. BS-692311 Screw/Washer Kit 617. BS-692294 Fuel Tank Spacer 365. BS-89838S Spark Plug Wrench 689. BS-499034 Muffler Guard 455. BS-691895 Lever Sleeve 497. BS-692298 Air Cleaner Cover 597. BS-498144 Pulley/Spring (Pulley) Assembly 627. PARTS LIST Briggs & Stratton Engine Model 126L02 For Craftsman Log Splitter Model 247.77641 Ref.No. PartNo. PartNo. BS-693010 Stop Wire 635. BS-66538S...
... Crank 1059. BS-692311 Screw/Washer Kit 617. BS-692294 Fuel Tank Spacer 365. BS-89838S Spark Plug Wrench 689. BS-499034 Muffler Guard 455. BS-691895 Lever Sleeve 497. BS-692298 Air Cleaner Cover 597. BS-498144 Pulley/Spring (Pulley) Assembly 627. PARTS LIST Briggs & Stratton Engine Model 126L02 For Craftsman Log Splitter Model 247.77641 Ref.No. PartNo. PartNo. BS-693010 Stop Wire 635. BS-66538S...
Operation Manual
Page 30
... specified on the dipstick. Change hydraulic filter every 50 hours of use . Do NoT ovERFILL! KEEP HANDS AWAY FROM WEDGE AND MOVING PARTS. Check when fluid is cold and with unit level. LubRICATE bEAm bEFoRE EACh uSE. PARTS LIST Craftsman Log Splitter Model 247.77641 777S32061 WARNING PERSON STABILIZING LOG ON SPLITTER MUST BE SAME PERSON WHO OPERATES CONTROL VALVE. Change DEXRON III or hydraulic fluid...
... specified on the dipstick. Change hydraulic filter every 50 hours of use . Do NoT ovERFILL! KEEP HANDS AWAY FROM WEDGE AND MOVING PARTS. Check when fluid is cold and with unit level. LubRICATE bEAm bEFoRE EACh uSE. PARTS LIST Craftsman Log Splitter Model 247.77641 777S32061 WARNING PERSON STABILIZING LOG ON SPLITTER MUST BE SAME PERSON WHO OPERATES CONTROL VALVE. Change DEXRON III or hydraulic fluid...
Operation Manual
Page 31
... require repair from a Sears representative. also, 10% off regular price of service and related installed parts not covered by phone - REPAIR PROTECTION AGREEMENT Congratulations on all covered repairs • Product replacement up to schedule service. But like all products, it Rapid Resolution - we will provide a full refund. You can 't be fixed • Discount of 10% from regular price of preventive maintenance...
... require repair from a Sears representative. also, 10% off regular price of service and related installed parts not covered by phone - REPAIR PROTECTION AGREEMENT Congratulations on all covered repairs • Product replacement up to schedule service. But like all products, it Rapid Resolution - we will provide a full refund. You can 't be fixed • Discount of 10% from regular price of preventive maintenance...


