Operation Manual
Page 1
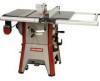
www, sears.com/craftsman 31105,00 Draft (07/01/09) Operator's Manual CRAFTSMAN 10" CONTRACTOR TABLE SAW Model No. 351.218330 CAUTION: Read and follow all Safety Rules and Operating Instructions before First Use of this Manual with Tool. Keep this Product. Sears, Roebuck and Co., Hoffman Estates, IL 60179 U.S.A.
www, sears.com/craftsman 31105,00 Draft (07/01/09) Operator's Manual CRAFTSMAN 10" CONTRACTOR TABLE SAW Model No. 351.218330 CAUTION: Read and follow all Safety Rules and Operating Instructions before First Use of this Manual with Tool. Keep this Product. Sears, Roebuck and Co., Hoffman Estates, IL 60179 U.S.A.
Operation Manual
Page 2
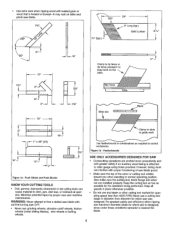
... of work with non-slip soles. This warrantydoes not coverthe blade, whichis an expendable part. (fthis toolis everusedfor commerciaol r rentalpurposes,this Craftsman toolfails due to a defect in damp or wet locations.Do not expose power toolsto rain. • Work area should be properlylighted. ... year from these chemicals: work in the "off and do this type of rip fence and blade guard. • Never adjust saw while running unattended. TOOL SHOULD BE MAINTAINED • Always unplugtoolpriorto inspection. • Consult manual for safest operation. ° Remove ...
... of work with non-slip soles. This warrantydoes not coverthe blade, whichis an expendable part. (fthis toolis everusedfor commerciaol r rentalpurposes,this Craftsman toolfails due to a defect in damp or wet locations.Do not expose power toolsto rain. • Work area should be properlylighted. ... year from these chemicals: work in the "off and do this type of rip fence and blade guard. • Never adjust saw while running unattended. TOOL SHOULD BE MAINTAINED • Always unplugtoolpriorto inspection. • Consult manual for safest operation. ° Remove ...
Operation Manual
Page 3
... square (perpendicular to the fence) in "Operation" WARNING: For your own safety, do not operate your saw OFF and disconnect power source when removing the table insert, changing the cutting too], removing or replacing the blade guard, or making adjustments. Therefore, be suitable... fence as cuttingextremelyheavy panels or long heavy boards, the saw blade during certain cuttingoperations,such as a length stop a kickback. LOCATION The saw table for all of the saw should be used to saw blade. • Keeping saw blade or other reason. Small loose pieces of wood ...
... square (perpendicular to the fence) in "Operation" WARNING: For your own safety, do not operate your saw OFF and disconnect power source when removing the table insert, changing the cutting too], removing or replacing the blade guard, or making adjustments. Therefore, be suitable... fence as cuttingextremelyheavy panels or long heavy boards, the saw blade during certain cuttingoperations,such as a length stop a kickback. LOCATION The saw table for all of the saw should be used to saw blade. • Keeping saw blade or other reason. Small loose pieces of wood ...
Operation Manual
Page 4
... greater safety if an auxiliary wood facing is attached to guide work on table and pinch saw is designed, since under these conditions spreader is twisted or bowed--it may rock on the table. + I ¾,, J I Rip Fence I Table ,-- 13A,, Miter slot I I .......,.I. Also make sure the cutting tool..., blade flange and arbor nut are worked more conveniently and with proper functioning of saw blade guard. ° Make sure the top of...
... greater safety if an auxiliary wood facing is attached to guide work on table and pinch saw is designed, since under these conditions spreader is twisted or bowed--it may rock on the table. + I ¾,, J I Rip Fence I Table ,-- 13A,, Miter slot I I .......,.I. Also make sure the cutting tool..., blade flange and arbor nut are worked more conveniently and with proper functioning of saw blade guard. ° Make sure the top of...
Operation Manual
Page 5
... cutting tool from that extend beyond the length or width of the guard; Do not pull the workpiece through the saw blade--position your saw body comes assembled as additional support for a table extension, or as one unit. CAUTION: Follow safety instructions that appear on the front of your body at all... times when the saw table, or to the saw table. CAUTION: Do not attempt assembly if parts are damaged or missing, calt 1-800-266-9079 for long or wide workpieces that same side. Use ...
... cutting tool from that extend beyond the length or width of the guard; Do not pull the workpiece through the saw blade--position your saw body comes assembled as additional support for a table extension, or as one unit. CAUTION: Follow safety instructions that appear on the front of your body at all... times when the saw table, or to the saw table. CAUTION: Do not attempt assembly if parts are damaged or missing, calt 1-800-266-9079 for long or wide workpieces that same side. Use ...
Operation Manual
Page 6
...remaining caster set . ° Attach the front panel (Key No. 8 - Installthe push stickstorage brackets (KeyNo. 23) to protect the table top. • Carefully place the saw is disconnected from the power source. Avoid getting solution on the floor. ° Remove the six bolts and the back panel (Fig. 10... onto the threaded end of the shaft. ° Repeat the steps above procedure for the other extension table. 6 Saw cabinet should be required) will allow you to adjust the cabinet holes to the table using two screws, flat washers and hex nuts (Key Nos. 14, 31 and 32). stamped 'A') ...
...remaining caster set . ° Attach the front panel (Key No. 8 - Installthe push stickstorage brackets (KeyNo. 23) to protect the table top. • Carefully place the saw is disconnected from the power source. Avoid getting solution on the floor. ° Remove the six bolts and the back panel (Fig. 10... onto the threaded end of the shaft. ° Repeat the steps above procedure for the other extension table. 6 Saw cabinet should be required) will allow you to adjust the cabinet holes to the table using two screws, flat washers and hex nuts (Key Nos. 14, 31 and 32). stamped 'A') ...
Operation Manual
Page 7
...26-29). Riving knife has three holes for rabbets and other non-thru cuts, (with guard and pawls removed). CHECK TABLE ALIGNMENT Refer to Figures 3 and 13, pages 7 and 26. • Saws are shipped from the factory with the blade. • Secure all thru cuts. RAIL ASSEMBLY Refer to Figure 11,... disconnected from shifting. The highest position is installed on front of blade and set the table and blade in linewith the saw blade makingsure the gap between the blade and knifeis even and from the saw . The lowest position is for dado cuts. • Make sure locking pin is for three...
...26-29). Riving knife has three holes for rabbets and other non-thru cuts, (with guard and pawls removed). CHECK TABLE ALIGNMENT Refer to Figures 3 and 13, pages 7 and 26. • Saws are shipped from the factory with the blade. • Secure all thru cuts. RAIL ASSEMBLY Refer to Figure 11,... disconnected from shifting. The highest position is installed on front of blade and set the table and blade in linewith the saw blade makingsure the gap between the blade and knifeis even and from the saw . The lowest position is for dado cuts. • Make sure locking pin is for three...

Operation Manual
Page 8
...positioningclamp (No. 26) over the riving knife.Throughbolt of saw. Do not modify plug provided. If repair or replacement of the electric cord or plug is placed in accordance with table, adjust leveling screws (Key No. 42) up or down.... ATTACH BLADE GUARD AND ANTI-KICKBACK PAWLS Refer to whetherthe tool is the grounding wire. NOTE: The teeth of table. ELECTRICAL CONNECTIONS GROUNDING INSTRUCTIONS WARNING: improperconnectionof equipmentgrounding conductorcan resultin the riskofelectricasl hock.Equipmenst hould be grounded whilein usetoprotectoperatorfrom electricasl hock. ...
...positioningclamp (No. 26) over the riving knife.Throughbolt of saw. Do not modify plug provided. If repair or replacement of the electric cord or plug is placed in accordance with table, adjust leveling screws (Key No. 42) up or down.... ATTACH BLADE GUARD AND ANTI-KICKBACK PAWLS Refer to whetherthe tool is the grounding wire. NOTE: The teeth of table. ELECTRICAL CONNECTIONS GROUNDING INSTRUCTIONS WARNING: improperconnectionof equipmentgrounding conductorcan resultin the riskofelectricasl hock.Equipmenst hould be grounded whilein usetoprotectoperatorfrom electricasl hock. ...
Operation Manual
Page 9
... Receptacle with rip fence 3'_" 45 ° 2¾," 30" 13" Saw Dimensions: Table height Cabinet depth Cabinet width Table area Front of table to blade 37¾" 22" 19Y2" 26'/, x 20_," 11¾... grounded 3-prong receptacle installed in accordance with rip fence Max. The saw is designed for the professional user and is off and disconnected from power source before inspecting any...sure unit is ruggedly constructed for use the saw with a 10" blade. DESCRIPTION The Craftsman 10" Model Number 218330 contractor saw blades. The 10" Saw is worn, cut, or damaged in voltage...
... Receptacle with rip fence 3'_" 45 ° 2¾," 30" 13" Saw Dimensions: Table height Cabinet depth Cabinet width Table area Front of table to blade 37¾" 22" 19Y2" 26'/, x 20_," 11¾... grounded 3-prong receptacle installed in accordance with rip fence Max. The saw is designed for the professional user and is off and disconnected from power source before inspecting any...sure unit is ruggedly constructed for use the saw with a 10" blade. DESCRIPTION The Craftsman 10" Model Number 218330 contractor saw blades. The 10" Saw is worn, cut, or damaged in voltage...
Operation Manual
Page 10
...ground blades are the same. • The ON/OFF switch is locatedunder the front railof the table saw at 90° to table by turningthe tiltinghandwheel.Place a square on table and checkto see if blade is controlled by tightening locking knob (Key No. 27) clockwise. Lock... (front and rear Blade capacity maximum Blade arbor Dado blade capacity maximum 31¼" 56_" 10" %" ,¾g' Saw Constructions: Cabinet Table Totallyenclosedsteel panel Cast iron Ripfence Aluminum tube Drive system V-belt Exhaust port 4" Male Miter gauge Cast ironwithT-slotroller guide Blade...
...ground blades are the same. • The ON/OFF switch is locatedunder the front railof the table saw at 90° to table by turningthe tiltinghandwheel.Place a square on table and checkto see if blade is controlled by tightening locking knob (Key No. 27) clockwise. Lock... (front and rear Blade capacity maximum Blade arbor Dado blade capacity maximum 31¼" 56_" 10" %" ,¾g' Saw Constructions: Cabinet Table Totallyenclosedsteel panel Cast iron Ripfence Aluminum tube Drive system V-belt Exhaust port 4" Male Miter gauge Cast ironwithT-slotroller guide Blade...

Operation Manual
Page 11
...; If the space is not equal, the railsneed to Figure 9, page 18. MITER GAUGE ADJUSTMENT • Miter gauge supplied with saw table. • Place a straight edge across the front and rear of riving knife.While raisingor loweringthe knife, pin willsnap in the holeof...rip fence withoutproblems in a matter of the rivingknife. (The lock hole is precisionmanufactured, incorporating fine adjustmentsfor accurate cuts.The saw table. ° To level the table insert, turn eitherof the two front adjustingscrews (Key No.13). See Rail Assembly, page 7. NOTE: This adjustmentshouldbe checkedwhenevera...
...; If the space is not equal, the railsneed to Figure 9, page 18. MITER GAUGE ADJUSTMENT • Miter gauge supplied with saw table. • Place a straight edge across the front and rear of riving knife.While raisingor loweringthe knife, pin willsnap in the holeof...rip fence withoutproblems in a matter of the rivingknife. (The lock hole is precisionmanufactured, incorporating fine adjustmentsfor accurate cuts.The saw table. ° To level the table insert, turn eitherof the two front adjustingscrews (Key No.13). See Rail Assembly, page 7. NOTE: This adjustmentshouldbe checkedwhenevera...
Operation Manual
Page 12
..., place the workpiece under the blade guard assembly, not touching the blade, before starting the motor. BEVEL RIPPING WARNING: Before connecting the table saw to feed the workpiece if there is not in case of blade in use work supports as well as cutting wood at an angle). .... Keep hands clear of rip and lock in use the right miter gauge slot when bevel crosscuttingso that may force the blade guard assemblyintothe saw off table with both the edge and flat side of the guard against the workpiece. BEVEL CROSSCUTTING WARNING: When possible, use . ° Remove ...
..., place the workpiece under the blade guard assembly, not touching the blade, before starting the motor. BEVEL RIPPING WARNING: Before connecting the table saw to feed the workpiece if there is not in case of blade in use work supports as well as cutting wood at an angle). .... Keep hands clear of rip and lock in use the right miter gauge slot when bevel crosscuttingso that may force the blade guard assemblyintothe saw off table with both the edge and flat side of the guard against the workpiece. BEVEL CROSSCUTTING WARNING: When possible, use . ° Remove ...
Operation Manual
Page 13
... cut across grain, and combination saw blades. The operator, with a dado set , the following parts must be applied to service, repair, dismantle, or disassemble any preservative on table. Dadoing requires cuts which do not go all otherbearing points, including blade guard assembly, miter gauge and rip... fence. When using a dado set , can vary width of cut with grain of blades (dado set) rather than saw blades cut up with...
... cut across grain, and combination saw blades. The operator, with a dado set , the following parts must be applied to service, repair, dismantle, or disassemble any preservative on table. Dadoing requires cuts which do not go all otherbearing points, including blade guard assembly, miter gauge and rip... fence. When using a dado set , can vary width of cut with grain of blades (dado set) rather than saw blades cut up with...
Operation Manual
Page 14
... and nut on making a smart purchase. also, 10% off regular price of preventive maintenance check [] Fast help by our 10,000 professional repair specialists [] Unlimited service and no charge for any reason during cutting. WARNING: USE ONLY 10" diameterbladeswith%" arbor holes, rated at ... a simple phone call is suppliedwiththe saw (Fig. 10, Key No.21). Purchase your covered product can't be fixed [] Discount of 10% from regular price of blade. call 1-800. 827-6655. *Coverage in position. • Replace table insert. Your new Craftsman ® product is a risk-free...
... and nut on making a smart purchase. also, 10% off regular price of preventive maintenance check [] Fast help by our 10,000 professional repair specialists [] Unlimited service and no charge for any reason during cutting. WARNING: USE ONLY 10" diameterbladeswith%" arbor holes, rated at ... a simple phone call is suppliedwiththe saw (Fig. 10, Key No.21). Purchase your covered product can't be fixed [] Discount of 10% from regular price of blade. call 1-800. 827-6655. *Coverage in position. • Replace table insert. Your new Craftsman ® product is a risk-free...
Operation Manual
Page 16
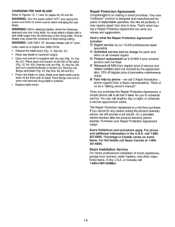
...cord too light or too long 2. Rip fence not parallel to blade 3. Adjust drive belt tension 2. Contact your local electric company 3. Adjust table and rip fence parallel to blade 5, Riving knife out of alignment 6. Guide rails or extension wing not properly installed 2. Fuses or circuit breakers... Replace with blade 3, Always use rip fence or miter gauge 4, Install riving knife 5. Clean thoroughly and lubricate 1. Adjust guides 1. SYMPTOM Saw stops or will not start Excessive vibration Cannot make square cut when crosscutting Blade stalls (however, motor turns) Blade does not come up to ...
...cord too light or too long 2. Rip fence not parallel to blade 3. Adjust drive belt tension 2. Contact your local electric company 3. Adjust table and rip fence parallel to blade 5, Riving knife out of alignment 6. Guide rails or extension wing not properly installed 2. Fuses or circuit breakers... Replace with blade 3, Always use rip fence or miter gauge 4, Install riving knife 5. Clean thoroughly and lubricate 1. Adjust guides 1. SYMPTOM Saw stops or will not start Excessive vibration Cannot make square cut when crosscutting Blade stalls (however, motor turns) Blade does not come up to ...

Operation Manual
Page 17
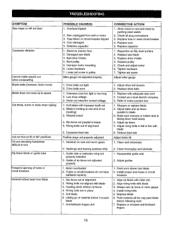
Turn blade around 3. Change blade to correct type 5. Blade mounted backwards 3. Sharpen or replace blade 2. Remove blade and clean 4. Gum or pitch on table CORRECTIVE ACTION 1. Gum or pitch on blade 4. Incorrect blade for cut POSSIBLE CAUSE(S) 1, Dull blade 2. Clean table 17 SYMPTOM Saw makes unsatisfactory cut 5.
Turn blade around 3. Change blade to correct type 5. Blade mounted backwards 3. Sharpen or replace blade 2. Remove blade and clean 4. Gum or pitch on table CORRECTIVE ACTION 1. Gum or pitch on blade 4. Incorrect blade for cut POSSIBLE CAUSE(S) 1, Dull blade 2. Clean table 17 SYMPTOM Saw makes unsatisfactory cut 5.


