Operation Manual
Page 1
Keep this Product. Sears, Roebuck and Co., Hoffman Estates, IL 60179 U.S.A. Operator's Manual CRAFTSMAN 10" CONTRACTOR TABLE SAW Model No. 351.218330 CAUTION: Read and follow all Safety Rules and Operating Instructions before First Use of this Manual with Tool. www, sears.com/craftsman 31105,00 Draft (07/01/09)
Keep this Product. Sears, Roebuck and Co., Hoffman Estates, IL 60179 U.S.A. Operator's Manual CRAFTSMAN 10" CONTRACTOR TABLE SAW Model No. 351.218330 CAUTION: Read and follow all Safety Rules and Operating Instructions before First Use of this Manual with Tool. www, sears.com/craftsman 31105,00 Draft (07/01/09)
Operation Manual
Page 2
... state. Remember that adjusting tools are : • Lead from lead-based paints. • Crystalline silica from bricks and cement and other rightswhichvary from these chemicals: work in severe personal injury'. Warranty Safety Rules Unpacking Assembly Installation Operation Maintenance Repair Protection Agreement Troubleshooting Parts Illustration and List Espafiol 2 2-5 5 6-8 8-9 9-13 13 14 16-17 18-29 30-47 ONE-YEAR FULL WARRANTY ON CRAFTSMAN TOOL if this warrantywill applyfor...
... state. Remember that adjusting tools are : • Lead from lead-based paints. • Crystalline silica from bricks and cement and other rightswhichvary from these chemicals: work in severe personal injury'. Warranty Safety Rules Unpacking Assembly Installation Operation Maintenance Repair Protection Agreement Troubleshooting Parts Illustration and List Espafiol 2 2-5 5 6-8 8-9 9-13 13 14 16-17 18-29 30-47 ONE-YEAR FULL WARRANTY ON CRAFTSMAN TOOL if this warrantywill applyfor...
Operation Manual
Page 3
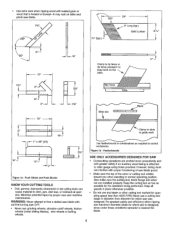
... disconnect power source when removing the table insert, changing the cutting too], removing or replacing the blade guard, or making adjustments. Therefore, be suitable for ripping widths less than 6 inches. ° Not confining the cutoff piece when ripping or crosscutting. This could cause fingers or hand to position and guide the work into a saw blade or other cutting tool. • For rip or rip-type cuts, the following proper setup and cutting procedures for resawing, dadoing, or rabbeting--replace guard as...
... disconnect power source when removing the table insert, changing the cutting too], removing or replacing the blade guard, or making adjustments. Therefore, be suitable for ripping widths less than 6 inches. ° Not confining the cutoff piece when ripping or crosscutting. This could cause fingers or hand to position and guide the work into a saw blade or other cutting tool. • For rip or rip-type cuts, the following proper setup and cutting procedures for resawing, dadoing, or rabbeting--replace guard as...
Operation Manual
Page 4
... to stick, jam, stall saw OFE • Never use grinding wheels, abrasive cutoff wheels, friction wheels (metal slitting blades), wire wheels or buffing wheels. Keep the cutting tool as low as required to miter gauge using holes provided. For greatest safety and efficiency when ripping, use any blade or other cutting tool marked for the operation being performed. Figure lb - Also make sure the cutting tool, blade flange and arbor nut are worked more conveniently and with...
... to stick, jam, stall saw OFE • Never use grinding wheels, abrasive cutoff wheels, friction wheels (metal slitting blades), wire wheels or buffing wheels. Keep the cutting tool as low as required to miter gauge using holes provided. For greatest safety and efficiency when ripping, use any blade or other cutting tool marked for the operation being performed. Figure lb - Also make sure the cutting tool, blade flange and arbor nut are worked more conveniently and with...
Operation Manual
Page 5
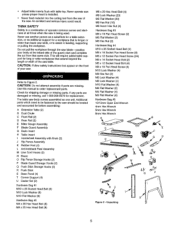
.... CAUTION: Follow safety instructions that same side. Refer to order replacement parts. • Adjust table inserts flush with Knob (2) J Rip Fence Assembly K Rubber Foot (4) L Antkkickback Pawi Assembly M Line Cord Hooks (2) N Brace O Rip Fence Storage Hooks (2) P Blade Guard Storage Hooks (2) Q Push Stick Storage Hooks (2) R Push Stick S Base Panel (4) T Corner Support (4) U Caster Set (2) Hardware Bag #1 M!0 x 25 Socket Head Bolt (6) M10 Lock Washer (6) M10 Flat Washer (6) Hardware Bag #2 M8 x 28 Hex Head Bolt (8) M8 x 25 Hex Head Bolt (8) M8...
.... CAUTION: Follow safety instructions that same side. Refer to order replacement parts. • Adjust table inserts flush with Knob (2) J Rip Fence Assembly K Rubber Foot (4) L Antkkickback Pawi Assembly M Line Cord Hooks (2) N Brace O Rip Fence Storage Hooks (2) P Blade Guard Storage Hooks (2) Q Push Stick Storage Hooks (2) R Push Stick S Base Panel (4) T Corner Support (4) U Caster Set (2) Hardware Bag #1 M!0 x 25 Socket Head Bolt (6) M10 Lock Washer (6) M10 Flat Washer (6) Hardware Bag #2 M8 x 28 Hex Head Bolt (8) M8 x 25 Hex Head Bolt (8) M8...
Operation Manual
Page 6
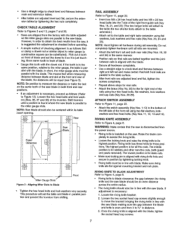
... stick is attached to the base legs. ° Turn the saw is disconnected from the power source. Use this saw. ° Place a large sheet of the caster sets. • Repeat for table top. Also, completely remove all fasteners securely. • Use two M8 x 16 socket pan head bolts (Key No. 1) to attach a corner support bracket (Key No. 3) to the remaining caster set . ° Attach the front...
... stick is attached to the base legs. ° Turn the saw is disconnected from the power source. Use this saw. ° Place a large sheet of the caster sets. • Repeat for table top. Also, completely remove all fasteners securely. • Use two M8 x 16 socket pan head bolts (Key No. 1) to attach a corner support bracket (Key No. 3) to the remaining caster set . ° Attach the front...
Operation Manual
Page 7
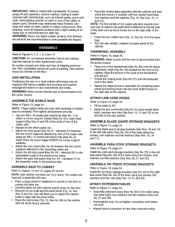
... hex nuts completely. RIVING KNIFE ASSEMBLY Refer to _," in order to obtain the best results from the saw blade, if adjustmentis necessary: 1. Riving knife has three holes for dado cuts. • Make sure locking pin is aligned with the saw , it is just touching. The middle position is installed on the same tooth of checking alignment is parallel to miter gauge (a combination square...
... hex nuts completely. RIVING KNIFE ASSEMBLY Refer to _," in order to obtain the best results from the saw blade, if adjustmentis necessary: 1. Riving knife has three holes for dado cuts. • Make sure locking pin is aligned with the saw , it is just touching. The middle position is installed on the same tooth of checking alignment is parallel to miter gauge (a combination square...

Operation Manual
Page 8
... rip fence assembly onto rails,positioningclamp (No. 26) over the riving knife.Throughbolt of anti-kickback pawls should be parallel to the table.Use set screws(Key No. 8) to lock in table. • To adjust insert level with a qualifiedelectrician if groundinginstructions are also thoroughlycleaned. ° The mitergauge is the grounding wire. Be certainlock- In the event of a malfunction or breakdown, grounding provides a path of table. Locking Pin...
... rip fence assembly onto rails,positioningclamp (No. 26) over the riving knife.Throughbolt of anti-kickback pawls should be parallel to the table.Use set screws(Key No. 8) to lock in table. • To adjust insert level with a qualifiedelectrician if groundinginstructions are also thoroughlycleaned. ° The mitergauge is the grounding wire. Be certainlock- In the event of a malfunction or breakdown, grounding provides a path of table. Locking Pin...
Operation Manual
Page 9
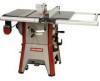
.... • Use the table to blade 37¾" 22" 19Y2" 26'/, x 20_," 11¾" 9 The power lines are not properly grounded. cut right of cut at 90 Maximum tilt angle of arbor (left of blade with 10" Blade: Depth of cut at 45 Max. long is available for simple and one-hand maneuverability. DESCRIPTION The Craftsman 10" Model Number 218330 contractor saw with rip fence Max. The 10" Saw is properly...
.... • Use the table to blade 37¾" 22" 19Y2" 26'/, x 20_," 11¾" 9 The power lines are not properly grounded. cut right of cut at 90 Maximum tilt angle of arbor (left of blade with 10" Blade: Depth of cut at 45 Max. long is available for simple and one-hand maneuverability. DESCRIPTION The Craftsman 10" Model Number 218330 contractor saw with rip fence Max. The 10" Saw is properly...
Operation Manual
Page 10
... on the front of saw to lock handwheel securely. Rip Fence Dimensions: Rip fence Rip fence rails (front and rear Blade capacity maximum Blade arbor Dado blade capacity maximum 31¼" 56_" 10" %" ,¾g' Saw Constructions: Cabinet Table Totallyenclosedsteel panel Cast iron Ripfence Aluminum tube Drive system V-belt Exhaust port 4" Male Miter gauge Cast ironwithT-slotroller guide Blade guard Acrylic with anti-kickback pawls Switch Lockingpaddle switch with it. Saw blade must not be cut. WARNING: Make sure...
... on the front of saw to lock handwheel securely. Rip Fence Dimensions: Rip fence Rip fence rails (front and rear Blade capacity maximum Blade arbor Dado blade capacity maximum 31¼" 56_" 10" %" ,¾g' Saw Constructions: Cabinet Table Totallyenclosedsteel panel Cast iron Ripfence Aluminum tube Drive system V-belt Exhaust port 4" Male Miter gauge Cast ironwithT-slotroller guide Blade guard Acrylic with anti-kickback pawls Switch Lockingpaddle switch with it. Saw blade must not be cut. WARNING: Make sure...

Operation Manual
Page 11
... from leaving T-slot. MITER GAUGE ADJUSTMENT • Miter gauge supplied with saw table. ° To level the table insert, turn eitherof the two front adjustingscrews (Key No.13). Position miter gauge at desired angle and tighten lock handle. • Be positive the edge of the fence. • If the space is accurately constructed for precision work. Rip fence has been adjusted at the factory to tighten locking nut after adjustment is made by lifting the locking lever (Key No. 2). Be...
... from leaving T-slot. MITER GAUGE ADJUSTMENT • Miter gauge supplied with saw table. ° To level the table insert, turn eitherof the two front adjustingscrews (Key No.13). Position miter gauge at desired angle and tighten lock handle. • Be positive the edge of the fence. • If the space is accurately constructed for precision work. Rip fence has been adjusted at the factory to tighten locking nut after adjustment is made by lifting the locking lever (Key No. 2). Be...
Operation Manual
Page 12
... stand directly in front of the wood. After blade has stopped turning, lift guard and remove the piece. ° Always lower blade below the table level when machine is at angle otherthan 90° to the power source or operating the saw blade. Use caution when starting the motor. RESAWlNG Performed with rip fence, the same as ripping a piece of wood through the cut to feed the workpiece if there is installed for...
... stand directly in front of the wood. After blade has stopped turning, lift guard and remove the piece. ° Always lower blade below the table level when machine is at angle otherthan 90° to the power source or operating the saw blade. Use caution when starting the motor. RESAWlNG Performed with rip fence, the same as ripping a piece of wood through the cut to feed the workpiece if there is installed for...
Operation Manual
Page 13
... blades (dado set allows operator to remove more material in owner's manual furnished with a light application of medium consistency machine oil. To make sure everything is done with either miter gauge or rip fence. Therefore, blade guard must be substituted dado table insert (not included). Install blade guard immediately upon completion of a smooth cut : type of steel; Rabbet cuts can also be removed. Dadoing is correct before connecting power and starting saw blades. However, the dado set ) rather than saw , see that all adjustments...
... blades (dado set allows operator to remove more material in owner's manual furnished with a light application of medium consistency machine oil. To make sure everything is done with either miter gauge or rip fence. Therefore, blade guard must be substituted dado table insert (not included). Install blade guard immediately upon completion of a smooth cut : type of steel; Rabbet cuts can also be removed. Dadoing is correct before connecting power and starting saw blades. However, the dado set ) rather than saw , see that all adjustments...
Operation Manual
Page 14
... U.S.A. Thinner blades may require repair from a Sears representative. Depress lock pin(Fig. 13, Key No.26) and turn counterclockwiseto loosen nut.Remove nut, flange and blade (Fig. 13, Key Nos.59, 60 and 61). ° Place new blade on making a smart purchase. Think of home appliances, garage door openers, water heaters, and other major home items, in position. • Replace table insert. call is a risk-free purchase...
... U.S.A. Thinner blades may require repair from a Sears representative. Depress lock pin(Fig. 13, Key No.26) and turn counterclockwiseto loosen nut.Remove nut, flange and blade (Fig. 13, Key Nos.59, 60 and 61). ° Place new blade on making a smart purchase. Think of home appliances, garage door openers, water heaters, and other major home items, in position. • Replace table insert. call is a risk-free purchase...
Operation Manual
Page 16
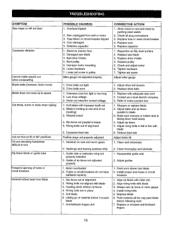
... blade 3, Always use rip fence or miter gauge 4, Install riving knife 5. SYMPTOM Saw stops or will not start Excessive vibration Cannot make square cut when crosscutting Blade stalls (however, motor turns) Blade does not come up to speed Cut binds, burns or stalls when ripping Cut not true at one end of cut (heeling) 3, Warped board 4. Defective capacitor 1, Stand on rack and worm gears 1. Replace fuse or reset circuit breaker 4, RepIace cord 5, Replace capacitor I . Extension cord too light...
... blade 3, Always use rip fence or miter gauge 4, Install riving knife 5. SYMPTOM Saw stops or will not start Excessive vibration Cannot make square cut when crosscutting Blade stalls (however, motor turns) Blade does not come up to speed Cut binds, burns or stalls when ripping Cut not true at one end of cut (heeling) 3, Warped board 4. Defective capacitor 1, Stand on rack and worm gears 1. Replace fuse or reset circuit breaker 4, RepIace cord 5, Replace capacitor I . Extension cord too light...

Operation Manual
Page 17
Blade mounted backwards 3. Sharpen or replace blade 2. Turn blade around 3. Gum or pitch on table CORRECTIVE ACTION 1. Change blade to correct type 5. Clean table 17 Incorrect blade for cut POSSIBLE CAUSE(S) 1, Dull blade 2. Gum or pitch on blade 4. Remove blade and clean 4. SYMPTOM Saw makes unsatisfactory cut 5.
Blade mounted backwards 3. Sharpen or replace blade 2. Turn blade around 3. Gum or pitch on table CORRECTIVE ACTION 1. Change blade to correct type 5. Clean table 17 Incorrect blade for cut POSSIBLE CAUSE(S) 1, Dull blade 2. Gum or pitch on blade 4. Remove blade and clean 4. SYMPTOM Saw makes unsatisfactory cut 5.

Operation Manual
Page 21
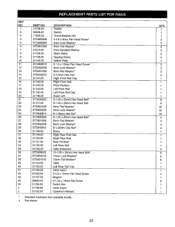
KEY NO. 1 2 3 4 5 7 8 9 10 1I I2 13 14 15 16 I7 18 19 2O 2I 22 23 24 25 26 PART NO, 31125.00 06346.00 31126,00 3I I27.00 STD870820 STD852008 STD851008 31128.00 31129.00 ...RECOMMENDED ACCESSORY I .0 x 12mm Socket Pan Head Screw Front Corner Support Front Panel 8-1.25 x 20ram Socket Head Bolt* 8ram Lock Washer* 8mm Flat Washer* Strain Relief Line Cord Hook 6-1.0 x 16 Socket Pan Head Screw Left Panel 6mm Flat Washer* 6-1.0mm Fiber Hex Nut* Angle Plate Right Panel 4mm Flat Washer* 4mm Lock Washer* 4-0.7 x 10mm Pan Head Screw* 8-1.25mm Hex Nut* Rubber Pad Wrench Knob Left Rear Corner Support Rear ...
KEY NO. 1 2 3 4 5 7 8 9 10 1I I2 13 14 15 16 I7 18 19 2O 2I 22 23 24 25 26 PART NO, 31125.00 06346.00 31126,00 3I I27.00 STD870820 STD852008 STD851008 31128.00 31129.00 ...RECOMMENDED ACCESSORY I .0 x 12mm Socket Pan Head Screw Front Corner Support Front Panel 8-1.25 x 20ram Socket Head Bolt* 8ram Lock Washer* 8mm Flat Washer* Strain Relief Line Cord Hook 6-1.0 x 16 Socket Pan Head Screw Left Panel 6mm Flat Washer* 6-1.0mm Fiber Hex Nut* Angle Plate Right Panel 4mm Flat Washer* 4mm Lock Washer* 4-0.7 x 10mm Pan Head Screw* 8-1.25mm Hex Nut* Rubber Pad Wrench Knob Left Rear Corner Support Rear ...
Operation Manual
Page 23
... 8mm Flat Washer* 8mm Lock Washer* 8-1.25mm Hex Nut* 8-1.25 x 20mm Hex Head Bo]t* 8mm Flat Washer* 8mm Lock Washer* 8-1.25mm Cap Nut* Brace Right Rear Rail Cap Right Rear Rail Rear Partition Left Rear Rail Table Extension I0-1.25 x 25mm Hex Head Bolt* 10ram Lock Washer* 10mm Flat Washer* Tabte Left Rear Rail Cap Table ]nseri 5-0.8 x 10ram Fiat Head Screw Magnet 8-1.25 x 16mm Set Screw Switch Box Dado Insert Operator's Manual Standard hardware...
... 8mm Flat Washer* 8mm Lock Washer* 8-1.25mm Hex Nut* 8-1.25 x 20mm Hex Head Bo]t* 8mm Flat Washer* 8mm Lock Washer* 8-1.25mm Cap Nut* Brace Right Rear Rail Cap Right Rear Rail Rear Partition Left Rear Rail Table Extension I0-1.25 x 25mm Hex Head Bolt* 10ram Lock Washer* 10mm Flat Washer* Tabte Left Rear Rail Cap Table ]nseri 5-0.8 x 10ram Fiat Head Screw Magnet 8-1.25 x 16mm Set Screw Switch Box Dado Insert Operator's Manual Standard hardware...

Operation Manual
Page 27
... Hex Nut* 04293.00 31183.00 31184.00 31185.00 02803.00 6 x 6 x 20mm Key Motor Pulley Drive Belt Arbor Pulley 6-1.0 x 12 Set Screw 31186.00 STD315225 STD870620 Bushing 6202LS Ball Bearing* 6-1.0 x 20mm Socket Head Bolt* STD852006 6mm Lock Washer* STD851006 6mm Flat Washer* 31187.00 31188.00 Height Stop Motor Bracket 31189.00 PSTD315235 31190.00 31191.00 STD851005 STD852005 Arbor Locking Bushing ..... 6203LL Ball Bearing* Spring Locking Pin w/knob...
... Hex Nut* 04293.00 31183.00 31184.00 31185.00 02803.00 6 x 6 x 20mm Key Motor Pulley Drive Belt Arbor Pulley 6-1.0 x 12 Set Screw 31186.00 STD315225 STD870620 Bushing 6202LS Ball Bearing* 6-1.0 x 20mm Socket Head Bolt* STD852006 6mm Lock Washer* STD851006 6mm Flat Washer* 31187.00 31188.00 Height Stop Motor Bracket 31189.00 PSTD315235 31190.00 31191.00 STD851005 STD852005 Arbor Locking Bushing ..... 6203LL Ball Bearing* Spring Locking Pin w/knob...
Operation Manual
Page 29
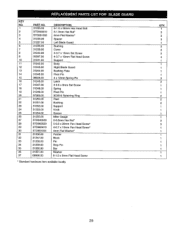
....00 09956.00 DESCRIPTION 6-1.0 x 58mm Hex Head Bolt 6-1.0mm Hex Nut* 6mm Flat Washer* Spacer Left Blade Guard Bushing Cover 4-0.7 x 15ram Set Screw 4-0.7 x 10mm Flat Head Screw Support Body Right Blade Guard Bushing Plate Pivot Pin 4 x 12mm Spring Pin Latch 3-0.5 x 8mm Set Screw Spring Pivot Pin 3CMI-9 Retaining Ring Pawl Bushing Support Knob Spacer Miter Gauge 5-0.8ram Hex Nut* 5-0.8 x 20ram Pan Head Screw* 4-0.7 x 10mm Pan Head Screw* 4mm Fiat Washer* Pointer Block Pin Stop Pin Bar Washer 6-1.0 x 8mm Fiat Head Screw * Standard hardware item available locally.
....00 09956.00 DESCRIPTION 6-1.0 x 58mm Hex Head Bolt 6-1.0mm Hex Nut* 6mm Flat Washer* Spacer Left Blade Guard Bushing Cover 4-0.7 x 15ram Set Screw 4-0.7 x 10mm Flat Head Screw Support Body Right Blade Guard Bushing Plate Pivot Pin 4 x 12mm Spring Pin Latch 3-0.5 x 8mm Set Screw Spring Pivot Pin 3CMI-9 Retaining Ring Pawl Bushing Support Knob Spacer Miter Gauge 5-0.8ram Hex Nut* 5-0.8 x 20ram Pan Head Screw* 4-0.7 x 10mm Pan Head Screw* 4mm Fiat Washer* Pointer Block Pin Stop Pin Bar Washer 6-1.0 x 8mm Fiat Head Screw * Standard hardware item available locally.


