

Operation Manual
Page 1
TABLE SAW Model No. 315.21 8050 _lJ WARNING: To reduce the risk of injury, the user must reed end understand the operator's manual before using this manual for future reference OPERATOR'S MANUAL 10 in. Customer Help Line: 1-800-932-3188 Sears, Roebuck and Co., 3333 Beverly Rd., Hoffman Estates, IL 60179 USA Visit the Craftsman web page: www,sears.com/craftsman 983000-695 8-23-05 Save this product.
TABLE SAW Model No. 315.21 8050 _lJ WARNING: To reduce the risk of injury, the user must reed end understand the operator's manual before using this manual for future reference OPERATOR'S MANUAL 10 in. Customer Help Line: 1-800-932-3188 Sears, Roebuck and Co., 3333 Beverly Rd., Hoffman Estates, IL 60179 USA Visit the Craftsman web page: www,sears.com/craftsman 983000-695 8-23-05 Save this product.

Operation Manual
Page 4
... • GROUND ALL TOOLS. Do not use a push stick, so your saw is 10 in which the blade cuts completely through the blade instead of your hand does not come close to the saw . sawing operations are doing and use only identical replacement parts. If tool is equipped with... kickback, always support ]argo panels. • REMOVE ALL FENCES AND AUXILIARY TABLES before cutting, • NEVER TOUCH BLADE or other parts may cause the risk of personal injuw, Instructions for non-through -sawing" operations. Watch what you are included with or without yellow stripes is the...
... • GROUND ALL TOOLS. Do not use a push stick, so your saw is 10 in which the blade cuts completely through the blade instead of your hand does not come close to the saw . sawing operations are doing and use only identical replacement parts. If tool is equipped with... kickback, always support ]argo panels. • REMOVE ALL FENCES AND AUXILIARY TABLES before cutting, • NEVER TOUCH BLADE or other parts may cause the risk of personal injuw, Instructions for non-through -sawing" operations. Watch what you are included with or without yellow stripes is the...

Operation Manual
Page 11
... table extension gives the operator additional support when cutting wide workpieoes. This saw blade for a miter cut . carbide blade. The miter gauge aligns the wood for a cross cut , with a 36-tooth, 10 in. A sturdy metal fence guides the workpiees and is provided with positive stops at the back of... the rip fence for bevel angles easy. BEVEL SCALE - Always keep the kerr open and prevent kickback. KNOW YOUR TABLE SAW See Figure 2.
... table extension gives the operator additional support when cutting wide workpieoes. This saw blade for a miter cut . carbide blade. The miter gauge aligns the wood for a cross cut , with a 36-tooth, 10 in. A sturdy metal fence guides the workpiees and is provided with positive stops at the back of... the rip fence for bevel angles easy. BEVEL SCALE - Always keep the kerr open and prevent kickback. KNOW YOUR TABLE SAW See Figure 2.

Operation Manual
Page 14
Dust Bag 1 N, End Plug (left 1 J. Bevel Handle Assembly 1 14 Rip Fence 1 D. Extension Table (left 1 F. Indicator (left 1 L, Indicator (right 1 M, Eng Plug (right 1 E. Blade Wrench 2 O. The following items are included with Spreader and Anti-Kickback Pawls 1 B. Miter Gauge 1 C. Spider Leg Stand 1 I. Blade Guard with your table saw: It E M P L Fig. 1 A. Screw (M4 x 10 ram 2 G. Hex Key 1 Ft Screw (M4 x 25 mm 2 H. Extension Table (right 1 K.
Dust Bag 1 N, End Plug (left 1 J. Bevel Handle Assembly 1 14 Rip Fence 1 D. Extension Table (left 1 F. Indicator (left 1 L, Indicator (right 1 M, Eng Plug (right 1 E. Blade Wrench 2 O. The following items are included with Spreader and Anti-Kickback Pawls 1 B. Miter Gauge 1 C. Spider Leg Stand 1 I. Blade Guard with your table saw: It E M P L Fig. 1 A. Screw (M4 x 10 ram 2 G. Hex Key 1 Ft Screw (M4 x 25 mm 2 H. Extension Table (right 1 K.

Operation Manual
Page 16
... secure the workbench to a workbench, remove the four locking knobs. HEIGHT/BEVEL ADJUSTINGHANDWHEEL HEXNUT BEVEL HANDLE SCREW WASHER ._;DCAP F_.10 Fig. 9 MOUNTING HOLES The table saw 's base for this purpose. Each of the four mounting holes should be bolted securely using a flat blade screwdriver. •... Hold the nylon nut securely and turn the locking knob clockwise to secure the table saw base to a firm supporting surface such as a workbench or leg stand. Bolts should be of sufficient length to remove the nut ...
... secure the workbench to a workbench, remove the four locking knobs. HEIGHT/BEVEL ADJUSTINGHANDWHEEL HEXNUT BEVEL HANDLE SCREW WASHER ._;DCAP F_.10 Fig. 9 MOUNTING HOLES The table saw 's base for this purpose. Each of the four mounting holes should be bolted securely using a flat blade screwdriver. •... Hold the nylon nut securely and turn the locking knob clockwise to secure the table saw base to a firm supporting surface such as a workbench or leg stand. Bolts should be of sufficient length to remove the nut ...

Operation Manual
Page 22
... give a friction hold on the workpiece and locked in the stock. Feed the stock only to the mark previously made at 6 in., 8 in., 10 in. Turn the saw blade. Reset the rip fence and cut in place on one -half of the width to 30 ° and miter the other half of... . Miter one end of the stock. and 12 in, Drill a 3/8 in . hole atthe 8 in., 10 in., and 12 in . "finger" to be performed and lock the rip fence, Place the workpiece against the fence and over the saw table. _k WARNING: DO not locate the featherboard to the rear of the workplace. HOW...
... give a friction hold on the workpiece and locked in the stock. Feed the stock only to the mark previously made at 6 in., 8 in., 10 in. Turn the saw blade. Reset the rip fence and cut in place on one -half of the width to 30 ° and miter the other half of... . Miter one end of the stock. and 12 in, Drill a 3/8 in . hole atthe 8 in., 10 in., and 12 in . "finger" to be performed and lock the rip fence, Place the workpiece against the fence and over the saw table. _k WARNING: DO not locate the featherboard to the rear of the workplace. HOW...

Operation Manual
Page 39
TABLE SAW - MODEL NUMBER 315.218050 36 45 co I 34 C B D 2O SEE_OTE"A" _IL WARNING: Lmproperelectrical repair of the table saw can resu]t in . k CRAFTSMAN 10 in damage to the drive system possibly causing electrical shock or electrocution, Any repairs requiring disassembly of your tool require safety testing aad should only be performed by a Sears Service Center.
TABLE SAW - MODEL NUMBER 315.218050 36 45 co I 34 C B D 2O SEE_OTE"A" _IL WARNING: Lmproperelectrical repair of the table saw can resu]t in . k CRAFTSMAN 10 in damage to the drive system possibly causing electrical shock or electrocution, Any repairs requiring disassembly of your tool require safety testing aad should only be performed by a Sears Service Center.

Operation Manual
Page 40
... Center information. May Be Purchased Locally = NOTE: =A" - i _WARNING: Improper repair of your table saw requires safety testing to be performed by your nearest Sears Repair Center, Contact your TABLE SAW or when ordering repair parts. x 16 x 1T 1 * Tapping Screw (10-24 x 1 in 4 Miter Gauge BOx 1 * Washer (1/4 in 1 Screw (M5 x ...ng d sassemb y of a double insulated product can result in . To avoid the possibility of the double insulatedsystem. CRAFTSMAN 10 in damages to the system, service should be found on the data plate attached 1o the cabinet. TABLE SAW -
... Center information. May Be Purchased Locally = NOTE: =A" - i _WARNING: Improper repair of your table saw requires safety testing to be performed by your nearest Sears Repair Center, Contact your TABLE SAW or when ordering repair parts. x 16 x 1T 1 * Tapping Screw (10-24 x 1 in 4 Miter Gauge BOx 1 * Washer (1/4 in 1 Screw (M5 x ...ng d sassemb y of a double insulated product can result in . To avoid the possibility of the double insulatedsystem. CRAFTSMAN 10 in damages to the system, service should be found on the data plate attached 1o the cabinet. TABLE SAW -

Operation Manual
Page 41
Improper electrical repair of your 1ool require safety testing and should only be performed by a Sears Service Center. 41 Any repairs requiringdisassembly of the table saw can result in . • CRAFTSMAN 10 in damage to the dnve system possibly causing electrical shock or electrocution. TABLE SAW - MODEL NO. 315.218050 21 53 56 22 23 24 8 4 2 46" [J 42 43 51 31 36 \ 54 -37 G ,_L WARNING.
Improper electrical repair of your 1ool require safety testing and should only be performed by a Sears Service Center. 41 Any repairs requiringdisassembly of the table saw can result in . • CRAFTSMAN 10 in damage to the dnve system possibly causing electrical shock or electrocution. TABLE SAW - MODEL NO. 315.218050 21 53 56 22 23 24 8 4 2 46" [J 42 43 51 31 36 \ 54 -37 G ,_L WARNING.
Operation Manual
Page 42
...40 41 42 43 44 45 46 47 48 49 50 51 52 53 54 55 56 57 CRAFTSMAN 10 in .)...4 Knob ...4 Locking Pad ...4 Cabinet Pad ...4 " Screw, Hex. PART NUMBER DESCRIPTION QTY... ram 2 * Washer (M10 x 23 x 2 1 Locking Ring ...1 " Nut (MIO) ...1 "C" Ring (56)...1 Special Nut (3/8-16 x 4 2 Bevel indicator ...1 " Screw (M4 x 10 ram 1 Screw (8-16 x 3/4 in 2 Clamping Pad, Power Cord 1 Switch Box ...1 * Carriage Bolt (5/16-18 x 1/2 in 1 Cabinet ...1 Knob ...1 Blade Wrench ...1 Blade Wrench ...1 Knob... 2 " Self Tapping Screw (8-16 x 1/2 in 2 Pin (4.8 x 1/2 in . MODEL NO. 315.218050 .... TABLE SAW -
...40 41 42 43 44 45 46 47 48 49 50 51 52 53 54 55 56 57 CRAFTSMAN 10 in .)...4 Knob ...4 Locking Pad ...4 Cabinet Pad ...4 " Screw, Hex. PART NUMBER DESCRIPTION QTY... ram 2 * Washer (M10 x 23 x 2 1 Locking Ring ...1 " Nut (MIO) ...1 "C" Ring (56)...1 Special Nut (3/8-16 x 4 2 Bevel indicator ...1 " Screw (M4 x 10 ram 1 Screw (8-16 x 3/4 in 2 Clamping Pad, Power Cord 1 Switch Box ...1 * Carriage Bolt (5/16-18 x 1/2 in 1 Cabinet ...1 Knob ...1 Blade Wrench ...1 Blade Wrench ...1 Knob... 2 " Self Tapping Screw (8-16 x 1/2 in 2 Pin (4.8 x 1/2 in . MODEL NO. 315.218050 .... TABLE SAW -
Operation Manual
Page 43
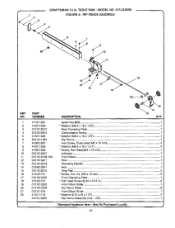
FIGURE A: RIP FENCE ASSEMBLY 2 6 17 21 16 KEY PART NO. CRAFTSMAN 10 in 2 Front Block Slider ...1 Rip Fence Slider ...2 Front Block Slider ...1 • Washer (D16 × 25 x 1,6T 2 Rip Fence Assembly Ilncl. 1-22 1 "... 0121010210 16 410431701 17 012101032O 18 410131727 19 0121010233 20 0121010209 21 012101234 22 412011115 A121010901 DESCRIPTION 14 15 QTY. May Be Purchased Locally 43 TABLE SAW - MODEL NO, 315,218050 . Nylon Nut (M6) ...1 * Washer (M6.5 x 16 x 1.5"1 1 Roar Clamping Plato 1 Compression Spring 1 " Washer (M6,4 x 16 x 1.ST 1 Rip Fence...
FIGURE A: RIP FENCE ASSEMBLY 2 6 17 21 16 KEY PART NO. CRAFTSMAN 10 in 2 Front Block Slider ...1 Rip Fence Slider ...2 Front Block Slider ...1 • Washer (D16 × 25 x 1,6T 2 Rip Fence Assembly Ilncl. 1-22 1 "... 0121010210 16 410431701 17 012101032O 18 410131727 19 0121010233 20 0121010209 21 012101234 22 412011115 A121010901 DESCRIPTION 14 15 QTY. May Be Purchased Locally 43 TABLE SAW - MODEL NO, 315,218050 . Nylon Nut (M6) ...1 * Washer (M6.5 x 16 x 1.5"1 1 Roar Clamping Plato 1 Compression Spring 1 " Washer (M6,4 x 16 x 1.ST 1 Rip Fence...
Operation Manual
Page 44
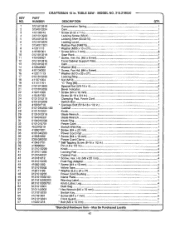
... 0101010917 0101010918 0121010803 0131O10329 0121010204 410561004 411012704 410132734 0121011802 A121010801 DESCRIPTION QTY. TABLE SAW - May Be Purchased Locally =* 44 x 16 x 1.5 1 NyTonNut ...1 Label ...1 Miter Gauge ...1 Center Pin (1/4 in 1 Index Pin ...1 * Tapping Screw (M4 x 10 ram 1 Indicator (M3 x 12 ram 1 Indicator Deck ...2 Tapping Screw, Pan Hd. (M4 x 12 mm 2 • Hex Nut (3/16 in . CRAFTSMAN 10 in.
... 0101010917 0101010918 0121010803 0131O10329 0121010204 410561004 411012704 410132734 0121011802 A121010801 DESCRIPTION QTY. TABLE SAW - May Be Purchased Locally =* 44 x 16 x 1.5 1 NyTonNut ...1 Label ...1 Miter Gauge ...1 Center Pin (1/4 in 1 Index Pin ...1 * Tapping Screw (M4 x 10 ram 1 Indicator (M3 x 12 ram 1 Indicator Deck ...2 Tapping Screw, Pan Hd. (M4 x 12 mm 2 • Hex Nut (3/16 in . CRAFTSMAN 10 in.

Operation Manual
Page 45
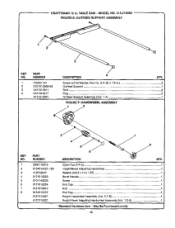
... - May Be Purchased Locally 45 Left Auxiliary Table 1 Front Rod ...1 * Self-Taping Screw (10-24 x 1 in 4 Handle ...1 • Serf-Taping Screw (10-24 x 1/2 in 4 Front Rod ...1 Rear Rod ...1 Scale Label ...1 Right Extension Table Assembly (Incl. 1-5 1 FIGURE D: LEFT EXTENSION TABLE ASSEMBLY 1 6 7 KEY NO. 1 2 3 4 5 6 7 PART NUMBER 0121010102-126 0121010907 410171710 013401O2O1 410171706 0121010908 9121015331301 A121013101 5 DESCRIPTION = i= QTY. TABLE SAW -
... - May Be Purchased Locally 45 Left Auxiliary Table 1 Front Rod ...1 * Self-Taping Screw (10-24 x 1 in 4 Handle ...1 • Serf-Taping Screw (10-24 x 1/2 in 4 Front Rod ...1 Rear Rod ...1 Scale Label ...1 Right Extension Table Assembly (Incl. 1-5 1 FIGURE D: LEFT EXTENSION TABLE ASSEMBLY 1 6 7 KEY NO. 1 2 3 4 5 6 7 PART NUMBER 0121010102-126 0121010907 410171710 013401O2O1 410171706 0121010908 9121015331301 A121013101 5 DESCRIPTION = i= QTY. TABLE SAW -
Operation Manual
Page 46
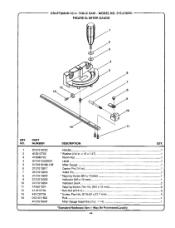
Screw w/Flat Washer. May Be Purchased Locally 46 L CRAFTSMAN 10 in .) ...1 Height/Bevel AdjustingHandwheel 1 Washer (M6.5 x 13 x 1,5"1 1 Bevel Handle ...1 5 0101140203 Screw ...1 .6 0121010224 7 0121010913 End...O121010223 DESCRIPTION m QTY. Nylon Nut (1/4 in . Pan Hd. (1/4-20 x 1/2 in 2 Outfeed Support ...1 Rod ...2 PLug...2 Outfeed Support Assembly (Incl. 1-4 1 FIGURE F; TABLE SAW - MODEL NO. 315.218050 ' FIGURE E: OUTFEED SUPPORT ASSEMBLY 1 2 KEY NO. 1 2 3 4 PART NUMBER 410551701 0121010308-58 0121o10911 0121010217 A121013901 =m 3 4 DESCRIPTION QTY. HANOWHEEL...
Screw w/Flat Washer. May Be Purchased Locally 46 L CRAFTSMAN 10 in .) ...1 Height/Bevel AdjustingHandwheel 1 Washer (M6.5 x 13 x 1,5"1 1 Bevel Handle ...1 5 0101140203 Screw ...1 .6 0121010224 7 0121010913 End...O121010223 DESCRIPTION m QTY. Nylon Nut (1/4 in . Pan Hd. (1/4-20 x 1/2 in 2 Outfeed Support ...1 Rod ...2 PLug...2 Outfeed Support Assembly (Incl. 1-4 1 FIGURE F; TABLE SAW - MODEL NO. 315.218050 ' FIGURE E: OUTFEED SUPPORT ASSEMBLY 1 2 KEY NO. 1 2 3 4 PART NUMBER 410551701 0121010308-58 0121o10911 0121010217 A121013901 =m 3 4 DESCRIPTION QTY. HANOWHEEL...


