

Operation Manual
Page 2
... Safety Rules...3-4 • Specific Safety Rules ...4-5 • Symbols ... 6-7 • Electrical 8 • Glossary of Terms 9 " Features... 10-13 • ToolsNeeded ... 13 • Loose Parts ... 14 • "Assembly ...15-19 • Operation 19-32 II Adjustments... 33-35 • Maintenance ... 36 • Troubleshooting...37...-38 • Exploded View...39-47 • Parts Ordering/Service ...Back Page ONE YEAR FULL WARRANTY ON CRAFTSMAN TOOL If this Craftsman tool fails due to a defect in material or workmanship within one year from ...
... Safety Rules...3-4 • Specific Safety Rules ...4-5 • Symbols ... 6-7 • Electrical 8 • Glossary of Terms 9 " Features... 10-13 • ToolsNeeded ... 13 • Loose Parts ... 14 • "Assembly ...15-19 • Operation 19-32 II Adjustments... 33-35 • Maintenance ... 36 • Troubleshooting...37...-38 • Exploded View...39-47 • Parts Ordering/Service ...Back Page ONE YEAR FULL WARRANTY ON CRAFTSMAN TOOL If this Craftsman tool fails due to a defect in material or workmanship within one year from ...

Operation Manual
Page 3
Learn the saw while {t is off when plugging in any other part that is damaged should be disconnected, • AVOID ACCIDENTAL STARTING. Do not use it was designed. • USE RIGHTTOOL. Don=tforce the tool or attachment ... 14 is dusty. • PROTECT YOUR HEARING, Wear bearing protection during extended periods of personal injury. • USE THE RIGHT DIRECTION OF FEED. l= CHECK DAMAGED PARTS, Before further use outdoors and so marked, • ALWAYS KEEP THE BLADE GUARD AND RIVING KNIFE/SPREADER/SPLITFER IN PLACE and in good condition. A guard...
Learn the saw while {t is off when plugging in any other part that is damaged should be disconnected, • AVOID ACCIDENTAL STARTING. Do not use it was designed. • USE RIGHTTOOL. Don=tforce the tool or attachment ... 14 is dusty. • PROTECT YOUR HEARING, Wear bearing protection during extended periods of personal injury. • USE THE RIGHT DIRECTION OF FEED. l= CHECK DAMAGED PARTS, Before further use outdoors and so marked, • ALWAYS KEEP THE BLADE GUARD AND RIVING KNIFE/SPREADER/SPLITFER IN PLACE and in good condition. A guard...

Operation Manual
Page 4
...8226; DOUBLE CHECK ALL SETUPS. Keep the blade guard down, the antikickback pawls down, and the rivingknife/spreader/ splitter properly aligned to the saw is 10 in this manual or addendums, Use of accessories that accept the tool's plug. • DO NOT MODIFY the plug provided. Use a ...incorrect. Usa of blade pinching and kickback, always support ]argo panels. • REMOVE ALL FENCES AND AUXILIARY TABLES before cutting, • NEVER TOUCH BLADE or other parts may cause the risk of personal injuw, Instructions for non-through the blade instead of cord location and keep it...
...8226; DOUBLE CHECK ALL SETUPS. Keep the blade guard down, the antikickback pawls down, and the rivingknife/spreader/ splitter properly aligned to the saw is 10 in this manual or addendums, Use of accessories that accept the tool's plug. • DO NOT MODIFY the plug provided. Use a ...incorrect. Usa of blade pinching and kickback, always support ]argo panels. • REMOVE ALL FENCES AND AUXILIARY TABLES before cutting, • NEVER TOUCH BLADE or other parts may cause the risk of personal injuw, Instructions for non-through the blade instead of cord location and keep it...

Operation Manual
Page 5
... guide the work. • NEVER stand or have any part of your exposure to these chemicals: work in line with the path of the saw blade. • NEVER reach behind, over the saw blade. • SAVE THESE INSTRUCTIONS. b) Use saw blade guard and dying knife/spreader/ splitter for every operation...or over , or within three inches of the blade or cutter with safe operation BEFORE performing any work using the table saw. • ALWAYS TURN OFF SAW before it is pushed all through sawing. If you loan someone this manual or addendums. Use of accessories that are : • lead from lead-...
... guide the work. • NEVER stand or have any part of your exposure to these chemicals: work in line with the path of the saw blade. • NEVER reach behind, over the saw blade. • SAVE THESE INSTRUCTIONS. b) Use saw blade guard and dying knife/spreader/ splitter for every operation...or over , or within three inches of the blade or cutter with safe operation BEFORE performing any work using the table saw. • ALWAYS TURN OFF SAW before it is pushed all through sawing. If you loan someone this manual or addendums. Use of accessories that are : • lead from lead-...

Operation Manual
Page 7
Before beginning power tool operation, always wear safety goggles or safety glasses with side shields. When servicing, use only identical replacement parts. _k WARNING: To avoid serious personal injury, do not attempt to use this product until you return the product to your eyes, which , if not ...
Before beginning power tool operation, always wear safety goggles or safety glasses with side shields. When servicing, use only identical replacement parts. _k WARNING: To avoid serious personal injury, do not attempt to use this product until you return the product to your eyes, which , if not ...

Operation Manual
Page 9
... caused by the workpiece being dropped into the blade or being guided by cutter blades when the workplace is designed to the table surface. Anti-Kickback Pawls (radial arm and table saws) A device which produces a square-sided notch or trough in the workplace (recluires a special blade). Featherboard A device used ... or shaping operation made at 90 °, Compound Cut A cross cut by the blade in a non-through or part{al cut removing a wedge from a block so the end (or part of the end) is angled rather than 90 _ to stop the workpiece from being done, Worktable Surface where the ...
... caused by the workpiece being dropped into the blade or being guided by cutter blades when the workplace is designed to the table surface. Anti-Kickback Pawls (radial arm and table saws) A device which produces a square-sided notch or trough in the workplace (recluires a special blade). Featherboard A device used ... or shaping operation made at 90 °, Compound Cut A cross cut by the blade in a non-through or part{al cut removing a wedge from a block so the end (or part of the end) is angled rather than 90 _ to stop the workpiece from being done, Worktable Surface where the ...

Operation Manual
Page 15
...starting and possible sedous personal injury. _IL WARNING: De not lift the saw without help when needed. • Inspect the tool carefully to your body. Hold it , cheek for assistance. _L WARNING" If any parts are replaced. Ignoring these precautions can result in serious personal injury. _k... not discard the packing material until you have carefully inspected and satisfactorily operated the tool. • The saw is heavy. After assembling it close to make sure the table saw is misuse and could result in possible serious personal injury. Do not reach ever or across the blade....
...starting and possible sedous personal injury. _IL WARNING: De not lift the saw without help when needed. • Inspect the tool carefully to your body. Hold it , cheek for assistance. _L WARNING" If any parts are replaced. Ignoring these precautions can result in serious personal injury. _k... not discard the packing material until you have carefully inspected and satisfactorily operated the tool. • The saw is heavy. After assembling it close to make sure the table saw is misuse and could result in possible serious personal injury. Do not reach ever or across the blade....

Operation Manual
Page 32
... Push the lever to the left while holding the throat plate in place. To avoid personal injury, always use an adjustable dado on this saw, NOTE: This saw cannot be used to make sure both the inner blade washer and outer blade washer are used. .& WARNING: Always put all spacers in ... shims if necessary, • Move the bevel locking lever to the right and rotate the blade back to the tool. An optional dadc throat plate (part number 0121010317) is designed for use push blocks, push sticks, or featherboards when making any non-through cut . • Reinstall the arbor nut. • ...
... Push the lever to the left while holding the throat plate in place. To avoid personal injury, always use an adjustable dado on this saw, NOTE: This saw cannot be used to make sure both the inner blade washer and outer blade washer are used. .& WARNING: Always put all spacers in ... shims if necessary, • Move the bevel locking lever to the right and rotate the blade back to the tool. An optional dadc throat plate (part number 0121010317) is designed for use push blocks, push sticks, or featherboards when making any non-through cut . • Reinstall the arbor nut. • ...
Operation Manual
Page 36
...from vadous types of commercial solvents and may be damaged by cleaning out saw has been lubricated at any other parts may result in position. • Check the blade guard assembly. • TOmaintain the table surfaces, fence, and rails, periodically apply paste wax to them and ...buff to provide smooth functioning. Use of the miter gauge. • Protect the blade by their use only identical replacement parts. Use a resin solvent on the blade teeth....
...from vadous types of commercial solvents and may be damaged by cleaning out saw has been lubricated at any other parts may result in position. • Check the blade guard assembly. • TOmaintain the table surfaces, fence, and rails, periodically apply paste wax to them and ...buff to provide smooth functioning. Use of the miter gauge. • Protect the blade by their use only identical replacement parts. Use a resin solvent on the blade teeth....

Operation Manual
Page 40
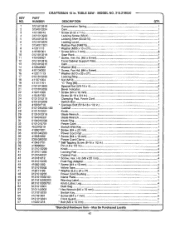
... NO. 315.218050 -- = == The model number wirl be performed by your nearest Sears Repair Center, Contact your TABLE SAW or when ordering repair parts. May Be Purchased Locally = NOTE: =A" - x 16 x 1T 1 * Tapping Screw (10-24 x 1 in 4 Miter Gauge BOx 1 * Washer (1/4 in 1 Screw (M5 x 6 ram, Soc...M4 × 10 ram 2 *Standard Hardwere Item - TABLE SAW - Any repairS requ r ng d sassemb y of alteration or damage to be performed by your nearest Sears Repair Center, Contact your nearest Sears Retail Store for Service Center information, .1111 40 CRAFTSMAN 10 in all correspondence...
... NO. 315.218050 -- = == The model number wirl be performed by your nearest Sears Repair Center, Contact your TABLE SAW or when ordering repair parts. May Be Purchased Locally = NOTE: =A" - x 16 x 1T 1 * Tapping Screw (10-24 x 1 in 4 Miter Gauge BOx 1 * Washer (1/4 in 1 Screw (M5 x 6 ram, Soc...M4 × 10 ram 2 *Standard Hardwere Item - TABLE SAW - Any repairS requ r ng d sassemb y of alteration or damage to be performed by your nearest Sears Repair Center, Contact your nearest Sears Retail Store for Service Center information, .1111 40 CRAFTSMAN 10 in all correspondence...
Operation Manual
Page 42
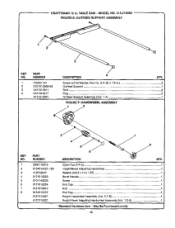
PART NUMBER DESCRIPTION QTY. 0121010919 0134010224 410138743 0121O10906 0134010316 0121010220 0134011301 41201113 410181001 0121010219...Screw (8-16 x 1/2 in 2 Pin (4.8 x 1/2 in . Hd. (M6 x 20 mm 4 Duet Bag Adaptor 1 - May Be Purchased Locally 42 MODEL NO. 315.218050 .... TABLE SAW - Screw (M4 x 10 mm 4 Velero Tape ...2 * Washer (5.2 x 24 x 2"1 2 Power Cord Bushing 1 Name Plate ...1 Warning Label ...1 Knob Label, Leg ...4 Dust Bag ...1 • Hex Wrench...45 46 47 48 49 50 51 52 53 54 55 56 57 CRAFTSMAN 10 in .)...4 Knob ...4 Locking Pad ...4 Cabinet Pad ...4 " Screw, Hex.
PART NUMBER DESCRIPTION QTY. 0121010919 0134010224 410138743 0121O10906 0134010316 0121010220 0134011301 41201113 410181001 0121010219...Screw (8-16 x 1/2 in 2 Pin (4.8 x 1/2 in . Hd. (M6 x 20 mm 4 Duet Bag Adaptor 1 - May Be Purchased Locally 42 MODEL NO. 315.218050 .... TABLE SAW - Screw (M4 x 10 mm 4 Velero Tape ...2 * Washer (5.2 x 24 x 2"1 2 Power Cord Bushing 1 Name Plate ...1 Warning Label ...1 Knob Label, Leg ...4 Dust Bag ...1 • Hex Wrench...45 46 47 48 49 50 51 52 53 54 55 56 57 CRAFTSMAN 10 in .)...4 Knob ...4 Locking Pad ...4 Cabinet Pad ...4 " Screw, Hex.
Operation Manual
Page 43
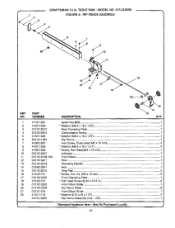
... Clamping Plate 1 " Flat Head Screw (8-32 x 3/16 in . MODEL NO, 315,218050 . May Be Purchased Locally 43 FIGURE A: RIP FENCE ASSEMBLY 2 6 17 21 16 KEY PART NO. TABLE SAW - CRAFTSMAN 10 in 2 Front Block Slider ...1 Rip Fence Slider ...2 Front Block Slider ...1 • Washer (D16 × 25 x 1,6T 2 Rip Fence Assembly Ilncl. 1-22 1 "Standard Hardware Item...
... Clamping Plate 1 " Flat Head Screw (8-32 x 3/16 in . MODEL NO, 315,218050 . May Be Purchased Locally 43 FIGURE A: RIP FENCE ASSEMBLY 2 6 17 21 16 KEY PART NO. TABLE SAW - CRAFTSMAN 10 in 2 Front Block Slider ...1 Rip Fence Slider ...2 Front Block Slider ...1 • Washer (D16 × 25 x 1,6T 2 Rip Fence Assembly Ilncl. 1-22 1 "Standard Hardware Item...
Operation Manual
Page 44
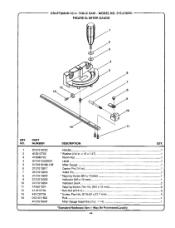
...*Standard Hardware Item - x 16 x 1.5 1 NyTonNut ...1 Label ...1 Miter Gauge ...1 Center Pin (1/4 in 1 Index Pin ...1 * Tapping Screw (M4 x 10 ram 1 Indicator (M3 x 12 ram 1 Indicator Deck ...2 Tapping Screw, Pan Hd. (M4 x 12 mm 2 • Hex Nut (3/16 in . ... GAUGE 1 2 3 12 13 14 KEY NO. 1 2 3 4 G 6 7 8 9 10 11 12 13 14 k, PART NUMBER 0121010222 412012705 412080702 9121015330302 0131010109-126 0101010917 0101010918 0121010803 0131O10329 0121010204 410561004 411012704 410132734 0121011802 A121010801 DESCRIPTION QTY. CRAFTSMAN 10 in. TABLE SAW - May Be Purchased Locally =* 44
...*Standard Hardware Item - x 16 x 1.5 1 NyTonNut ...1 Label ...1 Miter Gauge ...1 Center Pin (1/4 in 1 Index Pin ...1 * Tapping Screw (M4 x 10 ram 1 Indicator (M3 x 12 ram 1 Indicator Deck ...2 Tapping Screw, Pan Hd. (M4 x 12 mm 2 • Hex Nut (3/16 in . ... GAUGE 1 2 3 12 13 14 KEY NO. 1 2 3 4 G 6 7 8 9 10 11 12 13 14 k, PART NUMBER 0121010222 412012705 412080702 9121015330302 0131010109-126 0101010917 0101010918 0121010803 0131O10329 0121010204 410561004 411012704 410132734 0121011802 A121010801 DESCRIPTION QTY. CRAFTSMAN 10 in. TABLE SAW - May Be Purchased Locally =* 44

Operation Manual
Page 45
... x 1/2 in 4 Front Rod ...1 Rear Rod ...1 Scale Label ...1 Right Extension Table Assembly (Incl. 1-5 1 FIGURE D: LEFT EXTENSION TABLE ASSEMBLY 1 6 7 KEY NO. 1 2 3 4 5 6 7 PART NUMBER 0121010102-126 0121010907 410171710 013401O2O1 410171706 0121010908 9121015331301 A121013101 5 DESCRIPTION = i= QTY. MODEL NO. 315.218050 __ FIGURE C : RIGHT EXTENSION TABLE ASSEMBLY 1 5 4 3 2 KEY NO. 1 2 3 4 5 PART NUMBER 0121010103-126 410171710 0121010909 0121010910 9131015331302 A121013102 DESCRIPTION QTY. TABLE SAW -
... x 1/2 in 4 Front Rod ...1 Rear Rod ...1 Scale Label ...1 Right Extension Table Assembly (Incl. 1-5 1 FIGURE D: LEFT EXTENSION TABLE ASSEMBLY 1 6 7 KEY NO. 1 2 3 4 5 6 7 PART NUMBER 0121010102-126 0121010907 410171710 013401O2O1 410171706 0121010908 9121015331301 A121013101 5 DESCRIPTION = i= QTY. MODEL NO. 315.218050 __ FIGURE C : RIGHT EXTENSION TABLE ASSEMBLY 1 5 4 3 2 KEY NO. 1 2 3 4 5 PART NUMBER 0121010103-126 410171710 0121010909 0121010910 9131015331302 A121013102 DESCRIPTION QTY. TABLE SAW -
Operation Manual
Page 46
Screw w/Flat Washer. May Be Purchased Locally 46 L CRAFTSMAN 10 in 2 Outfeed Support ...1 Rod ...2 PLug...2 Outfeed Support Assembly (Incl. 1-4 1 FIGURE F; Pan Hd. (1/4-20 x 1/2 in...Assembly (Incl. 2,7-8 1 Height/Bevel AdjustingNandwheel Assembly (Incl. 1,3-6 1 ii =Standard Hardware Item - PART NUMBER 1 0000110812 2 0134010221-130 3 412012041 4 O121010223 DESCRIPTION m QTY. MODEL NO. 315.218050 ' FIGURE E: OUTFEED SUPPORT ASSEMBLY 1 2 KEY NO. 1 2 3 4 PART NUMBER 410551701 0121010308-58 0121o10911 0121010217 A121013901 =m 3 4 DESCRIPTION QTY. TABLE SAW -
Screw w/Flat Washer. May Be Purchased Locally 46 L CRAFTSMAN 10 in 2 Outfeed Support ...1 Rod ...2 PLug...2 Outfeed Support Assembly (Incl. 1-4 1 FIGURE F; Pan Hd. (1/4-20 x 1/2 in...Assembly (Incl. 2,7-8 1 Height/Bevel AdjustingNandwheel Assembly (Incl. 1,3-6 1 ii =Standard Hardware Item - PART NUMBER 1 0000110812 2 0134010221-130 3 412012041 4 O121010223 DESCRIPTION m QTY. MODEL NO. 315.218050 ' FIGURE E: OUTFEED SUPPORT ASSEMBLY 1 2 KEY NO. 1 2 3 4 PART NUMBER 410551701 0121010308-58 0121o10911 0121010217 A121013901 =m 3 4 DESCRIPTION QTY. TABLE SAW -
Operation Manual
Page 47
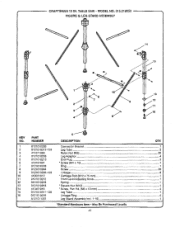
MODELNO.315,218050 FIGUREG=LEGSTANDASSEMBLY 14 KEY NO. 1 2 3 4 5 6 7 8 9 10 11 12 13 14 15 16 PART NUMBER 0121010203 0121010312-126 411071003 0121010205 O121O10213 410191001 0121010228 0121010804 0121010805-126 410031012 O121010212 0131010918 O121010918 410451016 0121010311-126 0121010226 A121011301 DESCRIPTION QTY. May Be ...
MODELNO.315,218050 FIGUREG=LEGSTANDASSEMBLY 14 KEY NO. 1 2 3 4 5 6 7 8 9 10 11 12 13 14 15 16 PART NUMBER 0121010203 0121010312-126 411071003 0121010205 O121O10213 410191001 0121010228 0121010804 0121010805-126 410031012 O121010212 0131010918 O121010918 410451016 0121010311-126 0121010226 A121011301 DESCRIPTION QTY. May Be ...

Operation Manual
Page 48
...and Canada) www.sears.¢om www,sears.ca ......... !.i._....... .... ..... ._., .::_::.,: Our Home For repair of carry in your nearest Seers Parts & Repair Center 1m 800488 m 1222 Call anytime, day or night (U.S.A. MC M_rque de commerce / MD M_tque d_pO_ee de Sean_, Roebuc_ and...For Sears professional installation of all major brand appliances, ii::::_::::__ lawn and garden equipment, or heating and cooling systems, _. For the replacement parts, accessories and owner's manuals that you need to do-it ! Roebuckand Co. M_rce de Sew_io de Se_s. Your Home ,;:::,_,: For repair...
...and Canada) www.sears.¢om www,sears.ca ......... !.i._....... .... ..... ._., .::_::.,: Our Home For repair of carry in your nearest Seers Parts & Repair Center 1m 800488 m 1222 Call anytime, day or night (U.S.A. MC M_rque de commerce / MD M_tque d_pO_ee de Sean_, Roebuc_ and...For Sears professional installation of all major brand appliances, ii::::_::::__ lawn and garden equipment, or heating and cooling systems, _. For the replacement parts, accessories and owner's manuals that you need to do-it ! Roebuckand Co. M_rce de Sew_io de Se_s. Your Home ,;:::,_,: For repair...

