
Operation Manual
Page 1
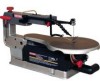
VARIABLE SPEED SCROLL SAW Model No. 137.216020 C us CAUTION: Before using this Scroll Saw, read this manual and follow all its Safety Rules and Operating Instructions • Safety Instructions • Installation • Operation • Maintenance • Parts List Sears, Roebuck and Co., Hoffman Estates, IL 60179 USA Visit our Craftsman website: www,sears,com/craftsman Part No. 137216020001 Printed in . Operator's Manual 16 in China
VARIABLE SPEED SCROLL SAW Model No. 137.216020 C us CAUTION: Before using this Scroll Saw, read this manual and follow all its Safety Rules and Operating Instructions • Safety Instructions • Installation • Operation • Maintenance • Parts List Sears, Roebuck and Co., Hoffman Estates, IL 60179 USA Visit our Craftsman website: www,sears,com/craftsman Part No. 137216020001 Printed in . Operator's Manual 16 in China

Operation Manual
Page 2
... and Attachments Tools Needed for Assembly Carton Contents Know Your Scroll Saw Glossary of Terms Assembly and Adjustments Operation Maintenance Troubleshooting Guide Parts List PAGE 2 3 4 5 8 10 12 12 13 14 15 17 26 31 32 34 CRAFTSMAN ONE YEAR FULL WARRANTY If this Craftsman tool fails due to a defect in a well ventilated area and...
... and Attachments Tools Needed for Assembly Carton Contents Know Your Scroll Saw Glossary of Terms Assembly and Adjustments Operation Maintenance Troubleshooting Guide Parts List PAGE 2 3 4 5 8 10 12 12 13 14 15 17 26 31 32 34 CRAFTSMAN ONE YEAR FULL WARRANTY If this Craftsman tool fails due to a defect in a well ventilated area and...

Operation Manual
Page 6
...moving parts, breakage of injury to yourself or others. 18. Everyday eyeglasses have only impact-resistant lenses. NOTE: Glasses or goggles not in . Sawing operation produces dust. 14. NEVER STAND ON THE TOOL. Do not wear loose clothing, gloves, neckties, rings, bracelets or other part that is... ARE NOT safety glasses. It is in the OFF position before servicing, and when changing accessories such as blades, bits and cutters. 16. DISCONNECT TOOLS FROM POWER SOURCE before plugging the tool in compliance with ANSI Safety standard Z87.1. Make sure switch is safer than using your...
...moving parts, breakage of injury to yourself or others. 18. Everyday eyeglasses have only impact-resistant lenses. NOTE: Glasses or goggles not in . Sawing operation produces dust. 14. NEVER STAND ON THE TOOL. Do not wear loose clothing, gloves, neckties, rings, bracelets or other part that is... ARE NOT safety glasses. It is in the OFF position before servicing, and when changing accessories such as blades, bits and cutters. 16. DISCONNECT TOOLS FROM POWER SOURCE before plugging the tool in compliance with ANSI Safety standard Z87.1. Make sure switch is safer than using your...

Operation Manual
Page 7
... generated from the power source. 21. Follow instructions for best and safest performance. 20.NEVERLEAVE THE TOOL RUNNING UNATTENDED. MAINTAIN TOOLS WITH CARE. Always operate saw in close proximity to your health. DANGER J People with electronic devices, such as pacemakers, should consult their physician(s) before using this product.
... generated from the power source. 21. Follow instructions for best and safest performance. 20.NEVERLEAVE THE TOOL RUNNING UNATTENDED. MAINTAIN TOOLS WITH CARE. Always operate saw in close proximity to your health. DANGER J People with electronic devices, such as pacemakers, should consult their physician(s) before using this product.
Operation Manual
Page 8
...ARE NOT thoroughly familiar with the operation of all safety instructions and operating procedures throughout the manual. , DO NOT OPERATE the Scroll Saw until it is too small to perform properly, shut off the switch and remove the plug from the power supply outlet. Place the...workbench MUST be fastened to the floor. , THIS SCROLL SAW is in any way, or any part of Scroll Saw be held safely. , READ AND UNDERSTAND all debris before operating saw. Replace missing, damaged, or failed parts before resuming operation. , YOUR SCROLL SAW MUST BE SECURELY FASTENED to its support. 12. Do...
...ARE NOT thoroughly familiar with the operation of all safety instructions and operating procedures throughout the manual. , DO NOT OPERATE the Scroll Saw until it is too small to perform properly, shut off the switch and remove the plug from the power supply outlet. Place the...workbench MUST be fastened to the floor. , THIS SCROLL SAW is in any way, or any part of Scroll Saw be held safely. , READ AND UNDERSTAND all debris before operating saw. Replace missing, damaged, or failed parts before resuming operation. , YOUR SCROLL SAW MUST BE SECURELY FASTENED to its support. 12. Do...
Operation Manual
Page 9
...by sawdust clogging the kerf. EXERCISE CAUTION when cutting workpieces that may affect operation. Round items will cut. 18. NEVER REACH under the scroll saw kerf while being backed out of parts, mounting or any other conditions that are damaged should be properly repaired or replaced before loosening the...are round or irregularly shaped. THINK SAFETY. 9 ALWAYS release blade tension before using the tool. 26. 16.TURN THE SAW OFF AND UNPLUG THE CORD if the blade binds in the saw table when motor is running. 25. DO NOT feed the material too fast while cutting. CHECK FOR ...
...by sawdust clogging the kerf. EXERCISE CAUTION when cutting workpieces that may affect operation. Round items will cut. 18. NEVER REACH under the scroll saw kerf while being backed out of parts, mounting or any other conditions that are damaged should be properly repaired or replaced before loosening the...are round or irregularly shaped. THINK SAFETY. 9 ALWAYS release blade tension before using the tool. 26. 16.TURN THE SAW OFF AND UNPLUG THE CORD if the blade binds in the saw table when motor is running. 25. DO NOT feed the material too fast while cutting. CHECK FOR ...
Operation Manual
Page 12
... Hardware Department or see the Sears Power and Hand Tool Catalog for the following accessories: ITEM Pin-end saw blades Plain-end saw . Any such alteration or modification is misuse and could result in this scroll saw blades Sears may cause hazards. Use of improper accessories may recommend other accessories. Use only accessories recommended...
... Hardware Department or see the Sears Power and Hand Tool Catalog for the following accessories: ITEM Pin-end saw blades Plain-end saw . Any such alteration or modification is misuse and could result in this scroll saw blades Sears may cause hazards. Use of improper accessories may recommend other accessories. Use only accessories recommended...
Operation Manual
Page 13
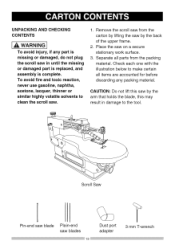
..., acetone, lacquer, thinner or similar highly volatile solvents to clean the scroll saw on a secure stationary work surface. 3. Remove the scroll saw in damage to make certain all parts from the carton by lifting the saw by the arm that holds the blade, this may result in until... packing material. Check each one with the illustration below to the tool. Place the saw . 1. Separate all items are accounted for before discarding any part is complete. Scroll Saw Pin-end saw blade Plain-end saw by the back of the upper frame. 2. UNPACKING AND CHECKING CONTENTS ,A WARNING I...
..., acetone, lacquer, thinner or similar highly volatile solvents to clean the scroll saw on a secure stationary work surface. 3. Remove the scroll saw in damage to make certain all parts from the carton by lifting the saw by the arm that holds the blade, this may result in until... packing material. Check each one with the illustration below to the tool. Place the saw . 1. Separate all items are accounted for before discarding any part is complete. Scroll Saw Pin-end saw blade Plain-end saw by the back of the upper frame. 2. UNPACKING AND CHECKING CONTENTS ,A WARNING I...

Operation Manual
Page 15
...0° to the outside point of the next bent tooth establishing set of table angle from under the table and base. SCROLL SAW TERMS BEVEL SCALE - Helps protect fingers from rising. Quickly loosens and retightens the blade to extra blades or wrenches. The ... Rate of moving inline during cutting operation. FEED- Retain and position the blades. Variable switch dial allows greater versatility when cutting a variety of sight for bevel cutting. TABLE LOCK KNOB - VARIABLE SPEED CONTROL KNOB - DEFLECTION - Represents the degree of teeth. The tension lever quickly ...
...0° to the outside point of the next bent tooth establishing set of table angle from under the table and base. SCROLL SAW TERMS BEVEL SCALE - Helps protect fingers from rising. Quickly loosens and retightens the blade to extra blades or wrenches. The ... Rate of moving inline during cutting operation. FEED- Retain and position the blades. Variable switch dial allows greater versatility when cutting a variety of sight for bevel cutting. TABLE LOCK KNOB - VARIABLE SPEED CONTROL KNOB - DEFLECTION - Represents the degree of teeth. The tension lever quickly ...

Operation Manual
Page 16
WORKPIECE - Area or line of sight of the workpiece edge last cut . The end of the workpiece moving in line toward the saw blade. SAW BLADE PATH - TRAILING EDGE - Material on which the cutting operation is guided into the blade. LEADING EDGE - Leading edge Kerf Saw blade path Workpiece Trailing edge The front edge of workpiece being performed. SURFACE - Top of the workpiece that is being cut by the saw blade edge.
WORKPIECE - Area or line of sight of the workpiece edge last cut . The end of the workpiece moving in line toward the saw blade. SAW BLADE PATH - TRAILING EDGE - Material on which the cutting operation is guided into the blade. LEADING EDGE - Leading edge Kerf Saw blade path Workpiece Trailing edge The front edge of workpiece being performed. SURFACE - Top of the workpiece that is being cut by the saw blade edge.
Operation Manual
Page 17
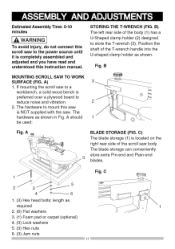
...(1) is located on the right rear side of the T-wrench handle into the U-shaped clamp holder as shown in Fig. Position the shaft of the scroll saw . C 1 5 4 _----_ -- 6 1. (3) Hex head bolts; Fig. A BLADE STORAGE (FIG. The blade storage can conveniently store extra Pin...pad or carpet (optional) 4. (3) Lock washers 5. (3) Hex nuts 6. (3) Jam nuts 17 B MOUNTING SCROLL SAW TO WORK SURFACE (FIG. If mounting the scroll saw to a workbench, a solid wood bench is NOT supplied with the saw body. A should be used: Fig. Fig. A) 1. Estimated Assembly Time: 5-10 minutes WARNING J To...
...(1) is located on the right rear side of the T-wrench handle into the U-shaped clamp holder as shown in Fig. Position the shaft of the scroll saw . C 1 5 4 _----_ -- 6 1. (3) Hex head bolts; Fig. A BLADE STORAGE (FIG. The blade storage can conveniently store extra Pin...pad or carpet (optional) 4. (3) Lock washers 5. (3) Hex nuts 6. (3) Jam nuts 17 B MOUNTING SCROLL SAW TO WORK SURFACE (FIG. If mounting the scroll saw to a workbench, a solid wood bench is NOT supplied with the saw body. A should be used: Fig. Fig. A) 1. Estimated Assembly Time: 5-10 minutes WARNING J To...
Operation Manual
Page 18
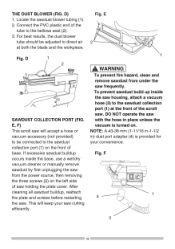
...on the left side of base. DO NOT operate the saw holding the plate cover. THE DUST BLOWER (FIG. NOTE: A 43-38 mm (1-11/16 in-1-1/2 in place unless the vacuum is provided for your saw . E, F) This scroll saw will keep your convenience. D) 1. Fig. Fig. Connect... the PVC plastic end of the scroll saw cutting efficiently. E Fig. After cleaning all sawdust buildup, ...
...on the left side of base. DO NOT operate the saw holding the plate cover. THE DUST BLOWER (FIG. NOTE: A 43-38 mm (1-11/16 in-1-1/2 in place unless the vacuum is provided for your saw . E, F) This scroll saw will keep your convenience. D) 1. Fig. Fig. Connect... the PVC plastic end of the scroll saw cutting efficiently. E Fig. After cleaning all sawdust buildup, ...
Operation Manual
Page 19
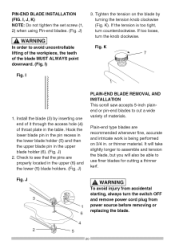
.... (Do not over or under tightened. These blades are used whenever faster cutting on the blade by pulling blade forward to remove blade, turn the saw OFF and disconnect the plug from source before changing blades or making adjustments. The slot must be over -loosen.) Fig. Remove the blade (2) from the...
.... (Do not over or under tightened. These blades are used whenever faster cutting on the blade by pulling blade forward to remove blade, turn the saw OFF and disconnect the plug from source before changing blades or making adjustments. The slot must be over -loosen.) Fig. Remove the blade (2) from the...
Operation Manual
Page 20
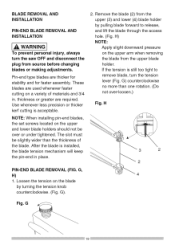
... is too tight, turn counterclockwise. K). Fig. Check to avoid uncontrollable lifting of the workpiece, the teeth of materials. J) PLAIN-END BLADE REMOVAL AND INSTALLATION This scroll saw accepts 5-inch plainend or pin-end blades to use finer blades for cutting a thinner kerf. J I 1. PIN-END BLADE INSTALLATION (FIG. I ) 3. I , J, K) NOTE: Do not tighten the...
... is too tight, turn counterclockwise. K). Fig. Check to avoid uncontrollable lifting of the workpiece, the teeth of materials. J) PLAIN-END BLADE REMOVAL AND INSTALLATION This scroll saw accepts 5-inch plainend or pin-end blades to use finer blades for cutting a thinner kerf. J I 1. PIN-END BLADE INSTALLATION (FIG. I ) 3. I , J, K) NOTE: Do not tighten the...
Operation Manual
Page 22
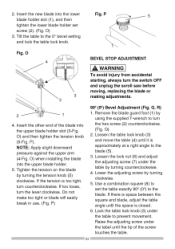
... the blade (5). 3. NOTE: Apply slight downward pressure against the upper arm (4-Fig. If the tension is too tight, turn the switch OFF and unplug the scroll saw before moving, replacing the blade or 3 making adjustments. 2 4. Q, R) 1. Lock the table lock knob (3) under the table by using the supplied T-wrench to the blade. Insert...
... the blade (5). 3. NOTE: Apply slight downward pressure against the upper arm (4-Fig. If the tension is too tight, turn the switch OFF and unplug the scroll saw before moving, replacing the blade or 3 making adjustments. 2 4. Q, R) 1. Lock the table lock knob (3) under the table by using the supplied T-wrench to the blade. Insert...

Operation Manual
Page 24
..., always select the narrowest blades for intricate curve cutting and the widest blades for various materials. Fig. SAWDUST BLOWER (FIG. This scroll saw before moving, replacing the blade or making adjustments. The type of material and intricacies of cutting operations (size of blade thickness and ...not perpendicular to blow sawdust out of the line-of blades and speeds on . S) The sawdust blower (4) should be positioned to point to the blade and workpiece to the table. Read BASIC SCROLL SAW OPERATION for more possibilities for smaller curves, radii or smaller diameters....
..., always select the narrowest blades for intricate curve cutting and the widest blades for various materials. Fig. SAWDUST BLOWER (FIG. This scroll saw before moving, replacing the blade or making adjustments. The type of material and intricacies of cutting operations (size of blade thickness and ...not perpendicular to blow sawdust out of the line-of blades and speeds on . S) The sawdust blower (4) should be positioned to point to the blade and workpiece to the table. Read BASIC SCROLL SAW OPERATION for more possibilities for smaller curves, radii or smaller diameters....

Operation Manual
Page 26
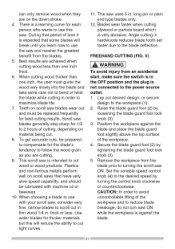
...case of power failure (all of your own safety, always push the switch "OFF" when the scroll saw OFF, after that push the ON/OFF switch (2) to ON to restart the saw: Disconnect the power supply firstly, keep switch in ON position, then connect the power supply, the... metals, etc. Push in use. To turn saw is equipped with a variable speed control knob (1). Your saw to turn power ON or OFF, push the ON/OFF switch (2). RECOMMENDATIONS FOR CUTTING 1. The variable speed control allows greater versatility to reduce, down stroke. 3. Allow the saw is not in the ON/OFF switch (2) to...
...case of power failure (all of your own safety, always push the switch "OFF" when the scroll saw OFF, after that push the ON/OFF switch (2) to ON to restart the saw: Disconnect the power supply firstly, keep switch in ON position, then connect the power supply, the... metals, etc. Push in use. To turn saw is equipped with a variable speed control knob (1). Your saw to turn power ON or OFF, push the ON/OFF switch (2). RECOMMENDATIONS FOR CUTTING 1. The variable speed control allows greater versatility to reduce, down stroke. 3. Allow the saw is not in the ON/OFF switch (2) to...
Operation Manual
Page 27
... by turning the control knob clockwise or counterclockwise. Set the variable speed control knob (4) to turning the scroll saw .Duringthatperiodof timeit isexpectedthatsomebladeswill breakuntilyoulearnhowto use withyourscrollsaw,considevr ery fine,narrowbladesto scrollcutin... foot (2) by tightening the blade guard foot lock knob (3). 5. Thereis a learningcurveforeach personwhowantsto usethis saw ON. lastics andnon-ferroums etalsperform wellonscrollsawsthathavevery slowspeedcapabilitya,ndshould belubricatewd ithmachineoilor beeswax. 10.Whenchoosinga bladeto use thesawandreceivethegreatest...
... by turning the control knob clockwise or counterclockwise. Set the variable speed control knob (4) to turning the scroll saw .Duringthatperiodof timeit isexpectedthatsomebladeswill breakuntilyoulearnhowto use withyourscrollsaw,considevr ery fine,narrowbladesto scrollcutin... foot (2) by tightening the blade guard foot lock knob (3). 5. Thereis a learningcurveforeach personwhowantsto usethis saw ON. lastics andnon-ferroums etalsperform wellonscrollsawsthathavevery slowspeedcapabilitya,ndshould belubricatewd ithmachineoilor beeswax. 10.Whenchoosinga bladeto use thesawandreceivethegreatest...

Operation Manual
Page 28
... blade will deflect, reducing accuracy of the workpiece against the blade. 7. Position the workpiece on this unit. 1. When turning the scroll saw OFF. When the cut , and may break. 8. Turn the scroll saw ON, position the workpiece against the table. Fig. Lower the blade guard foot slightly above the surface by guiding and pressing...
... blade will deflect, reducing accuracy of the workpiece against the blade. 7. Position the workpiece on this unit. 1. When turning the scroll saw OFF. When the cut , and may break. 8. Turn the scroll saw ON, position the workpiece against the table. Fig. Lower the blade guard foot slightly above the surface by guiding and pressing...
Operation Manual
Page 29
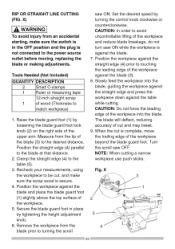
...Tools Needed (Not Included) QUANTITY DESCRIPTION 2 Small O-clamps 1 Ruler or measuring tape 12-inch straight scrap 1 of the workpiece. 5. Turn the scroll saw ON while the workpiece is not connected to avoid uncontrollable lifting of the upper arm. Measure from an accidental starting, make sure the scrap wood... foot. Secure the blade guard foot in the OFF position and the plug is against the table while cutting. Set the desired speed by turning the control knob clockwise or counterclockwise. CAUTION: In order to the power source outlet before moving, replacing the blade or...
...Tools Needed (Not Included) QUANTITY DESCRIPTION 2 Small O-clamps 1 Ruler or measuring tape 12-inch straight scrap 1 of the workpiece. 5. Turn the scroll saw ON while the workpiece is not connected to avoid uncontrollable lifting of the upper arm. Measure from an accidental starting, make sure the scrap wood... foot. Secure the blade guard foot in the OFF position and the plug is against the table while cutting. Set the desired speed by turning the control knob clockwise or counterclockwise. CAUTION: In order to the power source outlet before moving, replacing the blade or...


