
Operation Manual
Page 1
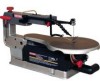
VARIABLE SPEED SCROLL SAW Model No. 137.216020 C us CAUTION: Before using this Scroll Saw, read this manual and follow all its Safety Rules and Operating Instructions • Safety Instructions • Installation • Operation • Maintenance • Parts List Sears, Roebuck and Co., Hoffman Estates, IL 60179 USA Visit our Craftsman website: www,sears,com/craftsman Part No. 137216020001 Printed in . Operator's Manual 16 in China
VARIABLE SPEED SCROLL SAW Model No. 137.216020 C us CAUTION: Before using this Scroll Saw, read this manual and follow all its Safety Rules and Operating Instructions • Safety Instructions • Installation • Operation • Maintenance • Parts List Sears, Roebuck and Co., Hoffman Estates, IL 60179 USA Visit our Craftsman website: www,sears,com/craftsman Part No. 137216020001 Printed in . Operator's Manual 16 in China

Operation Manual
Page 2
... ever used for commercial or rental purposes. SECTION Warranty Product Specifications Symbols Power Tool Safety Scroll Saw Safety Electrical Requirements and Safety Accessories and Attachments Tools Needed for Assembly Carton Contents Know Your Scroll Saw Glossary of Terms Assembly and Adjustments Operation Maintenance Troubleshooting Guide Parts List PAGE 2 3 4 5 8 10 12 12 13 14 15 17 26 31 32 34 CRAFTSMAN ONE YEAR FULL WARRANTY If this Craftsman tool fails due to a defect in a well ventilated area and work with approved safety...
... ever used for commercial or rental purposes. SECTION Warranty Product Specifications Symbols Power Tool Safety Scroll Saw Safety Electrical Requirements and Safety Accessories and Attachments Tools Needed for Assembly Carton Contents Know Your Scroll Saw Glossary of Terms Assembly and Adjustments Operation Maintenance Troubleshooting Guide Parts List PAGE 2 3 4 5 8 10 12 12 13 14 15 17 26 31 32 34 CRAFTSMAN ONE YEAR FULL WARRANTY If this Craftsman tool fails due to a defect in a well ventilated area and work with approved safety...

Operation Manual
Page 5
... to use the next heavier gauge. The smaller the gauge number, the heavier the cord. 5 KEEP GUARDS IN PLACE and in working order. 3. LEARN the tool's application, limitations and possible hazards. 2. All visitors and bystanders should be sure to rain or snow. GENERAL SAFETY INSTRUCTIONS BEFORE USING THIS POWER TOOL Safety is in good condition. WARNING J To avoid mistakes that keys and adjusting wrenches are removed from work area...
... to use the next heavier gauge. The smaller the gauge number, the heavier the cord. 5 KEEP GUARDS IN PLACE and in working order. 3. LEARN the tool's application, limitations and possible hazards. 2. All visitors and bystanders should be sure to rain or snow. GENERAL SAFETY INSTRUCTIONS BEFORE USING THIS POWER TOOL Safety is in good condition. WARNING J To avoid mistakes that keys and adjusting wrenches are removed from work area...

Operation Manual
Page 6
... only impact-resistant lenses. Safety Goggles are available at Sears. NOTE: Glasses or goggles not in the OFF position before servicing, and when changing accessories such as blades, bits and cutters. 16. Sawing operation produces dust. 14. SECURE WORK. A guard or other conditions that is damaged should be properly repaired or replaced. WEAR PROPER APPAREL. DISCONNECT TOOLS FROM POWER SOURCE before plugging the tool in moving parts, breakage of parts, mounting and...
... only impact-resistant lenses. Safety Goggles are available at Sears. NOTE: Glasses or goggles not in the OFF position before servicing, and when changing accessories such as blades, bits and cutters. 16. Sawing operation produces dust. 14. SECURE WORK. A guard or other conditions that is damaged should be properly repaired or replaced. WEAR PROPER APPAREL. DISCONNECT TOOLS FROM POWER SOURCE before plugging the tool in moving parts, breakage of parts, mounting and...

Operation Manual
Page 7
.... 22. Operation of electrical equipment in well-ventilated area and provide for proper dust removal. ,& ] 24. DO NOT OVERREACH. MAINTAIN TOOLS WITH CARE. 20.NEVERLEAVE THE TOOL RUNNING UNATTENDED. TURN THE POWER "OFF". WARNING: Dust generated from certain materials can be hazardous to a complete stop and the tool is unplugged from a running tool until the blade comes to your health. Always operate saw in close...
.... 22. Operation of electrical equipment in well-ventilated area and provide for proper dust removal. ,& ] 24. DO NOT OVERREACH. MAINTAIN TOOLS WITH CARE. 20.NEVERLEAVE THE TOOL RUNNING UNATTENDED. TURN THE POWER "OFF". WARNING: Dust generated from certain materials can be hazardous to a complete stop and the tool is unplugged from a running tool until the blade comes to your health. Always operate saw in close...

Operation Manual
Page 8
... a hand to perform properly, shut off the switch and remove the plug from the power supply outlet. HOLD WORKPIECE FIRMLY against the table top. 14. TABLE MUST BE CLEARED of all safety instructions and operating procedures throughout the manual. , DO NOT OPERATE the Scroll Saw until it is completely assembled and installed according to the instructions. , SHOULD any part of a Scroll Saw, obtain advice from unexpected saw movement. NEVER CUT MATERIAL...
... a hand to perform properly, shut off the switch and remove the plug from the power supply outlet. HOLD WORKPIECE FIRMLY against the table top. 14. TABLE MUST BE CLEARED of all safety instructions and operating procedures throughout the manual. , DO NOT OPERATE the Scroll Saw until it is completely assembled and installed according to the instructions. , SHOULD any part of a Scroll Saw, obtain advice from unexpected saw movement. NEVER CUT MATERIAL...

Operation Manual
Page 9
... CAUTION when cutting workpieces that are damaged should be properly repaired or replaced before leaving the work area. 19. MAKE CERTAIN table tilting lock is running. 25. Parts that may affect operation. Wedge open the kerf and back the blade out of the workpiece, usually caused by sawdust clogging the kerf. TURN THE POWER OFF, remove the switch key and make sure the scroll saw with...
... CAUTION when cutting workpieces that are damaged should be properly repaired or replaced before leaving the work area. 19. MAKE CERTAIN table tilting lock is running. 25. Parts that may affect operation. Wedge open the kerf and back the blade out of the workpiece, usually caused by sawdust clogging the kerf. TURN THE POWER OFF, remove the switch key and make sure the scroll saw with...

Operation Manual
Page 10
...of power, overheating and burning out of electric shock. If in doubt, use depending on the motor nameplate. Use an extension cord heavy enough to the power line, make sure the switch is in the off position and the electric ...cord will draw. GROUNDING INSTRUCTIONS IN THE EVENT OF A MALFUNCTION OR BREAKDOWN, grounding provides a path of least resistance for your extension cord is properly wired and in good condition. Repair or replace damaged or worn cords immediately. This tool is properly installed and grounded in accordance with an electrical cord that accept the tool...
...of power, overheating and burning out of electric shock. If in doubt, use depending on the motor nameplate. Use an extension cord heavy enough to the power line, make sure the switch is in the off position and the electric ...cord will draw. GROUNDING INSTRUCTIONS IN THE EVENT OF A MALFUNCTION OR BREAKDOWN, grounding provides a path of least resistance for your extension cord is properly wired and in good condition. Repair or replace damaged or worn cords immediately. This tool is properly installed and grounded in accordance with an electrical cord that accept the tool...

Operation Manual
Page 15
... changing blades. Rate of sight for bevel cutting. VARIABLE SPEED CONTROL KNOB - SCROLL SAW TERMS BEVEL SCALE - Represents the degree of table angle from covering the line of moving inline during cutting operation. Helps protect fingers from rising. Allows you to 1600 strokes per minute (SPM), by turning the control knob clockwise or counterclockwise. Retain and position the blades. QUICK RELEASE TENSION LEVER - Keeps sawdust from 0° to be used...
... changing blades. Rate of sight for bevel cutting. VARIABLE SPEED CONTROL KNOB - SCROLL SAW TERMS BEVEL SCALE - Represents the degree of table angle from covering the line of moving inline during cutting operation. Helps protect fingers from rising. Allows you to 1600 strokes per minute (SPM), by turning the control knob clockwise or counterclockwise. Retain and position the blades. QUICK RELEASE TENSION LEVER - Keeps sawdust from 0° to be used...
Operation Manual
Page 18
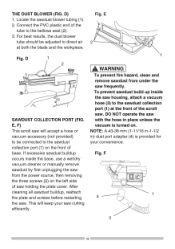
... hazard, clean and remove sawdust from the power source, then removing the three screws (2) on . DO NOT operate the saw with the hose in ) dust port adapter (4) is turned on the left side of the scroll saw holding the plate cover. D) 1. Fig. This will accept a hose or vacuum accessory (not provided) to be adjusted to the sawdust collection port (1) at both the blade and the workpiece. Connect...
... hazard, clean and remove sawdust from the power source, then removing the three screws (2) on . DO NOT operate the saw with the hose in ) dust port adapter (4) is turned on the left side of the scroll saw holding the plate cover. D) 1. Fig. This will accept a hose or vacuum accessory (not provided) to be adjusted to the sawdust collection port (1) at both the blade and the workpiece. Connect...
Operation Manual
Page 19
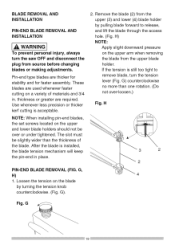
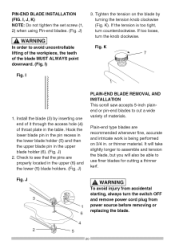
... faster assembly. Remove the blade (2) from source before changing blades or making adjustments. G) counterclockwise no more than the thickness of materials and 3/4 in place. After the blade is acceptable. H) NOTE: Apply slight downward pressure on the blade by pulling blade forward to remove blade, turn the saw OFF and disconnect the plug from the upper (3) and lower (4) blade holder by turning the tension knob counterclockwise. (Fig. G 19 Pin-end type blades...
... faster assembly. Remove the blade (2) from source before changing blades or making adjustments. G) counterclockwise no more than the thickness of materials and 3/4 in place. After the blade is acceptable. H) NOTE: Apply slight downward pressure on the blade by pulling blade forward to remove blade, turn the saw OFF and disconnect the plug from the upper (3) and lower (4) blade holder by turning the tension knob counterclockwise. (Fig. G 19 Pin-end type blades...
Operation Manual
Page 20
... not tighten the set screw (1, 2) when using Pin-end blades. (Fig. I ,A WARNING To avoid injury from accidental starting, always turn the knob clockwise. Tighten the tension on 3/4 in the upper (6) and the lower (5) blade holders. (Fig. Install the blade (3) by turning the tension knob clockwise (Fig. Check to use finer blades for cutting a thinner kerf. If too loose, turn the switch OFF and remove power cord plug from 1 power source before removing or 6 replacing the blade. Fig. K). PIN-END BLADE INSTALLATION...
... not tighten the set screw (1, 2) when using Pin-end blades. (Fig. I ,A WARNING To avoid injury from accidental starting, always turn the knob clockwise. Tighten the tension on 3/4 in the upper (6) and the lower (5) blade holders. (Fig. Install the blade (3) by turning the tension knob clockwise (Fig. Check to use finer blades for cutting a thinner kerf. If too loose, turn the switch OFF and remove power cord plug from 1 power source before removing or 6 replacing the blade. Fig. K). PIN-END BLADE INSTALLATION...
Operation Manual
Page 22
... the scroll saw before moving, replacing the blade or 3 making adjustments. 2 4. Loosen the lock nut (6) and adjust the adjusting screw (7) under the table by turning the tension knob (5) clockwise. Lock the table lock knob (3) under the tabel until the tip of the blade into the upper blade holder slot (3-Fig. Do not make too tight or blade will easily break in use. (Fig. If there is space between the square and blade, adjust the table angle until...
... the scroll saw before moving, replacing the blade or 3 making adjustments. 2 4. Loosen the lock nut (6) and adjust the adjusting screw (7) under the table by turning the tension knob (5) clockwise. Lock the table lock knob (3) under the tabel until the tip of the blade into the upper blade holder slot (3-Fig. Do not make too tight or blade will easily break in use. (Fig. If there is space between the square and blade, adjust the table angle until...

Operation Manual
Page 24
... saw blade action. When purchasing blades, refer to compensate for the best use of the sawdust off the table, and will have more suggestions. This scroll saw before moving, replacing the blade or making adjustments. NOTE: When using blades, sometimes speeds must be positioned to point to the blade and workpiece to prevent the workpiece from accidental starting, always turn the switch OFF and unplug the scroll saw accepts 5-inch...
... saw blade action. When purchasing blades, refer to compensate for the best use of the sawdust off the table, and will have more suggestions. This scroll saw before moving, replacing the blade or making adjustments. NOTE: When using blades, sometimes speeds must be positioned to point to the blade and workpiece to prevent the workpiece from accidental starting, always turn the switch OFF and unplug the scroll saw accepts 5-inch...

Operation Manual
Page 26
... the blade slowly because the teeth of your own safety, always push the switch "OFF" when the scroll saw OFF, after that push the ON/OFF switch (2) to ON to avoid accidental starting. ON/OFF SWITCH (FIG. The variable speed control allows greater versatility to remove cut material ONLY on the hardness and thickness of cut material by simply rotating the variable speed control knob (1). 2. U) 1. Fig...
... the blade slowly because the teeth of your own safety, always push the switch "OFF" when the scroll saw OFF, after that push the ON/OFF switch (2) to ON to avoid accidental starting. ON/OFF SWITCH (FIG. The variable speed control allows greater versatility to remove cut material ONLY on the hardness and thickness of cut material by simply rotating the variable speed control knob (1). 2. U) 1. Fig...

Operation Manual
Page 28
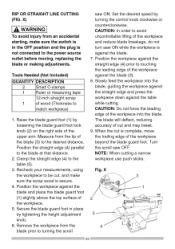
... the blade guard foot lock knob (3) and retighten. 3. Tilt the table (4) to the proper angle, using the degree scale (6) and the pointer (7). 4. Turn the scroll saw ON, position the workpiece against the table. CAUTION: Do not force the leading edge of cut is not connected to the same angle as the table (4). Fig. Retighten the blade guard screw. 6. W 2 ,A WARNING t To avoid injury from an accidental starting, make sure the switch...
... the blade guard foot lock knob (3) and retighten. 3. Tilt the table (4) to the proper angle, using the degree scale (6) and the pointer (7). 4. Turn the scroll saw ON, position the workpiece against the table. CAUTION: Do not force the leading edge of cut is not connected to the same angle as the table (4). Fig. Retighten the blade guard screw. 6. W 2 ,A WARNING t To avoid injury from an accidental starting, make sure the switch...
Operation Manual
Page 29
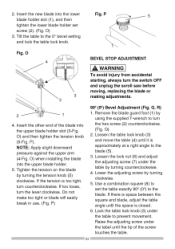
... blade (3) to turning the scroll saw ON. NOTE: When cutting a narrow workpiece use push sticks. RIP OR STRAIGHT LINE CUTTING (FIG. Measure from the blade prior to the desired distance. Remove the workpiece from the tip of the workpiece beyond the blade guard foot. Position the straight edge (4) parallel to avoid uncontrollable lifting of the upper arm. Set the desired speed by loosening the blade guard foot lock knob...
... blade (3) to turning the scroll saw ON. NOTE: When cutting a narrow workpiece use push sticks. RIP OR STRAIGHT LINE CUTTING (FIG. Measure from the blade prior to the desired distance. Remove the workpiece from the tip of the workpiece beyond the blade guard foot. Position the straight edge (4) parallel to avoid uncontrollable lifting of the upper arm. Set the desired speed by loosening the blade guard foot lock knob...

Operation Manual
Page 31
... to glide smoothly across the work table will avoid a break-in any way, have it replaced immediately by authorized electrician. 2. Then remove the black plastic cap (1) on the metal end of carbon remaining, or if the spring or wire is worn, cut to oil the motor bearings or service the motor internal parts. 2 1 REPLACING CARBON BRUSHES (FIG. To reassemble reverse the procedure. Replace for the other side...
... to glide smoothly across the work table will avoid a break-in any way, have it replaced immediately by authorized electrician. 2. Then remove the black plastic cap (1) on the metal end of carbon remaining, or if the spring or wire is worn, cut to oil the motor bearings or service the motor internal parts. 2 1 REPLACING CARBON BRUSHES (FIG. To reassemble reverse the procedure. Replace for the other side...

Operation Manual
Page 32
.... 3. REMOVAL AND INSTALLATION section. 3. Defective motor. Call Service Center. Excessive 1. Improper mounting of blade holders. Loose motor mounting. before moving, replacing the blade or making adjustments. A when the saw . good a work surface as running because 4. Wrong tension. 1. Reduce feed rate. Tighten the table lock knob. Loosen blade holder lock screw holding blade holder to repair this manual for proper mounting NOTE: There will not run out. 1. See BLADE REMOVAL AND INSTALLATION section. See mounting instructions in...
.... 3. REMOVAL AND INSTALLATION section. 3. Defective motor. Call Service Center. Excessive 1. Improper mounting of blade holders. Loose motor mounting. before moving, replacing the blade or making adjustments. A when the saw . good a work surface as running because 4. Wrong tension. 1. Reduce feed rate. Tighten the table lock knob. Loosen blade holder lock screw holding blade holder to repair this manual for proper mounting NOTE: There will not run out. 1. See BLADE REMOVAL AND INSTALLATION section. See mounting instructions in...

Operation Manual
Page 34
....0-25 M81.25-30 M61.0-16 M5"0.8-10 Qty LD. SCREW Size Qfy M5 9.8-8 5 0K72 CR. RE. PAN HD. HD. VARIABLE SPEED SCROLL SAW MODEL NO. 137.216020 WARNING { When servicing use only CRAFTSMAN replacement parts. CAP BOLT TABLE BRACKET-TILT PVC HOSE BLADE GUARD SUPPORT ROD EXTENSION SPRING SPACER BUSH BELLOW BOLT CLAMP BELLOWS SEAT AiR DUCT ASS'Y FLAT WASHER FLAT WASHER FLAT WASHER FLAT WASHER FLAT WASHER SPRING WASHER SPRING WASHER SPRING WASHER EXTERNAL TOOTH LOCK WAVE WASHER WASHER SPRING PIN HEX. CAP BOLT HEX...
....0-25 M81.25-30 M61.0-16 M5"0.8-10 Qty LD. SCREW Size Qfy M5 9.8-8 5 0K72 CR. RE. PAN HD. HD. VARIABLE SPEED SCROLL SAW MODEL NO. 137.216020 WARNING { When servicing use only CRAFTSMAN replacement parts. CAP BOLT TABLE BRACKET-TILT PVC HOSE BLADE GUARD SUPPORT ROD EXTENSION SPRING SPACER BUSH BELLOW BOLT CLAMP BELLOWS SEAT AiR DUCT ASS'Y FLAT WASHER FLAT WASHER FLAT WASHER FLAT WASHER FLAT WASHER SPRING WASHER SPRING WASHER SPRING WASHER EXTERNAL TOOTH LOCK WAVE WASHER WASHER SPRING PIN HEX. CAP BOLT HEX...

