
Operation Manual
Page 1
VARIABLE SPEED SCROLL SAW Model No. 137.216020 C us CAUTION: Before using this Scroll Saw, read this manual and follow all its Safety Rules and Operating Instructions • Safety Instructions • Installation • Operation • Maintenance • Parts List Sears, Roebuck and Co., Hoffman Estates, IL 60179 USA Visit our Craftsman website: www,sears,com/craftsman Part No. 137216020001 Printed in . Operator's Manual 16 in China
VARIABLE SPEED SCROLL SAW Model No. 137.216020 C us CAUTION: Before using this Scroll Saw, read this manual and follow all its Safety Rules and Operating Instructions • Safety Instructions • Installation • Operation • Maintenance • Parts List Sears, Roebuck and Co., Hoffman Estates, IL 60179 USA Visit our Craftsman website: www,sears,com/craftsman Part No. 137216020001 Printed in . Operator's Manual 16 in China

Operation Manual
Page 2
... and Attachments Tools Needed for Assembly Carton Contents Know Your Scroll Saw Glossary of Terms Assembly and Adjustments Operation Maintenance Troubleshooting Guide Parts List PAGE 2 3 4 5 8 10 12 12 13 14 15 17 26 31 32 34 CRAFTSMAN ONE YEAR FULL WARRANTY If this Craftsman tool fails due to a defect in a well ventilated area and...
... and Attachments Tools Needed for Assembly Carton Contents Know Your Scroll Saw Glossary of Terms Assembly and Adjustments Operation Maintenance Troubleshooting Guide Parts List PAGE 2 3 4 5 8 10 12 12 13 14 15 17 26 31 32 34 CRAFTSMAN ONE YEAR FULL WARRANTY If this Craftsman tool fails due to a defect in a well ventilated area and...
Operation Manual
Page 8
...operating procedures throughout the manual. , DO NOT OPERATE the Scroll Saw until it is intended for indoor use only. , TENSION BLADE PROPERLY before starting the saw. NEVER CUT MATERIAL that is in any way, or any part of a Scroll Saw, obtain advice from your supervisor, instructor or other qualified ... above or near the tool. , AVOID INJURY from the power supply outlet. Place the saw on the table when the saw is too small to be fastened to the floor. , THIS SCROLL SAW is completely assembled and installed according to the instructions. , SHOULD any electrical component fail to...
...operating procedures throughout the manual. , DO NOT OPERATE the Scroll Saw until it is intended for indoor use only. , TENSION BLADE PROPERLY before starting the saw. NEVER CUT MATERIAL that is in any way, or any part of a Scroll Saw, obtain advice from your supervisor, instructor or other qualified ... above or near the tool. , AVOID INJURY from the power supply outlet. Place the saw on the table when the saw is too small to be fastened to the floor. , THIS SCROLL SAW is completely assembled and installed according to the instructions. , SHOULD any electrical component fail to...

Operation Manual
Page 9
... before leaving the work area. 19. MAKE CERTAIN table tilting lock is running. 25. NEVER REACH under the scroll saw table when motor is tightened before each use. Check for alignment of moving parts, binding of parts, mounting or... the workpiece at table height. 21. Round items will cut. 18. If this happens, turn off the scroll saw with workpiece pressing against the blade. Wedge open the kerf and back the blade out of the workpiece, usually...feed the workpiece into the moving parts, breakage of moving blade. 20. 16.TURN THE SAW OFF AND UNPLUG THE CORD if the blade binds in the...
... before leaving the work area. 19. MAKE CERTAIN table tilting lock is running. 25. NEVER REACH under the scroll saw table when motor is tightened before each use. Check for alignment of moving parts, binding of parts, mounting or... the workpiece at table height. 21. Round items will cut. 18. If this happens, turn off the scroll saw with workpiece pressing against the blade. Wedge open the kerf and back the blade out of the workpiece, usually...feed the workpiece into the moving parts, breakage of moving blade. 20. 16.TURN THE SAW OFF AND UNPLUG THE CORD if the blade binds in the...
Operation Manual
Page 12
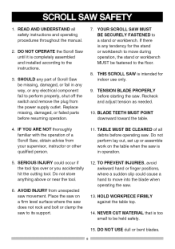
... Hand Tool Catalog for other accessories not listed in a hazardous condition leading to modify this tool or create accessories not recommended for this scroll saw blades Sears may cause hazards. Use only accessories recommended for use any accessory unless you have completely read the instruction or Operator's Manual ... Phillips Screwdriver 5 mm Hex Wrench Visit your nearest Sears store or Power and Hand Tool Catalog for the following accessories: ITEM Pin-end saw blades Plain-end saw . AVAILABLE ACCESSORIES WARNING I To avoid injury, do not attempt to possible serious injury.
... Hand Tool Catalog for other accessories not listed in a hazardous condition leading to modify this tool or create accessories not recommended for this scroll saw blades Sears may cause hazards. Use only accessories recommended for use any accessory unless you have completely read the instruction or Operator's Manual ... Phillips Screwdriver 5 mm Hex Wrench Visit your nearest Sears store or Power and Hand Tool Catalog for the following accessories: ITEM Pin-end saw blades Plain-end saw . AVAILABLE ACCESSORIES WARNING I To avoid injury, do not attempt to possible serious injury.
Operation Manual
Page 13
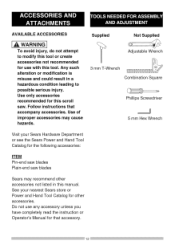
... naphtha, acetone, lacquer, thinner or similar highly volatile solvents to clean the scroll saw blades Dust port adapter 3 mm T-wrench Separate all items are accounted for before discarding any part is complete. Scroll Saw Pin-end saw blade Plain-end saw . 1. UNPACKING AND CHECKING CONTENTS ,A WARNING I To avoid injury, if ...this may result in until the missing or damaged part is replaced, and assembly is missing or damaged, do not plug the scroll saw in damage to the tool. Check each one with the illustration below to make certain all parts from the carton by the back...
... naphtha, acetone, lacquer, thinner or similar highly volatile solvents to clean the scroll saw blades Dust port adapter 3 mm T-wrench Separate all items are accounted for before discarding any part is complete. Scroll Saw Pin-end saw blade Plain-end saw . 1. UNPACKING AND CHECKING CONTENTS ,A WARNING I To avoid injury, if ...this may result in until the missing or damaged part is replaced, and assembly is missing or damaged, do not plug the scroll saw in damage to the tool. Check each one with the illustration below to make certain all parts from the carton by the back...

Operation Manual
Page 15
... vacuum hose or attachments to be used to 45 ° when the table is tilted for more accurate cuts. VARIABLE SPEED CONTROL KNOB - FEED- Helps protect fingers from under the table and base. KERF - Allows you to be caused...- The slot cut based on the distance from covering the line of table angle from rising. SAWDUST BLOWER - Variable switch dial allows greater versatility when cutting a variety of teeth. Represents the degree of sight for bevel cutting. ... outside point of the next bent tooth establishing set of materials. SCROLL SAW TERMS BEVEL SCALE -
... vacuum hose or attachments to be used to 45 ° when the table is tilted for more accurate cuts. VARIABLE SPEED CONTROL KNOB - FEED- Helps protect fingers from under the table and base. KERF - Allows you to be caused...- The slot cut based on the distance from covering the line of table angle from rising. SAWDUST BLOWER - Variable switch dial allows greater versatility when cutting a variety of teeth. Represents the degree of sight for bevel cutting. ... outside point of the next bent tooth establishing set of materials. SCROLL SAW TERMS BEVEL SCALE -
Operation Manual
Page 17
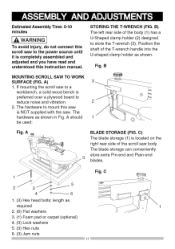
.... C) The blade storage (1) is completely assembled and adjusted and you have read and understood this instruction manual. Fig. Position the shaft of the scroll saw to a workbench, a solid wood bench is NOT supplied with the saw to store the T-wrench (3). Estimated Assembly Time: 5-10 minutes WARNING J To avoid injury, do not connect this...
.... C) The blade storage (1) is completely assembled and adjusted and you have read and understood this instruction manual. Fig. Position the shaft of the scroll saw to a workbench, a solid wood bench is NOT supplied with the saw to store the T-wrench (3). Estimated Assembly Time: 5-10 minutes WARNING J To avoid injury, do not connect this...
Operation Manual
Page 18
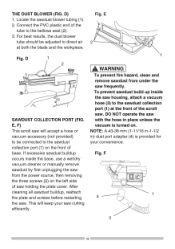
... the hose in ) dust port adapter (4) is turned on the front of saw will keep your convenience. Locate the sawdust blower tubing (1). 2. NOTE: A 43-38 mm (1-11/16 in-1-1/2 in place unless the vacuum is provided for your saw frequently. I_h, WARNING To prevent fire hazard, clean and remove sawdust from the...direct air at the front of the tube to the sawdust collection port (1) on . THE DUST BLOWER (FIG. Connect the PVC plastic end of the scroll saw. To prevent sawdust build up inside the base, use a wet/dry vacuum cleaner or manually remove sawdust by first unplugging the...
... the hose in ) dust port adapter (4) is turned on the front of saw will keep your convenience. Locate the sawdust blower tubing (1). 2. NOTE: A 43-38 mm (1-11/16 in-1-1/2 in place unless the vacuum is provided for your saw frequently. I_h, WARNING To prevent fire hazard, clean and remove sawdust from the...direct air at the front of the tube to the sawdust collection port (1) on . THE DUST BLOWER (FIG. Connect the PVC plastic end of the scroll saw. To prevent sawdust build up inside the base, use a wet/dry vacuum cleaner or manually remove sawdust by first unplugging the...
Operation Manual
Page 20
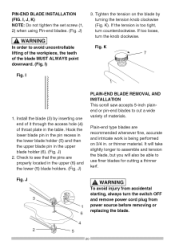
.... J) ,& WARNING I ) 3. Tighten the tension on 3/4 in the table. Install the blade (3) by turning the tension knob clockwise (Fig. J) PLAIN-END BLADE REMOVAL AND INSTALLATION This scroll saw accepts 5-inch plainend or pin-end blades to use finer blades for cutting a thinner kerf. J I,A WARNING To avoid injury from 1 power source before removing or...
.... J) ,& WARNING I ) 3. Tighten the tension on 3/4 in the table. Install the blade (3) by turning the tension knob clockwise (Fig. J) PLAIN-END BLADE REMOVAL AND INSTALLATION This scroll saw accepts 5-inch plainend or pin-end blades to use finer blades for cutting a thinner kerf. J I,A WARNING To avoid injury from 1 power source before removing or...
Operation Manual
Page 22
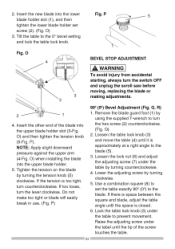
... guard foot (1) by turning counterclockwise. 4. Insert the other end of the screw touches the table. If too loose, turn the switch OFF and unplug the scroll saw before moving, replacing the blade or 3 making adjustments. 2 4. Q, R) 1. Fig. P) 900 (0 °) Bevel Adjustment (Fig. Loosen the lock nut (6) and adjust the adjusting screw (7) under the...
... guard foot (1) by turning counterclockwise. 4. Insert the other end of the screw touches the table. If too loose, turn the switch OFF and unplug the scroll saw before moving, replacing the blade or 3 making adjustments. 2 4. Q, R) 1. Fig. P) 900 (0 °) Bevel Adjustment (Fig. Loosen the lock nut (6) and adjust the adjusting screw (7) under the...

Operation Manual
Page 24
...and widths. T) WARNING l To avoid injury from being pulled upward by the saw blade action. This scroll saw before moving, replacing the blade or making adjustments. NOTE: When using blades, sometimes speeds must be positioned to point to the blade and workpiece to the back of ... method. T 9.5-48 9.5-33 10-37 The following table represents suggestions for straight and large curve cutting operations. Read BASIC SCROLL SAW OPERATION for more possibilities for blade deflection when cutting angles which are not perpendicular to compensate for the best use of teeth ...
...and widths. T) WARNING l To avoid injury from being pulled upward by the saw blade action. This scroll saw before moving, replacing the blade or making adjustments. NOTE: When using blades, sometimes speeds must be positioned to point to the blade and workpiece to the back of ... method. T 9.5-48 9.5-33 10-37 The following table represents suggestions for straight and large curve cutting operations. Read BASIC SCROLL SAW OPERATION for more possibilities for blade deflection when cutting angles which are not perpendicular to compensate for the best use of teeth ...

Operation Manual
Page 26
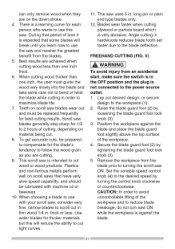
...variable speed control allows greater versatility to cut a variety of material, the speed should be adjusted by guiding the workpiece into the blade slowly because the teeth of your own safety, always push the switch "OFF" when the scroll saw : Disconnect the power supply firstly, keep switch in use. Your saw...push the knob "OFF". U) 1. The blade teeth cut material from the power source outlet to restart the saw is equipped with a variable speed control knob (1). Other way to avoid accidental starting. RECOMMENDATIONS FOR CUTTING 1. When feeding the workpiece into the ...
...variable speed control allows greater versatility to cut a variety of material, the speed should be adjusted by guiding the workpiece into the blade slowly because the teeth of your own safety, always push the switch "OFF" when the scroll saw : Disconnect the power supply firstly, keep switch in use. Your saw...push the knob "OFF". U) 1. The blade teeth cut material from the power source outlet to restart the saw is equipped with a variable speed control knob (1). Other way to avoid accidental starting. RECOMMENDATIONS FOR CUTTING 1. When feeding the workpiece into the ...
Operation Manual
Page 27
...hardwoodrseducesbladetoothset fasterdueto thebladedeflection. Secure the blade guard foot (2) by turning the control knob clockwise or counterclockwise. Set the variable speed control knob (4) to the power source outlet. 1. Raise the blade guard foot (2) by loosening the blade guard...connected to the desired speed by tightening the blade guard foot lock knob (3). 5. Teethonscrolsl awbladeswearout andmustbereplacedfrequently forbestcuttingresultsS. V) [_ WARNING J To avoid injury from the blade prior to turning the scroll saw .Duringthatperiodof timeit isexpectedthatsomebladeswill ...
...hardwoodrseducesbladetoothset fasterdueto thebladedeflection. Secure the blade guard foot (2) by turning the control knob clockwise or counterclockwise. Set the variable speed control knob (4) to the power source outlet. 1. Raise the blade guard foot (2) by loosening the blade guard...connected to the desired speed by tightening the blade guard foot lock knob (3). 5. Teethonscrolsl awbladeswearout andmustbereplacedfrequently forbestcuttingresultsS. V) [_ WARNING J To avoid injury from the blade prior to turning the scroll saw .Duringthatperiodof timeit isexpectedthatsomebladeswill ...

Operation Manual
Page 28
... blade. 7. Position the workpiece on the left are possible on this unit. 1. Follow items 4-8 under FREEHAND CUTTING OPERATION. 9 Fig. Turn the scroll saw ON, position the workpiece against scrap wood prior to touching the leading edge of the workpiece beyond the blade guard foot. Fig. V 2 1 4... the blade guard screw (8), and tilt the blade guard to the power source outlet before moving, replacing the blade or making adjustments. When turning the scroll saw OFF. W) Bevel cuts up to 45 degrees to workpiece (1). 2. Tighten the table lock knob (5). 5. W 2 ,A WARNING t To avoid injury...
... blade. 7. Position the workpiece on the left are possible on this unit. 1. Follow items 4-8 under FREEHAND CUTTING OPERATION. 9 Fig. Turn the scroll saw ON, position the workpiece against scrap wood prior to touching the leading edge of the workpiece beyond the blade guard foot. Fig. V 2 1 4... the blade guard screw (8), and tilt the blade guard to the power source outlet before moving, replacing the blade or making adjustments. When turning the scroll saw OFF. W) Bevel cuts up to 45 degrees to workpiece (1). 2. Tighten the table lock knob (5). 5. W 2 ,A WARNING t To avoid injury...
Operation Manual
Page 29
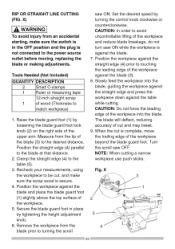
...of the blade (3) to touching the leading edge of the upper arm. Clamp the straight edge (4) to turning the scroll saw ON. Position the workpiece against the table while cutting. Set the desired speed by loosening the blade guard foot lock knob (2) on the right side of the workpiece against the straight edge... (Not Included) QUANTITY DESCRIPTION 2 Small O-clamps 1 Ruler or measuring tape 12-inch straight scrap 1 of the workpiece and reduce blade breakage, do not turn saw OFF. Turn the scroll saw ON while the workpiece is not connected to be cut and may break. 9.
...of the blade (3) to touching the leading edge of the upper arm. Clamp the straight edge (4) to turning the scroll saw ON. Position the workpiece against the table while cutting. Set the desired speed by loosening the blade guard foot lock knob (2) on the right side of the workpiece against the straight edge... (Not Included) QUANTITY DESCRIPTION 2 Small O-clamps 1 Ruler or measuring tape 12-inch straight scrap 1 of the workpiece and reduce blade breakage, do not turn saw OFF. Turn the scroll saw ON while the workpiece is not connected to be cut and may break. 9.

Operation Manual
Page 30
... knob (2). 5. Follow the process, items 3-8, under FREEHAND CUTTING OPERATIONS. 6. Install the blade (3) through the hole in the workpiece. 2. When finished making the interior scroll cuts simply turn the scroll saw table with the workpiece hole (4) over the access hole in . Remove the blade by turning the tension knob (2) counterclockwise. Y 3 4 Refer to BLADE REMOVAL...
... knob (2). 5. Follow the process, items 3-8, under FREEHAND CUTTING OPERATIONS. 6. Install the blade (3) through the hole in the workpiece. 2. When finished making the interior scroll cuts simply turn the scroll saw table with the workpiece hole (4) over the access hole in . Remove the blade by turning the tension knob (2) counterclockwise. Y 3 4 Refer to BLADE REMOVAL...

Operation Manual
Page 34
... SPRING SET PLATE CLAMP BOLSTER BLADE CLAMP BOLSTER BLADE NEEDLE POINTER CAUTION LABEL HEX. VARIABLE SPEED SCROLL SAW MODEL NO. 137.216020 WARNING { When servicing use only CRAFTSMAN replacement parts. PARTS LIST FOR SAW SCHEMATIC I 2NQ8 HANDLE 1 2NQ9 ROCKER ARM COVER 1 2NXM MOTOR BRACKET 1 2NXP... M5 9.8-12 1 0K7F CR. PAN HD. HD. HD. TRUSS HD. PAN HD. SOC. TAPPING SCREW M416-8 4 0KA4 CR. RE. 16 in. HD. HD. TRUSS HD. ROUND WASHER HD. SCREW CR. Repair service is done by a qualified service technician. PAN HD. RE. ...
... SPRING SET PLATE CLAMP BOLSTER BLADE CLAMP BOLSTER BLADE NEEDLE POINTER CAUTION LABEL HEX. VARIABLE SPEED SCROLL SAW MODEL NO. 137.216020 WARNING { When servicing use only CRAFTSMAN replacement parts. PARTS LIST FOR SAW SCHEMATIC I 2NQ8 HANDLE 1 2NQ9 ROCKER ARM COVER 1 2NXM MOTOR BRACKET 1 2NXP... M5 9.8-12 1 0K7F CR. PAN HD. HD. HD. TRUSS HD. PAN HD. SOC. TAPPING SCREW M416-8 4 0KA4 CR. RE. 16 in. HD. HD. TRUSS HD. ROUND WASHER HD. SCREW CR. Repair service is done by a qualified service technician. PAN HD. RE. ...

