

Operation Manual
Page 1
Circular Saw with Laser Trac TM Model No. 112.10872 Z_ CAUTION: Read, understand and follow all Safety Rules and Operating Instructions in . Operator's Manual 2.8 Amp Compact Multi-Purpose/Plunge Action 3-in this Manual before using this product_ Sears, Roebuck and Co., Hoffman Estates, IL 60179 U.S.A. Visit our Craftsman ®webslte: www.sears.com/craftsman • WARRANTY • SAFETY • UNPACKING • DESCRIPTION • OPERATION • MAINTENANCE
Circular Saw with Laser Trac TM Model No. 112.10872 Z_ CAUTION: Read, understand and follow all Safety Rules and Operating Instructions in . Operator's Manual 2.8 Amp Compact Multi-Purpose/Plunge Action 3-in this Manual before using this product_ Sears, Roebuck and Co., Hoffman Estates, IL 60179 U.S.A. Visit our Craftsman ®webslte: www.sears.com/craftsman • WARRANTY • SAFETY • UNPACKING • DESCRIPTION • OPERATION • MAINTENANCE

Operation Manual
Page 3
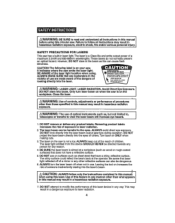
...serious Injury to yourself or to possible dangers. We recommend a Wide V|slon Safety Meek for proper accident prevention measures, manual, Including al! The safely symbols, and the explanations with s ¢lmular btade can result in foreign objects being...all safety instructions below : NOTE: Equipment and/or property damage may result in this saw. Always follow all instructions listed to equipment or other Craftsman Outlets. Injury. | ,'_ CAUTION I Finajuiluryretotoyooubresyeltfhiosr soatfheetyrswoarrnpirnogpeMrtAy YdaremsauglteI,nAplwerasyosnafol llow l the safety ...
...serious Injury to yourself or to possible dangers. We recommend a Wide V|slon Safety Meek for proper accident prevention measures, manual, Including al! The safely symbols, and the explanations with s ¢lmular btade can result in foreign objects being...all safety instructions below : NOTE: Equipment and/or property damage may result in this saw. Always follow all instructions listed to equipment or other Craftsman Outlets. Injury. | ,'_ CAUTION I Finajuiluryretotoyooubresyeltfhiosr soatfheetyrswoarrnpirnogpeMrtAy YdaremsauglteI,nAplwerasyosnafol llow l the safety ...
Operation Manual
Page 4
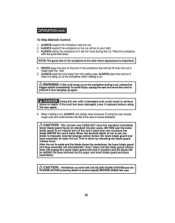
...,Turn laser on the workplece. hese lasersdo not normallypresent an opticalhazard.However,DO NOT stareat the beam as this laser device in this circular saw . DO NOT stare Into beam. Leaving the toolon Increases the risk of someone inadvertently staring Into the laser's beam° _CAUTION'... or performanceof procedures ] other reflective surfaces can be dangerous. 6. The laser beam can also be harmful to follow all Instructions In this manual t before using , ALWAYS MAKE SURE that laser light reflected off when not in laser light.The laser is not a toy.ALWAYS keep...
...,Turn laser on the workplece. hese lasersdo not normallypresent an opticalhazard.However,DO NOT stareat the beam as this laser device in this circular saw . DO NOT stare Into beam. Leaving the toolon Increases the risk of someone inadvertently staring Into the laser's beam° _CAUTION'... or performanceof procedures ] other reflective surfaces can be dangerous. 6. The laser beam can also be harmful to follow all Instructions In this manual t before using , ALWAYS MAKE SURE that laser light reflected off when not in laser light.The laser is not a toy.ALWAYS keep...

Operation Manual
Page 5
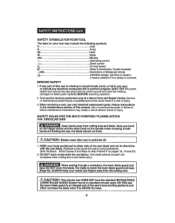
.... Air vents often cover moving parts. Be sure switch ls in serious Injury. 9. Make your hand and frees both hands to lose control_ 4. earn the saw's applications and limitations, as well as In the presence of accessories that have been designedfor use with other laser tools could result in "OFF" positionbefore...) 380-1553. AVOID accidental starting. Keep proper footing and balance at all times. Stable footing on the switchor plugging in sertouspersonal Injury, 4. Read the operator's manual carefullyL.
.... Air vents often cover moving parts. Be sure switch ls in serious Injury. 9. Make your hand and frees both hands to lose control_ 4. earn the saw's applications and limitations, as well as In the presence of accessories that have been designedfor use with other laser tools could result in "OFF" positionbefore...) 380-1553. AVOID accidental starting. Keep proper footing and balance at all times. Stable footing on the switchor plugging in sertouspersonal Injury, 4. Read the operator's manual carefullyL.
Operation Manual
Page 8
... I .n.d.i.c.a.t.ed.sa.n.g.e.r.w,.a.r.n.i.n.go.r.c.a.u.t.i.o.n It means attentlonl Your safety is Involvedo SERVICE SAFETY 1. CIRCULAR SAW on the trigger switch and the other hand on standard circularsaws. SAFETYSYMBOLSFORYOURTOOL Thelabelonyourtoolmay Include the..."O5_)N.AOLTWcAoYveSWrKthheeeenpblsyaaodwueri.nThghatenhdbrsolauadgnehdIfsainwbgeoelrorkswpaltwehceaeyl,otfhrwoeemlrobtwhlaeedrcebugltatuidnaegrdgauereanardd. or should any electrical component fall In any part of this manual. Follow Instructions In the maintenance section of electricshock or injury. and blade. DO NOT...
... I .n.d.i.c.a.t.ed.sa.n.g.e.r.w,.a.r.n.i.n.go.r.c.a.u.t.i.o.n It means attentlonl Your safety is Involvedo SERVICE SAFETY 1. CIRCULAR SAW on the trigger switch and the other hand on standard circularsaws. SAFETYSYMBOLSFORYOURTOOL Thelabelonyourtoolmay Include the..."O5_)N.AOLTWcAoYveSWrKthheeeenpblsyaaodwueri.nThghatenhdbrsolauadgnehdIfsainwbgeoelrorkswpaltwehceaeyl,otfhrwoeemlrobtwhlaeedrcebugltatuidnaegrdgauereanardd. or should any electrical component fall In any part of this manual. Follow Instructions In the maintenance section of electricshock or injury. and blade. DO NOT...
Operation Manual
Page 9
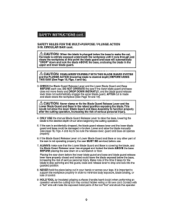
...the blade exposed below the base to drop and lock intothe guarded position, 8. Lower and raise the blade manually (see page 18, Figs.4 and 4a) to desired depth) BEFORE USING THIS SAW (See Page 18, Figs. 4 and 4e). 3_CHECK the Blade Guard Release Leverand the LowerBlade Guardand Base ...workplace until It cuts through and clears the workplece; Make note of control 9- CIRCULAR SAW cont. /_ CAUTION: When the blade Is plunged below the base, Increasingthe risk of the saw is not operating properly, the saw MUST BE serviced before the lower blade guard and base and blade guard release ...
...the blade exposed below the base to drop and lock intothe guarded position, 8. Lower and raise the blade manually (see page 18, Figs.4 and 4a) to desired depth) BEFORE USING THIS SAW (See Page 18, Figs. 4 and 4e). 3_CHECK the Blade Guard Release Leverand the LowerBlade Guardand Base ...workplace until It cuts through and clears the workplece; Make note of control 9- CIRCULAR SAW cont. /_ CAUTION: When the blade Is plunged below the base, Increasingthe risk of the saw is not operating properly, the saw MUST BE serviced before the lower blade guard and base and blade guard release ...

Operation Manual
Page 11
... hearing. Saw Blade Path The area over, under, behind or in front of lhe blade, as the specific potential hazards related to this tool Following this rule wilt reduce the risk of a workpiece, where the blade is dusty 4, PROTECT your power tool. Read operator's manual carefutlyo Learn...or replaced at your lungs. Wear appropriate personal hearing protection during use them repaired at a Sears Service Center_ 8. BE AWARE of the saw wears 6 INSPECT the tool cords periodically and if damaged have these instructions also, Spindle The shaft on which will operate properly and ...
... hearing. Saw Blade Path The area over, under, behind or in front of lhe blade, as the specific potential hazards related to this tool Following this rule wilt reduce the risk of a workpiece, where the blade is dusty 4, PROTECT your power tool. Read operator's manual carefutlyo Learn...or replaced at your lungs. Wear appropriate personal hearing protection during use them repaired at a Sears Service Center_ 8. BE AWARE of the saw wears 6 INSPECT the tool cords periodically and if damaged have these instructions also, Spindle The shaft on which will operate properly and ...

Operation Manual
Page 18
... any reason, If It becomes damaged or begins to operate slowly or sluggishly, DO NOT operate the saw until the damage or problem has been corrected, repaired or replaced° KICKBACK..°WHAT CAUSES IT... HELP PREVENT IT (Figs. 5, 5a and 5b) The Causes of -cut is set, the blade is manually lowered berow the base, (in a plunge action) by releasing the blade guard release lever wh]ie holding... the finger lift bracket on the base, as you lower the saw's handle and blade to the selected depth, Upper Blade Guard When starling and while making a cut through...
... any reason, If It becomes damaged or begins to operate slowly or sluggishly, DO NOT operate the saw until the damage or problem has been corrected, repaired or replaced° KICKBACK..°WHAT CAUSES IT... HELP PREVENT IT (Figs. 5, 5a and 5b) The Causes of -cut is set, the blade is manually lowered berow the base, (in a plunge action) by releasing the blade guard release lever wh]ie holding... the finger lift bracket on the base, as you lower the saw's handle and blade to the selected depth, Upper Blade Guard When starling and while making a cut through...
Operation Manual
Page 21
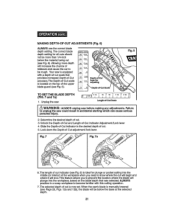
...wilt increase the chance of kickback and cause the cut scale that provtdesincreasedDepth-of-Cut accuracy.The Depth-of cut is now set.When the saw'sblade is equipped with this cuttingoperation. 7_The selecteddepth of the workpfecewhen youneed to be below the material being cut , 3. TO SETTHE BLADE ...DEPTH (FIG. 7 and 7a) 1o Unplug the saw is manually lowered dSeePage 25, Figs. The length of cut indicator(see Fig.6). Slide the Depth-of-Cut indicatorto the deslred depth of *Cutscale Is located...
...wilt increase the chance of kickback and cause the cut scale that provtdesincreasedDepth-of-Cut accuracy.The Depth-of cut is now set.When the saw'sblade is equipped with this cuttingoperation. 7_The selecteddepth of the workpfecewhen youneed to be below the material being cut , 3. TO SETTHE BLADE ...DEPTH (FIG. 7 and 7a) 1o Unplug the saw is manually lowered dSeePage 25, Figs. The length of cut indicator(see Fig.6). Slide the Depth-of-Cut indicatorto the deslred depth of *Cutscale Is located...

Operation Manual
Page 24
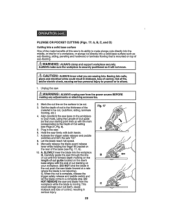
... trigger safety release end paddle switchand let the blade come to turnthe saw and blade from the workplace (see Fig. 12, F), the lower blade guard and base will be abte to the desired angle for your cutline. 3. Manually releasethe blade guard release leverwhile holdingthe finger lift bracketon the rear of ...the base (see Pg.19, Ffg 5a)oAlign the center of the "V" notch on the saw . DO NOT bind the blade In the cut . push the...
... trigger safety release end paddle switchand let the blade come to turnthe saw and blade from the workplace (see Fig. 12, F), the lower blade guard and base will be abte to the desired angle for your cutline. 3. Manually releasethe blade guard release leverwhile holdingthe finger lift bracketon the rear of ...the base (see Pg.19, Ffg 5a)oAlign the center of the "V" notch on the saw . DO NOT bind the blade In the cut . push the...
Operation Manual
Page 26
... In position and the blade will be onyourright. 3, ALWAYSclampthe workplaceso it does not hang up on standard circular saws. When makinga cut Is made (see Fig 13s). 5, ALWAYS keep the cord away from the cutting area. L_ CAUTION: This....Toavoid Injury unplug the saw again. 6. ALWAYsSupportht eworkplacneeatrhecut° 2. IfUtshiengcothrde shaaws bwelethn adadmamagaegde,dhcaovredItcroeupldlacreesdublteIfnorseeruiosiunsg | the saw and move during the CUtrP, lace the workplace with the good side down_ NOTE:The good side of cut Is set, the blade Is manually lowered (plunge action) below...
... In position and the blade will be onyourright. 3, ALWAYSclampthe workplaceso it does not hang up on standard circular saws. When makinga cut Is made (see Fig 13s). 5, ALWAYS keep the cord away from the cutting area. L_ CAUTION: This....Toavoid Injury unplug the saw again. 6. ALWAYsSupportht eworkplacneeatrhecut° 2. IfUtshiengcothrde shaaws bwelethn adadmamagaegde,dhcaovredItcroeupldlacreesdublteIfnorseeruiosiunsg | the saw and move during the CUtrP, lace the workplace with the good side down_ NOTE:The good side of cut Is set, the blade Is manually lowered (plunge action) below...
Operation Manual
Page 29
Manually release the blade guard release leverwhile holdlng the fingerlift bracket on the surface tobe cut. 3,...etco) 4. Mark the cutline on the rear of the base (see Page 21, Figo6). 5_ Plug in the cut;push the saw blade forward at a rate where the blade is Its abilityto make plungecuts directly Into the middle, or Interiorof a workplace, or plunge... the sawthroughthe line of cut untl!the forward depth marking or} the length of cut guide located on the saw's base aligns with the end of cut Is complete, release the trigger safetyrelease and paddle switch and letthe bladecome to others...
Manually release the blade guard release leverwhile holdlng the fingerlift bracket on the surface tobe cut. 3,...etco) 4. Mark the cutline on the rear of the base (see Page 21, Figo6). 5_ Plug in the cut;push the saw blade forward at a rate where the blade is Its abilityto make plungecuts directly Into the middle, or Interiorof a workplace, or plunge... the sawthroughthe line of cut untl!the forward depth marking or} the length of cut guide located on the saw's base aligns with the end of cut Is complete, release the trigger safetyrelease and paddle switch and letthe bladecome to others...
Operation Manual
Page 33
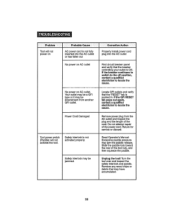
... verify that may jam the paddle release. Slide the paddle lock toward the rear of the power cord, Return for serviceor discard° Read Operator's Manual. If the GFI RESET tab pops out again, contact a qualified electrician to locate the cause, No power on AC outlet Properly Install power cord plug...
... verify that may jam the paddle release. Slide the paddle lock toward the rear of the power cord, Return for serviceor discard° Read Operator's Manual. If the GFI RESET tab pops out again, contact a qualified electrician to locate the cause, No power on AC outlet Properly Install power cord plug...

Operation Manual
Page 38
... Torsoni_l spr!ng t 300773 Retaining Ring 17-A 1 300794 splndte 1 300900 Saw Blade 1 300750 Ou!e,r Ffange I 38 Assembly .......... 1 1 300776 Spanner 2 300777 ,,, Screw 1 300788 Bolt I 3780029 Prolector Board 2 300783 Owners Manual I 300749 Screw 1 601747 Included Laser Unit Assembly Laser Cover ? 1 ........ included included Included included SpringWash,e,r, , , Adaptor Upper Guard Label ? Circular Saw Model Number 112.10872 The Model Number willbe found on the Nameplate. Pointer 1 1 1 1 1 included included included Cem,,Bu,t!,0n ...
... Torsoni_l spr!ng t 300773 Retaining Ring 17-A 1 300794 splndte 1 300900 Saw Blade 1 300750 Ou!e,r Ffange I 38 Assembly .......... 1 1 300776 Spanner 2 300777 ,,, Screw 1 300788 Bolt I 3780029 Prolector Board 2 300783 Owners Manual I 300749 Screw 1 601747 Included Laser Unit Assembly Laser Cover ? 1 ........ included included Included included SpringWash,e,r, , , Adaptor Upper Guard Label ? Circular Saw Model Number 112.10872 The Model Number willbe found on the Nameplate. Pointer 1 1 1 1 1 included included included Cem,,Bu,t!,0n ...

Operation Manual
Page 80
... and garden equipment, or heating and cooling systems, no matter who made It, no matter who sold Itl For the replacement parts, accessories and owner's manuals that you need to do r_e_,r_Bra_, LLC LLC Brard_ LLC O _r_ I_randl, LLC For Sears professionalinstallationof home appliances and items like garage door openers...
... and garden equipment, or heating and cooling systems, no matter who made It, no matter who sold Itl For the replacement parts, accessories and owner's manuals that you need to do r_e_,r_Bra_, LLC LLC Brard_ LLC O _r_ I_randl, LLC For Sears professionalinstallationof home appliances and items like garage door openers...


