
Operation Manual
Page 2
Warranty Safety Symbols Safety Instructions Glossary of Terms Unpacking Description Operation Maintenance Troubleshooting Accessories Repair Parts Sears Repair Parts Phone Numbers Page 2 Page 3 Pages 4-11 Pages 11-12 Page 13 Pages 14-15 Pages 16-31 Pages 31-32 Pages 33-34 Page 35 Pages 35-38 Back Cover ONEYEAR FULLWARRANTY ON CRAFTSMAN ® PRODUCT tf this Craftsman Tool fails due to a defect in material or workmanship within...
Warranty Safety Symbols Safety Instructions Glossary of Terms Unpacking Description Operation Maintenance Troubleshooting Accessories Repair Parts Sears Repair Parts Phone Numbers Page 2 Page 3 Pages 4-11 Pages 11-12 Page 13 Pages 14-15 Pages 16-31 Pages 31-32 Pages 33-34 Page 35 Pages 35-38 Back Cover ONEYEAR FULLWARRANTY ON CRAFTSMAN ® PRODUCT tf this Craftsman Tool fails due to a defect in material or workmanship within...

Operation Manual
Page 3
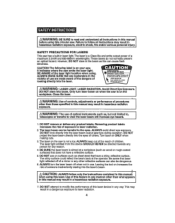
... in this saw. safety alert symbols such as in electric shock, fire and/or serious personal injury. Always follow all instructions listed to read and understand all safety instructions below : NOTE: Equipment and/or property damage may result If these Instructions are no substitutes for use over eyeglasses or standard safety glasses with aide shield and s full-face shield when needed.
... in this saw. safety alert symbols such as in electric shock, fire and/or serious personal injury. Always follow all instructions listed to read and understand all safety instructions below : NOTE: Equipment and/or property damage may result If these Instructions are no substitutes for use over eyeglasses or standard safety glasses with aide shield and s full-face shield when needed.
Operation Manual
Page 4
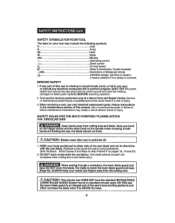
... looking directly Into the laser. 2t Cf'R _ 1040,10 _¢4 1 _10,t_t A_tD [KPOSU_1_ _WARNING: LASER LIGHT. DO NOT attemptto modify the performance of this cancause flash blindness, CAUTION:The following label Is on ONLY when making cuts. 3. Failure to follow all Instructions In this manual t before using this circular saw emits the laser light, BE AWARE of the laser light location when using this laser, Use...
... looking directly Into the laser. 2t Cf'R _ 1040,10 _¢4 1 _10,t_t A_tD [KPOSU_1_ _WARNING: LASER LIGHT. DO NOT attemptto modify the performance of this cancause flash blindness, CAUTION:The following label Is on ONLY when making cuts. 3. Failure to follow all Instructions In this manual t before using this circular saw emits the laser light, BE AWARE of the laser light location when using this laser, Use...

Operation Manual
Page 5
... and visitors away while operating a power tool, Distractions can be caught In movlng parts. 5. Read the operator's manual carefullyL. Be sure switch ls in "OFF" positionbefore plugging lm DO NOT carry tools with your finger on the switch.Carrying tools with this tool, 2. REMOVE adjusting keys or wrenches before turning the tool "ON". Keep proper footing and balance at all times. Dust mask, non-skid safety shoes,hard hat...
... and visitors away while operating a power tool, Distractions can be caught In movlng parts. 5. Read the operator's manual carefullyL. Be sure switch ls in "OFF" positionbefore plugging lm DO NOT carry tools with your finger on the switch.Carrying tools with this tool, 2. REMOVE adjusting keys or wrenches before turning the tool "ON". Keep proper footing and balance at all times. Dust mask, non-skid safety shoes,hard hat...

Operation Manual
Page 6
... In a polarized outlet only one tool maybecome hazardous when usedon another tool. 10. Doubleinsulation[]eliminates the need for this saw Is a double Insulated tool, This saw . g°USE ONLY accessories that cannot be controlled with the switch ts dangerous and must be suitable for your application. KEEP blade guards In place and in good working order, ELECTRICAL SAFETY _WARNING: Do not permit fingers to...
... In a polarized outlet only one tool maybecome hazardous when usedon another tool. 10. Doubleinsulation[]eliminates the need for this saw Is a double Insulated tool, This saw . g°USE ONLY accessories that cannot be controlled with the switch ts dangerous and must be suitable for your application. KEEP blade guards In place and in good working order, ELECTRICAL SAFETY _WARNING: Do not permit fingers to...
Operation Manual
Page 8
... SERVICE SAFETY 1. DO NOT reach underneath the workplece. baansde CAUTION: This circularsaw DOES NOT have the missing. or should break, bend, or fall to perform properly; Use of the saw blade and not in direct line with the saw Is missing or should any electrical component fall In any part of this manual. Keep one hand [Z_ CAUTION: Blades coast after saw Is switched...
... SERVICE SAFETY 1. DO NOT reach underneath the workplece. baansde CAUTION: This circularsaw DOES NOT have the missing. or should break, bend, or fall to perform properly; Use of the saw blade and not in direct line with the saw Is missing or should any electrical component fall In any part of this manual. Keep one hand [Z_ CAUTION: Blades coast after saw Is switched...
Operation Manual
Page 9
... use. 7. CIRCULAR SAW cont. /_ CAUTION: When the blade Is plunged below the base, Increasingthe risk of -cut , the blade Is entirely exposed underneath the workplace until It cuts through and clears the workplece; ONLY USE the manual Blade Guard Release Lever to false the base, lowering the blade to make the cut when beginning the cuttingoperatlon_ 5_If the saw 's body) when performing an operation where the cutting tool may contact hidden wiring...
... use. 7. CIRCULAR SAW cont. /_ CAUTION: When the blade Is plunged below the base, Increasingthe risk of -cut , the blade Is entirely exposed underneath the workplace until It cuts through and clears the workplece; ONLY USE the manual Blade Guard Release Lever to false the base, lowering the blade to make the cut when beginning the cuttingoperatlon_ 5_If the saw 's body) when performing an operation where the cutting tool may contact hidden wiring...
Operation Manual
Page 10
... Injury. The blade washers and bolts were specially designed for the dust exposure. tOshItanhtjeuarrrbyel(adsdeeesesigpcnaoaguteeldsd1rfuo6nrauenrdsrea1wt7ici)t.ahllythaisnd 12, NEVER use NIOSH/OSHA approved respiratory protection appropriate for your hand to move when making the cut. 11oWhen ripping, ALWAYSUSE a rip fence or straight edge guide.This Improves the accuracy of work.To reduce your exposure to filter out microscopic particles.. CIRCULAR SAW cont. 10rALWAYS clamp the workplece...
... Injury. The blade washers and bolts were specially designed for the dust exposure. tOshItanhtjeuarrrbyel(adsdeeesesigpcnaoaguteeldsd1rfuo6nrauenrdsrea1wt7ici)t.ahllythaisnd 12, NEVER use NIOSH/OSHA approved respiratory protection appropriate for your hand to move when making the cut. 11oWhen ripping, ALWAYSUSE a rip fence or straight edge guide.This Improves the accuracy of work.To reduce your exposure to filter out microscopic particles.. CIRCULAR SAW cont. 10rALWAYS clamp the workplece...

Operation Manual
Page 11
... or has been cut ,, Miter Cut A cutting operation made with the blade at a Sears Service Center_ 8. INSPECT and remove all instructions listed below may affect the tool's operation. BE AWARE of electric shock, fire or serious injuryr 2 ALWAYS wear safety glasses or eye shields when using this tool, make a pocket cut by a spinning object in electric shock, fire and!or serious personal injury, 1. A guard or other part that the saw blade tooth is...
... or has been cut ,, Miter Cut A cutting operation made with the blade at a Sears Service Center_ 8. INSPECT and remove all instructions listed below may affect the tool's operation. BE AWARE of electric shock, fire or serious injuryr 2 ALWAYS wear safety glasses or eye shields when using this tool, make a pocket cut by a spinning object in electric shock, fire and!or serious personal injury, 1. A guard or other part that the saw blade tooth is...

Operation Manual
Page 12
... or Material The item on which the cutting operation is being done The surfaces of the work clamp, or other proper device to keep the workpiece from twisting or moving during the cut Through Sawing Any cutting operation where the blade extends completely through the thickness of the workpiece. Compound Miter Cut A compound miter cut is a cut made using a fence, miter gauge, fixture, work piece° Bevel Cut A cutting operation made across the grain of a workpiece...
... or Material The item on which the cutting operation is being done The surfaces of the work clamp, or other proper device to keep the workpiece from twisting or moving during the cut Through Sawing Any cutting operation where the blade extends completely through the thickness of the workpiece. Compound Miter Cut A compound miter cut is a cut made using a fence, miter gauge, fixture, work piece° Bevel Cut A cutting operation made across the grain of a workpiece...
Operation Manual
Page 13
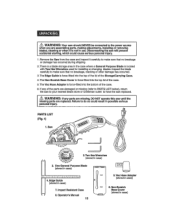
... in case) Non-Scratch Base Cover (stored in the case where a General Purpose Blade is not In use. Impact ResistantCase 8, Operator'sManual 13 "-'-_r 5.Vae Hose Adapter (stored incase) 6. I. Disconnectingthe saw unt, the missing parts are replaced. Z_ WARNING: Yoursaw should NEVER be connected to the power soume when you are assembling pads, maldng adjustments,Installing or removing blades, cleaning or when It is located with "PwoHex Wrenches used for installing or changing blades...
... in case) Non-Scratch Base Cover (stored in the case where a General Purpose Blade is not In use. Impact ResistantCase 8, Operator'sManual 13 "-'-_r 5.Vae Hose Adapter (stored incase) 6. I. Disconnectingthe saw unt, the missing parts are replaced. Z_ WARNING: Yoursaw should NEVER be connected to the power soume when you are assembling pads, maldng adjustments,Installing or removing blades, cleaning or when It is located with "PwoHex Wrenches used for installing or changing blades...
Operation Manual
Page 14
... operate when plugged intocorrect 120-volt, 60*HzAC ONLYoutlet, checkthe powersuppiyoThis saw has an 8-ft., 2*wire powercord (no -load speed) Motor. Laser TracTM the unique, Innovative feature for efficient powertransmission. Quick depth-of-cut adjustments witha maximum depth-of-cut scale, located on direct current (DC).The largevoltage drop will cause a loss of blade position on paddle for easy operation. 12. ErgonomtcallydesignedBlade Guard Release Lever and Base Assembly Finger Lift forefficient operation...
... operate when plugged intocorrect 120-volt, 60*HzAC ONLYoutlet, checkthe powersuppiyoThis saw has an 8-ft., 2*wire powercord (no -load speed) Motor. Laser TracTM the unique, Innovative feature for efficient powertransmission. Quick depth-of-cut adjustments witha maximum depth-of-cut scale, located on direct current (DC).The largevoltage drop will cause a loss of blade position on paddle for easy operation. 12. ErgonomtcallydesignedBlade Guard Release Lever and Base Assembly Finger Lift forefficient operation...
Operation Manual
Page 16
... the other blade could result In an accident causing serious Injury. i, _WARNING: ONLY USE the saw blades need to _-ln. Turn the wrench that it prevents the outer blade washer from power source BEFORE assembling parts, making adjustments or changing blades. 2. thlck (See Fig. 3b). Using a dull blade places a heavy load on the blade slows the saw down, Use gum and pitch remover, hot water or kerosene to wear protective work gloves while handling a saw .
... the other blade could result In an accident causing serious Injury. i, _WARNING: ONLY USE the saw blades need to _-ln. Turn the wrench that it prevents the outer blade washer from power source BEFORE assembling parts, making adjustments or changing blades. 2. thlck (See Fig. 3b). Using a dull blade places a heavy load on the blade slows the saw down, Use gum and pitch remover, hot water or kerosene to wear protective work gloves while handling a saw .
Operation Manual
Page 17
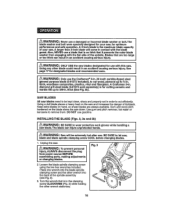
... base. 7. Set the depth-of-cut scale to unscrew the blade spindle clamping 5osRceremv_o, ve the screw and the outer "D" washer. 6. Place the new saw blade through the blade slot in a COUNTERCLOCKWISE direction. 12. Replace the spindle screwand hand tightenit in the base and onto the spindle shaft against the Inner"D" bushtng. Diamond grit steel blade 17 Put a drop of 7!8-incheso Release the blade release lever and RAISE the base with your gloved hand and remove...
... base. 7. Set the depth-of-cut scale to unscrew the blade spindle clamping 5osRceremv_o, ve the screw and the outer "D" washer. 6. Place the new saw blade through the blade slot in a COUNTERCLOCKWISE direction. 12. Replace the spindle screwand hand tightenit in the base and onto the spindle shaft against the Inner"D" bushtng. Diamond grit steel blade 17 Put a drop of 7!8-incheso Release the blade release lever and RAISE the base with your gloved hand and remove...

Operation Manual
Page 18
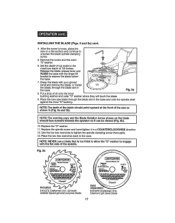
... integral part of the saw's base and ONLY encloses the blade when it is ABOVE the saw's base (see Fig_4)_ When the desired depth-of-cut is set, the blade is manually lowered berow the base, (in a plunge action) by releasing the blade guard release lever wh]ie holding the finger lift bracket on the base, as you lower the saw until the damage or problem has been corrected, repaired or replaced...
... integral part of the saw's base and ONLY encloses the blade when it is ABOVE the saw's base (see Fig_4)_ When the desired depth-of-cut is set, the blade is manually lowered berow the base, (in a plunge action) by releasing the blade guard release lever wh]ie holding the finger lift bracket on the base, as you lower the saw until the damage or problem has been corrected, repaired or replaced...

Operation Manual
Page 22
... personal Injury, ALWAYSdisconnect the plug from power source BEFORE assembling parts, making adjustments or i changing blades, Your saw has a handle/motor housing withsoft-grip that adjusts Fig, 8 3O° to release the handlefor adjustment. 3. This feature provides more efficient cuttlng 15o angles for vadous applications and added gripping comfort with one j handand pushthe swivel head lock and release button "IN" to 3 different cutting angles, 0°, 15°, and 30...
... personal Injury, ALWAYSdisconnect the plug from power source BEFORE assembling parts, making adjustments or i changing blades, Your saw has a handle/motor housing withsoft-grip that adjusts Fig, 8 3O° to release the handlefor adjustment. 3. This feature provides more efficient cuttlng 15o angles for vadous applications and added gripping comfort with one j handand pushthe swivel head lock and release button "IN" to 3 different cutting angles, 0°, 15°, and 30...

Operation Manual
Page 24
... the base with both hands on the saw, keepingthe front of the base flat against the workplece as you lowerthe saw's handle and blade to a complete stop.DO NOT REMOVEthe saw before making any adjustments.Failure 2_ Set-up and clamp your workplaceand mark your cutting application. 4. push the saw blade forward at a rate where the blade is not laboring.When the cut Is comptets, release the trigger safety release end...
... the base with both hands on the saw, keepingthe front of the base flat against the workplece as you lowerthe saw's handle and blade to a complete stop.DO NOT REMOVEthe saw before making any adjustments.Failure 2_ Set-up and clamp your workplaceand mark your cutting application. 4. push the saw blade forward at a rate where the blade is not laboring.When the cut Is comptets, release the trigger safety release end...
Operation Manual
Page 26
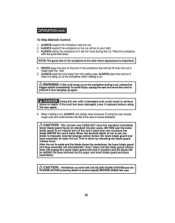
... cord away from the cutting area. To HelpMaintainControl: 1. trigger switch Immediately.Toavoid Injury unplug the saw and move during the CUtrP, lace the workplace with the good side down_ NOTE:The good side of cut Is set, the blade Is manually lowered (plunge action) below the lower blade guard and base assembly to make the cut, This Is done by the upper and lower blade guard...
... cord away from the cutting area. To HelpMaintainControl: 1. trigger switch Immediately.Toavoid Injury unplug the saw and move during the CUtrP, lace the workplace with the good side down_ NOTE:The good side of cut Is set, the blade Is manually lowered (plunge action) below the lower blade guard and base assembly to make the cut, This Is done by the upper and lower blade guard...
Operation Manual
Page 33
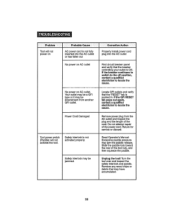
... a_empt repair of the cord. Excesslve paddle pressure may be Jammed° Remove powerplug from another GFI outlet, Locate GFI outlets and verify that may have accumulated. 33 Safety Interlock may be downstream from the AC outlet and Inspect the plug and the length of the power cord, Return for serviceor discard° Read Operator's Manual. Slide the paddle lock toward...
... a_empt repair of the cord. Excesslve paddle pressure may be Jammed° Remove powerplug from another GFI outlet, Locate GFI outlets and verify that may have accumulated. 33 Safety Interlock may be downstream from the AC outlet and Inspect the plug and the length of the power cord, Return for serviceor discard° Read Operator's Manual. Slide the paddle lock toward...

Operation Manual
Page 37
... Labet? 1 15 included Brand LabeI 1 101 300767 Carbon brush set 2 ,17, included Carbon Brush Assembty 2 18 fncluded Brush HoIder 2 102 601744 MOtOr Assemb!_ 1 19 included Rear Support, 1 21 included 22 included Be!! PCB Set Switch Qty+ t 4 1 I 1 t 1 1 I Se!f tapping Screw ST4.2X 16 R!pht hous!ng Tr+gger Unit Assembly Cover revolve-button Compression Sprtng Knob holder Power Cord Assembly Cable Protector inner Line 120 (b!ue) inner wire 60 (brown) .
... Labet? 1 15 included Brand LabeI 1 101 300767 Carbon brush set 2 ,17, included Carbon Brush Assembty 2 18 fncluded Brush HoIder 2 102 601744 MOtOr Assemb!_ 1 19 included Rear Support, 1 21 included 22 included Be!! PCB Set Switch Qty+ t 4 1 I 1 t 1 1 I Se!f tapping Screw ST4.2X 16 R!pht hous!ng Tr+gger Unit Assembly Cover revolve-button Compression Sprtng Knob holder Power Cord Assembly Cable Protector inner Line 120 (b!ue) inner wire 60 (brown) .


