
Operation Manual
Page 9
... of serious personal Injury. 4. ONLY USE the manual Blade Guard Release Lever to false the base, lowering the blade to the desired depth-of-cut In your hands or across your legs, It isimportantto support the workplace propedy tn order to be damaged or broken. Lower and...exposed underneath the workplace until It cuts through and clears the workplece; Contactwith a "llve" wire wLllmake the exposed metal parts of seriouspersonal Injury. CIRCULAR SAW cont. /_ CAUTION: When the blade Is plunged below the base, Increasingthe risk of the tool "live" and shockthe operator. at this point...
... of serious personal Injury. 4. ONLY USE the manual Blade Guard Release Lever to false the base, lowering the blade to the desired depth-of-cut In your hands or across your legs, It isimportantto support the workplace propedy tn order to be damaged or broken. Lower and...exposed underneath the workplace until It cuts through and clears the workplece; Contactwith a "llve" wire wLllmake the exposed metal parts of seriouspersonal Injury. CIRCULAR SAW cont. /_ CAUTION: When the blade Is plunged below the base, Increasingthe risk of the tool "live" and shockthe operator. at this point...
Operation Manual
Page 14
CIRCULAR SAW (Fig. 2) l NopOeTrEat:iBnegffoeraetuartteesmapntdinsgatfoetuysreqyuoiurer msaewn_tfsa,miliarize yourselfwith all of the Your plunge action circularsaw has a precision-built electric motor and It shouldbe connected to help produceaccuratestraightcuts. 16. Easy to read and set depth-of-cut of -cut scale,...lubricated 100% ball bearings for cutting ceramic and marble tile up to 3/4-1n,thick,woodbasecomposites, plastics, vinyland ftberglass.A Craftsman 3-In. Provtdessure cuts fn plywood, woodbase composites, plastics, vinyl and fiberglass with the general purpose blade Included,...
CIRCULAR SAW (Fig. 2) l NopOeTrEat:iBnegffoeraetuartteesmapntdinsgatfoetuysreqyuoiurer msaewn_tfsa,miliarize yourselfwith all of the Your plunge action circularsaw has a precision-built electric motor and It shouldbe connected to help produceaccuratestraightcuts. 16. Easy to read and set depth-of-cut of -cut scale,...lubricated 100% ball bearings for cutting ceramic and marble tile up to 3/4-1n,thick,woodbasecomposites, plastics, vinyland ftberglass.A Craftsman 3-In. Provtdessure cuts fn plywood, woodbase composites, plastics, vinyl and fiberglass with the general purpose blade Included,...

Operation Manual
Page 15
This Saw has the following features: cont. (Fig.2) Laser Tta¢TM and LED Workllght On / Off Switch uetsble Handle Soft-Grip Laser Light Aperture and LED Workllgh Depth-of-Cut and Length-of-Cut Indicator and Adjustment / Lock Lever for Edg_ iplng Screw Clamping Washer Length-of-Cut Indicator Scale Upper Blade... I / Retaining Mounting Slots for Edge Gulde Length_of*Cut Indicator Scale Lower Blade Guard and Base Rating No-Load Speed Biade Diameter Blade Arbor Maximum Cutting Depth Input 2.8 Amps 2800 RPM 3-in, (76,2mm) .3g4-1n. (1o ram) 7/8-1n. (22.2mm) 120-v., 60Hz AC '15
This Saw has the following features: cont. (Fig.2) Laser Tta¢TM and LED Workllght On / Off Switch uetsble Handle Soft-Grip Laser Light Aperture and LED Workllgh Depth-of-Cut and Length-of-Cut Indicator and Adjustment / Lock Lever for Edg_ iplng Screw Clamping Washer Length-of-Cut Indicator Scale Upper Blade... I / Retaining Mounting Slots for Edge Gulde Length_of*Cut Indicator Scale Lower Blade Guard and Base Rating No-Load Speed Biade Diameter Blade Arbor Maximum Cutting Depth Input 2.8 Amps 2800 RPM 3-in, (76,2mm) .3g4-1n. (1o ram) 7/8-1n. (22.2mm) 120-v., 60Hz AC '15
Operation Manual
Page 17
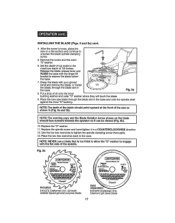
...cut scale to the maximum depth of oil onto the Inner bushing washer and outer "D" washer where they will touch the blade° 9. Place the new saw as shown In (Fig, 3a and 3b). Fig. 3a 8. i, u, ,, , NOTE:The teeth of the saw blade through the blade slot...copy and the Blade Rotation Arrow shown on s fiat surfaceand continue to engage Fig. 3b Included: 9-61272 Craftsman 3-In. 20 tooth carbide tipped general purpose blade Sold separately 9-61273 Craftsman 3-1n. Diamond grit steel blade 17 Replace the spindle screwand hand tightenit in the case. I wNiOthTEth:...
...cut scale to the maximum depth of oil onto the Inner bushing washer and outer "D" washer where they will touch the blade° 9. Place the new saw as shown In (Fig, 3a and 3b). Fig. 3a 8. i, u, ,, , NOTE:The teeth of the saw blade through the blade slot...copy and the Blade Rotation Arrow shown on s fiat surfaceand continue to engage Fig. 3b Included: 9-61272 Craftsman 3-In. 20 tooth carbide tipped general purpose blade Sold separately 9-61273 Craftsman 3-1n. Diamond grit steel blade 17 Replace the spindle screwand hand tightenit in the case. I wNiOthTEth:...

Operation Manual
Page 18
BLADE GUARD SYSTEM (Figs. 4 and 4a) Fig. 4 The iower blade guard is an integral part of the saw's base and ONLY encloses the blade when it is ABOVE the saw's base (see Fig_4)_ When the desired depth-of-cut is set, the blade is manually lowered berow the base, (in a plunge action) by releasing... the blade guard release lever wh]ie holding the finger lift bracket on the base, as you lower the saw's handle and blade to the selected depth, Upper Blade Guard When starling and while making a cut, the blade is designed for your protection and safety and should NEVER be...
BLADE GUARD SYSTEM (Figs. 4 and 4a) Fig. 4 The iower blade guard is an integral part of the saw's base and ONLY encloses the blade when it is ABOVE the saw's base (see Fig_4)_ When the desired depth-of-cut is set, the blade is manually lowered berow the base, (in a plunge action) by releasing... the blade guard release lever wh]ie holding the finger lift bracket on the base, as you lower the saw's handle and blade to the selected depth, Upper Blade Guard When starling and while making a cut, the blade is designed for your protection and safety and should NEVER be...

Operation Manual
Page 20
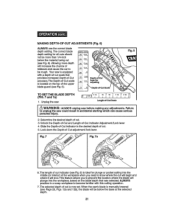
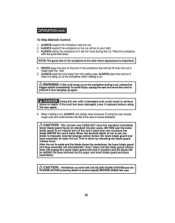
...ecdoinattreollyoifftthheebsAlaaLwdWe. Ways to Help Prevent Kickback cont. 6. KEEP the blade at the correct depth setting. If the saw blade is binding, it may walk up or Kickback from the workplece when the saw in the workplece, CENTER the blade In the keff and checkto be sure that...or gummed-up blades produce narrow kerr which causes excessive friction, blade btndlng and Kickback. 8. When restarting the saw is tight and secure BEFORE maklng a cut (See Fig. 5). The depth setting should not exceed 1/4-Inch below the material being cut . USE E,I_TRACAUTION when plunge cutting making a "Pocket...
...ecdoinattreollyoifftthheebsAlaaLwdWe. Ways to Help Prevent Kickback cont. 6. KEEP the blade at the correct depth setting. If the saw blade is binding, it may walk up or Kickback from the workplece when the saw in the workplece, CENTER the blade In the keff and checkto be sure that...or gummed-up blades produce narrow kerr which causes excessive friction, blade btndlng and Kickback. 8. When restarting the saw is tight and secure BEFORE maklng a cut (See Fig. 5). The depth setting should not exceed 1/4-Inch below the material being cut . USE E,I_TRACAUTION when plunge cutting making a "Pocket...
Operation Manual
Page 21
...Depth-of -Cut IndicatorAdjustment/Lock lever 4. Your saw is now set.When the saw , t , I , t , Hl Length-of cut indicator(see Fig. 5). wAcLoWulAdYreSsuunlpt lIungascacwidebnetfaolrsetmaratiknigngwahnicyhacdajunsctmauesnetss.eFraioiluusre 2. Fig, 7 Fig. 7a (, 6. MAKINGDEPTH-OF-CUATDJUSTMENT(SFig.6) ALWAYSuse the correct blade depth... located on the blade depththat wasselected.ALWAYS practicein a scrap workplaceto becomefamiliar with a depth-of cut , 3. Determine the desired depth of cut is equipped with this cuttingoperation. 7_The selecteddepth of -cut to knowwhere...
...Depth-of -Cut IndicatorAdjustment/Lock lever 4. Your saw is now set.When the saw , t , I , t , Hl Length-of cut indicator(see Fig. 5). wAcLoWulAdYreSsuunlpt lIungascacwidebnetfaolrsetmaratiknigngwahnicyhacdajunsctmauesnetss.eFraioiluusre 2. Fig, 7 Fig. 7a (, 6. MAKINGDEPTH-OF-CUATDJUSTMENT(SFig.6) ALWAYSuse the correct blade depth... located on the blade depththat wasselected.ALWAYS practicein a scrap workplaceto becomefamiliar with a depth-of cut , 3. Determine the desired depth of cut is equipped with this cuttingoperation. 7_The selecteddepth of -cut to knowwhere...
Operation Manual
Page 23
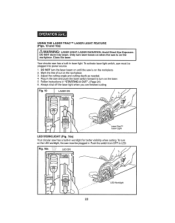
... (Fig, 10a) Your circular saw has a built-in worklight for better vtsibi/lty when cutting To turn on the LED work]ight, the saw must be plugged in laser light To activate laser light switch, saw must be plugged into beam...laser. 5. i ll,l,,,ll i,,Hllll L Yourcircular saw has a built-in , Push the switch from OFF to turn the laser beam on until the saw is on the i _wWorAkRplNecINe.G:Class ILliAaSlEasRer°LIGH...T..........L....A.....S.....E.....R...........R.....A.....D.....I..A......T.. Adjust the cutting angle and cutting depth as needed., 4 Plug in "STARTING A CUT...
... (Fig, 10a) Your circular saw has a built-in worklight for better vtsibi/lty when cutting To turn on the LED work]ight, the saw must be plugged in laser light To activate laser light switch, saw must be plugged into beam...laser. 5. i ll,l,,,ll i,,Hllll L Yourcircular saw has a built-in , Push the switch from OFF to turn the laser beam on until the saw is on the i _wWorAkRplNecINe.G:Class ILliAaSlEasRer°LIGH...T..........L....A.....S.....E.....R...........R.....A.....D.....I..A......T.. Adjust the cutting angle and cutting depth as needed., 4 Plug in "STARTING A CUT...

Operation Manual
Page 24
... cause kickback, loss of control, and result in accidental starting your hands positioned as shown In Fig, 13a, 24 When the blade and saw to the selected depth, MAKE SURETHE BLADE IS NOT MAKINGCONTACT WITH THE WORKPIECE. 9_ With both hands. 7_ Positionthe front of the workplace that is moving.This could... lift bracketon the rear of the base (see Pg.19, Ffg 5a)oAlign the center of the "V" notch on the saw are clear of -Cut (with your cut ; Set the Depth-of and removed from the workplace while the blade is solidlysupported (see Rgo12, A and 13)as you enter the workplace...
... cause kickback, loss of control, and result in accidental starting your hands positioned as shown In Fig, 13a, 24 When the blade and saw to the selected depth, MAKE SURETHE BLADE IS NOT MAKINGCONTACT WITH THE WORKPIECE. 9_ With both hands. 7_ Positionthe front of the workplace that is moving.This could... lift bracketon the rear of the base (see Pg.19, Ffg 5a)oAlign the center of the "V" notch on the saw are clear of -Cut (with your cut ; Set the Depth-of and removed from the workplace while the blade is solidlysupported (see Rgo12, A and 13)as you enter the workplace...
Operation Manual
Page 26
.... 3, ALWAYSclampthe workplaceso it wtlinot move the cordto I_WAR prevent It NfroINmGh:antfgtihnegcuopradghaainn.gsup on standard circular saws. ON THIS saw on the workplece when making a cuL I / J [_ Injury or death. ALWAYSplace the ...EsMsaanwd...t.h..e....II....... 26 IfUtshiengcothrde shaaws bwelethn adadmamagaegde,dhcaovredItcroeupldlacreesdublteIfnorseeruiosiunsg | the saw 's base. When the desired depth of the saw's base and only encloses the blade ABOVE the saw again. 6. ALWAYsSupportht eworkplacneeatrhecut° 2. ALWAYsSupportht eworkplacsoethe cutwili ...
.... 3, ALWAYSclampthe workplaceso it wtlinot move the cordto I_WAR prevent It NfroINmGh:antfgtihnegcuopradghaainn.gsup on standard circular saws. ON THIS saw on the workplece when making a cuL I / J [_ Injury or death. ALWAYSplace the ...EsMsaanwd...t.h..e....II....... 26 IfUtshiengcothrde shaaws bwelethn adadmamagaegde,dhcaovredItcroeupldlacreesdublteIfnorseeruiosiunsg | the saw 's base. When the desired depth of the saw's base and only encloses the blade ABOVE the saw again. 6. ALWAYsSupportht eworkplacneeatrhecut° 2. ALWAYsSupportht eworkplacsoethe cutwili ...
Operation Manual
Page 29
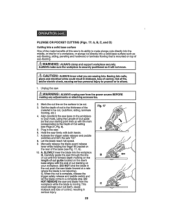
... sawthroughthe line of cut untl!the forward depth marking or} the length of cut (kerf), cause kickbackand loss of sub-flooring. [ ZA_LWWAARYNSImNGak: e surAe tLhWe AwYoSrcklpalmeopeaIsndsescuuprpeolyrpt wosolrtklopnleecdessoeIctuwrlefilyn.ot move. Mark the cutline on your cut guide located on the saw base on top of control, resulting In...(DO NOT bind the blade in the saw. 6o Hold the saw firmly with the end of cut marking on the surface tobe cut. 3, Set the depth-of-cut to the thickness of the material to a completestop, DO NOT REMOVE the saw blade forward at a rate where the ...
... sawthroughthe line of cut untl!the forward depth marking or} the length of cut (kerf), cause kickbackand loss of sub-flooring. [ ZA_LWWAARYNSImNGak: e surAe tLhWe AwYoSrcklpalmeopeaIsndsescuuprpeolyrpt wosolrtklopnleecdessoeIctuwrlefilyn.ot move. Mark the cutline on your cut guide located on the saw base on top of control, resulting In...(DO NOT bind the blade in the saw. 6o Hold the saw firmly with the end of cut marking on the surface tobe cut. 3, Set the depth-of-cut to the thickness of the material to a completestop, DO NOT REMOVE the saw blade forward at a rate where the ...
