Routine Care
Page 12
... computer-related customs regulations for each country on your itinerary. ● Consult with a voltage converter kit sold for each location in which you plan to power the computer with Customer Care about power cord and adapter requirements for appliances. 8 Chapter 3 Traveling and shipping ENWW Voltage, frequency, and plug configurations vary.
... computer-related customs regulations for each country on your itinerary. ● Consult with a voltage converter kit sold for each location in which you plan to power the computer with Customer Care about power cord and adapter requirements for appliances. 8 Chapter 3 Traveling and shipping ENWW Voltage, frequency, and plug configurations vary.

Routine Care - Windows Vista
Page 11
... of electric shock, fire, or damage to the equipment, do not attempt to use it before you turn it on. ● If you plan to power the computer with a voltage converter kit sold for each location in which you are traveling internationally: ● Check the computer-related customs regulations for each...
... of electric shock, fire, or damage to the equipment, do not attempt to use it before you turn it on. ● If you plan to power the computer with a voltage converter kit sold for each location in which you are traveling internationally: ● Check the computer-related customs regulations for each...
Drives
Page 11
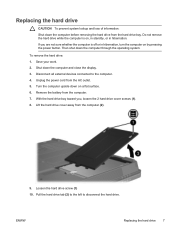
...the computer. 7. Save your work. 2. Pull the hard drive tab (2) to the left to the computer. 4. Then shut down on by pressing the power button. Shut down the computer and close the display. 3. Do not remove the hard drive while the computer is off or in hibernation. To remove... the hard drive: 1. ENWW Replacing the hard drive 7 Unplug the power cord from the hard drive bay. If you , loosen the 2 hard drive cover screws (1). 8. Loosen the hard drive screw (1) 10. Replacing the hard ...
...the computer. 7. Save your work. 2. Pull the hard drive tab (2) to the left to the computer. 4. Then shut down on by pressing the power button. Shut down the computer and close the display. 3. Do not remove the hard drive while the computer is off or in hibernation. To remove... the hard drive: 1. ENWW Replacing the hard drive 7 Unplug the power cord from the hard drive bay. If you , loosen the 2 hard drive cover screws (1). 8. Loosen the hard drive screw (1) 10. Replacing the hard ...
Drives
Page 28
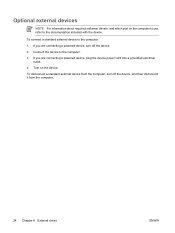
... device. Connect the device to the computer: 1. Turn on the computer to use, refer to the documentation included with the device. If you are connecting a powered device, turn off the device, and then disconnect it from the computer, turn off the device. 2. To disconnect a standard external device from the computer. 24...
... device. Connect the device to the computer: 1. Turn on the computer to use, refer to the documentation included with the device. If you are connecting a powered device, turn off the device, and then disconnect it from the computer, turn off the device. 2. To disconnect a standard external device from the computer. 24...

Drives - Windows Vista
Page 10
... Then shut down the computer and close the display. 3. Disconnect all external devices connected to disconnect the hard drive. 6 Chapter 3 Hard drives ENWW Unplug the power cord from the computer (2). 9. Turn the computer upside down on , in the Sleep state, or in Hibernation, turn the computer on by pressing the... power button. Lift the hard drive cover away from the AC outlet. 5. Remove the battery from the hard drive bay. To remove the hard drive: ...
... Then shut down the computer and close the display. 3. Disconnect all external devices connected to disconnect the hard drive. 6 Chapter 3 Hard drives ENWW Unplug the power cord from the computer (2). 9. Turn the computer upside down on , in the Sleep state, or in Hibernation, turn the computer on by pressing the... power button. Lift the hard drive cover away from the AC outlet. 5. Remove the battery from the hard drive bay. To remove the hard drive: ...

Drives - Windows Vista
Page 25
... To connect a standard external device to the computer. 3. Connect the device to the computer: 1. If you are connecting a powered device, turn off the device. 2. If you are connecting a powered device, plug the device power cord into a grounded electrical outlet. 4. Turn on the computer to use, refer to the documentation included with the device. Optional...
... To connect a standard external device to the computer. 3. Connect the device to the computer: 1. If you are connecting a powered device, turn off the device. 2. If you are connecting a powered device, plug the device power cord into a grounded electrical outlet. 4. Turn on the computer to use, refer to the documentation included with the device. Optional...
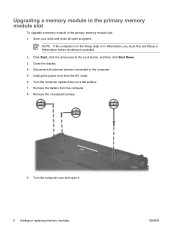
Memory Modules
Page 5
... capacity of static electricity by upgrading the existing memory module in the primary memory module slot. CAUTION To prevent damage to the equipment, unplug the power cord and remove all batteries before installing a memory module. 1 Adding or replacing memory modules The computer has two memory module compartments. To reduce the risk of...
... capacity of static electricity by upgrading the existing memory module in the primary memory module slot. CAUTION To prevent damage to the equipment, unplug the power cord and remove all batteries before installing a memory module. 1 Adding or replacing memory modules The computer has two memory module compartments. To reduce the risk of...
Memory Modules
Page 6
Then shut down on a flat surface. 6. Unplug the power cord from the computer. 7. Pull away the retention clips (1) on by pressing the power button. Turn the computer upside down the computer through the operating system.) 3. To remove a memory module: a. Save your work. 2. Shut down the computer and close ...
Then shut down on a flat surface. 6. Unplug the power cord from the computer. 7. Pull away the retention clips (1) on by pressing the power button. Turn the computer upside down the computer through the operating system.) 3. To remove a memory module: a. Save your work. 2. Shut down the computer and close ...
Memory Modules
Page 10
... open it. 6 Chapter 1 Adding or replacing memory modules ENWW Save your work. 2. Remove the 3 keyboard screws. 8. Then shut down on by pressing the power button. Unplug the power cord from the computer. 7. Disconnect all external devices connected to the computer. 4. Remove the battery from the AC outlet. 5. Turn the computer upside down the...
... open it. 6 Chapter 1 Adding or replacing memory modules ENWW Save your work. 2. Remove the 3 keyboard screws. 8. Then shut down on by pressing the power button. Unplug the power cord from the computer. 7. Disconnect all external devices connected to the computer. 4. Remove the battery from the AC outlet. 5. Turn the computer upside down the...
Memory Modules - Windows Vista
Page 5
... memory module in the primary memory module slot. ENWW 1 CAUTION Electrostatic discharge (ESD) can be upgraded by adding a memory module to the equipment, unplug the power cord and remove all batteries before installing a memory module. WARNING! CAUTION To prevent damage to a memory module, hold the memory module by touching a grounded metal object...
... memory module in the primary memory module slot. ENWW 1 CAUTION Electrostatic discharge (ESD) can be upgraded by adding a memory module to the equipment, unplug the power cord and remove all batteries before installing a memory module. WARNING! CAUTION To prevent damage to a memory module, hold the memory module by touching a grounded metal object...

Memory Modules - Windows Vista
Page 6
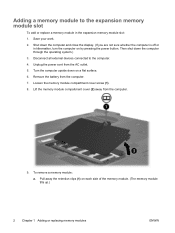
... from the computer. 8. Disconnect all open programs. NOTE If the computer is in the Sleep state or in the expansion memory module slot: 1. Unplug the power cord from the AC outlet. 6. Close the display. 4. To remove a memory module: a. Loosen the memory module compartment cover screw (1). 9. Adding a memory module to the expansion memory...
... from the computer. 8. Disconnect all open programs. NOTE If the computer is in the Sleep state or in the expansion memory module slot: 1. Unplug the power cord from the AC outlet. 6. Close the display. 4. To remove a memory module: a. Loosen the memory module compartment cover screw (1). 9. Adding a memory module to the expansion memory...
Memory Modules - Windows Vista
Page 10
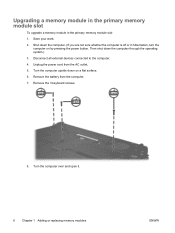
... in the primary memory module slot To upgrade a memory module in Hibernation, you must first exit Sleep or Hibernation before shutdown is possible. 2. Unplug the power cord from the computer. 8. Remove the battery from the AC outlet. 6. Close the display. 4. Remove the 3 keyboard screws. 9. Turn the computer upside down on a flat surface...
... in the primary memory module slot To upgrade a memory module in Hibernation, you must first exit Sleep or Hibernation before shutdown is possible. 2. Unplug the power cord from the computer. 8. Remove the battery from the AC outlet. 6. Close the display. 4. Remove the 3 keyboard screws. 9. Turn the computer upside down on a flat surface...

Notebook Tour
Page 22
... into external power. (5) Country-specific modem cable adapter (select models only) Adapts the modem cable to a non-RJ-11 telephone jack. *Modem cables, batteries, and power cords vary in appearance by an AC or a DC power source. Additional hardware components Component (1) Power cord* (2) HP... Smart AC Adapter Description Connects an AC adapter to DC power. Converts AC power to an AC outlet.
... into external power. (5) Country-specific modem cable adapter (select models only) Adapts the modem cable to a non-RJ-11 telephone jack. *Modem cables, batteries, and power cords vary in appearance by an AC or a DC power source. Additional hardware components Component (1) Power cord* (2) HP... Smart AC Adapter Description Connects an AC adapter to DC power. Converts AC power to an AC outlet.
Notebook Tour
Page 27
...identifying 4, 9 battery release latch 13 bays battery 13, 19 Bluetooth device 13 hard drive 14 Bluetooth compartment 13 Bluetooth label 19 buttons mute 6 power 6 wireless 6 C cable RJ-11 (modem) 18 caps lock light 4 Certificate of Authenticity label 19 compartments Bluetooth 13 memory module 14 Mini... Card 13 components bottom 13 display 15 front 9 left-side 12 rear 10 right-side 11 top 2 connector, power 10 cord, power, identifying 18 D display image, switching 8 screen brightness hotkeys 8 display release latch 9, 15 display switch 15 docking connector 13 drive light ...
...identifying 4, 9 battery release latch 13 bays battery 13, 19 Bluetooth device 13 hard drive 14 Bluetooth compartment 13 Bluetooth label 19 buttons mute 6 power 6 wireless 6 C cable RJ-11 (modem) 18 caps lock light 4 Certificate of Authenticity label 19 compartments Bluetooth 13 memory module 14 Mini... Card 13 components bottom 13 display 15 front 9 left-side 12 rear 10 right-side 11 top 2 connector, power 10 cord, power, identifying 18 D display image, switching 8 screen brightness hotkeys 8 display release latch 9, 15 display switch 15 docking connector 13 drive light ...
Notebook Tour
Page 28
... system Microsoft Certificate of Authenticity label 19 Product Key 19 optical drive, identifying 11 P PC Card slot 12 ports external monitor 10 USB 11, 12 power button 6 power connector 10 power cord 18 power light 4, 9 Presentation button 6 Product Key 19 product name and number, computer 19 ...R rated input power specifications 22 reader, fingerprint 7 regulatory information modem approval label 19 regulatory ...
... system Microsoft Certificate of Authenticity label 19 Product Key 19 optical drive, identifying 11 P PC Card slot 12 ports external monitor 10 USB 11, 12 power button 6 power connector 10 power cord 18 power light 4, 9 Presentation button 6 Product Key 19 product name and number, computer 19 ...R rated input power specifications 22 reader, fingerprint 7 regulatory information modem approval label 19 regulatory ...

Notebook Tour - Windows Vista
Page 22
NOTE The computer operates on DC power, which can be powered from a stand alone DC power source, it should be supplied by an AC or a DC power source. Converts AC power to an AC outlet. models only) *Modem cables, batteries, and power cords vary in appearance by HP for use with ... non-RJ-11 telephone jack. Although the computer can be powered only with an AC adapter or a DC power source supplied and approved by region and country. 18 Chapter 1 Components ENWW Additional hardware components Component (1) Power cord* (2) HP Smart AC Adapter Description Connects an AC adapter to...
NOTE The computer operates on DC power, which can be powered from a stand alone DC power source, it should be supplied by an AC or a DC power source. Converts AC power to an AC outlet. models only) *Modem cables, batteries, and power cords vary in appearance by HP for use with ... non-RJ-11 telephone jack. Although the computer can be powered only with an AC adapter or a DC power source supplied and approved by region and country. 18 Chapter 1 Components ENWW Additional hardware components Component (1) Power cord* (2) HP Smart AC Adapter Description Connects an AC adapter to...
Notebook Tour - Windows Vista
Page 26
...identifying 4, 9 battery release latch 13 bays battery 13, 19 Bluetooth device 13 hard drive 14 Bluetooth compartment 13 Bluetooth label 19 buttons mute 6 power 6 wireless 6 C cable RJ-11 (modem) 18 caps lock light 4 Certificate of Authenticity label 19 compartments Bluetooth 13 memory module 14 Mini... Card 13 components bottom 13 display 15 front 9 left-side 12 rear 10 right-side 11 top 2 connector, power 10 cord, power, identifying 18 D display image, switching 8 screen brightness hotkeys 8 display release latch 9, 15 display switch 15 docking connector 14 drive light ...
...identifying 4, 9 battery release latch 13 bays battery 13, 19 Bluetooth device 13 hard drive 14 Bluetooth compartment 13 Bluetooth label 19 buttons mute 6 power 6 wireless 6 C cable RJ-11 (modem) 18 caps lock light 4 Certificate of Authenticity label 19 compartments Bluetooth 13 memory module 14 Mini... Card 13 components bottom 13 display 15 front 9 left-side 12 rear 10 right-side 11 top 2 connector, power 10 cord, power, identifying 18 D display image, switching 8 screen brightness hotkeys 8 display release latch 9, 15 display switch 15 docking connector 14 drive light ...
Notebook Tour - Windows Vista
Page 27
... Authenticity label 19 Product Key 19 optical drive light 11 optical drive, identifying 11 P PC Card slot 12 ports external monitor 10 USB 11, 12 power button 6 power connector 10 power cord 18 power light 4, 9 Presentation button 6 Product Key 19 product name and number, computer 19 ...R rated input power specifications 20 reader, fingerprint 7 regulatory information modem approval label 19 regulatory label 19 ...
... Authenticity label 19 Product Key 19 optical drive light 11 optical drive, identifying 11 P PC Card slot 12 ports external monitor 10 USB 11, 12 power button 6 power connector 10 power cord 18 power light 4, 9 Presentation button 6 Product Key 19 product name and number, computer 19 ...R rated input power specifications 20 reader, fingerprint 7 regulatory information modem approval label 19 regulatory label 19 ...

Power
Page 8
...pin adapter. Do not disable the power cord grounding pin, for example, by unplugging the power cord from a system that is easily accessible at all times. Plug the power cord into an AC outlet (3). 4 Chapter 2 Power sources ENWW To reduce the risk of the power cord into the AC adapter (2). 3....on the computer. 2. To connect the computer to the equipment: Plug the power cord into a grounded (earthed) 3-pin outlet. Plug the AC adapter into the power connector (1) on the power cord, plug the cord into an AC outlet that is an important safety feature. Connecting the AC ...
...pin adapter. Do not disable the power cord grounding pin, for example, by unplugging the power cord from a system that is easily accessible at all times. Plug the power cord into an AC outlet (3). 4 Chapter 2 Power sources ENWW To reduce the risk of the power cord into the AC adapter (2). 3....on the computer. 2. To connect the computer to the equipment: Plug the power cord into a grounded (earthed) 3-pin outlet. Plug the AC adapter into the power connector (1) on the power cord, plug the cord into an AC outlet that is an important safety feature. Connecting the AC ...

