Compaq nc6220 Memory Slots - Notebook PC
Compaq nc6220 Memory Slots
Related Manual Pages


Similar Questions

How Can I Look At Photographs And End Them To Other People On My Compaq Presario
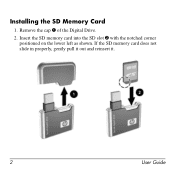
I think I may have to put a memory card from the camera into a 'memory slot' ; is this true? Where, ...
I think I may have to put a memory card from the camera into a 'memory slot' ; is this true? Where, ...
(Posted by Anonymous-160330 7 years ago)

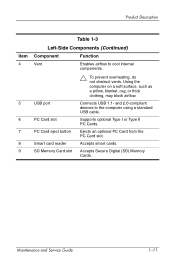
Where Are The Memory Slots
Ican find 1 memory slot underneath a smill cover in the base. where is the second one
Ican find 1 memory slot underneath a smill cover in the base. where is the second one
(Posted by irvinedouglas 11 years ago)

Number 2 Memory Slot On Compaq Presario X1400 Notebook.
I have found and upgraded one memory slot. but can't find the other slot to upgrade. where do I find...
I have found and upgraded one memory slot. but can't find the other slot to upgrade. where do I find...
(Posted by petermorris 13 years ago)