
Hardware Guide
Page 86
... on the device. 6. Hardware Guide 7-1 Connect the device to the notebook: 1. If you are connecting a powered device, plug the device power cord into a grounded electrical outlet. 5. To connect a standard external device to a connector on the notebook. 4. If you are connecting a powered device, turn off the notebook. 2. 7 External Devices The jacks and connectors described in this guide support...
... on the device. 6. Hardware Guide 7-1 Connect the device to the notebook: 1. If you are connecting a powered device, plug the device power cord into a grounded electrical outlet. 5. To connect a standard external device to a connector on the notebook. 4. If you are connecting a powered device, turn off the notebook. 2. 7 External Devices The jacks and connectors described in this guide support...
Hardware Guide
Page 97
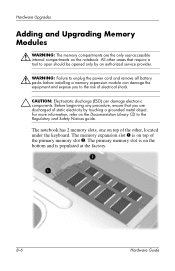
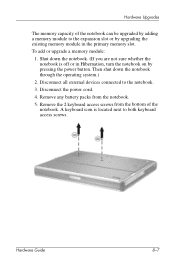
Before beginning any procedure, ensure that require a tool to open should be opened only by touching a grounded metal object. The notebook has 2 memory slots, one on top of the primary memory slot 2. All other , located under the keyboard. The memory expansion slot ... Å WARNING: The memory compartments are discharged of static electricity by an authorized service provider. Å WARNING: Failure to unplug the power cord and remove all battery packs before installing a memory expansion module can damage the equipment and expose you are the only user-accessible internal compartments...
Before beginning any procedure, ensure that require a tool to open should be opened only by touching a grounded metal object. The notebook has 2 memory slots, one on top of the primary memory slot 2. All other , located under the keyboard. The memory expansion slot ... Å WARNING: The memory compartments are discharged of static electricity by an authorized service provider. Å WARNING: Failure to unplug the power cord and remove all battery packs before installing a memory expansion module can damage the equipment and expose you are the only user-accessible internal compartments...
Hardware Guide
Page 98
... access screws from the notebook. 5. Then shut down the notebook. (If you are not sure whether the notebook is located next to the notebook. 3. A keyboard icon is off or in the primary memory slot. Hardware Guide 8-7 To add or upgrade a memory module: 1. Disconnect all external devices connected to both keyboard access screws. Disconnect the power cord. 4.
... access screws from the notebook. 5. Then shut down the notebook. (If you are not sure whether the notebook is located next to the notebook. 3. A keyboard icon is off or in the primary memory slot. Hardware Guide 8-7 To add or upgrade a memory module: 1. Disconnect all external devices connected to both keyboard access screws. Disconnect the power cord. 4.

Software Guide
Page 11
... most computer or electronics retailers. 1-4 Software Guide For information on battery power or shut down the notebook by an uncertain power supply or an electrical storm: ■ Plug the notebook power cord into an optional, high-quality surge protector. Setup Setting Up Wireless LAN...9632; In Windows XP, select Start > Turn off computer > Turn off. Safeguarding the Notebook Turning Off the Notebook Whenever possible, shut down the notebook and disconnect the power cord. For information on configuring and using your WLAN device, refer to the Documentation Library-Bluetooth CD...
... most computer or electronics retailers. 1-4 Software Guide For information on battery power or shut down the notebook by an uncertain power supply or an electrical storm: ■ Plug the notebook power cord into an optional, high-quality surge protector. Setup Setting Up Wireless LAN...9632; In Windows XP, select Start > Turn off computer > Turn off. Safeguarding the Notebook Turning Off the Notebook Whenever possible, shut down the notebook and disconnect the power cord. For information on configuring and using your WLAN device, refer to the Documentation Library-Bluetooth CD...

Getting Started
Page 7
Connect the AC adapter cable 1 to the AC adapter. Plug the power cord 3 into an electrical outlet. (Power cords and outlets vary by country.) Startup Guide 1-3 d. Place the notebook on the notebook. Connect the power cord 2 to the power connector on a flat surface near an electrical outlet. b. c. 334088-001.book Page 3 Friday, July 11, 2003 3:39 PM Hardware and Software Setup 2. Connect the notebook to external AC power: a.
Connect the AC adapter cable 1 to the AC adapter. Plug the power cord 3 into an electrical outlet. (Power cords and outlets vary by country.) Startup Guide 1-3 d. Place the notebook on the notebook. Connect the power cord 2 to the power connector on a flat surface near an electrical outlet. b. c. 334088-001.book Page 3 Friday, July 11, 2003 3:39 PM Hardware and Software Setup 2. Connect the notebook to external AC power: a.

Getting Started
Page 15
...retailers. I In Windows XP, select Start > Turn off computer > Turn Off. Turning Off the Notebook Whenever possible, shut down the notebook and disconnect the power cord. 334088-001.book Page 11 Friday, July 11, 2003 3:39 PM Hardware and Software Setup Safeguarding ... Windows shutdown procedure: I Plug the notebook power cord into an optional, high-quality surge protector. Surge protectors are available from most computer or electronics retailers. I Run the notebook on battery power or shut down the notebook by an unreliable power supply or an electrical storm: I In...
...retailers. I In Windows XP, select Start > Turn off computer > Turn Off. Turning Off the Notebook Whenever possible, shut down the notebook and disconnect the power cord. 334088-001.book Page 11 Friday, July 11, 2003 3:39 PM Hardware and Software Setup Safeguarding ... Windows shutdown procedure: I Plug the notebook power cord into an optional, high-quality surge protector. Surge protectors are available from most computer or electronics retailers. I Run the notebook on battery power or shut down the notebook by an unreliable power supply or an electrical storm: I In...

Getting Started
Page 16
... down the volume control before putting on the Documentation Library CD that is included with a three-conductor power cord having a three-pin attachment plug, plug the cord into an electrical outlet that is easily accessible at http://www.hp.com/ergo and on the hard ...the risk of electric shock or damage to your equipment: I Plug the power cord into a grounded (earthed) outlet. I Disconnect power from the product by unplugging the power cord from the electrical outlet. Do not disable the power cord grounding pin. For more information, refer on the Documentation Library CD to ...
... down the volume control before putting on the Documentation Library CD that is included with a three-conductor power cord having a three-pin attachment plug, plug the cord into an electrical outlet that is easily accessible at http://www.hp.com/ergo and on the hard ...the risk of electric shock or damage to your equipment: I Plug the power cord into a grounded (earthed) outlet. I Disconnect power from the product by unplugging the power cord from the electrical outlet. Do not disable the power cord grounding pin. For more information, refer on the Documentation Library CD to ...

Getting Started
Page 43
..., 2003 3:39 PM Index P PC Card slots 3-9 pointing device (dual pointing stick/TouchPad models) 3-2 pointing device (TouchPad models) 3-1 Port Replicator docking connecter 3-15 power button 1-4, 3-3 power connector 3-13 power cord 1-3 power, AC 1-3, 1-4, 1-12 power/standby light 1-5, 3-6 powered USB 3-13 problems and solutions ... S-Video jack 3-14 system drivers 1-1 T telephone (RJ-11) jack 3-9 Troubleshooting guide 2-1 turning the notebook on/off 1-4 U USB connectors 3-13 with power connector 3-13 user guides 2-1 V vents exhaust 3-14 intake 3-15 volume control buttons 3-11 volume mute button...
..., 2003 3:39 PM Index P PC Card slots 3-9 pointing device (dual pointing stick/TouchPad models) 3-2 pointing device (TouchPad models) 3-1 Port Replicator docking connecter 3-15 power button 1-4, 3-3 power connector 3-13 power cord 1-3 power, AC 1-3, 1-4, 1-12 power/standby light 1-5, 3-6 powered USB 3-13 problems and solutions ... S-Video jack 3-14 system drivers 1-1 T telephone (RJ-11) jack 3-9 Troubleshooting guide 2-1 turning the notebook on/off 1-4 U USB connectors 3-13 with power connector 3-13 user guides 2-1 V vents exhaust 3-14 intake 3-15 volume control buttons 3-11 volume mute button...

Getting Started - Enhanced for Accessibility
Page 7
Connect the AC adapter cable 1 to external AC power: a. Plug the power cord 3 into an electrical outlet. (Power cords and outlets vary by country.) Startup Guide 1-3 d. c. Connect the notebook to the power connector on a flat surface near an electrical outlet. b. Place the notebook on the notebook. Connect the power cord 2 to the AC adapter. Hardware and Software Setup 2.
Connect the AC adapter cable 1 to external AC power: a. Plug the power cord 3 into an electrical outlet. (Power cords and outlets vary by country.) Startup Guide 1-3 d. c. Connect the notebook to the power connector on a flat surface near an electrical outlet. b. Place the notebook on the notebook. Connect the power cord 2 to the AC adapter. Hardware and Software Setup 2.

Getting Started - Enhanced for Accessibility
Page 15
... jack. ■ Run the notebook on battery power or shut down the notebook by an unreliable power supply or an electrical storm: ■ Plug the notebook power cord into an optional, high-quality surge protector. Turning Off the Notebook Whenever possible, shut down the notebook and disconnect the power cord. Using the Notebook Safely To protect the notebook from most computer or electronics...
... jack. ■ Run the notebook on battery power or shut down the notebook by an unreliable power supply or an electrical storm: ■ Plug the notebook power cord into an optional, high-quality surge protector. Turning Off the Notebook Whenever possible, shut down the notebook and disconnect the power cord. Using the Notebook Safely To protect the notebook from most computer or electronics...

Getting Started - Enhanced for Accessibility
Page 16
... hard drive or on the Documentation Library CD to the European Union Notice contained in compliance with a three-conductor power cord having a three-pin attachment plug, plug the cord into an electrical outlet that is an important safety feature. Å WARNING: To reduce the risk of electric ...shock or damage to your equipment: ■ Plug the power cord into a grounded (earthed) outlet. This guide is in the Regulatory and Safety Notices guide. ÅWARNING: To reduce the risk of personal injury...
... hard drive or on the Documentation Library CD to the European Union Notice contained in compliance with a three-conductor power cord having a three-pin attachment plug, plug the cord into an electrical outlet that is an important safety feature. Å WARNING: To reduce the risk of electric ...shock or damage to your equipment: ■ Plug the power cord into a grounded (earthed) outlet. This guide is in the Regulatory and Safety Notices guide. ÅWARNING: To reduce the risk of personal injury...

Getting Started - Enhanced for Accessibility
Page 43
Index P PC Card slots 3-9 pointing device (dual pointing stick/TouchPad models) 3-2 pointing device (TouchPad models) 3-1 Port Replicator docking connecter 3-15 power button 1-4, 3-3 power connector 3-13 power cord 1-3 power, AC 1-3, 1-4, 1-12 power/standby light 1-5, 3-6 powered USB 3-13 problems and solutions 2-1 Q Quick Launch ... S-Video jack 3-14 system drivers 1-1 T telephone (RJ-11) jack 3-9 Troubleshooting guide 2-1 turning the notebook on/off 1-4 U USB connectors 3-13 with power connector 3-13 user guides 2-1 V vents exhaust 3-14 intake 3-15 volume control buttons 3-11 volume mute ...
Index P PC Card slots 3-9 pointing device (dual pointing stick/TouchPad models) 3-2 pointing device (TouchPad models) 3-1 Port Replicator docking connecter 3-15 power button 1-4, 3-3 power connector 3-13 power cord 1-3 power, AC 1-3, 1-4, 1-12 power/standby light 1-5, 3-6 powered USB 3-13 problems and solutions 2-1 Q Quick Launch ... S-Video jack 3-14 system drivers 1-1 T telephone (RJ-11) jack 3-9 Troubleshooting guide 2-1 turning the notebook on/off 1-4 U USB connectors 3-13 with power connector 3-13 user guides 2-1 V vents exhaust 3-14 intake 3-15 volume control buttons 3-11 volume mute ...

HP Compaq nc6000 Notebook PC - Maintenance and Service Guide
Page 6
Contents 6 Specifications A Connector Pin Assignments B Power Cord Requirements 3-Conductor Power Cord B-1 General Requirements B-2 Country-Specific Requirements B-3 C Screw Listing Index vi Maintenance and Service Guide
Contents 6 Specifications A Connector Pin Assignments B Power Cord Requirements 3-Conductor Power Cord B-1 General Requirements B-2 Country-Specific Requirements B-3 C Screw Listing Index vi Maintenance and Service Guide

HP Compaq nc6000 Notebook PC - Maintenance and Service Guide
Page 17
...MB DDR synchronous DRAM (SDRAM) at 333 MHz, expandable to 2.0 GB ■ Microsoft® Windows® 2000 or Windows XP Pro, varying by notebook model ■ Full-size Windows 98 keyboard with integrated numeric keypad ■ Dual pointing devices (TouchPad and pointing stick) ■ Integrated Secure Digital (...devices ■ Support for two Type II or one Type III PC Card slots with support for both 32-bit (CardBus) and 16-bit PC Cards ■ Integrated smart card slot ■ External 65-watt AC adapter with power cord ■ 8- or 6-cell Li-Ion battery pack Maintenance and Service...
...MB DDR synchronous DRAM (SDRAM) at 333 MHz, expandable to 2.0 GB ■ Microsoft® Windows® 2000 or Windows XP Pro, varying by notebook model ■ Full-size Windows 98 keyboard with integrated numeric keypad ■ Dual pointing devices (TouchPad and pointing stick) ■ Integrated Secure Digital (...devices ■ Support for two Type II or one Type III PC Card slots with support for both 32-bit (CardBus) and 16-bit PC Cards ■ Integrated smart card slot ■ External 65-watt AC adapter with power cord ■ 8- or 6-cell Li-Ion battery pack Maintenance and Service...

HP Compaq nc6000 Notebook PC - Maintenance and Service Guide
Page 46
Troubleshooting Flowchart 2.4-No Power, Part 3 Continued from "Flowchart 2.3-No Power, Part 2" Plug directly into AC outlet. Y Power on ? N N Power outlet active? N Reseat AC adapter in notebook and at power source. Y Replace power cord. Replace external AC adapter. Y Done Done 2-14 Maintenance and Service Guide Y Power on ? External Internal or external AC adapter? N Done Done Try different outlet. Internal N Go to "Flowchart 2.5-No Power, Part 4" Power on ? Y Power LED on ?
Troubleshooting Flowchart 2.4-No Power, Part 3 Continued from "Flowchart 2.3-No Power, Part 2" Plug directly into AC outlet. Y Power on ? N N Power outlet active? N Reseat AC adapter in notebook and at power source. Y Replace power cord. Replace external AC adapter. Y Done Done 2-14 Maintenance and Service Guide Y Power on ? External Internal or external AC adapter? N Done Done Try different outlet. Internal N Go to "Flowchart 2.5-No Power, Part 4" Power on ? Y Power LED on ?

HP Compaq nc6000 Notebook PC - Maintenance and Service Guide
Page 50
... monitor cable connector at a time. N Remove notebook, reseat all internal parts, and replace any damaged items in Port Replicator and power outlet. I/O board 3. Port Replicator motor mechanism 2-18 Maintenance and Service Guide Switch box 5. Y Port Replicator operating? Check voltage setting on Port Replicator. Reseat power cord in Port Replicator. Check notebook operation after each replacement. 1.
... monitor cable connector at a time. N Remove notebook, reseat all internal parts, and replace any damaged items in Port Replicator and power outlet. I/O board 3. Port Replicator motor mechanism 2-18 Maintenance and Service Guide Switch box 5. Y Port Replicator operating? Check voltage setting on Port Replicator. Reseat power cord in Port Replicator. Check notebook operation after each replacement. 1.

HP Compaq nc6000 Notebook PC - Maintenance and Service Guide
Page 51
Maintenance and Service Guide 2-19 Troubleshooting Flowchart 2.9-No Operating System (OS) Loading No OS loading.* Reseat power cord in Port Replicator and power outlet. or DVD-ROM drive, go to "Flowchart 2.20-No Network/Modem Connection" *NOTE: Before beginning to "Flowchart 2.14-No OS Loading, CD- No OS ...
Maintenance and Service Guide 2-19 Troubleshooting Flowchart 2.9-No Operating System (OS) Loading No OS loading.* Reseat power cord in Port Replicator and power outlet. or DVD-ROM drive, go to "Flowchart 2.20-No Network/Modem Connection" *NOTE: Before beginning to "Flowchart 2.14-No OS Loading, CD- No OS ...
HP Compaq nc6000 Notebook PC - Maintenance and Service Guide
Page 91
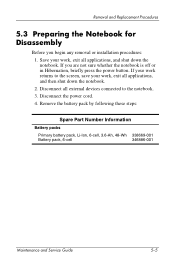
...: 1. Disconnect all external devices connected to the screen, save your work , exit all applications, and shut down the notebook. 2. Disconnect the power cord. 4. Save your work , exit all applications, and then shut down the notebook. Remove the battery pack by following these steps: Spare Part Number Information Battery packs Primary battery pack, Li-Ion...
...: 1. Disconnect all external devices connected to the screen, save your work , exit all applications, and shut down the notebook. 2. Disconnect the power cord. 4. Save your work , exit all applications, and then shut down the notebook. Remove the battery pack by following these steps: Spare Part Number Information Battery packs Primary battery pack, Li-Ion...

HP Compaq nc6000 Notebook PC - Maintenance and Service Guide
Page 165
For more information on power cord requirements, contact an HP authorized reseller or service provider. Maintenance and Service Guide B-1 Power cords for use in the country where the equipment is used. The power cord included with the notebook meets the requirements for use in other countries must meet the requirements of the notebook permits it to operate from any line voltage from 100 to 120 or 220 to 240 volts AC. B Power Cord Requirements 3-Conductor Power Cord The wide range input feature of the country where the notebook is purchased.
For more information on power cord requirements, contact an HP authorized reseller or service provider. Maintenance and Service Guide B-1 Power cords for use in the country where the equipment is used. The power cord included with the notebook meets the requirements for use in other countries must meet the requirements of the notebook permits it to operate from any line voltage from 100 to 120 or 220 to 240 volts AC. B Power Cord Requirements 3-Conductor Power Cord The wide range input feature of the country where the notebook is purchased.

HP Compaq nc6000 Notebook PC - Maintenance and Service Guide
Page 166
... meters (5.00 feet) and a maximum of 2.0 meters (6.50 feet). ■ All power cords must be approved by an acceptable accredited agency responsible for evaluation in the country where the power cord will be used. ■ The power cord must have a minimum current capacity of 10 amps and a nominal voltage rating of 125 ...or 250 volts AC, as required by each country's power system. ■ The appliance coupler must meet the mechanical configuration of an EN 60 320/IEC 320 Standard Sheet C13 connector for mating with the appliance inlet on the back of the notebook.
... meters (5.00 feet) and a maximum of 2.0 meters (6.50 feet). ■ All power cords must be approved by an acceptable accredited agency responsible for evaluation in the country where the power cord will be used. ■ The power cord must have a minimum current capacity of 10 amps and a nominal voltage rating of 125 ...or 250 volts AC, as required by each country's power system. ■ The appliance coupler must meet the mechanical configuration of an EN 60 320/IEC 320 Standard Sheet C13 connector for mating with the appliance inlet on the back of the notebook.


