HP USB Digital Drive
Page 2
The HP USB Digital Drive 1 is running Microsoft Windows XP Home, Windows XP Pro, or Windows 2000. User Guide 1 An SD memory card 2 may not be used with any HP authorized reseller. However, you will need an SD memory card to operate the Digital Drive. You can be included. The Digital Drive can purchase one (in various storage capacities) from any computer that is a pocket-sized SD (Secure Digital) memory drive for storing and transferring files such as digital pictures, music, video, and data.
The HP USB Digital Drive 1 is running Microsoft Windows XP Home, Windows XP Pro, or Windows 2000. User Guide 1 An SD memory card 2 may not be used with any HP authorized reseller. However, you will need an SD memory card to operate the Digital Drive. You can be included. The Digital Drive can purchase one (in various storage capacities) from any computer that is a pocket-sized SD (Secure Digital) memory drive for storing and transferring files such as digital pictures, music, video, and data.
HP USB Digital Drive
Page 3
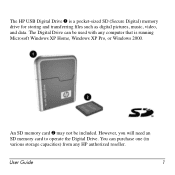
Installing the SD Memory Card 1. Insert the SD memory card into the SD slot 2 with the notched corner positioned on the lower left as shown. Remove the cap 1 of the Digital Drive. 2. If the SD memory card does not slide in properly, gently pull it out and reinsert it. 2 User Guide
Installing the SD Memory Card 1. Insert the SD memory card into the SD slot 2 with the notched corner positioned on the lower left as shown. Remove the cap 1 of the Digital Drive. 2. If the SD memory card does not slide in properly, gently pull it out and reinsert it. 2 User Guide
HP USB Digital Drive
Page 10
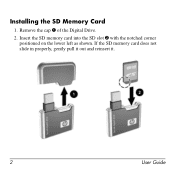
User Guide 9 Removing the SD Memory Card ✎ Do not attempt to pull the SD memory card out when the status light on the Digital Drive is flashing. » After you disconnect the Digital Drive from your computer, gently pull the SD memory card from the Digital Drive.
User Guide 9 Removing the SD Memory Card ✎ Do not attempt to pull the SD memory card out when the status light on the Digital Drive is flashing. » After you disconnect the Digital Drive from your computer, gently pull the SD memory card from the Digital Drive.
HP ProtectTools: Authentication technologies and suitability to task
Page 7
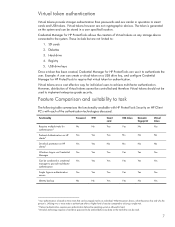
...USB drive keys Once a token has been created, Credential Manager for HP ProtectTools can create a virtual token on HP Client PC's with each of Virtual tokens cannot be controlled and therefore Virtual tokens should not be read. 7 Functionality Password TPM Requires ...operating system is generated on the hard drive can be uniquely tied to require that can be stored in operation to smart cards and USB tokens. SD cards 2. Diskettes 3. Example: A user can use it to achieve multi-factor authentication. However, distribution of the authentication technologies discussed...
...USB drive keys Once a token has been created, Credential Manager for HP ProtectTools can create a virtual token on HP Client PC's with each of Virtual tokens cannot be controlled and therefore Virtual tokens should not be read. 7 Functionality Password TPM Requires ...operating system is generated on the hard drive can be uniquely tied to require that can be stored in operation to smart cards and USB tokens. SD cards 2. Diskettes 3. Example: A user can use it to achieve multi-factor authentication. However, distribution of the authentication technologies discussed...
Hardware Guide
Page 6
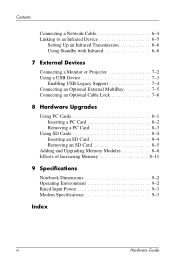
... 7-2 Using a USB Device 7-3 Enabling USB Legacy Support 7-4 Connecting an Optional External MultiBay 7-5 Connecting an Optional Cable Lock 7-6 8 Hardware Upgrades Using PC Cards 8-1 Inserting a PC Card 8-2 Removing a PC Card 8-3 Using SD Cards 8-4 Inserting an SD Card 8-4 Removing an SD Card 8-5 Adding and Upgrading Memory Modules 8-6 Effects of Increasing Memory 8-11 9 Specifications Notebook Dimensions 9-2 Operating Environment 9-2 Rated Input Power 9-3 Modem Specifications 9-3 Index vi Hardware Guide
... 7-2 Using a USB Device 7-3 Enabling USB Legacy Support 7-4 Connecting an Optional External MultiBay 7-5 Connecting an Optional Cable Lock 7-6 8 Hardware Upgrades Using PC Cards 8-1 Inserting a PC Card 8-2 Removing a PC Card 8-3 Using SD Cards 8-4 Inserting an SD Card 8-4 Removing an SD Card 8-5 Adding and Upgrading Memory Modules 8-6 Effects of Increasing Memory 8-11 9 Specifications Notebook Dimensions 9-2 Operating Environment 9-2 Rated Input Power 9-3 Modem Specifications 9-3 Index vi Hardware Guide
Hardware Guide
Page 15
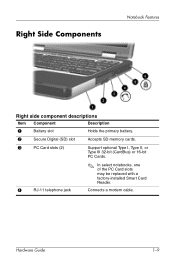
Hardware Guide 1-9 Connects a modem cable. Right Side Components Notebook Features Right side component descriptions Item Component Description 1 Battery slot Holds the primary battery. 2 Secure Digital (SD) slot Accepts SD memory cards. 3 PC Card slots (2) Support optional Type I, Type II, or Type III 32-bit (CardBus) or 16-bit PC Cards. 4 RJ-11 telephone jack ✎ In select notebooks, one of the PC Card slots may be replaced with a factory-installed Smart Card Reader.
Hardware Guide 1-9 Connects a modem cable. Right Side Components Notebook Features Right side component descriptions Item Component Description 1 Battery slot Holds the primary battery. 2 Secure Digital (SD) slot Accepts SD memory cards. 3 PC Card slots (2) Support optional Type I, Type II, or Type III 32-bit (CardBus) or 16-bit PC Cards. 4 RJ-11 telephone jack ✎ In select notebooks, one of the PC Card slots may be replaced with a factory-installed Smart Card Reader.

Hardware Guide
Page 95
... until the card clicks into an SD Card slot. ■ Do not move or transport the notebook while an SD Card is inserted. Inserting an SD Card Ä CAUTION: To prevent damage to the connectors: ■ Use minimal pressure when inserting an SD Card into place. 8-4 Hardware Guide Insert the SD Card into the SD Card slot. 2. Hardware Upgrades Using SD Cards Secure Digital (SD) Cards are removable...
... until the card clicks into an SD Card slot. ■ Do not move or transport the notebook while an SD Card is inserted. Inserting an SD Card Ä CAUTION: To prevent damage to the connectors: ■ Use minimal pressure when inserting an SD Card into place. 8-4 Hardware Guide Insert the SD Card into the SD Card slot. 2. Hardware Upgrades Using SD Cards Secure Digital (SD) Cards are removable...

Hardware Guide
Page 96
... the slot. Gently press in on the SD Card 1 to remove. (When the card can be safely removed, a message is displayed.) ❏ In Windows XP, select the Safely Remove Hardware icon in the taskbar, then select the PC Card. (To display the Safely Remove Hardware icon, select Show ...Hidden Icons in the task bar, then stop the SD Card before removing it . 4. To remove an SD Card: 1. Close all files and applications using the SD Card. 2. Hardware Upgrades Removing an SD Card Ä CAUTION: To ...
... the slot. Gently press in on the SD Card 1 to remove. (When the card can be safely removed, a message is displayed.) ❏ In Windows XP, select the Safely Remove Hardware icon in the taskbar, then select the PC Card. (To display the Safely Remove Hardware icon, select Show ...Hidden Icons in the task bar, then stop the SD Card before removing it . 4. To remove an SD Card: 1. Close all files and applications using the SD Card. 2. Hardware Upgrades Removing an SD Card Ä CAUTION: To ...

Hardware Guide
Page 112
... battery pack temperature considerations 3-19 Hardware Guide Index-7 See Standby slots memory 1-5, 8-9 SD Card 8-4 socket services, PC Card 8-2 software modem 3-17 Power Meter (Windows) 3-8 SpeedStep (Windows 2000 Professional) 3-18 speaker, internal identifying 5-2 speakers 1-12 speakers, external audio line-out jack 5-1 connecting 5-2 specifications, notebook 9-1 Standby exiting 1-3, 2-6 initiated during critical low-battery condition 3-11 initiating with hotkey...
... battery pack temperature considerations 3-19 Hardware Guide Index-7 See Standby slots memory 1-5, 8-9 SD Card 8-4 socket services, PC Card 8-2 software modem 3-17 Power Meter (Windows) 3-8 SpeedStep (Windows 2000 Professional) 3-18 speaker, internal identifying 5-2 speakers 1-12 speakers, external audio line-out jack 5-1 connecting 5-2 specifications, notebook 9-1 Standby exiting 1-3, 2-6 initiated during critical low-battery condition 3-11 initiating with hotkey...

Software Guide
Page 15
...; Do not dock or undock the notebook in a Port Replicator. ■ Do not add or remove memory modules. ■ Do not insert or remove any hard drives. ■ Do not connect or disconnect external devices. ■ Do not insert or remove a PC Card or a Secure Digital (SD) card. Make sure that the Enable hibernate support...
...; Do not dock or undock the notebook in a Port Replicator. ■ Do not add or remove memory modules. ■ Do not insert or remove any hard drives. ■ Do not connect or disconnect external devices. ■ Do not insert or remove a PC Card or a Secure Digital (SD) card. Make sure that the Enable hibernate support...

Getting Started
Page 31
334088-001.book Page 9 Friday, July 11, 2003 3:39 PM Right Side Components Notebook Features Right side component descriptions Item Component Description 1 Battery slot Holds the primary battery. 2 Secure Digital (SD) slot Accepts SD memory cards. 3 PC Card slots (2) Support optional Type I, Type II, or Type III 32-bit (CardBus) or 16-bit PC Cards. ✎ In select notebooks, one of the PC Card slots may be replaced with a factory-installed Smart Card Reader. 4 RJ-11 telephone jack Connects a modem cable. Startup Guide 3-9
334088-001.book Page 9 Friday, July 11, 2003 3:39 PM Right Side Components Notebook Features Right side component descriptions Item Component Description 1 Battery slot Holds the primary battery. 2 Secure Digital (SD) slot Accepts SD memory cards. 3 PC Card slots (2) Support optional Type I, Type II, or Type III 32-bit (CardBus) or 16-bit PC Cards. ✎ In select notebooks, one of the PC Card slots may be replaced with a factory-installed Smart Card Reader. 4 RJ-11 telephone jack Connects a modem cable. Startup Guide 3-9

Getting Started
Page 43
...Page 3 Friday, July 11, 2003 3:39 PM Index P PC Card slots 3-9 pointing device (dual pointing stick/TouchPad models) 3-2 ...11 telephone jack 3-9 RJ-45 network jack 3-13 S Safety & Comfort Guide 2-2 scroll lock light 3-6 Secure Digital (SD) slot 3-9 security cable slot 3-10 Software Guide 2-1 software, Adobe Acrobat Reader 2-2 speakers 3-12 Standby exiting 3-3 light... 3-6 S-Video jack 3-14 system drivers 1-1 T telephone (RJ-11) jack 3-9 Troubleshooting guide 2-1 turning the notebook on/off 1-4 U USB connectors 3-13 with power connector 3-13 user guides 2-1 V vents exhaust 3-14 intake 3-15...
...Page 3 Friday, July 11, 2003 3:39 PM Index P PC Card slots 3-9 pointing device (dual pointing stick/TouchPad models) 3-2 ...11 telephone jack 3-9 RJ-45 network jack 3-13 S Safety & Comfort Guide 2-2 scroll lock light 3-6 Secure Digital (SD) slot 3-9 security cable slot 3-10 Software Guide 2-1 software, Adobe Acrobat Reader 2-2 speakers 3-12 Standby exiting 3-3 light... 3-6 S-Video jack 3-14 system drivers 1-1 T telephone (RJ-11) jack 3-9 Troubleshooting guide 2-1 turning the notebook on/off 1-4 U USB connectors 3-13 with power connector 3-13 user guides 2-1 V vents exhaust 3-14 intake 3-15...

Getting Started - Enhanced for Accessibility
Page 31
Right Side Components Notebook Features Right side component descriptions Item Component Description 1 Battery slot Holds the primary battery. 2 Secure Digital (SD) slot Accepts SD memory cards. 3 PC Card slots (2) Support optional Type I, Type II, or Type III 32-bit (CardBus) or 16-bit PC Cards. ✎ In select notebooks, one of the PC Card slots may be replaced with a factory-installed Smart Card Reader. 4 RJ-11 telephone jack Connects a modem cable. Startup Guide 3-9
Right Side Components Notebook Features Right side component descriptions Item Component Description 1 Battery slot Holds the primary battery. 2 Secure Digital (SD) slot Accepts SD memory cards. 3 PC Card slots (2) Support optional Type I, Type II, or Type III 32-bit (CardBus) or 16-bit PC Cards. ✎ In select notebooks, one of the PC Card slots may be replaced with a factory-installed Smart Card Reader. 4 RJ-11 telephone jack Connects a modem cable. Startup Guide 3-9

Getting Started - Enhanced for Accessibility
Page 43
Index P PC Card slots 3-9 pointing device (dual pointing stick/TouchPad models) 3-2 pointing...11 RJ-11 telephone jack 3-9 RJ-45 network jack 3-13 S Safety & Comfort Guide 2-2 scroll lock light 3-6 Secure Digital (SD) slot 3-9 security cable slot 3-10 Software Guide 2-1 software, Adobe Acrobat Reader 2-2 speakers 3-12 Standby exiting 3-3 light 3-6 ...S-Video jack 3-14 system drivers 1-1 T telephone (RJ-11) jack 3-9 Troubleshooting guide 2-1 turning the notebook on/off 1-4 U USB connectors 3-13 with power connector 3-13 user guides 2-1 V vents exhaust 3-14 intake 3-15 volume ...
Index P PC Card slots 3-9 pointing device (dual pointing stick/TouchPad models) 3-2 pointing...11 RJ-11 telephone jack 3-9 RJ-45 network jack 3-13 S Safety & Comfort Guide 2-2 scroll lock light 3-6 Secure Digital (SD) slot 3-9 security cable slot 3-10 Software Guide 2-1 software, Adobe Acrobat Reader 2-2 speakers 3-12 Standby exiting 3-3 light 3-6 ...S-Video jack 3-14 system drivers 1-1 T telephone (RJ-11) jack 3-9 Troubleshooting guide 2-1 turning the notebook on/off 1-4 U USB connectors 3-13 with power connector 3-13 user guides 2-1 V vents exhaust 3-14 intake 3-15 volume ...

HP Compaq nc6000 Notebook PC - Maintenance and Service Guide
Page 17
...Microsoft® Windows® 2000 or Windows XP Pro, varying by notebook model ■ Full-size Windows 98 keyboard with integrated numeric keypad ■ Dual pointing devices (TouchPad and pointing stick) ■ Integrated Secure Digital (SD) Memory Card flash media slot ■ Support for MultiBay device ■ Integrated ...® LAN and Mini PCI 802.11a/b/g LAN devices ■ Support for two Type II or one Type III PC Card slots with support for both 32-bit (CardBus) and 16-bit PC Cards ■ Integrated smart card slot ■ External 65-watt AC adapter with power cord ■ 8-
...Microsoft® Windows® 2000 or Windows XP Pro, varying by notebook model ■ Full-size Windows 98 keyboard with integrated numeric keypad ■ Dual pointing devices (TouchPad and pointing stick) ■ Integrated Secure Digital (SD) Memory Card flash media slot ■ Support for MultiBay device ■ Integrated ...® LAN and Mini PCI 802.11a/b/g LAN devices ■ Support for two Type II or one Type III PC Card slots with support for both 32-bit (CardBus) and 16-bit PC Cards ■ Integrated smart card slot ■ External 65-watt AC adapter with power cord ■ 8-

HP Compaq nc6000 Notebook PC - Maintenance and Service Guide
Page 18
...+RW/R and CD-RW combo drive ❏ 8-cell Prismatic battery pack ■ Connectors for: ❏ SD Card ❏ Infrared ❏ One Type III PC Card slot ❏ Two Type II PC Card slots ❏ RJ-11 (modem) ❏ RJ-45 network interface card (NIC) ❏ Universal Serial Bus (USB) v. 2.0 ❏ S-Video ❏ Parallel ❏ External monitor ❏...
...+RW/R and CD-RW combo drive ❏ 8-cell Prismatic battery pack ■ Connectors for: ❏ SD Card ❏ Infrared ❏ One Type III PC Card slot ❏ Two Type II PC Card slots ❏ RJ-11 (modem) ❏ RJ-45 network interface card (NIC) ❏ Universal Serial Bus (USB) v. 2.0 ❏ S-Video ❏ Parallel ❏ External monitor ❏...

HP Compaq nc6000 Notebook PC - Maintenance and Service Guide
Page 22
.... RJ-11 telephone jack Connects a modem cable. 1-16 Maintenance and Service Guide PC Card slots (2) Support optional Type I, Type II, or Type III 32-bit (CardBus) or 16-bit PC Cards. Secure Digital (SD) Memory Card slot Accepts SD Cards and MultiMedia Cards. Product Description The notebook rear panel and right-side components are shown below and described in Table...
.... RJ-11 telephone jack Connects a modem cable. 1-16 Maintenance and Service Guide PC Card slots (2) Support optional Type I, Type II, or Type III 32-bit (CardBus) or 16-bit PC Cards. Secure Digital (SD) Memory Card slot Accepts SD Cards and MultiMedia Cards. Product Description The notebook rear panel and right-side components are shown below and described in Table...

HP Compaq nc6000 Notebook PC - Maintenance and Service Guide
Page 195
...A-1 RTC battery illustrated 3-2, 3-8 removal 5-47 S Screw Kit, spare part number 3-11, 3-15 scroll lock light, location 1-20 Secure Digital (SD) Card slot, location 1-16 security cable slot, location 1-17 security module removal 5-31 spare part number 3-11, 3-15, 5-31 serial connector location .../R and CD-RW Combo drive 6-11 DVD/CD-RW combo drive 6-9 DVD-ROM drive 6-11 hard drive 6-5 I/O addresses 6-14 interrupts 6-13 notebook 6-1 static shielding materials 4-8 stereo speakers, location 1-15 S-Video connector location 1-17 pin assignments A-3 switch cover illustrated 3-2 removal 5-28 spare part ...
...A-1 RTC battery illustrated 3-2, 3-8 removal 5-47 S Screw Kit, spare part number 3-11, 3-15 scroll lock light, location 1-20 Secure Digital (SD) Card slot, location 1-16 security cable slot, location 1-17 security module removal 5-31 spare part number 3-11, 3-15, 5-31 serial connector location .../R and CD-RW Combo drive 6-11 DVD/CD-RW combo drive 6-9 DVD-ROM drive 6-11 hard drive 6-5 I/O addresses 6-14 interrupts 6-13 notebook 6-1 static shielding materials 4-8 stereo speakers, location 1-15 S-Video connector location 1-17 pin assignments A-3 switch cover illustrated 3-2 removal 5-28 spare part ...


