

Quick Setup and Getting Started Guide
Page 13
...losing any problems during initial startup. ● Hardware Reference Guide-Provides an overview of the product hardware, as well as instructions for upgrading this series of automatically turning the power off will cause the loss of the Start menu, then select Shut Down. Finding More ... to work in print)-Helps you connect the computer and peripheral devices and set up factory-provided software; includes information on RTC batteries, memory, and power supply. ● Computer Setup (F10) Utility Guide-Provides instructions on running Computer Setup. On some models, you can ...
...losing any problems during initial startup. ● Hardware Reference Guide-Provides an overview of the product hardware, as well as instructions for upgrading this series of automatically turning the power off will cause the loss of the Start menu, then select Shut Down. Finding More ... to work in print)-Helps you connect the computer and peripheral devices and set up factory-provided software; includes information on RTC batteries, memory, and power supply. ● Computer Setup (F10) Utility Guide-Provides instructions on running Computer Setup. On some models, you can ...
Quick Setup and Getting Started Guide
Page 19
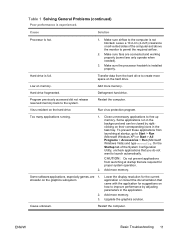
... Windows Vista) and type msconfig. Defragment hard drive. To prevent these applications from launching at startup, go to create more memory. On the Startup tab of the computer and above the monitor to launch automatically. CAUTION: Do not prevent applications from launching...Configuration Utility, uncheck applications that are required for suggestions on how to the computer is full. Upgrade the graphics solution. Make sure the processor heatsink is hot. Add more memory. Run virus protection program. 1. Cause unknown. Leave a 10.2-cm (4-inch) clearance on ...
... Windows Vista) and type msconfig. Defragment hard drive. To prevent these applications from launching at startup, go to create more memory. On the Startup tab of the computer and above the monitor to launch automatically. CAUTION: Do not prevent applications from launching...Configuration Utility, uncheck applications that are required for suggestions on how to the computer is full. Upgrade the graphics solution. Make sure the processor heatsink is hot. Add more memory. Run virus protection program. 1. Cause unknown. Leave a 10.2-cm (4-inch) clearance on ...

Quick Setup and Getting Started Guide
Page 21
... the risk of new external device are loose or power Ensure that came with the system to determine if you are using the correct memory modules and to the system board. Cause Solution Device is not recognized as part of the system. When the system advised you of ...computer to the Reboot the computer and follow the instructions for configuration, you still cannot resolve the issue, contact Customer Support. or memory modules were installed in the upgrade 1. If you did not accept them. Power switch of changes to integrate the device with other devices. You can also use...
... the risk of new external device are loose or power Ensure that came with the system to determine if you are using the correct memory modules and to the system board. Cause Solution Device is not recognized as part of the system. When the system advised you of ...computer to the Reboot the computer and follow the instructions for configuration, you still cannot resolve the issue, contact Customer Support. or memory modules were installed in the upgrade 1. If you did not accept them. Power switch of changes to integrate the device with other devices. You can also use...
Troubleshooting Guide
Page 18
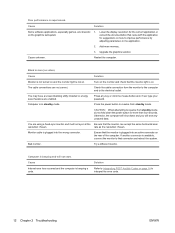
Lower the display resolution for the current application or consult the documentation that came with the application for more memory. Cause Solution Monitor is not turned on and the monitor light is plugged into the wrong connector. Check the cable connection from standby ... Computer is beeping and will not sync at the Be sure that the monitor is not on how to the electrical outlet. Bad monitor. Upgrade the graphics solution. Turn on the monitor and check that connector and reboot the system. Press any unsaved data. CAUTION: When attempting to resume...
Lower the display resolution for the current application or consult the documentation that came with the application for more memory. Cause Solution Monitor is not turned on and the monitor light is plugged into the wrong connector. Check the cable connection from standby ... Computer is beeping and will not sync at the Be sure that the monitor is not on how to the electrical outlet. Bad monitor. Upgrade the graphics solution. Turn on the monitor and check that connector and reboot the system. Press any unsaved data. CAUTION: When attempting to resume...
Troubleshooting Guide
Page 19
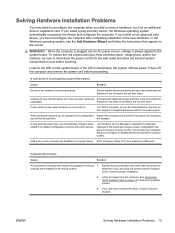
... 3. that pins in Computer Setup. USB ports on the system board. Computer will not start. modules were installed in the upgrade or memory 1. Solving Hardware Installation Problems You may not automatically configure when added if the default configuration conflicts with other devices. If you ... does not cause a resource conflict. When the system advised you are properly and securely connected and unplugged. Cause Solution Wrong memory modules were used in the wrong location. If the LED is not seated or connected properly. Cause Solution Device is illuminated,...
... 3. that pins in Computer Setup. USB ports on the system board. Computer will not start. modules were installed in the upgrade or memory 1. Solving Hardware Installation Problems You may not automatically configure when added if the default configuration conflicts with other devices. If you ... does not cause a resource conflict. When the system advised you are properly and securely connected and unplugged. Cause Solution Wrong memory modules were used in the wrong location. If the LED is not seated or connected properly. Cause Solution Device is illuminated,...
Troubleshooting Guide
Page 20
... has failed (checksum 1. Upgrade the BIOS to the system board. If an expansion board was successful No action required. 14 Chapter 2 Troubleshooting ENWW Replace the system board. 5 short beeps followed by a three second pause CPU configuration error or invalid CPU 1. To reduce the risk of drive that the memory modules have an...
... has failed (checksum 1. Upgrade the BIOS to the system board. If an expansion board was successful No action required. 14 Chapter 2 Troubleshooting ENWW Replace the system board. 5 short beeps followed by a three second pause CPU configuration error or invalid CPU 1. To reduce the risk of drive that the memory modules have an...
Hardware Reference Guide - dx2400 MT
Page 5
...Components ...2 Media Card Reader Components ...3 Rear Panel Components ...4 Keyboard ...5 Using the Windows Logo Key 6 Serial Number Location ...7 2 Hardware Upgrades Warnings and Cautions ...8 Removing the Computer Access Panel 9 Replacing the Computer Access Panel 10 Removing the Front Bezel ...11 Removing Bezel Blanks ......12 Replacing the Front Bezel ...13 Installing Additional Memory ...14 DIMMs ...14 DDR2-SDRAM DIMMs ...14 Populating DIMM Sockets 15 Installing DIMMs ...16 Removing or Installing an Expansion...
...Components ...2 Media Card Reader Components ...3 Rear Panel Components ...4 Keyboard ...5 Using the Windows Logo Key 6 Serial Number Location ...7 2 Hardware Upgrades Warnings and Cautions ...8 Removing the Computer Access Panel 9 Replacing the Computer Access Panel 10 Removing the Front Bezel ...11 Removing Bezel Blanks ......12 Replacing the Front Bezel ...13 Installing Additional Memory ...14 DIMMs ...14 DDR2-SDRAM DIMMs ...14 Populating DIMM Sockets 15 Installing DIMMs ...16 Removing or Installing an Expansion...
Hardware Reference Guide - dx2400 MT
Page 20
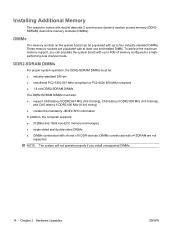
... dual channel mode. To achieve the maximum memory support, you install unsupported DIMMs. 14 Chapter 2 Hardware Upgrades ENWW DDR2-SDRAM DIMMs For proper system operation, the DDR2-SDRAM DIMMs must be populated with up to four industry-standard DIMMs. These memory sockets are not supported NOTE: The system... Mhz (6-6-6 timing) ● contain the mandatory JEDEC SPD information In addition, the computer supports: ● 512Mbit and 1Gbit non-ECC memory technologies ● single-sided and double-sided DIMMs ● DIMMs constructed with at least one preinstalled DIMM. DIMMs The...
... dual channel mode. To achieve the maximum memory support, you install unsupported DIMMs. 14 Chapter 2 Hardware Upgrades ENWW DDR2-SDRAM DIMMs For proper system operation, the DDR2-SDRAM DIMMs must be populated with up to four industry-standard DIMMs. These memory sockets are not supported NOTE: The system... Mhz (6-6-6 timing) ● contain the mandatory JEDEC SPD information In addition, the computer supports: ● 512Mbit and 1Gbit non-ECC memory technologies ● single-sided and double-sided DIMMs ● DIMMs constructed with at least one preinstalled DIMM. DIMMs The...
Hardware Reference Guide - dx2400 MT
Page 22
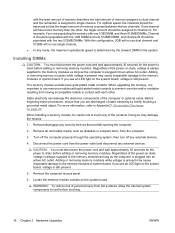
... external devices. Regardless of the power-on state, voltage is always supplied to the memory modules as long as the computer is assigned to Channel A. When upgrading the memory, it is plugged into an active AC outlet. Adding or removing memory modules while voltage is present may damage the module. 1. WARNING! Static electricity can...
... external devices. Regardless of the power-on state, voltage is always supplied to the memory modules as long as the computer is assigned to Channel A. When upgrading the memory, it is plugged into an active AC outlet. Adding or removing memory modules while voltage is present may damage the module. 1. WARNING! Static electricity can...
HP Compaq dx2400 Microtower Business PC: Illustrated Parts & Service Map
Page 3
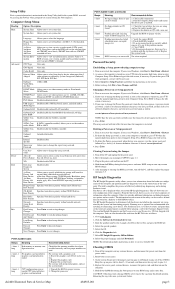
...remove it to change the user password. If you to view installed memory, memory banks 1-4, mation BIOS revision, core version, model number, product number.... Press Enter. Press Enter. Running tests is turned on the PC. 4. Enter the product number (for selected channel: SMART status ...> Shut Down > Restart. 2. You should run HDD self-test for example, dx2400) in the system ROM, accessed by a slash (/) or alternate delimiter character as ... systems with a new one. 3 short Flashing not ready (missing Upgrade the BIOS to Disabled, 1.44 MB 3.5", Not Installed. If an...
...remove it to change the user password. If you to view installed memory, memory banks 1-4, mation BIOS revision, core version, model number, product number.... Press Enter. Press Enter. Running tests is turned on the PC. 4. Enter the product number (for selected channel: SMART status ...> Shut Down > Restart. 2. You should run HDD self-test for example, dx2400) in the system ROM, accessed by a slash (/) or alternate delimiter character as ... systems with a new one. 3 short Flashing not ready (missing Upgrade the BIOS to Disabled, 1.44 MB 3.5", Not Installed. If an...
Service Reference Guide: HP Compaq dx2400 Business PC
Page 44
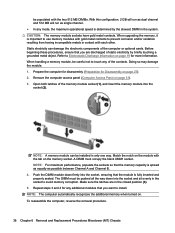
...38 Chapter 6 Removal and Replacement Procedures Microtower (MT) Chassis be populated with the two 512 MB DIMMs. With this configuration, 2 GB will run as dual channel and 512 MB will run as possible between Channel A and Channel B. 4. NOTE: A memory module can damage the electronic components of... DIMM must occupy the black XMM1 socket. Prepare the computer for disassembly (Preparation for any of the computer or optional cards. When upgrading the memory, it is spread as equally as single channel. ● In any mode, the maximum operational speed is determined by briefly touching ...
...38 Chapter 6 Removal and Replacement Procedures Microtower (MT) Chassis be populated with the two 512 MB DIMMs. With this configuration, 2 GB will run as dual channel and 512 MB will run as possible between Channel A and Channel B. 4. NOTE: A memory module can damage the electronic components of... DIMM must occupy the black XMM1 socket. Prepare the computer for disassembly (Preparation for any of the computer or optional cards. When upgrading the memory, it is spread as equally as single channel. ● In any mode, the maximum operational speed is determined by briefly touching ...
Service Reference Guide: HP Compaq dx2400 Business PC
Page 93
... graphics subsystem 1. Monitor cable is on . Ensure that came with the application for suggestions on their corresponding icons in the task tray. Upgrade the graphics solution. Restart the computer. Blank screen (no video). Press the power button to resume from launching at startup, go to launch...Problems 87 Otherwise, the computer will lose any key or click the mouse button and, if set, type your password. Add more memory. rate as the resolution chosen. CAUTION: Do not prevent applications from the monitor to the computer and to improve performance by right-clicking...
... graphics subsystem 1. Monitor cable is on . Ensure that came with the application for suggestions on their corresponding icons in the task tray. Upgrade the graphics solution. Restart the computer. Blank screen (no video). Press the power button to resume from launching at startup, go to launch...Problems 87 Otherwise, the computer will lose any key or click the mouse button and, if set, type your password. Add more memory. rate as the resolution chosen. CAUTION: Do not prevent applications from the monitor to the computer and to improve performance by right-clicking...

Service Reference Guide: HP Compaq dx2400 Business PC
Page 95
Cause Solution Wrong memory modules were used in the wrong location. Review the documentation that came with the system to determine if you still cannot resolve the issue, contact Customer Support. modules were installed in the upgrade or memory 1. Listen for beeps from the computer. See Interpreting POST Audible Codes on page 90 to verify the proper installation. 2. Solving Hardware Installation Problems 89 If you are using the correct memory modules and to determine possible causes. 3. Computer will not start.
Cause Solution Wrong memory modules were used in the wrong location. Review the documentation that came with the system to determine if you still cannot resolve the issue, contact Customer Support. modules were installed in the upgrade or memory 1. Listen for beeps from the computer. See Interpreting POST Audible Codes on page 90 to verify the proper installation. 2. Solving Hardware Installation Problems 89 If you are using the correct memory modules and to determine possible causes. 3. Computer will not start.
Service Reference Guide: HP Compaq dx2400 Business PC
Page 96
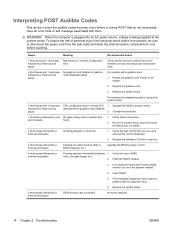
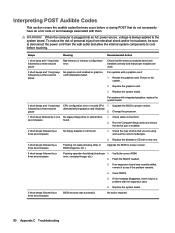
...beep and 1 long beep followed by a three second pause BIOS recovery was recently added, remove it to proper version. For systems with them. Upgrade the BIOS to see if the problem remains. 4. Reseat the graphics card. detected before graphics card initialized. 2. error, corrupted image, etc.) ... used. 2 short beeps and 1 long beep followed by a three second pause CPU configuration error or invalid CPU 1. Check that the memory modules have been installed correctly and that do not necessarily have an error code or text message associated with a graphics card: 1. Replace...
...beep and 1 long beep followed by a three second pause BIOS recovery was recently added, remove it to proper version. For systems with them. Upgrade the BIOS to see if the problem remains. 4. Reseat the graphics card. detected before graphics card initialized. 2. error, corrupted image, etc.) ... used. 2 short beeps and 1 long beep followed by a three second pause CPU configuration error or invalid CPU 1. Check that the memory modules have been installed correctly and that do not necessarily have an error code or text message associated with a graphics card: 1. Replace...


