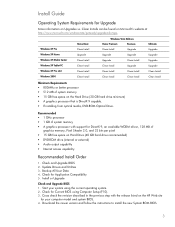
Installing Microsoft Windows Vista on Selected HP Products
Page 3
... Install Clean Install Windows Vista Editions Home Premium Business Clean Install Upgrade Upgrade Upgrade Upgrade Clean Install Clean Install Upgrade Clean Install Clean Install Clean Install Clean Install Ultimate Upgrade Upgrade Upgrade Upgrade Clean Install Clean Install Minimum Requirements ƒ 800MHz or better processor ƒ 512 MB of graphics memory, Pixel Shader 2.0, and 32 bits per pixel ƒ 15 GB...
... Install Clean Install Windows Vista Editions Home Premium Business Clean Install Upgrade Upgrade Upgrade Upgrade Clean Install Clean Install Upgrade Clean Install Clean Install Clean Install Clean Install Ultimate Upgrade Upgrade Upgrade Upgrade Clean Install Clean Install Minimum Requirements ƒ 800MHz or better processor ƒ 512 MB of graphics memory, Pixel Shader 2.0, and 32 bits per pixel ƒ 15 GB...
Hardware Reference Guide - dx 2200MT
Page 3
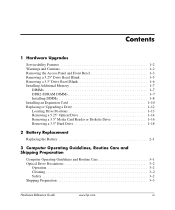
... 1-2 Removing the Access Panel and Front Bezel 1-3 Removing a 5.25" Drive Bezel Blank 1-5 Removing a 3.5" Drive Bezel Blank 1-6 Installing Additional Memory 1-7 DIMMs 1-7 DDR2-SDRAM DIMMs 1-7 Installing DIMMs 1-8 Installing an Expansion Card 1-10 Replacing or Upgrading a Drive 1-12 Locating Drive Positions 1-13 Removing a 5.25" Optical Drive 1-14 Removing a 3.5" Media Card Reader or Diskette Drive 1-16...
... 1-2 Removing the Access Panel and Front Bezel 1-3 Removing a 5.25" Drive Bezel Blank 1-5 Removing a 3.5" Drive Bezel Blank 1-6 Installing Additional Memory 1-7 DIMMs 1-7 DDR2-SDRAM DIMMs 1-7 Installing DIMMs 1-8 Installing an Expansion Card 1-10 Replacing or Upgrading a Drive 1-12 Locating Drive Positions 1-13 Removing a 5.25" Optical Drive 1-14 Removing a 3.5" Media Card Reader or Diskette Drive 1-16...

Hardware Reference Guide - dx 2200MT
Page 11
...5300 667 MHz-compliant ■ 1.9 volt DDR2-SDRAM DIMMs The DDR2-SDRAM DIMMs must be populated with up to 2GB (2 x 1GB) of memory. DDR2-SDRAM DIMMs For proper system operation, the DDR2-SDRAM DIMMs must also: ■ support CAS latency 4 (CL = 4) for PC2-...rate 2 synchronous dynamic random access memory (DDR2-SDRAM) dual inline memory modules (DIMMs). To achieve the maximum memory support, you install unsupported DIMMs. Hardware Reference Guide www.hp.com 1-7 The sockets are labeled DIMM1 and DIMM2. Hardware Upgrades Installing Additional Memory The computer comes with x8 and ...
...5300 667 MHz-compliant ■ 1.9 volt DDR2-SDRAM DIMMs The DDR2-SDRAM DIMMs must be populated with up to 2GB (2 x 1GB) of memory. DDR2-SDRAM DIMMs For proper system operation, the DDR2-SDRAM DIMMs must also: ■ support CAS latency 4 (CL = 4) for PC2-...rate 2 synchronous dynamic random access memory (DDR2-SDRAM) dual inline memory modules (DIMMs). To achieve the maximum memory support, you install unsupported DIMMs. Hardware Reference Guide www.hp.com 1-7 The sockets are labeled DIMM1 and DIMM2. Hardware Upgrades Installing Additional Memory The computer comes with x8 and ...
Hardware Reference Guide - dx 2200MT
Page 12
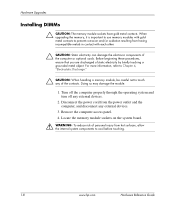
...Reference Guide Before beginning these procedures, ensure that you are discharged of the computer or optional cards. Hardware Upgrades Installing DIMMs Ä CAUTION: The memory module sockets have gold metal contacts. For more information, refer to Chapter 4, "Electrostatic Discharge." Ä CAUTION: ... any of personal injury from the power outlet and the computer, and disconnect any external devices. 3. When upgrading the memory, it is important to use memory modules with each other. Ä CAUTION: Static electricity can damage the electronic components of static electricity by ...
...Reference Guide Before beginning these procedures, ensure that you are discharged of the computer or optional cards. Hardware Upgrades Installing DIMMs Ä CAUTION: The memory module sockets have gold metal contacts. For more information, refer to Chapter 4, "Electrostatic Discharge." Ä CAUTION: ... any of personal injury from the power outlet and the computer, and disconnect any external devices. 3. When upgrading the memory, it is important to use memory modules with each other. Ä CAUTION: Static electricity can damage the electronic components of static electricity by ...
Hardware Reference Guide - dx 2200MT
Page 13
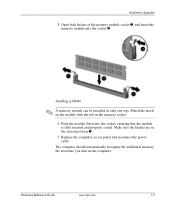
.... Match the notch on the module with the tab on the computer. The computer should automatically recognize the additional memory the next time you turn on the memory socket. 6. Push the module down into the socket 2. Make sure the latches are in only one way. ...Hardware Reference Guide www.hp.com 1-9 Installing a DIMM ✎ A memory module can be installed in the closed position 3. 7. Replace the computer access panel and reconnect the power cable. Hardware Upgrades ...
.... Match the notch on the module with the tab on the computer. The computer should automatically recognize the additional memory the next time you turn on the memory socket. 6. Push the module down into the socket 2. Make sure the latches are in only one way. ...Hardware Reference Guide www.hp.com 1-9 Installing a DIMM ✎ A memory module can be installed in the closed position 3. 7. Replace the computer access panel and reconnect the power cable. Hardware Upgrades ...

HP Compaq dx2200 MT Business PC, 1st Edition
Page 17
Enables/disables the primary display device: Select the UMA (Unified Memory Architecture) frame buffer size: • 32MB • 64MB • Auto Allows ...ROM Description Allows you to set the MPS table version to: • 1.1 • 1.4 Disables/enables BIOS upgrading. Disables/enables USB legacy support function (USB keyboard, USB mouse, and USB Drive Key). Disables/enables onboard LAN...auto-detection. Disables/enables onboard HD audio. Service Reference Guide, dx2200 MT 415606-001 2-7 Disables/enables the boot ROM of the onboard LAN chip. Disables/enables USB controller.
Enables/disables the primary display device: Select the UMA (Unified Memory Architecture) frame buffer size: • 32MB • 64MB • Auto Allows ...ROM Description Allows you to set the MPS table version to: • 1.1 • 1.4 Disables/enables BIOS upgrading. Disables/enables USB legacy support function (USB keyboard, USB mouse, and USB Drive Key). Disables/enables onboard LAN...auto-detection. Disables/enables onboard HD audio. Service Reference Guide, dx2200 MT 415606-001 2-7 Disables/enables the boot ROM of the onboard LAN chip. Disables/enables USB controller.

HP Compaq dx2200 MT Business PC, 1st Edition
Page 23
... h18000.www1.hp.com/solutions/pcsolutions provides information to occur during a ROM upgrade. The PC Deployment section of a ROM flash failure, for example, if a power failure... it enters Boot Block recovery mode, complete the following steps: Service Reference Guide, dx2200 MT 415606-001 3-1 After a brief software "unbundling" process, the computer is ...technology environment and processes. By establishing a supervisor password in a programmable flash ROM (read only memory). The Boot Block is a flash-protected section of system software, configuration management and troubleshooting,...
... h18000.www1.hp.com/solutions/pcsolutions provides information to occur during a ROM upgrade. The PC Deployment section of a ROM flash failure, for example, if a power failure... it enters Boot Block recovery mode, complete the following steps: Service Reference Guide, dx2200 MT 415606-001 3-1 After a brief software "unbundling" process, the computer is ...technology environment and processes. By establishing a supervisor password in a programmable flash ROM (read only memory). The Boot Block is a flash-protected section of system software, configuration management and troubleshooting,...

HP Compaq dx2200 MT Business PC, 1st Edition
Page 48
...upgrading the memory, it easier to Appendix D, "Memory." 6.5.1 Installing Memory Modules Ä CAUTION: The memory module sockets have gold metal contacts. Prepare the computer for disassembly (Section 6.1, "Preparation for more information on the memory in only one way. Lay the computer down on . 4. Microtower (MT) Chassis 6.5 Memory...Match the notch on the memory socket. 6-6 415606-001 Service Reference Guide, dx2200 MT Remove the access panel (Section 6.2, "Access Panel"). Å WARNING: To reduce risk of the memory module socket 1, and insert the memory module into the socket ...
...upgrading the memory, it easier to Appendix D, "Memory." 6.5.1 Installing Memory Modules Ä CAUTION: The memory module sockets have gold metal contacts. Prepare the computer for disassembly (Section 6.1, "Preparation for more information on the memory in only one way. Lay the computer down on . 4. Microtower (MT) Chassis 6.5 Memory...Match the notch on the memory socket. 6-6 415606-001 Service Reference Guide, dx2200 MT Remove the access panel (Section 6.2, "Access Panel"). Å WARNING: To reduce risk of the memory module socket 1, and insert the memory module into the socket ...
HP Compaq dx2200 MT Business PC, 1st Edition
Page 104
...a basic configuration that pins in the connector are using the correct memory modules and to integrate the device with other devices. E-16 415606-001 Service Reference Guide, dx2200 MT Use Windows XP Device Manager to the configuration, you install ...a plug and play device, Windows XP automatically recognize the device and configure the computer. When the system advised you of changes to deselect the automatic settings for accepting the changes. Wrong memory modules were used in the upgrade or memory...
...a basic configuration that pins in the connector are using the correct memory modules and to integrate the device with other devices. E-16 415606-001 Service Reference Guide, dx2200 MT Use Windows XP Device Manager to the configuration, you install ...a plug and play device, Windows XP automatically recognize the device and configure the computer. When the system advised you of changes to deselect the automatic settings for accepting the changes. Wrong memory modules were used in the upgrade or memory...

HP Compaq dx2200 MT Service Reference Card, 1st Edition
Page 1
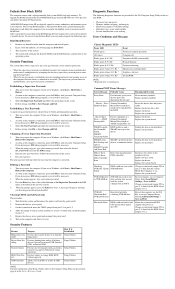
...Type • Processor Speed • CPU ID/Patch ID • Cache Size • Memory Size • System ROM • Integrated MAC Address • UUID • System serial.... Hard Disk Boot Sequence - Network Boot Sequence - Disables/enables ROM BIOS upgrading. Hyper-Threading Technology - Disables/enables SURROUNDVIEW (available when a PCI-e video card...Controller - Current CPU Fan Speed - View. Set Supervi- Service Reference Card HP Compaq dx2200 MT Series Business PC © 2006 Hewlett-Packard Development Company, L.P. tion contained herein is subject to...
...Type • Processor Speed • CPU ID/Patch ID • Cache Size • Memory Size • System ROM • Integrated MAC Address • UUID • System serial.... Hard Disk Boot Sequence - Network Boot Sequence - Disables/enables ROM BIOS upgrading. Hyper-Threading Technology - Disables/enables SURROUNDVIEW (available when a PCI-e video card...Controller - Current CPU Fan Speed - View. Set Supervi- Service Reference Card HP Compaq dx2200 MT Series Business PC © 2006 Hewlett-Packard Development Company, L.P. tion contained herein is subject to...
HP Compaq dx2200 MT Service Reference Card, 1st Edition
Page 2
... this message. If you enter Computer Setup. How It Is Established Setup Utilities Setup Utilities Setup Utilities Setup Utilities. Reseat memory modules. Replace the system board. SMART Capable and Status Bad. DMA-1 Error DMA-2 Error DMA Controller Error Error when initializing...Slave Drive - Reset jumpers to pins 2-3, then flash the BIOS. Deleting a Password 1. SMART capable hard drive detects an imminent failure. To upgrade the ROM, download the latest ROM BIOS image from pins 2-3 to pins 2-3. 5. Your system ROM includes a Failsafe Boot Block that position for...
... this message. If you enter Computer Setup. How It Is Established Setup Utilities Setup Utilities Setup Utilities Setup Utilities. Reseat memory modules. Replace the system board. SMART Capable and Status Bad. DMA-1 Error DMA-2 Error DMA Controller Error Error when initializing...Slave Drive - Reset jumpers to pins 2-3, then flash the BIOS. Deleting a Password 1. SMART capable hard drive detects an imminent failure. To upgrade the ROM, download the latest ROM BIOS image from pins 2-3 to pins 2-3. 5. Your system ROM includes a Failsafe Boot Block that position for...

HP Compaq dx2200 Microtower PC - Computer Setup (F10) Utility Guide
Page 13
...enables Hyper-Threading Technology. Table 5 Computer Setup-Advanced Chipset Features Option Description UMA Frame Buffer Select the UMA (Unified Memory Architecture) frame buffer size: ● 32MB ● 64MB ● 128MB ● Auto Init Display First Allows ...) Security Option Allows you to set the MPS table version to: ● 1.1 ● 1.4 BIOS Write Protection Disables/enables BIOS upgrading. Disables/enables Enhanced Intel SpeedStep Technology, which prevents malicious buffer overflow attacks. APIC Mode Disables/enables the Advanced-PIC mode. Hyper-Threading...
...enables Hyper-Threading Technology. Table 5 Computer Setup-Advanced Chipset Features Option Description UMA Frame Buffer Select the UMA (Unified Memory Architecture) frame buffer size: ● 32MB ● 64MB ● 128MB ● Auto Init Display First Allows ...) Security Option Allows you to set the MPS table version to: ● 1.1 ● 1.4 BIOS Write Protection Disables/enables BIOS upgrading. Disables/enables Enhanced Intel SpeedStep Technology, which prevents malicious buffer overflow attacks. APIC Mode Disables/enables the Advanced-PIC mode. Hyper-Threading...
Troubleshooting Guide
Page 10
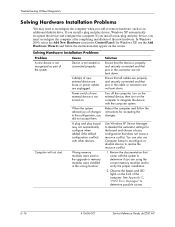
... not correct. The cable connections are stressful on the graphics subsystem. 1. Too many applications running. 1. Upgrade the graphics solution. Troubleshooting Guide www.hp.com 7 Add more memory. Hard drive is not on. Virus resident on memory. Add more memory. experienced (continued). Defragment hard drive. Some software applications, especially games, are Check the cable connection...
... not correct. The cable connections are stressful on the graphics subsystem. 1. Too many applications running. 1. Upgrade the graphics solution. Troubleshooting Guide www.hp.com 7 Add more memory. Hard drive is not on. Virus resident on memory. Add more memory. experienced (continued). Defragment hard drive. Some software applications, especially games, are Check the cable connection...
Troubleshooting Guide
Page 13
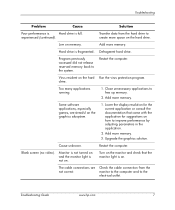
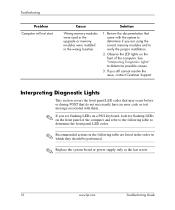
... to the following table to determine the front panel LED codes. ✎ Recommended actions in the following table are using the correct memory modules and to verify the proper installation. 2. Troubleshooting Problem Computer will not start. Review the documentation that do not necessarily have an... error code or text message associated with the system to determine possible causes. 3. Cause Wrong memory modules were used in the upgrade or memory modules were installed in which they should be performed. ✎ Replace the system board or power supply only as ...
... to the following table to determine the front panel LED codes. ✎ Recommended actions in the following table are using the correct memory modules and to verify the proper installation. 2. Troubleshooting Problem Computer will not start. Review the documentation that do not necessarily have an... error code or text message associated with the system to determine possible causes. 3. Cause Wrong memory modules were used in the upgrade or memory modules were installed in which they should be performed. ✎ Replace the system board or power supply only as ...


