Reference Guide
Page 9
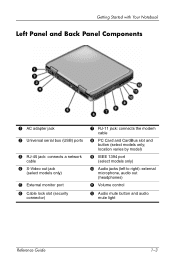
Getting Started with Your Notebook Left Panel and Back Panel Components 1 AC adapter jack 2 Universal serial bus (USB) ports 3 RJ-45 jack: connects a network cable 4 S-Video out jack (select models only) 5 External monitor port 6 Cable lock slot (security connector) 7 RJ-11 jack: connects the modem cable 8 PC Card and CardBus slot and button (select models only; Audio jacks (left to right): external microphone, audio out (headphones) q Volume control w Audio mute button and audio mute light Reference Guide 1-3 location varies by model) 9 IEEE 1394 port (select models only) -
Getting Started with Your Notebook Left Panel and Back Panel Components 1 AC adapter jack 2 Universal serial bus (USB) ports 3 RJ-45 jack: connects a network cable 4 S-Video out jack (select models only) 5 External monitor port 6 Cable lock slot (security connector) 7 RJ-11 jack: connects the modem cable 8 PC Card and CardBus slot and button (select models only; Audio jacks (left to right): external microphone, audio out (headphones) q Volume control w Audio mute button and audio mute light Reference Guide 1-3 location varies by model) 9 IEEE 1394 port (select models only) -
Reference Guide
Page 13
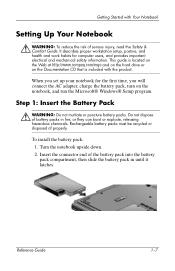
...and work habits for the first time, you will connect the AC adapter, charge the battery pack, turn on the Documentation CD that is located on the Web at http://www.compaq.com/ergo and on the hard drive or on the notebook, and run the Microsoft® Windows® Setup program.... Step 1: Insert the Battery Pack Å WARNING: Do not mutilate or puncture battery packs. Reference Guide 1-7 This guide is included with Your Notebook Setting Up Your Notebook Å...
...and work habits for the first time, you will connect the AC adapter, charge the battery pack, turn on the Documentation CD that is located on the Web at http://www.compaq.com/ergo and on the hard drive or on the notebook, and run the Microsoft® Windows® Setup program.... Step 1: Insert the Battery Pack Å WARNING: Do not mutilate or puncture battery packs. Reference Guide 1-7 This guide is included with Your Notebook Setting Up Your Notebook Å...

Reference Guide
Page 14
... the AC adapter. 3. Getting Started with Your Notebook Step 2: Connect AC Power Ä CAUTION: Use only the AC adapter included with the section "Step 3: Connect a Phone Line." 1-8 Reference Guide The notebook battery starts charging. ✎ When unplugging the power cord, unplug it from the outlet before unplugging it from the AC adapter. Using the wrong AC adapter could damage the notebook or adapter...
... the AC adapter. 3. Getting Started with Your Notebook Step 2: Connect AC Power Ä CAUTION: Use only the AC adapter included with the section "Step 3: Connect a Phone Line." 1-8 Reference Guide The notebook battery starts charging. ✎ When unplugging the power cord, unplug it from the outlet before unplugging it from the AC adapter. Using the wrong AC adapter could damage the notebook or adapter...
Reference Guide
Page 16
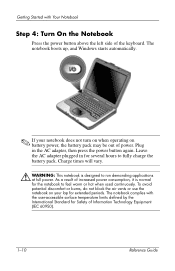
...9998; If your lap for extended periods. To avoid potential discomfort or burns, do not block the air vents or use the notebook on your notebook does not turn on when operating on battery power, the battery pack may be out of power. Getting Started with the user-...Safety of Information Technology Equipment (IEC 60950). 1-10 Reference Guide The notebook complies with Your Notebook Step 4: Turn On the Notebook Press the power button above the left side of the keyboard. Leave the AC adapter plugged in the AC adapter, then press the power button again. Plug in for several hours to...
...9998; If your lap for extended periods. To avoid potential discomfort or burns, do not block the air vents or use the notebook on your notebook does not turn on when operating on battery power, the battery pack may be out of power. Getting Started with the user-...Safety of Information Technology Equipment (IEC 60950). 1-10 Reference Guide The notebook complies with Your Notebook Step 4: Turn On the Notebook Press the power button above the left side of the keyboard. Leave the AC adapter plugged in the AC adapter, then press the power button again. Plug in for several hours to...

Reference Guide
Page 29
...are included with a DVD/CDRW Combo Drive, it also includes CD software that the AC adapter is equipped with the software. When writing to DVD+R or DVD+RW media, observe the following guidelines: ■ Place the notebook on a flat, stable surface. ■ Ensure that lets you can write to DVD... with a DVD+RW/R and CD-RW Combo Drive, you must install your DVD burning software from the CDs included with your notebook is connected to the notebook and an AC electrical outlet. ■ Close and exit all other software applications, except the CD burning software (when writing a data disc)...
...are included with a DVD/CDRW Combo Drive, it also includes CD software that the AC adapter is equipped with the software. When writing to DVD+R or DVD+RW media, observe the following guidelines: ■ Place the notebook on a flat, stable surface. ■ Ensure that lets you can write to DVD... with a DVD+RW/R and CD-RW Combo Drive, you must install your DVD burning software from the CDs included with your notebook is connected to the notebook and an AC electrical outlet. ■ Close and exit all other software applications, except the CD burning software (when writing a data disc)...
Reference Guide
Page 36
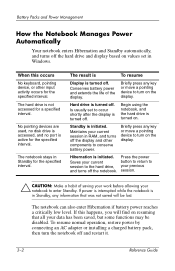
...session. Ä CAUTION: Make a habit of the display. To resume normal operation, restore power by connecting an AC adapter or installing a charged battery pack, then turn the notebook off the notebook. Briefly press any key or move a pointing device to the hard drive, your data has been saved, but ...Display is turned off . Briefly press any key or move a pointing device to conserve battery power. If power is interrupted while the notebook is not accessed for the specified interval. If this occurs No keyboard, pointing device, or other components to turn on values set to...
...session. Ä CAUTION: Make a habit of the display. To resume normal operation, restore power by connecting an AC adapter or installing a charged battery pack, then turn the notebook off the notebook. Briefly press any key or move a pointing device to the hard drive, your data has been saved, but ...Display is turned off . Briefly press any key or move a pointing device to conserve battery power. If power is interrupted while the notebook is not accessed for the specified interval. If this occurs No keyboard, pointing device, or other components to turn on values set to...
Reference Guide
Page 39
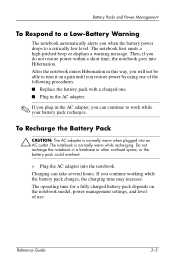
...this way, you will not be able to turn it on the notebook model, power management settings, and level of the following procedures: ■ Replace the battery pack with a charged one. ■ Plug in the AC adapter. ✎ If you plug in a briefcase or other confined space,... or the battery pack could overheat. » Plug the AC adapter into an AC outlet. To Recharge the Battery Pack Ä CAUTION: The AC adapter is normally warm while recharging. Do not recharge the notebook in the AC adapter, you continue working while the battery pack charges, the charging time may ...
...this way, you will not be able to turn it on the notebook model, power management settings, and level of the following procedures: ■ Replace the battery pack with a charged one. ■ Plug in the AC adapter. ✎ If you plug in a briefcase or other confined space,... or the battery pack could overheat. » Plug the AC adapter into an AC outlet. To Recharge the Battery Pack Ä CAUTION: The AC adapter is normally warm while recharging. Do not recharge the notebook in the AC adapter, you continue working while the battery pack charges, the charging time may ...
Reference Guide
Page 40
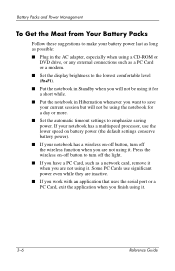
... serial port or a PC Card, exit the application when you finish using it. 3-6 Reference Guide Battery Packs and Power Management To Get the Most from Your Battery Packs Follow these suggestions to make your battery power last as long as possible: ■ Plug in the AC adapter, especially when using a... CD-ROM or DVD drive, or any external connections such as a PC Card or a modem. ■ Set the display brightness to the lowest comfortable level (Fn+F1). ■ Put the notebook in Standby when you will not be using ...
... serial port or a PC Card, exit the application when you finish using it. 3-6 Reference Guide Battery Packs and Power Management To Get the Most from Your Battery Packs Follow these suggestions to make your battery power last as long as possible: ■ Plug in the AC adapter, especially when using a... CD-ROM or DVD drive, or any external connections such as a PC Card or a modem. ■ Set the display brightness to the lowest comfortable level (Fn+F1). ■ Put the notebook in Standby when you will not be using ...
Reference Guide
Page 41
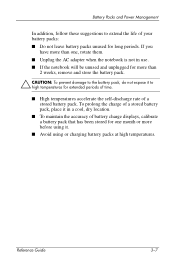
... the accuracy of battery charge displays, calibrate a battery pack that has been stored for one , rotate them. ■ Unplug the AC adapter when the notebook is not in use. ■ If the notebook will be unused and unplugged for more before using or charging battery packs at high temperatures. Reference Guide 3-7 If you have...
... the accuracy of battery charge displays, calibrate a battery pack that has been stored for one , rotate them. ■ Unplug the AC adapter when the notebook is not in use. ■ If the notebook will be unused and unplugged for more before using or charging battery packs at high temperatures. Reference Guide 3-7 If you have...
Reference Guide
Page 69
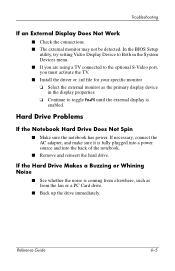
...; See whether the noise is coming from the fan or a PC Card drive. ■ Back up the drive immediately. Hard Drive Problems If the Notebook Hard Drive Does Not Spin ■ Make sure the notebook has power. Reference Guide 6-5 If necessary, connect the AC adapter, and make sure it is enabled. Troubleshooting If an External... the display properties ❏ Continue to toggle Fn+F5 until the external display is fully plugged into a power source and into the back of the notebook. ■ Remove and reinsert the hard drive.
...; See whether the noise is coming from the fan or a PC Card drive. ■ Back up the drive immediately. Hard Drive Problems If the Notebook Hard Drive Does Not Spin ■ Make sure the notebook has power. Reference Guide 6-5 If necessary, connect the AC adapter, and make sure it is enabled. Troubleshooting If an External... the display properties ❏ Continue to toggle Fn+F5 until the external display is fully plugged into a power source and into the back of the notebook. ■ Remove and reinsert the hard drive.
Reference Guide
Page 79
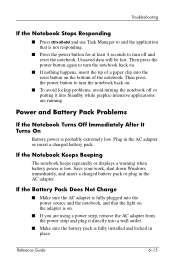
... running. Unsaved data will be lost. Plug in the AC adapter. Reference Guide 6-15 Power and Battery Pack Problems If the Notebook Turns Off Immediately After It Turns On Battery power is low. If the Notebook Keeps Beeping The notebook beeps repeatedly or displays a warning when battery power is ...immediately, and insert a charged battery pack or plug in the AC adapter or insert a charged battery pack. If the Battery Pack Does Not Charge ■ Make sure the AC adapter is fully plugged into the power source and the notebook, and that is not responding. ■ Press the power ...
... running. Unsaved data will be lost. Plug in the AC adapter. Reference Guide 6-15 Power and Battery Pack Problems If the Notebook Turns Off Immediately After It Turns On Battery power is low. If the Notebook Keeps Beeping The notebook beeps repeatedly or displays a warning when battery power is ...immediately, and insert a charged battery pack or plug in the AC adapter or insert a charged battery pack. If the Battery Pack Does Not Charge ■ Make sure the AC adapter is fully plugged into the power source and the notebook, and that is not responding. ■ Press the power ...
Reference Guide
Page 80
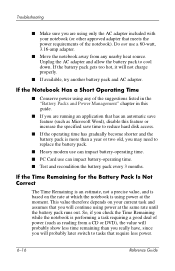
...recondition the battery pack every 3 months. Unplug the AC adapter and allow the battery pack to replace the battery pack. ■ Heavy modem use can impact battery-operating time. ■ PC Card use a 60-watt, 3.16-amp adapter. ■ Move the notebook away from a CD or DVD), the value will ...increase the specified save feature (such as reading from any of the notebook). If the battery pack gets too hot, it will not charge properly. ■ If available, try another battery pack and AC adapter. If the Notebook Has a Short Operating Time ■ Conserve power using power at the...
...recondition the battery pack every 3 months. Unplug the AC adapter and allow the battery pack to replace the battery pack. ■ Heavy modem use can impact battery-operating time. ■ PC Card use a 60-watt, 3.16-amp adapter. ■ Move the notebook away from a CD or DVD), the value will ...increase the specified save feature (such as reading from any of the notebook). If the battery pack gets too hot, it will not charge properly. ■ If available, try another battery pack and AC adapter. If the Notebook Has a Short Operating Time ■ Conserve power using power at the...
Reference Guide
Page 83
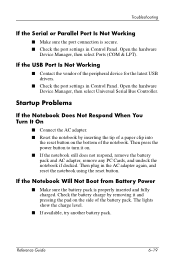
... Not Respond When You Turn It On ■ Connect the AC adapter. ■ Reset the notebook by removing it on. ■ If the notebook still does not respond, remove the battery pack and AC adapter, remove any PC Cards, and undock the notebook if docked. The lights show the charge level. ■ If available, ...the reset button on the side of the notebook. If the USB Port Is Not Working ■ Contact the vendor of the peripheral device for the latest USB drivers. ■ Check the port settings in the AC adapter again, and reset the notebook using the reset button. Open the hardware ...
... Not Respond When You Turn It On ■ Connect the AC adapter. ■ Reset the notebook by removing it on. ■ If the notebook still does not respond, remove the battery pack and AC adapter, remove any PC Cards, and undock the notebook if docked. The lights show the charge level. ■ If available, ...the reset button on the side of the notebook. If the USB Port Is Not Working ■ Contact the vendor of the peripheral device for the latest USB drivers. ■ Check the port settings in the AC adapter again, and reset the notebook using the reset button. Open the hardware ...
Reference Guide
Page 97
Index 1394 port connecting 5-6 location 1-3 A AC adapter connecting 1-8 jack location 1-3 adjusting brightness 2-6 monitor resolution 5-4 volume 2-6 ALT GR key 2-9 alternate graphics (ALT GR) 2-9 antivirus software 2-15 AT commands 4-4 audio adjusting volume 2-6 device connection 5-3 ...
Index 1394 port connecting 5-6 location 1-3 A AC adapter connecting 1-8 jack location 1-3 adjusting brightness 2-6 monitor resolution 5-4 volume 2-6 ALT GR key 2-9 alternate graphics (ALT GR) 2-9 antivirus software 2-15 AT commands 4-4 audio adjusting volume 2-6 device connection 5-3 ...

Startup Guide
Page 8
Audio jacks (left to right): external microphone, audio out (headphones) q Volume control w Audio mute button and audio mute light 1-4 Startup Guide Getting Started with Your Notebook Left Panel and Back Panel Components 1 AC adapter jack 2 Universal serial bus (USB) ports 3 RJ-45 jack: connects a network cable 4 S-Video out jack (select models only) 5 External monitor port 6 Cable lock slot (security connector) 7 RJ-11 jack: connects the modem cable 8 PC Card and CardBus slot and button (select models only; location varies by model) 9 IEEE 1394 port (select models only) -
Audio jacks (left to right): external microphone, audio out (headphones) q Volume control w Audio mute button and audio mute light 1-4 Startup Guide Getting Started with Your Notebook Left Panel and Back Panel Components 1 AC adapter jack 2 Universal serial bus (USB) ports 3 RJ-45 jack: connects a network cable 4 S-Video out jack (select models only) 5 External monitor port 6 Cable lock slot (security connector) 7 RJ-11 jack: connects the modem cable 8 PC Card and CardBus slot and button (select models only; location varies by model) 9 IEEE 1394 port (select models only) -
Startup Guide
Page 10
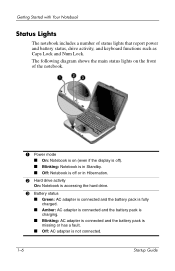
... ■ Blinking: Notebook is in Standby. ■ Off: Notebook is off or in Hibernation. 2 Hard drive activity On: Notebook is accessing the hard drive. 3 Battery status ■ Green: AC adapter is connected and the battery pack is fully charged. ■ Amber: AC adapter is connected and the... battery pack is charging. ■ Blinking: AC adapter is connected and the battery pack ...
... ■ Blinking: Notebook is in Standby. ■ Off: Notebook is off or in Hibernation. 2 Hard drive activity On: Notebook is accessing the hard drive. 3 Battery status ■ Green: AC adapter is connected and the battery pack is fully charged. ■ Amber: AC adapter is connected and the... battery pack is charging. ■ Blinking: AC adapter is connected and the battery pack ...
Startup Guide
Page 12
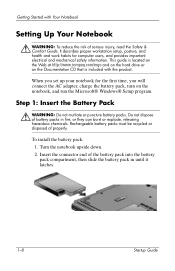
... in fire, or they can burst or explode, releasing hazardous chemicals. Turn the notebook upside down. 2. When you will connect the AC adapter, charge the battery pack, turn on the Documentation CD that is located on the Web at http://www.compaq.com/ergo and on the hard drive or on the... notebook, and run the Microsoft® Windows® Setup program. To install the battery pack: 1....
... in fire, or they can burst or explode, releasing hazardous chemicals. Turn the notebook upside down. 2. When you will connect the AC adapter, charge the battery pack, turn on the Documentation CD that is located on the Web at http://www.compaq.com/ergo and on the hard drive or on the... notebook, and run the Microsoft® Windows® Setup program. To install the battery pack: 1....

Startup Guide
Page 13
Using the wrong AC adapter could damage the notebook or adapter, cause data loss, and may void your notebook (or other approved adapter that meets the power requirements of the notebook). Connect the power cord to the AC adapter. 3. Plug the power cord into the notebook. 2. Plug the AC adapter into a wall outlet. Startup Guide 1-9 The notebook battery starts charging. ✎ When unplugging the...
Using the wrong AC adapter could damage the notebook or adapter, cause data loss, and may void your notebook (or other approved adapter that meets the power requirements of the notebook). Connect the power cord to the AC adapter. 3. Plug the power cord into the notebook. 2. Plug the AC adapter into a wall outlet. Startup Guide 1-9 The notebook battery starts charging. ✎ When unplugging the...

Startup Guide
Page 15
...To avoid potential discomfort or burns, do not block the air vents or use the notebook on battery power, the battery pack may be out of the keyboard. Leave the AC adapter plugged in the AC adapter, then press the power button again. Charge times will vary. Å WARNING: This... notebook is normal for extended periods. Getting Started with the user-accessible surface temperature limits ...
...To avoid potential discomfort or burns, do not block the air vents or use the notebook on battery power, the battery pack may be out of the keyboard. Leave the AC adapter plugged in the AC adapter, then press the power button again. Charge times will vary. Å WARNING: This... notebook is normal for extended periods. Getting Started with the user-accessible surface temperature limits ...

Startup Guide
Page 23
..., observe the following guidelines: ■ Place the notebook on the DVD drive and will be permanent. Most DVD drives let you change to the region code will be hard-coded on a flat, stable surface. ■ Ensure that the AC adapter is connected to the Help for your DVD player... software for a different region. If you get a region code error, you play a DVD intended for details about setting region codes. Refer to the notebook and an AC electrical outlet. ■ Close and exit all...
..., observe the following guidelines: ■ Place the notebook on the DVD drive and will be permanent. Most DVD drives let you change to the region code will be hard-coded on a flat, stable surface. ■ Ensure that the AC adapter is connected to the Help for your DVD player... software for a different region. If you get a region code error, you play a DVD intended for details about setting region codes. Refer to the notebook and an AC electrical outlet. ■ Close and exit all...


