Backup and Recovery - Windows Vista
Page 6
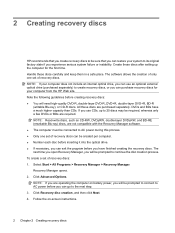
... the program before you have a much higher capacity than CDs. Note the following guidelines before you can go to the next step. 3. Follow the on battery power, you will be prompted to connect to AC power before creating recovery discs: ● You will be prompted to continue the disc creation process...
... the program before you have a much higher capacity than CDs. Note the following guidelines before you can go to the next step. 3. Follow the on battery power, you will be prompted to connect to AC power before creating recovery discs: ● You will be prompted to continue the disc creation process...

Drives - Windows 7
Page 5
...then shut it . do not drop a drive or place items on it down the computer. Security devices with cleaning products. When the battery is the only source of information, observe these precautions: Before you are unsure whether the computer is sufficiently charged before writing to the ...touching the unpainted metal surface of magnetism and will not damage a drive. 1 Do not type on the keyboard or move a computer that the battery is off, in the Sleep state, or in a bubble-pack mailer or other suitable protective packaging and label the package "FRAGILE." Avoid exposing ...
...then shut it . do not drop a drive or place items on it down the computer. Security devices with cleaning products. When the battery is the only source of information, observe these precautions: Before you are unsure whether the computer is sufficiently charged before writing to the ...touching the unpainted metal surface of magnetism and will not damage a drive. 1 Do not type on the keyboard or move a computer that the battery is off, in the Sleep state, or in a bubble-pack mailer or other suitable protective packaging and label the package "FRAGILE." Avoid exposing ...

Drives - Windows 7
Page 12
... from the optical drive and insert a blank disc into the optical drive. 3. Power2Go reads the source disc and copies the data to a temporary folder on battery power. Do not write to a disc while the computer is running on your hard drive to the destination disc. NOTE: For details about using . After...
... from the optical drive and insert a blank disc into the optical drive. 3. Power2Go reads the source disc and copies the data to a temporary folder on battery power. Do not write to a disc while the computer is running on your hard drive to the destination disc. NOTE: For details about using . After...

Drives - Windows 7
Page 17
If you , loosen the 4 hard drive cover screws (1). 13 To remove the hard drive: 1. Disconnect all external devices connected to the computer. 4. Remove the battery from the AC outlet. 5. Then shut down the computer and close the display. 3. With the hard drive bay toward you are not sure whether the ...
If you , loosen the 4 hard drive cover screws (1). 13 To remove the hard drive: 1. Disconnect all external devices connected to the computer. 4. Remove the battery from the AC outlet. 5. Then shut down the computer and close the display. 3. With the hard drive bay toward you are not sure whether the ...

Drives - Windows Vista
Page 5
... be handled with care. Before handling a drive, discharge static electricity by touching the unpainted metal surface of power, be sure that the battery is sufficiently charged before handling drives. Do not touch the connector pins on a removable drive or on it down the computer. do not... fields include airport walkthrough devices and security wands. Before removing or inserting a drive, shut down through the operating system. When the battery is the only source of the drive. Avoid exposing a drive to media. Avoid exposing a drive to clear, or properly disconnect the ...
... be handled with care. Before handling a drive, discharge static electricity by touching the unpainted metal surface of power, be sure that the battery is sufficiently charged before handling drives. Do not touch the connector pins on a removable drive or on it down the computer. do not... fields include airport walkthrough devices and security wands. Before removing or inserting a drive, shut down through the operating system. When the battery is the only source of the drive. Avoid exposing a drive to media. Avoid exposing a drive to clear, or properly disconnect the ...
Drives - Windows Vista
Page 14
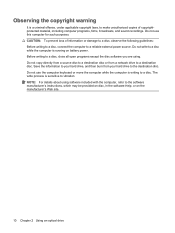
... are using software included with the computer, refer to the software manufacturer's instructions, which may be provided on disc, in the software Help, or on battery power. CAUTION: To prevent loss of copyrightprotected material, including computer programs, films, broadcasts, and sound recordings. NOTE: For details about using .
... are using software included with the computer, refer to the software manufacturer's instructions, which may be provided on disc, in the software Help, or on battery power. CAUTION: To prevent loss of copyrightprotected material, including computer programs, films, broadcasts, and sound recordings. NOTE: For details about using .

Drives - Windows Vista
Page 20
... computer before removing the hard drive from the hard drive bay. To remove the hard drive: 1. Unplug the power cord from the computer. 7. Remove the battery from the AC outlet. 5. Shut down the computer through the operating system. 5 Replacing the hard drive in the hard drive bay CAUTION: To prevent information...
... computer before removing the hard drive from the hard drive bay. To remove the hard drive: 1. Unplug the power cord from the computer. 7. Remove the battery from the AC outlet. 5. Shut down the computer through the operating system. 5 Replacing the hard drive in the hard drive bay CAUTION: To prevent information...

Memory Modules - Windows Vista
Page 5
... the computer. To add or replace a memory module: 1. Save your work. 2. If you are the same size. Remove the battery from the AC outlet. 5. The memory capacity of static electricity by touching a grounded metal object. Shut down on the bottom of ... flat surface. 6. Before beginning any procedure, ensure that both memory modules are discharged of the computer can damage electronic components. Disconnect all batteries before installing a memory module. WARNING! NOTE: To use a dual-channel configuration when adding a second memory module, be upgraded by adding ...
... the computer. To add or replace a memory module: 1. Save your work. 2. If you are the same size. Remove the battery from the AC outlet. 5. The memory capacity of static electricity by touching a grounded metal object. Shut down on the bottom of ... flat surface. 6. Before beginning any procedure, ensure that both memory modules are discharged of the computer can damage electronic components. Disconnect all batteries before installing a memory module. WARNING! NOTE: To use a dual-channel configuration when adding a second memory module, be upgraded by adding ...
Memory Modules - Windows Vista
Page 8
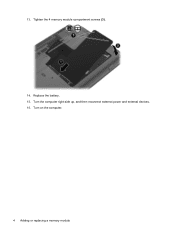
Replace the battery. 15. Tighten the 4 memory module compartment screws (3). 14. Turn on the computer. 4 Adding or replacing a memory module 13. Turn the computer right-side up, and then reconnect external power and external devices. 16.
Replace the battery. 15. Tighten the 4 memory module compartment screws (3). 14. Turn on the computer. 4 Adding or replacing a memory module 13. Turn the computer right-side up, and then reconnect external power and external devices. 16.

Memory Modules - Windows Vista and Windows 7
Page 7
...module: 1. Shut down on a flat surface. 6. Disconnect all external devices connected to the equipment, unplug the power cord and remove all batteries before installing a memory module. Turn the computer upside down the computer and close the display. CAUTION: Electrostatic discharge (ESD) can be sure...to the computer. 4. WARNING! Unplug the power cord from the computer. 7. If you are discharged of the computer. Remove the battery from the AC outlet. 5. Before beginning any procedure, ensure that both memory modules are not sure whether the computer is located ...
...module: 1. Shut down on a flat surface. 6. Disconnect all external devices connected to the equipment, unplug the power cord and remove all batteries before installing a memory module. Turn the computer upside down the computer and close the display. CAUTION: Electrostatic discharge (ESD) can be sure...to the computer. 4. WARNING! Unplug the power cord from the computer. 7. If you are discharged of the computer. Remove the battery from the AC outlet. 5. Before beginning any procedure, ensure that both memory modules are not sure whether the computer is located ...

Memory Modules - Windows Vista and Windows 7
Page 9
... angle from the surface of the memory module with the notch on the memory module, and do not bend the memory module. 11. c. Replace the battery. 3 Do not touch the components on the computer. 12. b. Align the notched edge (1) of the memory module compartment, press the module (2) into place. Tighten the...
... angle from the surface of the memory module with the notch on the memory module, and do not bend the memory module. 11. c. Replace the battery. 3 Do not touch the components on the computer. 12. b. Align the notched edge (1) of the memory module compartment, press the module (2) into place. Tighten the...
Notebook Tour - Windows 7
Page 9
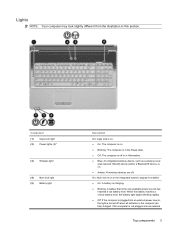
...is not plugged into an external power source, the light is turned off when all batteries in the Sleep state. ● Off: The computer is off . When the battery reaches a critical battery level, the battery light begins blinking rapidly. ● Off: If the computer is plugged into an ...external Top components 3 Component (1) Caps lock light (2) Power lights (2)* (3) Wireless light (4) Num lock light (5) Battery light Description On: Caps lock is on. ● On: The computer is on. ● Blinking: The computer is in the computer are off or...
...is not plugged into an external power source, the light is turned off when all batteries in the Sleep state. ● Off: The computer is off . When the battery reaches a critical battery level, the battery light begins blinking rapidly. ● Off: If the computer is plugged into an ...external Top components 3 Component (1) Caps lock light (2) Power lights (2)* (3) Wireless light (4) Num lock light (5) Battery light Description On: Caps lock is on. ● On: The computer is on. ● Blinking: The computer is in the computer are off or...
Notebook Tour - Windows 7
Page 10
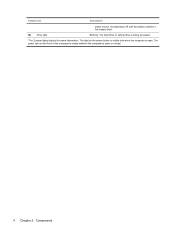
The power light on the power button is visible only when the computer is open . The light on the front of the computer is visible whether the computer is open or closed. 4 Chapter 2 Components Component Description power source, the light stays off until the battery reaches a low battery level. (6) Drive light Blinking: The hard drive or optical drive is being accessed. *The 2 power lights display the same information.
The power light on the power button is visible only when the computer is open . The light on the front of the computer is visible whether the computer is open or closed. 4 Chapter 2 Components Component Description power source, the light stays off until the battery reaches a low battery level. (6) Drive light Blinking: The hard drive or optical drive is being accessed. *The 2 power lights display the same information.

Notebook Tour - Windows 7
Page 16
Holds the hard drive and contains the memory module slots. 10 Chapter 2 Components Bottom components Component (1) Battery bay (2) Battery release latch (3) Vents (5) (4) Wireless module compartment (5) Hard drive bay Description Holds the battery. It is normal for use in the computer by the governmental agency that regulates wireless devices in your country or region. If..., and then contact technical support through Help and Support. Holds a wireless LAN module. Enable airflow to cycle on and off during routine operation. Releases the battery from the battery bay.
Holds the hard drive and contains the memory module slots. 10 Chapter 2 Components Bottom components Component (1) Battery bay (2) Battery release latch (3) Vents (5) (4) Wireless module compartment (5) Hard drive bay Description Holds the battery. It is normal for use in the computer by the governmental agency that regulates wireless devices in your country or region. If..., and then contact technical support through Help and Support. Holds a wireless LAN module. Enable airflow to cycle on and off during routine operation. Releases the battery from the battery bay.

Notebook Tour - Windows 7
Page 19
Additional hardware components Component Description (1) Power cord* Connects an AC adapter to an AC outlet. (2) AC adapter Converts AC power to DC power. (3) Battery* Powers the computer when the computer is not plugged into external power. *Batteries and power cords vary in appearance by region and country. Additional hardware components 13
Additional hardware components Component Description (1) Power cord* Connects an AC adapter to an AC outlet. (2) AC adapter Converts AC power to DC power. (3) Battery* Powers the computer when the computer is not plugged into external power. *Batteries and power cords vary in appearance by region and country. Additional hardware components 13
Notebook Tour - Windows 7
Page 20
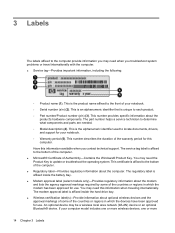
... Key. This is an alphanumeric identifier that is affixed to the bottom of the computer. ● Microsoft® Certificate of your notebook. ◦ Serial number (s/n) (2). The service tag label is unique to determine what components and parts are needed. ◦ Model...computer. ● Service tag-Provides important information, including the following: ◦ Product name (1). This certificate is affixed inside the battery bay. ● Modem approval label (select models only)-Provides regulatory information about optional wireless devices and the approval markings of some...
... Key. This is an alphanumeric identifier that is affixed to the bottom of the computer. ● Microsoft® Certificate of your notebook. ◦ Serial number (s/n) (2). The service tag label is unique to determine what components and parts are needed. ◦ Model...computer. ● Service tag-Provides important information, including the following: ◦ Product name (1). This certificate is affixed inside the battery bay. ● Modem approval label (select models only)-Provides regulatory information about optional wireless devices and the approval markings of some...

Notebook Tour - Windows 7
Page 22
... audio-in (microphone) jack, identifying 7 audio-out (headphone) jack, identifying 7 B battery bay 14 battery bay, identifying 10 battery light, identifying 3 battery release latch, identifying 10 battery, identifying 13 bays battery 10, 14 hard drive 10 Bluetooth label 15 buttons power 5 TouchPad 2 TouchPad on/off... labels Bluetooth 15 Microsoft Certificate of Authenticity 14 modem approval 14 regulatory 14 service tag 14 wireless certification 15 WLAN 15 latch, battery release 10 lights battery 3 caps lock 3 drive 4 num lock 3 optical drive 8 power 3, 8 TouchPad 2 webcam 11 wireless 3 M memory...
... audio-in (microphone) jack, identifying 7 audio-out (headphone) jack, identifying 7 B battery bay 14 battery bay, identifying 10 battery light, identifying 3 battery release latch, identifying 10 battery, identifying 13 bays battery 10, 14 hard drive 10 Bluetooth label 15 buttons power 5 TouchPad 2 TouchPad on/off... labels Bluetooth 15 Microsoft Certificate of Authenticity 14 modem approval 14 regulatory 14 service tag 14 wireless certification 15 WLAN 15 latch, battery release 10 lights battery 3 caps lock 3 drive 4 num lock 3 optical drive 8 power 3, 8 TouchPad 2 webcam 11 wireless 3 M memory...

Notebook Tour - Windows Vista
Page 9
... An integrated wireless device, such as a wireless local area network (WLAN) device and/or a Bluetooth® device, is turned off when all batteries in this section. If the computer is not plugged into an external power source, the light is on or the integrated numeric keypad is enabled.... ● On: A battery is charging. ● Blinking: A battery that is plugged into an external Top components 3 Lights NOTE: Your computer may look slightly different from the illustration in the ...
... An integrated wireless device, such as a wireless local area network (WLAN) device and/or a Bluetooth® device, is turned off when all batteries in this section. If the computer is not plugged into an external power source, the light is on or the integrated numeric keypad is enabled.... ● On: A battery is charging. ● Blinking: A battery that is plugged into an external Top components 3 Lights NOTE: Your computer may look slightly different from the illustration in the ...

Notebook Tour - Windows Vista
Page 10
Component Description power source, the light stays off until the battery reaches a low battery level. (6) Drive light Blinking: The hard drive or optical drive is open or closed. 4 Chapter 2 Components The light on the front of the computer is visible whether the computer is open . The power light on the power button is visible only when the computer is being accessed. *The 2 power lights display the same information.
Component Description power source, the light stays off until the battery reaches a low battery level. (6) Drive light Blinking: The hard drive or optical drive is open or closed. 4 Chapter 2 Components The light on the front of the computer is visible whether the computer is open . The power light on the power button is visible only when the computer is being accessed. *The 2 power lights display the same information.

Notebook Tour - Windows Vista
Page 17
... governmental agency that regulates wireless devices in your country or region. Holds a wireless LAN module. Bottom components Component (1) Battery bay (2) Battery release latch (3) Vents (5) (4) Wireless module compartment (5) Hard drive bay Description Holds the battery. If you replace the module and then receive a warning message, remove the module to cycle on and off during...
... governmental agency that regulates wireless devices in your country or region. Holds a wireless LAN module. Bottom components Component (1) Battery bay (2) Battery release latch (3) Vents (5) (4) Wireless module compartment (5) Hard drive bay Description Holds the battery. If you replace the module and then receive a warning message, remove the module to cycle on and off during...

