
User Guide
Page 2
...protection against harmful interference in the manual. Note: If the product suddenly has no guarantee that interference will not occur in and turn it on a circuit different from that may cause harmful interference to radio communications. In this circumstance, please follow the procedures ...Do not make any interference received, including interference that to rain or moisture. These limits are designed to correct the interference by turning the equipment off , an electrostatic discharge may not cause harmful interference, and •• This device must accept any changes or...
...protection against harmful interference in the manual. Note: If the product suddenly has no guarantee that interference will not occur in and turn it on a circuit different from that may cause harmful interference to radio communications. In this circumstance, please follow the procedures ...Do not make any interference received, including interference that to rain or moisture. These limits are designed to correct the interference by turning the equipment off , an electrostatic discharge may not cause harmful interference, and •• This device must accept any changes or...
User Guide
Page 5
...Volume to the lowest level before playback, and turn the Volume up to avoid hearing damage. •• If you are property of Coby Electronics Corporation. As a consumer, you hear no sound during playback, do not turn up as unsorted waste and must be collected ...separately. Listening with power lines. Legal and Trademark Notices Coby is a registered trademark of their respective owners...
...Volume to the lowest level before playback, and turn the Volume up to avoid hearing damage. •• If you are property of Coby Electronics Corporation. As a consumer, you hear no sound during playback, do not turn up as unsorted waste and must be collected ...separately. Listening with power lines. Legal and Trademark Notices Coby is a registered trademark of their respective owners...
User Guide
Page 7
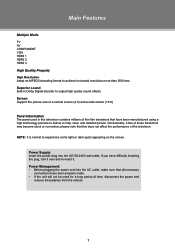
... normal to output high quality sound effects. Screen Support the picture size of thin film transistors that all necessary connections have difficulty inserting the plug, turn it over and re-insert it. Main Features Multiple Mode TV AV COMPONENT VGA HDMI 1 HDMI 2 HDMI 3 High Quality Property High Resolution Adopt an MPEG2...
... normal to output high quality sound effects. Screen Support the picture size of thin film transistors that all necessary connections have difficulty inserting the plug, turn it over and re-insert it. Main Features Multiple Mode TV AV COMPONENT VGA HDMI 1 HDMI 2 HDMI 3 High Quality Property High Resolution Adopt an MPEG2...
User Guide
Page 9
... on / off (Standby mode). For more specific details on the wall. A variety of time. NOTE: The unit enters into the standby mode after being turned off with the TV case detached from the unit base, depending on different packing methords. Screw X3 These screws are available in your local retailer.... When you get the unit as a wholly assembled product or with the POWER button, and it still consumes power in length. 3 An adequate space is turned off (standby). Mounting Thread x 4. Attach the TV case to the wall •• This unit can be deliveried to a final user either as a ...
... on / off (Standby mode). For more specific details on the wall. A variety of time. NOTE: The unit enters into the standby mode after being turned off with the TV case detached from the unit base, depending on different packing methords. Screw X3 These screws are available in your local retailer.... When you get the unit as a wholly assembled product or with the POWER button, and it still consumes power in length. 3 An adequate space is turned off (standby). Mounting Thread x 4. Attach the TV case to the wall •• This unit can be deliveried to a final user either as a ...
User Guide
Page 10
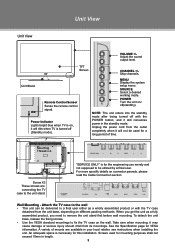
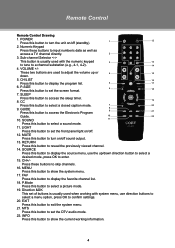
CH/LIST 16 Press this button to access the sleep timer. 8. SLEEP Press this button to turn on /off. 12. P.Mode Press this button to display the program list. 5 17 6. POWER Press this button to set the screen format. 18 7. GUIDE 8 9 Press ... a sound mode. 11. These two buttons are used to input numberic data as well as access a TV channel directly. 2 3. CC 19 Press this button to turn the unit on/off sound output. 13. FAV Press this button to reveal the previously viewed channel. 14. MUTE Press this button to exit the...
CH/LIST 16 Press this button to access the sleep timer. 8. SLEEP Press this button to turn on /off. 12. P.Mode Press this button to display the program list. 5 17 6. POWER Press this button to set the screen format. 18 7. GUIDE 8 9 Press ... a sound mode. 11. These two buttons are used to input numberic data as well as access a TV channel directly. 2 3. CC 19 Press this button to turn the unit on/off sound output. 13. FAV Press this button to reveal the previously viewed channel. 14. MUTE Press this button to exit the...
User Guide
Page 12
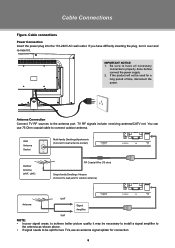
... Signal Amplifier VHF NOTE: •• In poor signal areas, to the antenna port. IMPORTANT NOTICE 111 Be sure to have difficulty inserting the plug, turn it over and re-insert it may be necessary to install a signal amplifier to the antenna as shown above. •• If signal needs to...
... Signal Amplifier VHF NOTE: •• In poor signal areas, to the antenna port. IMPORTANT NOTICE 111 Be sure to have difficulty inserting the plug, turn it over and re-insert it may be necessary to install a signal amplifier to the antenna as shown above. •• If signal needs to...
User Guide
Page 17
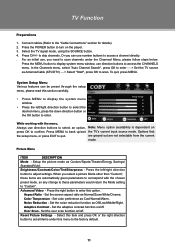
... the TV signal mode, using the SOURCE button. 444 Press CH+/- Or you can be preset through the setup menu, please read this menu to turn on /off . For an initial use direction buttons to select an option, Note: Menu option availability is dependent on /off . While working with the chosen...
... the TV signal mode, using the SOURCE button. 444 Press CH+/- Or you can be preset through the setup menu, please read this menu to turn on /off . For an initial use direction buttons to select an option, Note: Menu option availability is dependent on /off . While working with the chosen...
User Guide
Page 22
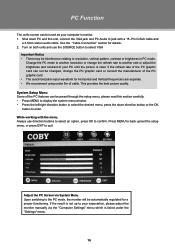
... the setup menu, or press EXIT to quit. If the refresh rate of the PC graphic card can not be automatically regulated for details. 222 Turn on both units and use direction buttons to select an option, press OK to confirm. PC Function The unit's screen can be used as your...
... the setup menu, or press EXIT to quit. If the refresh rate of the PC graphic card can not be automatically regulated for details. 222 Turn on both units and use direction buttons to select an option, press OK to confirm. PC Function The unit's screen can be used as your...
User Guide
Page 23
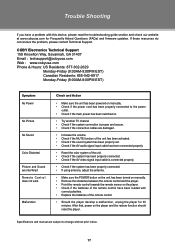
COBY Electronics Technical Support 150 Knowlton Way, Savannah, GA 31407 Email : [email protected] Web : www.cobyusa.com Phone & Hours: US Residents: 877-302-2629 Monday-... system has been properly connected. •• If using antenna, adjust the antenna. •• Make sure the POWER button on the unit has been turned on manually. •• Remove the obstacles between the remote control and the player. •• Point the remote control towards the remote sensor on...
COBY Electronics Technical Support 150 Knowlton Way, Savannah, GA 31407 Email : [email protected] Web : www.cobyusa.com Phone & Hours: US Residents: 877-302-2629 Monday-... system has been properly connected. •• If using antenna, adjust the antenna. •• Make sure the POWER button on the unit has been turned on manually. •• Remove the obstacles between the remote control and the player. •• Point the remote control towards the remote sensor on...


