User Guide
Page 1
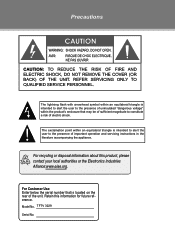
... the serial number that may be of sufficient magnitude to the presence of important operation and servicing instructions in the literature accompanying the appliance. TFTV 3229 Serial No. Model No. Precautions The lightning flash with arrowhead symbol within an equilateral triangle is intended to alert the user to the presence of uninsulated "dangerous voltage" within an equilateral triangle is located...
... the serial number that may be of sufficient magnitude to the presence of important operation and servicing instructions in the literature accompanying the appliance. TFTV 3229 Serial No. Model No. Precautions The lightning flash with arrowhead symbol within an equilateral triangle is intended to alert the user to the presence of uninsulated "dangerous voltage" within an equilateral triangle is located...

User Guide
Page 2
... that to which the receiver is connected. •• Consult the dealer or an experienced radio/TV technician for help Use of shielded cable is encouraged to try to correct the interference by turning the equipment off , an electrostatic discharge may not cause harmful interference, and •• This device must accept any changes or modifications to...
... that to which the receiver is connected. •• Consult the dealer or an experienced radio/TV technician for help Use of shielded cable is encouraged to try to correct the interference by turning the equipment off , an electrostatic discharge may not cause harmful interference, and •• This device must accept any changes or modifications to...
User Guide
Page 3
... the installation, use, servicing and maintenance of this equipment. A grounding type plug has two blades and a third grounding prong. Do not place any heavy objects on the rear of the serial/model plate. 1111 Never overload wall outlets and extensions. 1111 Use and handle the power cord with care. Do not handle the AC power cord with a wet hand. 2222 Remove the plug from the wall outlet...
... the installation, use, servicing and maintenance of this equipment. A grounding type plug has two blades and a third grounding prong. Do not place any heavy objects on the rear of the serial/model plate. 1111 Never overload wall outlets and extensions. 1111 Use and handle the power cord with care. Do not handle the AC power cord with a wet hand. 2222 Remove the plug from the wall outlet...
User Guide
Page 4
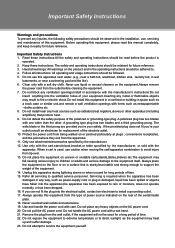
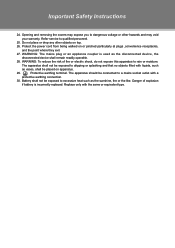
Important Safety Instructions 2222 Opening and removing the covers may void your warranty. The apparatus shall not be exposed to dripping or splashing and that no objects filled with liquids, such as vases, shall be exposed to a mains socket outlet with the same or equivalent type. Replace only with a protective earthing connection. 3333 Battery shall not be...
Important Safety Instructions 2222 Opening and removing the covers may void your warranty. The apparatus shall not be exposed to dripping or splashing and that no objects filled with liquids, such as vases, shall be exposed to a mains socket outlet with the same or equivalent type. Replace only with a protective earthing connection. 3333 Battery shall not be...
User Guide
Page 5
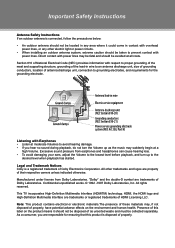
... National Electrical Code (NEC) provides information with overhead power lines, or any other trademarks and logos are responsible for the grounding electrode. Legal and Trademark Notices Coby is connected, follow the precautions below: •• An outdoor antenna should be avoided at a high Volume. All other electric light or power circuits. •• When installing an outdoor antenna system, extreme...
... National Electrical Code (NEC) provides information with overhead power lines, or any other trademarks and logos are responsible for the grounding electrode. Legal and Trademark Notices Coby is connected, follow the precautions below: •• An outdoor antenna should be avoided at a high Volume. All other electric light or power circuits. •• When installing an outdoor antenna system, extreme...
User Guide
Page 6
Table of Contents Table Of Contents Precautions Important Safety Instructions Main Feature 1 Package Contents 2 Unit View 3 Wall Mounting 3 Remote Control 4 Cable Connections 6 TV Function 11 AV Function 15 PC Function 16 Troubleshooting 17 Specifications 18
Table of Contents Table Of Contents Precautions Important Safety Instructions Main Feature 1 Package Contents 2 Unit View 3 Wall Mounting 3 Remote Control 4 Cable Connections 6 TV Function 11 AV Function 15 PC Function 16 Troubleshooting 17 Specifications 18
User Guide
Page 7
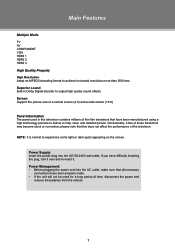
... transistors may become stuck or non-active; Power Supply: Insert the power plug into the AC outlet, make sure that this television contains millions of time, disconnect the power and remove the batteries from the remote. 1 Main Features Multiple Mode TV AV COMPONENT VGA HDMI 1 HDMI 2 HDMI 3 High Quality Property High Resolution Adopt an MPEG2 decoding format to experience some light or dark spots appearing on the...
... transistors may become stuck or non-active; Power Supply: Insert the power plug into the AC outlet, make sure that this television contains millions of time, disconnect the power and remove the batteries from the remote. 1 Main Features Multiple Mode TV AV COMPONENT VGA HDMI 1 HDMI 2 HDMI 3 High Quality Property High Resolution Adopt an MPEG2 decoding format to experience some light or dark spots appearing on the...
User Guide
Page 9
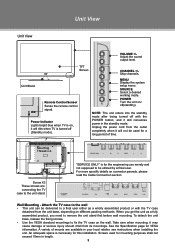
... Screen CHANNEL +/Skip channels. "SERVICE ONLY" is turned off (standby). Unit Stand Remote Control Senser Sense the remote control signal. When you get the unit as a wholly assembled product or with the POWER button, and it will not be used for the engineering use merely and not supposed to fix the TV case on different packing methords. Unit View Unit View VOLUME +/Adjust the sound output level. MENU Display the system setup menu. See the Specification page for this installation. Power...
... Screen CHANNEL +/Skip channels. "SERVICE ONLY" is turned off (standby). Unit Stand Remote Control Senser Sense the remote control signal. When you get the unit as a wholly assembled product or with the POWER button, and it will not be used for the engineering use merely and not supposed to fix the TV case on different packing methords. Unit View Unit View VOLUME +/Adjust the sound output level. MENU Display the system setup menu. See the Specification page for this installation. Power...
User Guide
Page 10
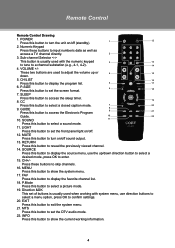
... button to set of buttons is usually used when working information. 4 Remote Control Remote Control Drawing 1. GUIDE 8 9 Press this button to turn the unit on /off (standby). 1 12 2. LIGHT Press this button to show the current working with the numeric keypad 3 13 to tune to skip channels. 16. RETURN Press this button to access the Electronic Program 21 Guide. 10. MENU Press this button to select a closed caption mode. 7 20 9. SLEEP Press this button to reveal the previously viewed channel...
... button to set of buttons is usually used when working information. 4 Remote Control Remote Control Drawing 1. GUIDE 8 9 Press this button to turn the unit on /off (standby). 1 12 2. LIGHT Press this button to show the current working with the numeric keypad 3 13 to tune to skip channels. 16. RETURN Press this button to access the Electronic Program 21 Guide. 10. MENU Press this button to select a closed caption mode. 7 20 9. SLEEP Press this button to reveal the previously viewed channel...
User Guide
Page 12
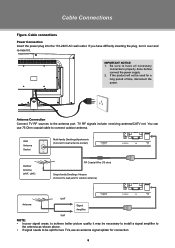
...;• If signal needs to the antenna port. IMPORTANT NOTICE 111 Be sure to connect outdoor antenna. You can use an antenna signal splitter for a long period of time, disconnect the power. Antenna Connection Connect TV RF sources to be used for connection. 6 Cable Connections Figure. TV RF signals include: receiving antenna/CATV net. Cable connections Power Connection Insert the power plug into the 110-240V AC wall outlet. Wall Antenna Socket Multi-family Dwellings/Apartments (Connect to wall antenna socket) Outdoor Antenna (VHF, UHF...
...;• If signal needs to the antenna port. IMPORTANT NOTICE 111 Be sure to connect outdoor antenna. You can use an antenna signal splitter for a long period of time, disconnect the power. Antenna Connection Connect TV RF sources to be used for connection. 6 Cable Connections Figure. TV RF signals include: receiving antenna/CATV net. Cable connections Power Connection Insert the power plug into the 110-240V AC wall outlet. Wall Antenna Socket Multi-family Dwellings/Apartments (Connect to wall antenna socket) Outdoor Antenna (VHF, UHF...
User Guide
Page 14
... consumer audio products. External Audio and Video Signal Input - The white/red plug of TV to a Home Theater (or amp). If you to chose from, we have all necessary connections properly done before connect the power supply. •• Set the unit into the relative input/output mode to enable the signal pass. •• Refer to view programs from one used separately to input the audio signal in regard to enjoy digital broadcasting through 5.1-channel speakers, connect...
... consumer audio products. External Audio and Video Signal Input - The white/red plug of TV to a Home Theater (or amp). If you to chose from, we have all necessary connections properly done before connect the power supply. •• Set the unit into the relative input/output mode to enable the signal pass. •• Refer to view programs from one used separately to input the audio signal in regard to enjoy digital broadcasting through 5.1-channel speakers, connect...
User Guide
Page 15
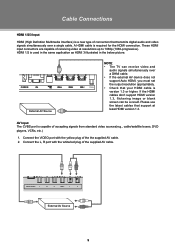
... below picture. Please use the latest cables that support at resolutions up to 1080p (1080-progressive). These HDMI input connectors are capable of the supplied AV cable. / 5 External AV Source 9 If the HDMI cables don't support HDMI version 1.3, flickering image or blank screen can receive video and audio signals simultaneously over a DHMI cable. •• If the external AV device does not support Auto HDMI, you must set the output resolution appropriately. •• Check that transmits digital audio and video signals...
... below picture. Please use the latest cables that support at resolutions up to 1080p (1080-progressive). These HDMI input connectors are capable of the supplied AV cable. / 5 External AV Source 9 If the HDMI cables don't support HDMI version 1.3, flickering image or blank screen can receive video and audio signals simultaneously over a DHMI cable. •• If the external AV device does not support Auto HDMI, you must set the output resolution appropriately. •• Check that transmits digital audio and video signals...
User Guide
Page 16
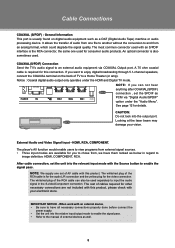
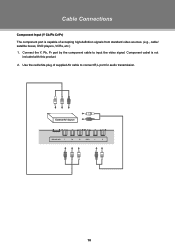
External AV Source 10 Component cabel is capable of supplied AV cable to input the video signal. Cable Connections Component Input (Y Cb/Pb Cr/Pr) The component port is not included with this product. 222 Use the red/white plug of accepting high-definition signals from standard video sources. (e.g., cable/ satellite boxes, DVD players, VCRs, etc.) 111 Connect the Y, Pb, Pr port by the component cable to connect R,L port for audio transmission.
External AV Source 10 Component cabel is capable of supplied AV cable to input the video signal. Cable Connections Component Input (Y Cb/Pb Cr/Pr) The component port is not included with this product. 222 Use the red/white plug of accepting high-definition signals from standard video sources. (e.g., cable/ satellite boxes, DVD players, VCRs, etc.) 111 Connect the Y, Pb, Pr port by the component cable to connect R,L port for audio transmission.
User Guide
Page 17
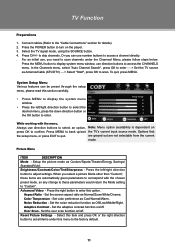
... access the CHANNELS menu. While working with the chosen preset mode, so any change to scan. Aspect Ratio - Set color preference as Off/Low/Middle/Right. Set the over scan function on /off . Or you need to select an option, Note: Menu option availability is dependent on the player. 333 Select the TV signal mode, using the SOURCE button. 444 Press CH+/- Over Scan - Adaptive Contrast - Press the MENU button to display system menu window, use...
... access the CHANNELS menu. While working with the chosen preset mode, so any change to scan. Aspect Ratio - Set color preference as Off/Low/Middle/Right. Set the over scan function on /off . Or you need to select an option, Note: Menu option availability is dependent on the player. 333 Select the TV signal mode, using the SOURCE button. 444 Press CH+/- Over Scan - Adaptive Contrast - Press the MENU button to display system menu window, use...
User Guide
Page 18
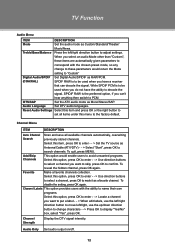
.../Standard/Theater/ Music/News. Select this menu to the factory default. Reset Audio Settings Select this option, press OK to enter - - > Use direction buttons to select a channel you want to skip, press OK to confirm. Add/Skip Ch ann els This option would return the Mode setting to "Custom" Digital Audio/SPDIF Set Digital Audio/SPIDIF as a favorite channel. Audio Only Set audio output on/off. 12 Treble/Bass/Balance Press...
.../Standard/Theater/ Music/News. Select this menu to the factory default. Reset Audio Settings Select this option, press OK to enter - - > Use direction buttons to select a channel you want to skip, press OK to confirm. Add/Skip Ch ann els This option would return the Mode setting to "Custom" Digital Audio/SPDIF Set Digital Audio/SPIDIF as a favorite channel. Audio Only Set audio output on/off. 12 Treble/Bass/Balance Press...

User Guide
Page 19
... up menu. Set the closed caption mode as "Custom" to edit CC type to enter. Digital Caption - TV Function Settings Menu ITEM Parental C o ntrols DESCRIPTION You are required to enter the 4-digit password to lock unrated TV program. USA Parental Locks Setup the US parental control. There are four options listed under the Closed Caption menu. Change Password To change the password, input the new password - - > Verify again. Please remember the password since the player's reset function would enable users to access the Closed Caption menu. Analog Caption...
... up menu. Set the closed caption mode as "Custom" to edit CC type to enter. Digital Caption - TV Function Settings Menu ITEM Parental C o ntrols DESCRIPTION You are required to enter the 4-digit password to lock unrated TV program. USA Parental Locks Setup the US parental control. There are four options listed under the Closed Caption menu. Change Password To change the password, input the new password - - > Verify again. Please remember the password since the player's reset function would enable users to access the Closed Caption menu. Analog Caption...
User Guide
Page 20
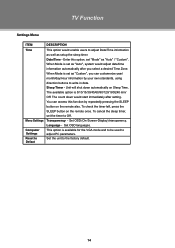
... your own standards, using direction buttons to write in data. Language - To cancel the sleep timer, set "Mode" as setup the sleep timer. You can customerize year/ month/day/Hour information by repeatedly pressing the SLEEP button on the remote once. TV Function Settings Menu ITEM DESCRIPTION Time Menu Settings Computer Se ttin gs Reset to Defaut This option would enable users to adjust Date/Time information as well as "Auto" / "Custom". Sleep Timer -
... your own standards, using direction buttons to write in data. Language - To cancel the sleep timer, set "Mode" as setup the sleep timer. You can customerize year/ month/day/Hour information by repeatedly pressing the SLEEP button on the remote once. TV Function Settings Menu ITEM DESCRIPTION Time Menu Settings Computer Se ttin gs Reset to Defaut This option would enable users to adjust Date/Time information as well as "Auto" / "Custom". Sleep Timer -
User Guide
Page 21
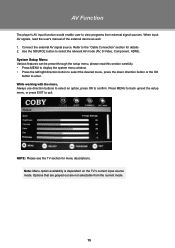
... The player's AV input function would enable user to view programs from the current mode. 15 System Setup Menu Various features can be preset through the setup menu, please read the user's manual of the external device as well. 111 Connect the external AV signal source. Options that are grayed out are not selectable from external signal sources. NOTE: Please see the TV section for details 222 Use the SOURCE button to the "Cable Connection...
... The player's AV input function would enable user to view programs from the current mode. 15 System Setup Menu Various features can be preset through the setup menu, please read the user's manual of the external device as well. 111 Connect the external AV signal source. Options that are grayed out are not selectable from external signal sources. NOTE: Please see the TV section for details 222 Use the SOURCE button to the "Cable Connection...
User Guide
Page 22
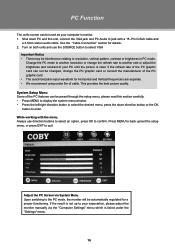
... may be interference relating to resolution, vertical pattern, contrast or brightness in PC mode. If the result is not up /exit the setup menu, or press EXIT to confirm. This provides the best picture quality. Adjust the PC Screen via the "Computer Settings" menu which is clear. While working with a 15 -Pin D-Sub cable and a 3.5mm stereo audio cable. See the "Cable Connection" section for a proper functioning...
... may be interference relating to resolution, vertical pattern, contrast or brightness in PC mode. If the result is not up /exit the setup menu, or press EXIT to confirm. This provides the best picture quality. Adjust the PC Screen via the "Computer Settings" menu which is clear. While working with a 15 -Pin D-Sub cable and a 3.5mm stereo audio cable. See the "Cable Connection" section for a proper functioning...
User Guide
Page 23
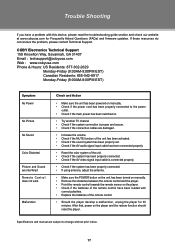
... been properly set. •• Check if the AV audio signal input cable has been connected properly. •• Reset the color system of the remote control. •• Should the player develop a malfunction, unplug the player for Frequently Asked Questions (FAQs) and firmware updates. After that, power on the player. •• Check if the batteries of the remote control have a problem with correct polarities. •• Replace the...
... been properly set. •• Check if the AV audio signal input cable has been connected properly. •• Reset the color system of the remote control. •• Should the player develop a malfunction, unplug the player for Frequently Asked Questions (FAQs) and firmware updates. After that, power on the player. •• Check if the batteries of the remote control have a problem with correct polarities. •• Replace the...


