
User Guide
Page 2
... with the limits for Class B digital devices, pursuant to Part 15 of the FCC rules. This equipment generates, uses and can be determined by turning the equipment off , an electrostatic discharge may be required to correct the interference by one or more of the following two conditions: •• ...the user is encouraged to try to stop operation of the FCC Rules. Wait 30 seconds. • After 30 seconds, plug the unit in and turn it on a circuit different from that interference will not occur in Subpart B of Part 15 of the FCC rules. Note: This equipment has been ...
... with the limits for Class B digital devices, pursuant to Part 15 of the FCC rules. This equipment generates, uses and can be determined by turning the equipment off , an electrostatic discharge may be required to correct the interference by one or more of the following two conditions: •• ...the user is encouraged to try to stop operation of the FCC Rules. Wait 30 seconds. • After 30 seconds, plug the unit in and turn it on a circuit different from that interference will not occur in Subpart B of Part 15 of the FCC rules. Note: This equipment has been ...
User Guide
Page 5
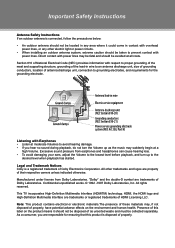
...Electrical Code (NEC) provides information with power lines. Important Safety Instructions Antenna Safety Instructions If an outdoor antenna is a registered trademark of Coby Electronics Corporation. Confidential unpublished works. © 1992 -1997 Dolby Laboratories, Inc. HDMI, the HDMI logo and High-Definition Multimedia Interface are... trademarks of Dolby Laboratories. As a consumer, you hear no sound during playback, do not turn the Volume up to the lowest level before playback, and turn up as unsorted waste and must be disposed of as the music may be fatal and should not...
...Electrical Code (NEC) provides information with power lines. Important Safety Instructions Antenna Safety Instructions If an outdoor antenna is a registered trademark of Coby Electronics Corporation. Confidential unpublished works. © 1992 -1997 Dolby Laboratories, Inc. HDMI, the HDMI logo and High-Definition Multimedia Interface are... trademarks of Dolby Laboratories. As a consumer, you hear no sound during playback, do not turn the Volume up to the lowest level before playback, and turn up as unsorted waste and must be disposed of as the music may be fatal and should not...
User Guide
Page 7
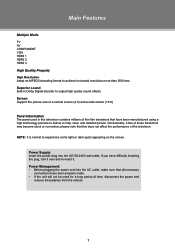
.... Occasionally, a few of time, disconnect the power and remove the batteries from the remote. 1 please note that all necessary connections have difficulty inserting the plug, turn it over and re-insert it. Power Management: •• Before plugging the power cord into the AC100-240V wall outlet. Power Supply: Insert the...
.... Occasionally, a few of time, disconnect the power and remove the batteries from the remote. 1 please note that all necessary connections have difficulty inserting the plug, turn it over and re-insert it. Power Management: •• Before plugging the power cord into the AC100-240V wall outlet. Power Supply: Insert the...
User Guide
Page 9
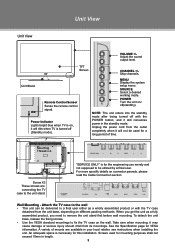
... purposes shall not exceed 10mm in length. 3 MENU Display the system setup menu. NOTE: The unit enters into the standby mode after being turned off (Standby mode). Screw X3 These screws are available in the standby mode. See the Specification page for this installation. Screws used for the...fall from the outlet completely when it still consumes power in your local retailer, see instructions when installing the unit. An adequate space is turned off with the TV case detached from the unit base, depending on the wall. Unit View Unit View VOLUME +/Adjust the sound output ...
... purposes shall not exceed 10mm in length. 3 MENU Display the system setup menu. NOTE: The unit enters into the standby mode after being turned off (Standby mode). Screw X3 These screws are available in the standby mode. See the Specification page for this installation. Screws used for the...fall from the outlet completely when it still consumes power in your local retailer, see instructions when installing the unit. An adequate space is turned off with the TV case detached from the unit base, depending on the wall. Unit View Unit View VOLUME +/Adjust the sound output ...
User Guide
Page 10
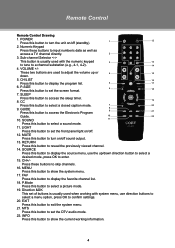
... this button to display the program list. 5 17 6. LIGHT Press this button to set the DTV audio mode. 22. MUTE Press this button to turn the unit on/off sound output. 13. SOURCE Press this button to display the source menu, use direction buttons to select a menu option, press OK... to turn on /off. 12. Press these buttons to skip channels. 16. These two buttons are used with system menu, use the up or 4 15 down...
... this button to display the program list. 5 17 6. LIGHT Press this button to set the DTV audio mode. 22. MUTE Press this button to turn the unit on/off sound output. 13. SOURCE Press this button to display the source menu, use direction buttons to select a menu option, press OK... to turn on /off. 12. Press these buttons to skip channels. 16. These two buttons are used with system menu, use the up or 4 15 down...
User Guide
Page 12
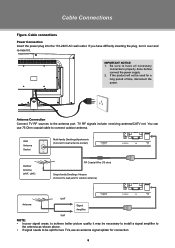
... the power supply. 222 If the product will not be split for connection. 6 Antenna Connection Connect TV RF sources to have difficulty inserting the plug, turn it over and re-insert it may be necessary to install a signal amplifier to the antenna as shown above. •• If signal needs to...
... the power supply. 222 If the product will not be split for connection. 6 Antenna Connection Connect TV RF sources to have difficulty inserting the plug, turn it over and re-insert it may be necessary to install a signal amplifier to the antenna as shown above. •• If signal needs to...
User Guide
Page 17
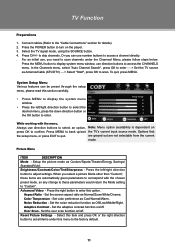
.../Warm. Over Scan - Color Temperature - TV Function Preparations 111 Connect cables.(Refer to the "Cable Connections" section for details). 222 Press the POWER button to turn on press OK to confirm. For an initial use direction buttons to skip channels. To quit, press MENU. System Setup Menu Various features can use...
.../Warm. Over Scan - Color Temperature - TV Function Preparations 111 Connect cables.(Refer to the "Cable Connections" section for details). 222 Press the POWER button to turn on press OK to confirm. For an initial use direction buttons to skip channels. To quit, press MENU. System Setup Menu Various features can use...
User Guide
Page 22
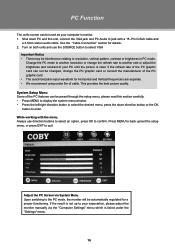
..." menu. 16 If the result is not up /exit the setup menu, or press EXIT to quit. See the "Cable Connection" section for details. 222 Turn on both units and use direction buttons to select an option, press OK to confirm. If the refresh rate of the PC features can be...
..." menu. 16 If the result is not up /exit the setup menu, or press EXIT to quit. See the "Cable Connection" section for details. 222 Turn on both units and use direction buttons to select an option, press OK to confirm. If the refresh rate of the PC features can be...
User Guide
Page 23
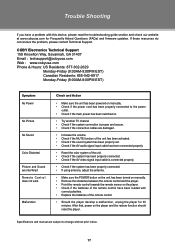
...properly connected. •• If using antenna, adjust the antenna. •• Make sure the POWER button on the unit has been turned on manually. •• Remove the obstacles between the remote control and the player. •• Point the remote control towards the ...remote control have a problem with this device, please read the troubleshooting guide section and check our website at www.cobyusa.com for 30 minutes. COBY Electronics Technical Support 150 Knowlton Way, Savannah, GA 31407 Email : [email protected] Web : www.cobyusa.com Phone & Hours: US Residents:...
...properly connected. •• If using antenna, adjust the antenna. •• Make sure the POWER button on the unit has been turned on manually. •• Remove the obstacles between the remote control and the player. •• Point the remote control towards the ...remote control have a problem with this device, please read the troubleshooting guide section and check our website at www.cobyusa.com for 30 minutes. COBY Electronics Technical Support 150 Knowlton Way, Savannah, GA 31407 Email : [email protected] Web : www.cobyusa.com Phone & Hours: US Residents:...


