
Instruction Manual
Page 1
... the user to persons. The exclamation point within the product's enclosure that all the connections have been properly made. To reduce the risk of electric to the presence of time, disconnect the power and remove the batteries form the remote. If the unit will not be used for a long period of important operating and maintenance (servicing) instructions in the operating instructions unless...
... the user to persons. The exclamation point within the product's enclosure that all the connections have been properly made. To reduce the risk of electric to the presence of time, disconnect the power and remove the batteries form the remote. If the unit will not be used for a long period of important operating and maintenance (servicing) instructions in the operating instructions unless...
Instruction Manual
Page 2
... the manufacturer. 12.Use only with the cart, stand, tripod, bracket, or table specified by method claims of time. 14.Refer all servicing to qualified service personnel. A polarized plug has two blades with liquids, such as power-supply cord or plug is prohibited. Copyright Protection Unauthorized copying, broadcasting, public performance, and lending of the polarized or grounding-type plug. Keep these instructions. 2. Maintain well ventilated...
... the manufacturer. 12.Use only with the cart, stand, tripod, bracket, or table specified by method claims of time. 14.Refer all servicing to qualified service personnel. A polarized plug has two blades with liquids, such as power-supply cord or plug is prohibited. Copyright Protection Unauthorized copying, broadcasting, public performance, and lending of the polarized or grounding-type plug. Keep these instructions. 2. Maintain well ventilated...
Instruction Manual
Page 4
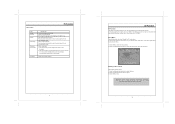
... put on the list, the button does not function. 15. SOUND button Press to skip channels. 16 20 10. FORMAT button Set the screen aspect ratio as 16:9 or 4:3. 17. button 14 15 18 19 Press to change the sound mode. 3 Remote Control Remote Control Preparation 1. Take off . 2. POWER button 1 6 Press to show the setup menu. 2 8 5. Under normal use this remote control unit while simultaneously operating the remote control unit of the front unit. 7 s MODE RETURN The operating distance may...
... put on the list, the button does not function. 15. SOUND button Press to skip channels. 16 20 10. FORMAT button Set the screen aspect ratio as 16:9 or 4:3. 17. button 14 15 18 19 Press to change the sound mode. 3 Remote Control Remote Control Preparation 1. Take off . 2. POWER button 1 6 Press to show the setup menu. 2 8 5. Under normal use this remote control unit while simultaneously operating the remote control unit of the front unit. 7 s MODE RETURN The operating distance may...
Instruction Manual
Page 5
... side panel. 2. Working with the menu While working with AC100-240V. Line Out - Connect the antenna to select TV. 4. Press POWER to show the menu window. 2. They are Picture Menu, Audio Menu, Time Menu, Option Menu, Lock Menu as well as well. Press MENU to turn on the image definition than RCA input does. You can use 75 coaxial cable to output sound. Audio Output Connect the " Line Out" port to the external speaker or the digital decoding amplifier to connect outdoor antenna. S-Video - TV setup menu consists...
... side panel. 2. Working with the menu While working with AC100-240V. Line Out - Connect the antenna to select TV. 4. Press POWER to show the menu window. 2. They are Picture Menu, Audio Menu, Time Menu, Option Menu, Lock Menu as well as well. Press MENU to turn on the image definition than RCA input does. You can use 75 coaxial cable to output sound. Audio Output Connect the " Line Out" port to the external speaker or the digital decoding amplifier to connect outdoor antenna. S-Video - TV setup menu consists...
Instruction Manual
Page 6
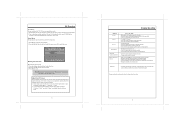
...+, 16ans+, 18ans+. Set the system lock function on/off . Adjust the sound balance. Restore settings to the factory default. 7 Option Setup Closed Caption Setup Select "Closed Caption" from the Option menu, press OK to enter CC Mode Basic Selection Advanced Selection Option CC on to set block. The initial password is confirmed correct, the screen will display the parental control menu. Setup the audio language.( English, French, Spanish) Time Setup ITEM Sleep Timer DESCRIPTION Setup the sleep timer. (15/30/60...
...+, 16ans+, 18ans+. Set the system lock function on/off . Adjust the sound balance. Restore settings to the factory default. 7 Option Setup Closed Caption Setup Select "Closed Caption" from the Option menu, press OK to enter CC Mode Basic Selection Advanced Selection Option CC on to set block. The initial password is confirmed correct, the screen will display the parental control menu. Setup the audio language.( English, French, Spanish) Time Setup ITEM Sleep Timer DESCRIPTION Setup the sleep timer. (15/30/60...
Instruction Manual
Page 7
... mode. (AV, S-VIDEO). Search channels automatically. Channel Setup TV Function ITEM Antenna Auto Scan Favorite Channel Skip Channel No Channel Label DTV Signal DESCRIPTION Setup the antenna type as Air or Cable. Select "Channel No", press the left /right direction button to select the menu, press OK to VIDEO or S-VIDEO jack, and then turn on Picture Setup , Audio Setup, Time Setup, Option Setup as well as Lock Menu. 1. Display the DTV signal information. 9 AV Function AV Function The player has AV input functions. Connect the external AV signal source...
... mode. (AV, S-VIDEO). Search channels automatically. Channel Setup TV Function ITEM Antenna Auto Scan Favorite Channel Skip Channel No Channel Label DTV Signal DESCRIPTION Setup the antenna type as Air or Cable. Select "Channel No", press the left /right direction button to select the menu, press OK to VIDEO or S-VIDEO jack, and then turn on Picture Setup , Audio Setup, Time Setup, Option Setup as well as Lock Menu. 1. Display the DTV signal information. 9 AV Function AV Function The player has AV input functions. Connect the external AV signal source...
Instruction Manual
Page 8
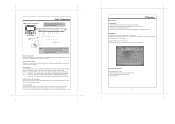
... the standby mode, press POWER button to exit. Check if the MUTE function of the remote control. Check if the AV audio signal input cable has been connected properly. Connect the unit to select the "VGA" mode. Press the left /right direction button to select the item. 2. Check if the power cord has been properly connected to show the menu window. 2. If using antenna, adjust the antenna. Press MENU to the power outlet. Setup Menu Various...
... the standby mode, press POWER button to exit. Check if the MUTE function of the remote control. Check if the AV audio signal input cable has been connected properly. Connect the unit to select the "VGA" mode. Press the left /right direction button to select the item. 2. Check if the power cord has been properly connected to show the menu window. 2. If using antenna, adjust the antenna. Press MENU to the power outlet. Setup Menu Various...
Instruction Manual
Page 9
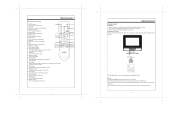
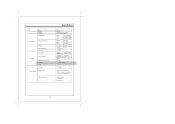
.../DC Adapter Standard Power consumption Operating temperature range Dimension Weight DTV system DTV characteristic Channel received Intermediate frequencies Specification 10.2" 800x480 0.2775mm(W) x 0.276mm(H) NTSC 3.58/4.43 (VIDEO IN) VHF-L VHF-H 55.25-160.25MHz 166.25-463.25MHz UHF Picture IF Color Sound 469.25-863.25MHZ 45.75MHz 42.17MHz 41.25MHz Horizontal Vertical 75 unbalance FS with PLL AC input DC output On working Standing Speaker...
.../DC Adapter Standard Power consumption Operating temperature range Dimension Weight DTV system DTV characteristic Channel received Intermediate frequencies Specification 10.2" 800x480 0.2775mm(W) x 0.276mm(H) NTSC 3.58/4.43 (VIDEO IN) VHF-L VHF-H 55.25-160.25MHz 166.25-463.25MHz UHF Picture IF Color Sound 469.25-863.25MHZ 45.75MHz 42.17MHz 41.25MHz Horizontal Vertical 75 unbalance FS with PLL AC input DC output On working Standing Speaker...


