User Manual
Page 6
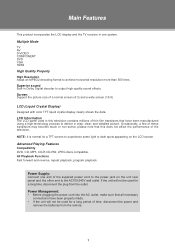
... High Resolution Adopt an MPEG2 decoding format to output high quality sound effects. NOTE: It is normal for a long time, disconnect the plug from the remote. 1
... High Resolution Adopt an MPEG2 decoding format to output high quality sound effects. NOTE: It is normal for a long time, disconnect the plug from the remote. 1

User Manual
Page 7
b. c. If any item is missing, contact your LCD TV/monitor. Package Contents Please make sure the following items are included with your dealer. a. a, Main Unit b, Power Cord & RCA Cable c, Remote Control Unit 2
b. c. If any item is missing, contact your LCD TV/monitor. Package Contents Please make sure the following items are included with your dealer. a. a, Main Unit b, Power Cord & RCA Cable c, Remote Control Unit 2
User Manual
Page 8
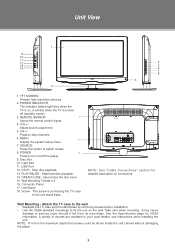
... by removing screws before installation. • Use the VESA standard mountings to switch modes. 8. See the Specification page for detailed description on the wall. REMOTE SENSOR 9 Sense the remote control signal. 4. Adjust sound output level. 5. OPEN/CLOSE - Unit Stand 18. NOTE: 10 mm is connecting the TV case to the unit stand...
... by removing screws before installation. • Use the VESA standard mountings to switch modes. 8. See the Specification page for detailed description on the wall. REMOTE SENSOR 9 Sense the remote control signal. 4. Adjust sound output level. 5. OPEN/CLOSE - Unit Stand 18. NOTE: 10 mm is connecting the TV case to the unit stand...
User Manual
Page 9
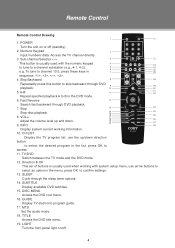
... available DVD subtitles. 15. A-B 31 11 32 Repeat specifed playback A to a channel substation (e.g., 4-1, 4-2). 5 24 6 25 e.g. LIGHT Turn the front panel light on or off . 4 Remote Control Remote Control Drawing 1 21 1. POWER Turn the unit on /off (standby). 2. Sub-channel Selector 3 22 This button is usually used with system setup menu, use the...
... available DVD subtitles. 15. A-B 31 11 32 Repeat specifed playback A to a channel substation (e.g., 4-1, 4-2). 5 24 6 25 e.g. LIGHT Turn the front panel light on or off . 4 Remote Control Remote Control Drawing 1 21 1. POWER Turn the unit on /off (standby). 2. Sub-channel Selector 3 22 This button is usually used with system setup menu, use the...
User Manual
Page 10
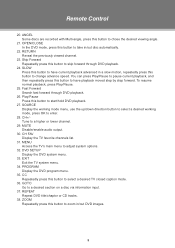
.... 26. OPEN/CLOSE In the DVD mode, press this button to select a desired TV closed caption mode. 36. RETURN Reveal the previously viewed channel. 23. Remote Control 20.
.... 26. OPEN/CLOSE In the DVD mode, press this button to select a desired TV closed caption mode. 36. RETURN Reveal the previously viewed channel. 23. Remote Control 20.
User Manual
Page 11
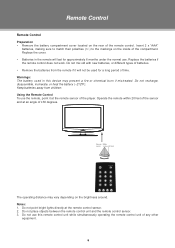
... mistreated. Notes: 111 Do not point bright lights directly at the remote control sensor. 222 Do not place objects between the remote control unit and the remote control sensor. 333 Do not use . Remote Control Remote Control Preparation •• Remove the battery compartment cover located on ...the rear of the compartment. Replace the cover. •• Batteries in this remote control unit while simultaneously operating the remote control unit of time. Warnings: The battery used in the remote will not be used for approximately 6 months under the normal use this device may...
... mistreated. Notes: 111 Do not point bright lights directly at the remote control sensor. 222 Do not place objects between the remote control unit and the remote control sensor. 333 Do not use . Remote Control Remote Control Preparation •• Remove the battery compartment cover located on ...the rear of the compartment. Replace the cover. •• Batteries in this remote control unit while simultaneously operating the remote control unit of time. Warnings: The battery used in the remote will not be used for approximately 6 months under the normal use this device may...
User Manual
Page 12
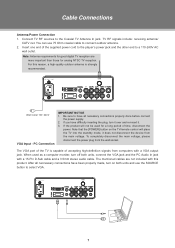
...-240V AC wall outlet. PC Connection IMPORTANT NOTICE 111 Be sure to have all neccessary connections have difficulty inserting the plug, turn on the TV/remote control will place the TV into the standby mode, it . 333 If the product will not be used as a computer moniter, turn off both units...
...-240V AC wall outlet. PC Connection IMPORTANT NOTICE 111 Be sure to have all neccessary connections have difficulty inserting the plug, turn on the TV/remote control will place the TV into the standby mode, it . 333 If the product will not be used as a computer moniter, turn off both units...
User Manual
Page 19
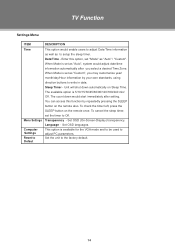
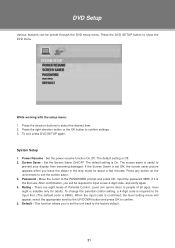
...used to adjust PC parameters. To cancel the sleep timer, set "Mode" as to setup the sleep timer. The count down automatically on the remote once. To check the timer left, press the SLEEP button on Sleep Time. Language - Enter this function by your own standards, using direction ... Unit will shut down would start immediately after you may customerize year/ month/day/Hour information by repeatedly pressing the SLEEP button on the remote also. You can access this option, set the timer to Off. TV Function Settings Menu ITEM DESCRIPTION Time Menu Settings Computer Se ttin ...
...used to adjust PC parameters. To cancel the sleep timer, set "Mode" as to setup the sleep timer. The count down automatically on the remote once. To check the timer left, press the SLEEP button on Sleep Time. Language - Enter this function by your own standards, using direction ... Unit will shut down would start immediately after you may customerize year/ month/day/Hour information by repeatedly pressing the SLEEP button on the remote also. You can access this option, set the timer to Off. TV Function Settings Menu ITEM DESCRIPTION Time Menu Settings Computer Se ttin ...
User Manual
Page 24
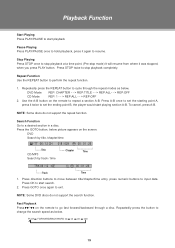
... - - > REP:TITLE - - > REP:ALL- - > REP:OFF CD Mode REP: 1 - - > REP:ALL - - > REP:OFF 222 Use the A-B button on the remote to change the search speed as below picture appears on the remote to input data. NOTE: Some DVD discs do not support the repeat function. Fast Playback Press / on the screen. Press...
... - - > REP:TITLE - - > REP:ALL- - > REP:OFF CD Mode REP: 1 - - > REP:ALL - - > REP:OFF 222 Use the A-B button on the remote to change the search speed as below picture appears on the remote to input data. NOTE: Some DVD discs do not support the repeat function. Fast Playback Press / on the screen. Press...
User Manual
Page 25
... direction buttons to select "Play " and press OK to change speed as below. Playback Function Slow Playback Slow Motion Press the SLOW button on the remote to have playback moved step by Step Press Play/Pause to pause current playback, and then repeatedly press SLOW to have current playback advanced in...
... direction buttons to select "Play " and press OK to change speed as below. Playback Function Slow Playback Slow Motion Press the SLOW button on the remote to have playback moved step by Step Press Play/Pause to pause current playback, and then repeatedly press SLOW to have current playback advanced in...
User Manual
Page 26
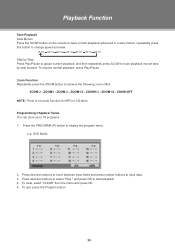
... menu. Level one opens discs to be input first. (The default code is suitable only for about a few minutes. Press any button on the unit/remote to the PASSWORD prompt and press OK. To change the parental control setting, a 4-digit code is required to people of Parental Control. This function allows...
... menu. Level one opens discs to be input first. (The default code is suitable only for about a few minutes. Press any button on the unit/remote to the PASSWORD prompt and press OK. To change the parental control setting, a 4-digit code is required to people of Parental Control. This function allows...
User Manual
Page 28
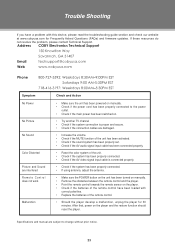
... properly set. •• Check if the AV audio signal input cable has been connected properly. •• Reset the color system of the remote control. •• Should the player develop a malfunction, unplug the player for Frequently Asked Questions (FAQs) and firmware updates. After that, power ... our website at www.cobyusa.com for 30 minutes. Symptom No Power No Picture No Sound Color Distorted Picture and Sound are interfered Remote Control does not work Malfunction Check and Action •• Make sure the unit has been powered on manually. •• ...
... properly set. •• Check if the AV audio signal input cable has been connected properly. •• Reset the color system of the remote control. •• Should the player develop a malfunction, unplug the player for Frequently Asked Questions (FAQs) and firmware updates. After that, power ... our website at www.cobyusa.com for 30 minutes. Symptom No Power No Picture No Sound Color Distorted Picture and Sound are interfered Remote Control does not work Malfunction Check and Action •• Make sure the unit has been powered on manually. •• ...


