
User Manual
Page 3
... products intended to operate from the wall outlet and disconnect the antenna or cable system. Overloading-do not overload wall outlets, extension cords, or integral convenience receptacles as power-supply cord or plug is provided for long periods of the obsolete outlet. (10). Refer all servicing to your home, consult your outlet, consult an electrician for replacement of time. Clean only with the manufacturer's instructions...
... products intended to operate from the wall outlet and disconnect the antenna or cable system. Overloading-do not overload wall outlets, extension cords, or integral convenience receptacles as power-supply cord or plug is provided for long periods of the obsolete outlet. (10). Refer all servicing to your home, consult your outlet, consult an electrician for replacement of time. Clean only with the manufacturer's instructions...
User Manual
Page 4
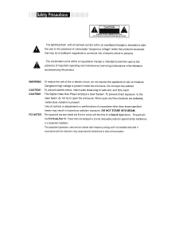
... used in a residential installation. The lightning flash with the limits for a Class B digital device. CAUTION: This Digital Video Disc Player employs a laser System. These limits are defeated, visible laser radiation is present inside the enclosure. CAUTION: To prevent electric shock, match wide blade plug to comply with arrowhead symbol within an equilateral triangle is intended to alert the user to the...
... used in a residential installation. The lightning flash with the limits for a Class B digital device. CAUTION: This Digital Video Disc Player employs a laser System. These limits are defeated, visible laser radiation is present inside the enclosure. CAUTION: To prevent electric shock, match wide blade plug to comply with arrowhead symbol within an equilateral triangle is intended to alert the user to the...
User Manual
Page 5
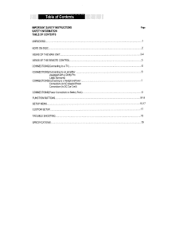
Table of Contents IMPORTANT SAFETY INSTRUCTIONS SAFETY INFORMATION TABLE OF CONTENTS UNPACKING NOTE ON DISC VIEWS OF THE MAIN UNIT VIEWS OF THE REMOTE CONTROL CONNECTIONS(Connecting to a TV) CONNECTIONS(Connecting to an amplifier equipped with a Dolby Pro Logic Surround) CONNECTIONS(Connecting to a HeadphonePower Connections (to AC Adapter)Power Connections (to DC Car Cord) CONNECTIONS(Power Connections to Battery Pack) FUNCTION BUTTONS SETUP MENU CUSTOM SETUP TROUBLE SHOOTING SPECIFICATIONS Page 1 2 3-4 5 6 6 7 8 9-14 15-17 17 18 19
Table of Contents IMPORTANT SAFETY INSTRUCTIONS SAFETY INFORMATION TABLE OF CONTENTS UNPACKING NOTE ON DISC VIEWS OF THE MAIN UNIT VIEWS OF THE REMOTE CONTROL CONNECTIONS(Connecting to a TV) CONNECTIONS(Connecting to an amplifier equipped with a Dolby Pro Logic Surround) CONNECTIONS(Connecting to a HeadphonePower Connections (to AC Adapter)Power Connections (to DC Car Cord) CONNECTIONS(Power Connections to Battery Pack) FUNCTION BUTTONS SETUP MENU CUSTOM SETUP TROUBLE SHOOTING SPECIFICATIONS Page 1 2 3-4 5 6 6 7 8 9-14 15-17 17 18 19
User Manual
Page 8
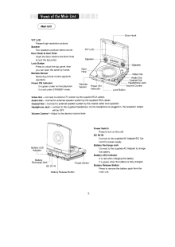
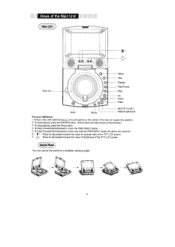
... battery. DC 9V IN Power Switch Battery Release Button Power Switch Press to external TV screen by the supplied RCA cables. Remote Sensor Receiving remote control signal for power supply. Volume Control -- TFT LCD Speaker • • Door Hole s. Connect to external speaker system by the supplied RCA cables Coaxial Out Connect to the supplied AC Adapter/DC Car Cord for operation. Battery LED Indicator It is red under normal playback. Lock Button Press to lock the top panel. Connect to turn on the unit. Door Hook...
... battery. DC 9V IN Power Switch Battery Release Button Power Switch Press to external TV screen by the supplied RCA cables. Remote Sensor Receiving remote control signal for power supply. Volume Control -- TFT LCD Speaker • • Door Hole s. Connect to external speaker system by the supplied RCA cables Coaxial Out Connect to the supplied AC Adapter/DC Car Cord for operation. Battery LED Indicator It is red under normal playback. Lock Button Press to lock the top panel. Connect to turn on the unit. Door Hook...
User Manual
Page 9
... hold the PREV/NEXT button for about two seconds. 6. - :Press to decrease/increase the value of contrast ratio of the TFT LCD screen. 7. -it goes into position. 2. To start playing, press the ENTER button. (Some discs will start playing automatically). 3. Views of the Main Unit Main Unit ) 0+ Disc Lid 0 0 0 ovo oC5 Setup Title Display Play/Pause Stop Up Down Enter Open Menu NEXT/F.F/LEFT PREV/F.B/RIGHT...
... hold the PREV/NEXT button for about two seconds. 6. - :Press to decrease/increase the value of contrast ratio of the TFT LCD screen. 7. -it goes into position. 2. To start playing, press the ENTER button. (Some discs will start playing automatically). 3. Views of the Main Unit Main Unit ) 0+ Disc Lid 0 0 0 ovo oC5 Setup Title Display Play/Pause Stop Up Down Enter Open Menu NEXT/F.F/LEFT PREV/F.B/RIGHT...
User Manual
Page 10
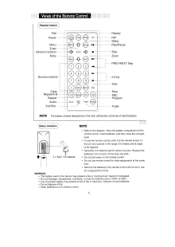
... remote control does not work. 2 x "AM" 1.5V batteries Do not spit water on the main unit/remote control are of fire or explosion. Dispose of used in this device may present a risk of same functions. Open the battery compartment of the Remote Control (R„ emote Control) Title Menu -Enter --Direction buttons Title 0 epla ,o• Menu Setup Enter Mute Zoom Display N/P Setup Play/Pause Stop Zoom PREY/NEXT Skip Numeric button ClearRepeat A-B.. Repeat SubTale Clear Audio...
... remote control does not work. 2 x "AM" 1.5V batteries Do not spit water on the main unit/remote control are of fire or explosion. Dispose of used in this device may present a risk of same functions. Open the battery compartment of the Remote Control (R„ emote Control) Title Menu -Enter --Direction buttons Title 0 epla ,o• Menu Setup Enter Mute Zoom Display N/P Setup Play/Pause Stop Zoom PREY/NEXT Skip Numeric button ClearRepeat A-B.. Repeat SubTale Clear Audio...

User Manual
Page 11
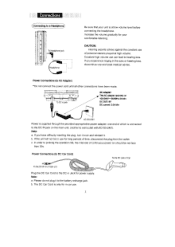
... connecting the DVD player to a TV set , 019 III ' 0 I 0 To VIDEO OUT To AUDIO OUT (TV or monitor with Dolby Digital. Refer to the owners manual. Connections (Connecting to a TV set , be sure to turn the power off and unplug both units from the wall outlet. (Connecting to an amplifier equipped with a Dolby Pro Logic Surround L Ira Amplifier equipped with a Dolby Pro Logic Surround o Frontiwitt To Coaxial Input...
... connecting the DVD player to a TV set , 019 III ' 0 I 0 To VIDEO OUT To AUDIO OUT (TV or monitor with Dolby Digital. Refer to the owners manual. Connections (Connecting to a TV set , be sure to turn the power off and unplug both units from the wall outlet. (Connecting to an amplifier equipped with a Dolby Pro Logic Surround L Ira Amplifier equipped with a Dolby Pro Logic Surround o Frontiwitt To Coaxial Input...
User Manual
Page 12
... plug, turn it over and reinsert it to the battery recharge jack. If you experience ringing in use . Power Connections (to DC Car Cord) To the DC Jack of Car To the DC 9V In of which is connected to the DC IN jack on the main unit, another to wall outlet with AC100-240V. b. Increase the volume gradually for power supply...
... plug, turn it over and reinsert it to the battery recharge jack. If you experience ringing in use . Power Connections (to DC Car Cord) To the DC Jack of Car To the DC 9V In of which is connected to the DC IN jack on the main unit, another to wall outlet with AC100-240V. b. Increase the volume gradually for power supply...
User Manual
Page 13
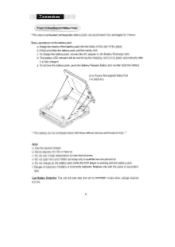
... hooks click. c. d. Do not open the cover. To charge the battery pack, connect the AC adapter to qualified service personnel. The battery LED indicator will auto stop and turn to green automatically after it be recharged about 300 times without obvious performance drop. - e. Do not charge up . Low Battery Detection: The unit will be red during the charging, and turn to STANDBY mode...
... hooks click. c. d. Do not open the cover. To charge the battery pack, connect the AC adapter to qualified service personnel. The battery LED indicator will auto stop and turn to green automatically after it be recharged about 300 times without obvious performance drop. - e. Do not charge up . Low Battery Detection: The unit will be red during the charging, and turn to STANDBY mode...

User Manual
Page 14
... during playback, the LCD display will be displayed on screen when there is a format problem with loaded disc: "WRONG REGIONAL DISC" Region code of the disc is higher than the rating level setting of the player. If a DVD disc menu appears on . Problem disc messages The following message will be substandard. The player will not be played. POWER management If the player will not play the disc. Lock Button Slide the POWER switch to the right to turn the unit on screen IIII...
... during playback, the LCD display will be displayed on screen when there is a format problem with loaded disc: "WRONG REGIONAL DISC" Region code of the disc is higher than the rating level setting of the player. If a DVD disc menu appears on . Problem disc messages The following message will be substandard. The player will not be played. POWER management If the player will not play the disc. Lock Button Slide the POWER switch to the right to turn the unit on screen IIII...
User Manual
Page 15
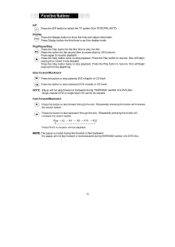
.... Repeatedly pressing the button will increase the search speed. Repeatedly pressing the button will increase the search speed. Function Buttons N/P O Press the N/P button to resume playback. Press again to select the TV system from the beginning. NOTE: The player is muted during "WARNING" section of a DVD disc. .10. Display pla Press the Display button to resume normal playback. Press the Stop button twice, to pause playing. (Still picture). Play...
.... Repeatedly pressing the button will increase the search speed. Repeatedly pressing the button will increase the search speed. Function Buttons N/P O Press the N/P button to resume playback. Press again to select the TV system from the beginning. NOTE: The player is muted during "WARNING" section of a DVD disc. .10. Display pla Press the Display button to resume normal playback. Press the Stop button twice, to pause playing. (Still picture). Play...
User Manual
Page 16
... Some DVD discs do not allow the TITLE function. Press the ENTER button to the DVD disc start menu or the players setup menu. Numeric Key Pad Random Program access) O000 1). X1/8-X1/16-X1/32 NOTE: The player is muted at slow motion. ZOOM co PLAYING DVD Press the ZOOM button repeatedly and the TV screen will display: 25% - 50% - 100% ---- 150% - 200% While at 150% or 200%, press the direction button...
... Some DVD discs do not allow the TITLE function. Press the ENTER button to the DVD disc start menu or the players setup menu. Numeric Key Pad Random Program access) O000 1). X1/8-X1/16-X1/32 NOTE: The player is muted at slow motion. ZOOM co PLAYING DVD Press the ZOOM button repeatedly and the TV screen will display: 25% - 50% - 100% ---- 150% - 200% While at 150% or 200%, press the direction button...
User Manual
Page 17
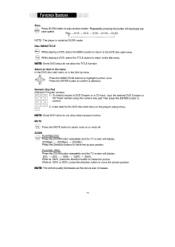
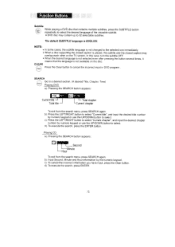
... the disc is removed, the language heard is turned on screen. NOTE: • If the desired language is not selected even after pressing the button several times, it means that contains multiple languages, press the AUDIO button repeatedly to quit the STEP mode. NOTE: Some DVD discs do not allow the A-B function playback. J Disc - Press REPEAT button repeatedly to normal playback. Function Buttons Repeat Section A-B To repeat playback a specific section of a Title, Chapter, Track or Disc. J Disc - The default AUDIO setting is played each time...
... the disc is removed, the language heard is turned on screen. NOTE: • If the desired language is not selected even after pressing the button several times, it means that contains multiple languages, press the AUDIO button repeatedly to quit the STEP mode. NOTE: Some DVD discs do not allow the A-B function playback. J Disc - Press REPEAT button repeatedly to normal playback. Function Buttons Repeat Section A-B To repeat playback a specific section of a Title, Chapter, Track or Disc. J Disc - The default AUDIO setting is played each time...
User Manual
Page 18
... subtitle language is not changed to the selected one immediately. • When a disc supporting the closed caption is ENGLISH. b). Press the LEFT/RIGHT button to select "Current chapter", and input the desired chapter number by numeric keypad or use the UP/DOWN button to cancel the incorrect input in DVD program . SEARCH Go to select the desired language of the viewable subtitle. Playing CD a). Function Buttons Subtitle While playing a DVD disc that the language...
... subtitle language is not changed to the selected one immediately. • When a disc supporting the closed caption is ENGLISH. b). Press the LEFT/RIGHT button to select "Current chapter", and input the desired chapter number by numeric keypad or use the UP/DOWN button to cancel the incorrect input in DVD program . SEARCH Go to select the desired language of the viewable subtitle. Playing CD a). Function Buttons Subtitle While playing a DVD disc that the language...

User Manual
Page 19
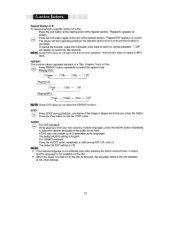
.... b. Repeat Step a to b to select the tracks you wish to start playing the programmed titles. Press PLAY to play a disc in a desired sequence. NOTE: Some discs do not allow program setting. SETUP Press the SETUP button to start playing the programmed tracks. Pro. Move the cursor to confirm. In CD mode a. b. In MP3 mode a. Setup The SETUP menu allows the viewer to adjust the setting details of the manual for further directions on how to use...
.... b. Repeat Step a to b to select the tracks you wish to start playing the programmed titles. Press PLAY to play a disc in a desired sequence. NOTE: Some discs do not allow program setting. SETUP Press the SETUP button to start playing the programmed tracks. Pro. Move the cursor to confirm. In CD mode a. b. In MP3 mode a. Setup The SETUP menu allows the viewer to adjust the setting details of the manual for further directions on how to use...
User Manual
Page 20
... DVD player can be displayed. Press the SETUP button. Then the SETUP menu appears on screen, with some setup features will not be adjusted in STOP mode before setting the SETUP menu, otherwise some parts cut automatically. .15. Press the UP/DOWN button to confirm your player is selected, the subtitle will be unavailable. --Language Setup-Press the UP/DOWN button to highlight the desired item from 4:3 PS (Pan Scan); 4:3 LB (Letter Box...
... DVD player can be displayed. Press the SETUP button. Then the SETUP menu appears on screen, with some setup features will not be adjusted in STOP mode before setting the SETUP menu, otherwise some parts cut automatically. .15. Press the UP/DOWN button to confirm your player is selected, the subtitle will be unavailable. --Language Setup-Press the UP/DOWN button to highlight the desired item from 4:3 PS (Pan Scan); 4:3 LB (Letter Box...
User Manual
Page 21
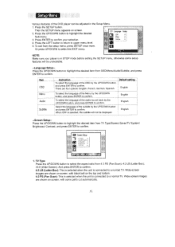
... optical outputs are turned on main unit or remote control to turn OFF the digital output setting, for the purpose of the disc player will automatically turn itself off function After the screen saver has been engaged for about a few minutes, the DVD player will not change the screen size for about a few minutes. Auto should only be used if you leave the DVD player in stop mode for these "Format-only" discs. 2. Adjusting the setting...
... optical outputs are turned on main unit or remote control to turn OFF the digital output setting, for the purpose of the disc player will automatically turn itself off function After the screen saver has been engaged for about a few minutes, the DVD player will not change the screen size for about a few minutes. Auto should only be used if you leave the DVD player in stop mode for these "Format-only" discs. 2. Adjusting the setting...

User Manual
Page 22
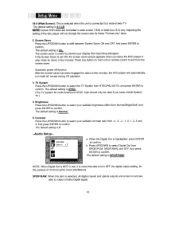
.... Setup Menu NOTE: In order to output a Dolby Digital signal, the amplifier or external device that the unit is hooked up to confirm. En Angle Mark Default k A). Level one opens discs to people of all digital coaxial and optical outputs are eight levels of the new password in PCM 2-channel format. To change the parental control setting, a 4-digit code is required to be required to confirm. B). Password Move the cursor to the factory default settings. Input...
.... Setup Menu NOTE: In order to output a Dolby Digital signal, the amplifier or external device that the unit is hooked up to confirm. En Angle Mark Default k A). Level one opens discs to people of all digital coaxial and optical outputs are eight levels of the new password in PCM 2-channel format. To change the parental control setting, a 4-digit code is required to be required to confirm. B). Password Move the cursor to the factory default settings. Input...
User Manual
Page 23
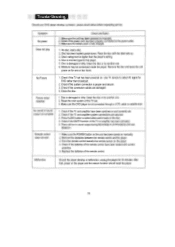
... inside the player. Point the remote control towards the remote sensor on manually. 2. No disc, load a disc. 2. Make sure the POWER button on the unit has been turned on . Make sure the battery pack is not connected through a VCR, cable or satellite dish. 1. Disc is damaged or dirty. No Picture Picture noisy/ distorted No sound or sound output not complete Remote control does not work 1. Check if the TV set has been powered on manually. 2. Replace the batteries of the...
... inside the player. Point the remote control towards the remote sensor on manually. 2. No disc, load a disc. 2. Make sure the POWER button on the unit has been turned on . Make sure the battery pack is not connected through a VCR, cable or satellite dish. 1. Disc is damaged or dirty. No Picture Picture noisy/ distorted No sound or sound output not complete Remote control does not work 1. Check if the TV set has been powered on manually. 2. Replace the batteries of the...

User Manual
Page 24
Specification Power supply DC 9.0V 2A (AC adapter TERMINAL) Power consumption
Specification Power supply DC 9.0V 2A (AC adapter TERMINAL) Power consumption


