
Quick Start Guide
Page 2
... Thank you purchased this product. Coby Video & MP3 player USB Cable Professional Stereo Earphones Quick start guide Features Integrated flash memory LCD full-color display Plays music, video, photos and text ID3 and LRC support for song and synchronized lyric information display Integrated FM Radio ...
... Thank you purchased this product. Coby Video & MP3 player USB Cable Professional Stereo Earphones Quick start guide Features Integrated flash memory LCD full-color display Plays music, video, photos and text ID3 and LRC support for song and synchronized lyric information display Integrated FM Radio ...

Quick Start Guide
Page 3
Press to increase the volume level. 2 You may also use this button to browse items in a list. 3 Volume Down. Press and hold ) icons with your finger to turn the player on the screen. You may also use this button to browse 3 items in a list. 2 Volume Up. Tap (or tap and hold to control the player. 5 Unit At A Glance 1 4 5 Page 3 English ÂÂ Unit at a Glance Name Description 1 Power/Enter. Press to select an item in a list. 4 LCD Touchscreen Touch controls are displayed on or off. Press to decrease the volume level.
Press to increase the volume level. 2 You may also use this button to browse items in a list. 3 Volume Down. Press and hold ) icons with your finger to turn the player on the screen. You may also use this button to browse 3 items in a list. 2 Volume Up. Tap (or tap and hold to control the player. 5 Unit At A Glance 1 4 5 Page 3 English ÂÂ Unit at a Glance Name Description 1 Power/Enter. Press to select an item in a list. 4 LCD Touchscreen Touch controls are displayed on or off. Press to decrease the volume level.

Quick Start Guide
Page 4
Use a paperclip to press this button to the player. English Name Description 6 USB Port Connect to a computer to transfer media files to reinitialize the player if it should freeze or behave abnormally. 6 Page 4 RESET 8 7 Unit At A Glance Connect to a computer to charge the player. 7 Headphone Jack Connect a pair of headphones or earphones with a 3.5mm plug for private listening. 8 Reset.
Use a paperclip to press this button to the player. English Name Description 6 USB Port Connect to a computer to transfer media files to reinitialize the player if it should freeze or behave abnormally. 6 Page 4 RESET 8 7 Unit At A Glance Connect to a computer to charge the player. 7 Headphone Jack Connect a pair of headphones or earphones with a 3.5mm plug for private listening. 8 Reset.

Quick Start Guide
Page 5
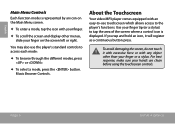
... the button located on the player, you access to a computer. 2. These modes are: Music: Browse and play Video. Radio: Listen to the Now Playing screen. Text: Browse and read text files. The Main menu gives you will see the Main menu. Setting: Adjust the player's options. About the Main Menu When you turn the player off, press and hold the button until the screen turns off. Video: Browse and play music. Playing: Return...
... the button located on the player, you access to a computer. 2. These modes are: Music: Browse and play Video. Radio: Listen to the Now Playing screen. Text: Browse and read text files. The Main menu gives you will see the Main menu. Setting: Adjust the player's options. About the Main Menu When you turn the player off, press and hold the button until the screen turns off. Video: Browse and play music. Playing: Return...
Quick Start Guide
Page 6
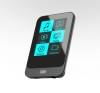
...-to-use the player's standard controls to tap the area of the screen where a control icon is represented by an icon on the screen left or right. To avoid damaging the screen, do not touch it will register as a continuous button press. Music Browser Controls. For best response, make sure your finger on the Main Menu screen. To enter a mode, tap...
...-to-use the player's standard controls to tap the area of the screen where a control icon is represented by an icon on the screen left or right. To avoid damaging the screen, do not touch it will register as a continuous button press. Music Browser Controls. For best response, make sure your finger on the Main Menu screen. To enter a mode, tap...

Quick Start Guide
Page 7
Getting Started Page 7 Use Coby Media Manager to transfer (sync) media files from the player onto your player: 1. Enjoy your computer to charge the battery. 2. Install the Coby Media Manager software from your synchronized music, video, and photo files on your computer. 3. English ÂÂ Getting Started To start playing media on the player! Connect the player to your computer to the player. 4.
Getting Started Page 7 Use Coby Media Manager to transfer (sync) media files from the player onto your player: 1. Enjoy your computer to charge the battery. 2. Install the Coby Media Manager software from your synchronized music, video, and photo files on your computer. 3. English ÂÂ Getting Started To start playing media on the player! Connect the player to your computer to the player. 4.
Quick Start Guide
Page 8
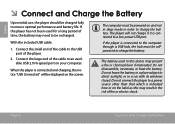
... USB cable: 1. When the player is indicated here or on the screen. The player will be displayed on the label as this device may need to be powered on your computer. Do not leave the battery in the risk of time, the battery may present a fire or chemical burn if mistreated. If the player is connected to a low-power USB port. English ÂÂ Connect...
... USB cable: 1. When the player is indicated here or on the screen. The player will be displayed on the label as this device may need to be powered on your computer. Do not leave the battery in the risk of time, the battery may present a fire or chemical burn if mistreated. If the player is connected to a low-power USB port. English ÂÂ Connect...
Quick Start Guide
Page 9
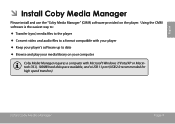
Install Coby Media Manager Page 9 English ÂÂ Install Coby Media Manager Please install and use the "Coby Media Manager" (CMM) software provided on your computer. Coby Media Manager requires a computer with your player Keep your player's software up to a format compatible with Microsoft Windows 7/Vista/XP or Macintosh OS X, 100MB hard disk space available, and a USB 1.1 port (USB 2.0 recommended for high speed transfers). Using the CMM software is the easiest way to...
Install Coby Media Manager Page 9 English ÂÂ Install Coby Media Manager Please install and use the "Coby Media Manager" (CMM) software provided on your computer. Coby Media Manager requires a computer with your player Keep your player's software up to a format compatible with Microsoft Windows 7/Vista/XP or Macintosh OS X, 100MB hard disk space available, and a USB 1.1 port (USB 2.0 recommended for high speed transfers). Using the CMM software is the easiest way to...
Quick Start Guide
Page 10
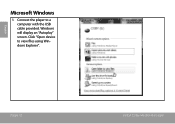
Page 10 Install Coby Media Manager Connect the player to view files using Windows Explorer". Click "Open device to a computer with the USB cable provided. English Microsoft Windows 1. Windows will display an "Autoplay" screen.
Page 10 Install Coby Media Manager Connect the player to view files using Windows Explorer". Click "Open device to a computer with the USB cable provided. English Microsoft Windows 1. Windows will display an "Autoplay" screen.
Quick Start Guide
Page 13
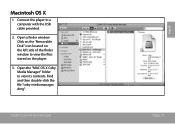
Click on the 'Removable Disk" icon located on the player. 3. Macintosh OS X 1. dmg". Connect the player to view the files stored on the left side of the finder window to a computer with the USB cable provided. 2. Find and then double-click the file "coby-mediamanager. Open a finder window. Install Coby Media Manager Page 13 English Open the "MAC OS X Coby Media Manager" folder to view its contents.
Click on the 'Removable Disk" icon located on the player. 3. Macintosh OS X 1. dmg". Connect the player to view the files stored on the left side of the finder window to a computer with the USB cable provided. 2. Find and then double-click the file "coby-mediamanager. Open a finder window. Install Coby Media Manager Page 13 English Open the "MAC OS X Coby Media Manager" folder to view its contents.
Quick Start Guide
Page 15
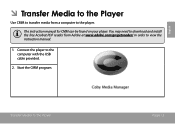
The instruction manual for CMM can be found on your player. Start the CMM program. English ÂÂ Transfer Media to the Player Use CMM to transfer media from Adobe at www.adobe.com/go/getreader/ in order to view the instruction manual. 1. Connect the player to the player. You may need to download and install the free Acrobat PDF reader from a computer to the computer with the USB cable provided. 2. Transfer Media To The Player Page 15
The instruction manual for CMM can be found on your player. Start the CMM program. English ÂÂ Transfer Media to the Player Use CMM to transfer media from Adobe at www.adobe.com/go/getreader/ in order to view the instruction manual. 1. Connect the player to the player. You may need to download and install the free Acrobat PDF reader from a computer to the computer with the USB cable provided. 2. Transfer Media To The Player Page 15
Quick Start Guide
Page 18
..., specifications, and manual are subject to change without notice. ID3, Windows Media port FM Frequency Range 87.5 - 108.0MHz MP820 series PC Interface USB 2.0 (MSC) Plug and Play Support Windows 7/Vista/XP Macintosh OS X Audio Output 3.5mm Stereo (Headphone) Power Rechargeable Li-Poly Battery USB Charge Play Time Music: 18 hours* * Music play time may vary depending on playing an MP3 encoded at 128 kbps. MP820 series Display Type 1.8" TFT LCD @ 128x160 Memory Integrated Flash Memory Audio Format Support...
..., specifications, and manual are subject to change without notice. ID3, Windows Media port FM Frequency Range 87.5 - 108.0MHz MP820 series PC Interface USB 2.0 (MSC) Plug and Play Support Windows 7/Vista/XP Macintosh OS X Audio Output 3.5mm Stereo (Headphone) Power Rechargeable Li-Poly Battery USB Charge Play Time Music: 18 hours* * Music play time may vary depending on playing an MP3 encoded at 128 kbps. MP820 series Display Type 1.8" TFT LCD @ 128x160 Memory Integrated Flash Memory Audio Format Support...

Quick Start Guide
Page 19
MP823 series Display Type 2.0" TFT LCD @ 176x220 Memory Integrated Flash Memory Audio Format Support MP3, WMA Video Format Support AMV: 220x176, 25fps Photo Format Support JPEG, BMP Song Info Sup- Page 19 English ID3, Windows Media port FM Frequency Range 87.5 - 108.0MHz PC Interface USB 2.0 (MSC) Plug and Play Support Windows 7/Vista/XP Macintosh OS X Specifications MP823 series Audio Input Integrated Microphone Audio Output 3.5mm Stereo (Headphone) Power Rechargeable Li-Poly Battery USB Charge Play Time Music: 18 hours...
MP823 series Display Type 2.0" TFT LCD @ 176x220 Memory Integrated Flash Memory Audio Format Support MP3, WMA Video Format Support AMV: 220x176, 25fps Photo Format Support JPEG, BMP Song Info Sup- Page 19 English ID3, Windows Media port FM Frequency Range 87.5 - 108.0MHz PC Interface USB 2.0 (MSC) Plug and Play Support Windows 7/Vista/XP Macintosh OS X Specifications MP823 series Audio Input Integrated Microphone Audio Output 3.5mm Stereo (Headphone) Power Rechargeable Li-Poly Battery USB Charge Play Time Music: 18 hours...
Quick Start Guide
Page 20
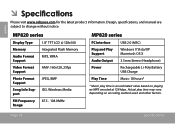
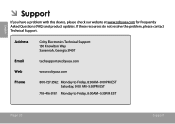
Address Coby Electronics Technical Support 150 Knowlton Way Savannah, Georgia 31407 Email Web Phone [email protected] www.cobyusa.com 800-727-3592: Monday to Friday, 8:30AM-9:00PM EST Saturday, 9:00 AM-5:30PM EST 718-416-3197: Monday to Friday, 8:00AM-5:30PM EST Page 20 Support English ÂÂ Support If you have a problem with this device, please check our website at www.cobyusa.com for Frequently Asked Questions (FAQ) and product updates. If these resources do not resolve the problem, please contact Technical Support.
Address Coby Electronics Technical Support 150 Knowlton Way Savannah, Georgia 31407 Email Web Phone [email protected] www.cobyusa.com 800-727-3592: Monday to Friday, 8:30AM-9:00PM EST Saturday, 9:00 AM-5:30PM EST 718-416-3197: Monday to Friday, 8:00AM-5:30PM EST Page 20 Support English ÂÂ Support If you have a problem with this device, please check our website at www.cobyusa.com for Frequently Asked Questions (FAQ) and product updates. If these resources do not resolve the problem, please contact Technical Support.

Quick Start Guide
Page 21
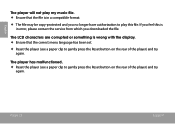
.... The buttons do not work. Reset the player (use a paper clip to gently press the Reset button on the rear of the music is poor. Try playing the file on the rear of the player) and try again. There is fully charged. The sound quality of the player) and try again. Try charging the player overnight (8 hours). Reset the player (use...
.... The buttons do not work. Reset the player (use a paper clip to gently press the Reset button on the rear of the music is poor. Try playing the file on the rear of the player) and try again. There is fully charged. The sound quality of the player) and try again. Try charging the player overnight (8 hours). Reset the player (use...
Quick Start Guide
Page 22
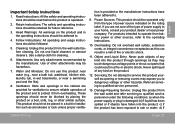
... wrong with the display. Ensure that the file is in error, please contact the service from which you no longer have authorization to play my music file. Ensure that the correct menu language has been set. Reset the player (use a paper clip to gently press the Reset button on the rear of the player) and try again...
... wrong with the display. Ensure that the file is in error, please contact the service from which you no longer have authorization to play my music file. Ensure that the correct menu language has been set. Reset the player (use a paper clip to gently press the Reset button on the rear of the player) and try again...

Quick Start Guide
Page 23
... below the serial number that may be of sufficient magnitude to gently press the Reset button on the rear of the player). • Turn on the rear of important operation and servicing instructions in the ears or hearing loss, discontinue use of electric shock. Serial No. Protect...played at high volume. For recycling or disposal information about this device to the presence of the unit. The lightning flash with arrowhead symbol within the product's enclosure that is intended to alert the user to rain or moisture. Dangerous high voltage is intended to alert the user...
... below the serial number that may be of sufficient magnitude to gently press the Reset button on the rear of the player). • Turn on the rear of important operation and servicing instructions in the ears or hearing loss, discontinue use of electric shock. Serial No. Protect...played at high volume. For recycling or disposal information about this device to the presence of the unit. The lightning flash with arrowhead symbol within the product's enclosure that is intended to alert the user to rain or moisture. Dangerous high voltage is intended to alert the user...

Quick Start Guide
Page 24
... the manual. Do not make any interference received, including interference that may cause harmful interference to radio communications. English FCC Statement: This device complies with the limits for help Use of shielded cable is required to comply with the instructions, may cause undesired operation. If such changes or modifications should be made, you could be determined by turning the...
... the manual. Do not make any interference received, including interference that may cause harmful interference to radio communications. English FCC Statement: This device complies with the limits for help Use of shielded cable is required to comply with the instructions, may cause undesired operation. If such changes or modifications should be made, you could be determined by turning the...
Quick Start Guide
Page 25
... service personnel under the following conditions: a) when the power-supply or plug is provided or the manufacturer instructions have fallen into this product near water (e.g., near a bath tub, washbowl, kitchen sink, laundry tub, in the cabinet are not sure of the type of any kind into the product; Never spill liquid of power supply to ensure reliable operation of power source...
... service personnel under the following conditions: a) when the power-supply or plug is provided or the manufacturer instructions have fallen into this product near water (e.g., near a bath tub, washbowl, kitchen sink, laundry tub, in the cabinet are not sure of the type of any kind into the product; Never spill liquid of power supply to ensure reliable operation of power source...

Quick Start Guide
Page 26
... are covered by the operating instructions as improper adjustment of other controls may result in damage and will often require extensive work by a qualified technician to restore the product to ensure that produce heat. Heat: The product should be sure that your service technician has used replacement parts specified by following the operating instructions. Unauthorized substitutions may result in fire, electric...
... are covered by the operating instructions as improper adjustment of other controls may result in damage and will often require extensive work by a qualified technician to restore the product to ensure that produce heat. Heat: The product should be sure that your service technician has used replacement parts specified by following the operating instructions. Unauthorized substitutions may result in fire, electric...


