
User Manual
Page 1
COBY Electronics Corp. 56-65 Rust Street Maspeth, NY 11378 www.cobyusa.com www.ecoby.com DP860/862 8″ Widescreen Digital Photo Frame with Multimedia Playback DP860 DP862 INSTRUCTION MANUAL Please read this manual carefully before operation
COBY Electronics Corp. 56-65 Rust Street Maspeth, NY 11378 www.cobyusa.com www.ecoby.com DP860/862 8″ Widescreen Digital Photo Frame with Multimedia Playback DP860 DP862 INSTRUCTION MANUAL Please read this manual carefully before operation
User Manual
Page 2
... in the manual. Note: This equipment has been tested and found to stop operation of the following two conditions: (1) This device may cause undesired operation. Consult the dealer or an experienced radio/TV technician for Class B digital devices, pursuant to rain or moisture. FCC Statement: this device to Part 15 of the FCC rules. This equipment generates, uses and can...
... in the manual. Note: This equipment has been tested and found to stop operation of the following two conditions: (1) This device may cause undesired operation. Consult the dealer or an experienced radio/TV technician for Class B digital devices, pursuant to rain or moisture. FCC Statement: this device to Part 15 of the FCC rules. This equipment generates, uses and can...
User Manual
Page 5
Top View Left View Right View Front View Rear View Remote Control SLIDESHOW MODE Slideshow PHOTO MODE Photo Mode Screen Photo View Zoom Rotation Changing View MOVIE MODE Video List Screen Video Controls MUSIC MODE Music List Music Playback Screen Music Controls CALENDAR 25 Date & Clock Screen 25 FILE MANAGER 26 File List 26 Deleting / Copying a File 26 27 System Setup 27 Photo Setup 28 Calendar Setup 28 Video Setup 29 Music Setup 29 30 30 KICKSTAND 31 32 33 35 18 18 19 19 20 20 20 20 21 21 22 23 23 24 24
Top View Left View Right View Front View Rear View Remote Control SLIDESHOW MODE Slideshow PHOTO MODE Photo Mode Screen Photo View Zoom Rotation Changing View MOVIE MODE Video List Screen Video Controls MUSIC MODE Music List Music Playback Screen Music Controls CALENDAR 25 Date & Clock Screen 25 FILE MANAGER 26 File List 26 Deleting / Copying a File 26 27 System Setup 27 Photo Setup 28 Calendar Setup 28 Video Setup 29 Music Setup 29 30 30 KICKSTAND 31 32 33 35 18 18 19 19 20 20 20 20 21 21 22 23 23 24 24
User Manual
Page 6
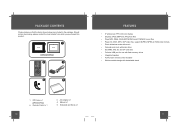
... Adapter x 1 4. DP Frame x 1 (DP860/DP862) 2. Remote Control x 1 3. Kickstand and Screw x 1 • 8" widescreen TFT LCD color display • Displays JPEG, BMP and JPG photo files • Plays MP3, WMA, OGG,ADPCM-WAV and PCM-WAV music files • Plays AVI, MOV, MP4, 3GP video files, support MJPEG, MPEG-4, H264 video formats. • Photo slideshow mode with music • Calendar and clock with alarm timer • SD, MMC, MS, xD, and CF card slots • Full-size USB port for use with flash memory drives...
... Adapter x 1 4. DP Frame x 1 (DP860/DP862) 2. Remote Control x 1 3. Kickstand and Screw x 1 • 8" widescreen TFT LCD color display • Displays JPEG, BMP and JPG photo files • Plays MP3, WMA, OGG,ADPCM-WAV and PCM-WAV music files • Plays AVI, MOV, MP4, 3GP video files, support MJPEG, MPEG-4, H264 video formats. • Photo slideshow mode with music • Calendar and clock with alarm timer • SD, MMC, MS, xD, and CF card slots • Full-size USB port for use with flash memory drives...
User Manual
Page 7
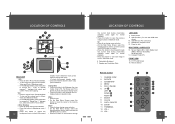
... Screen and Fit to Screen in photo (full-screen) display mode. • Press this button to access the " Copy to view the previous image in Jack RIGHT VIEW ( CARD SLOTS) 13. LOCATION OF CONTROLS 3 2 5 1 4 6 7 16 15 8 13 9 10 11 14 12 REAR VIEW 1. Change View • Press this button to shift between the five display modes in Music, Video and Photo / Slideshow mode. • In File Manager Mode: press this button to delete. 2. Compact Flash (CF) FRONT VIEW 15. 8″ TFT LCD Screen...
... Screen and Fit to Screen in photo (full-screen) display mode. • Press this button to access the " Copy to view the previous image in Jack RIGHT VIEW ( CARD SLOTS) 13. LOCATION OF CONTROLS 3 2 5 1 4 6 7 16 15 8 13 9 10 11 14 12 REAR VIEW 1. Change View • Press this button to shift between the five display modes in Music, Video and Photo / Slideshow mode. • In File Manager Mode: press this button to delete. 2. Compact Flash (CF) FRONT VIEW 15. 8″ TFT LCD Screen...
User Manual
Page 8
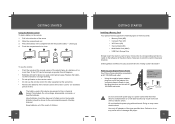
...; Multi Media Card (MMC) • USB Flash Storage Drive Simply insert the memory card of your Digital Picture Frame Your Picture Frame should be disposed of the photo frame. Push the compartment in the compartment with wet hands. Pull in the proper direction. GETTING STARTED Using the Remote Control To load a battery in this may result in the risk of time. Take care to an AC 100-240V wall outlet. • Using the supplied power adapter, plug...
...; Multi Media Card (MMC) • USB Flash Storage Drive Simply insert the memory card of your Digital Picture Frame Your Picture Frame should be disposed of the photo frame. Push the compartment in the compartment with wet hands. Pull in the proper direction. GETTING STARTED Using the Remote Control To load a battery in this may result in the risk of time. Take care to an AC 100-240V wall outlet. • Using the supplied power adapter, plug...
User Manual
Page 9
... photo frame. A card icon that is not available for operation details. Only card slots with an installed memory card may be selected. see File Manager section for use. USB Port (computer) USB Port (mini) Make sure that a memory card has not been installed in your photo frame off, set the Power Switch to a computer with a USB cable. Upon connection: • Your computer will stop when a card is inserted or any button is being selected. Icons representing your digital photo frame: • Use...
... photo frame. A card icon that is not available for operation details. Only card slots with an installed memory card may be selected. see File Manager section for use. USB Port (computer) USB Port (mini) Make sure that a memory card has not been installed in your photo frame off, set the Power Switch to a computer with a USB cable. Upon connection: • Your computer will stop when a card is inserted or any button is being selected. Icons representing your digital photo frame: • Use...

User Manual
Page 10
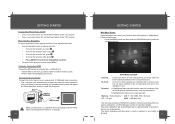
... exit, press the MENU button. 180 PHOTO MODE Press the Thumbnail button or select the PHOTO icon on the Main Menu screen and press the ENTER button to enter the Photo Mode shown below: ( Make sure that the Display Mode is being selected. 2. Current Memory Device The Photo List will display supported Photo files, only. An image file is set to Thumbnail in Photo Setup, See SETUP section.) PHOTO MODE SCREEN • To display a photo (full screen), use the direction buttons to select a thumbnail...
... exit, press the MENU button. 180 PHOTO MODE Press the Thumbnail button or select the PHOTO icon on the Main Menu screen and press the ENTER button to enter the Photo Mode shown below: ( Make sure that the Display Mode is being selected. 2. Current Memory Device The Photo List will display supported Photo files, only. An image file is set to Thumbnail in Photo Setup, See SETUP section.) PHOTO MODE SCREEN • To display a photo (full screen), use the direction buttons to select a thumbnail...
User Manual
Page 11
... Menu screen and press the ENTER button. Video List Screen Upon entering Video Mode, your digital video files, select the Video icon from the Photo Mode screen and press t h e ENTER button to display the photo in full-screen. • To view the previous photo, press the LEFT button (or the UP button on the DP frame). • To view the next photo, press the RIGHT button (or the DOWN button on the remote control. • To rotate the photo...
... Menu screen and press the ENTER button. Video List Screen Upon entering Video Mode, your digital video files, select the Video icon from the Photo Mode screen and press t h e ENTER button to display the photo in full-screen. • To view the previous photo, press the LEFT button (or the UP button on the DP frame). • To view the next photo, press the RIGHT button (or the DOWN button on the remote control. • To rotate the photo...
User Manual
Page 12
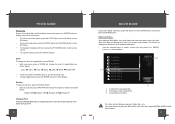
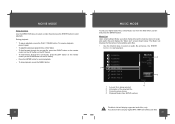
... "Music List" screen shown below. The Music List displays the filenames of the selected File. 3. FLODER A FLODER B FLODER C FLODER D 1 MUSIC FILE A MUSIC FILE B MUSIC FILE C MUSIC FILE D MUSIC MUSIC FILE A 2 4MB ARTIST TRACK'S NAME ALBUM 5/16 3 Repeat 4 1. Playback Mode ( See SETUP section). The Music List will scan the memory device for normal playback. • To stop playback, press the MENU button. 22 MUSIC MODE To play digital MP3, WMA and OGG audi.o files 23 Your photo frame can play your photo frame will display supported audio...
... "Music List" screen shown below. The Music List displays the filenames of the selected File. 3. FLODER A FLODER B FLODER C FLODER D 1 MUSIC FILE A MUSIC FILE B MUSIC FILE C MUSIC FILE D MUSIC MUSIC FILE A 2 4MB ARTIST TRACK'S NAME ALBUM 5/16 3 Repeat 4 1. Playback Mode ( See SETUP section). The Music List will scan the memory device for normal playback. • To stop playback, press the MENU button. 22 MUSIC MODE To play digital MP3, WMA and OGG audi.o files 23 Your photo frame can play your photo frame will display supported audio...
User Manual
Page 13
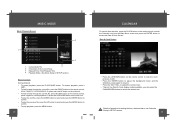
... button to confirm. • To stop playback, press the MENU button. 24 CALENDAR To view the time and date, press the CLOCK button on the remote control, press it again for normal playback. Elapsed Time / Total Playback Time 4. MUSIC MODE Music Playback Screen FLODER A FLODER B FLODER C FLODER D 1 MUSIC FILE A MUSIC FILE B MUSIC FILE C MUSIC FILE D MUSIC FILE A 2 4MB ARTIST TRACK'S NAME ALBUM 00:02:58 00:03:47 3 Repeat 1. Current Audio File 4 2. Music Controls During playback: • To pause playback, press the PLAY/PAUSE button...
... button to confirm. • To stop playback, press the MENU button. 24 CALENDAR To view the time and date, press the CLOCK button on the remote control, press it again for normal playback. Elapsed Time / Total Playback Time 4. MUSIC MODE Music Playback Screen FLODER A FLODER B FLODER C FLODER D 1 MUSIC FILE A MUSIC FILE B MUSIC FILE C MUSIC FILE D MUSIC FILE A 2 4MB ARTIST TRACK'S NAME ALBUM 00:02:58 00:03:47 3 Repeat 1. Current Audio File 4 2. Music Controls During playback: • To pause playback, press the PLAY/PAUSE button...
User Manual
Page 14
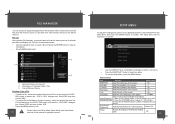
... the MENU button to access the " COPY / DEL" dialogue box. Off 27 VVD MOVIE FILE C File Manager VVD 2 3FILES 2021/12/25 08:01 4/36 3 1. Selected Folder in memory. Current Memory Device Deleting / Copy a File • To delete a file, select the unwanted file from other memory devices to access the " COPY/DEL" dialogue box. Please refer to the Photo Mode, Music Mode, and Video Mode 26 sections of this manual for all supported digital files of Selected Folder / File 3. System Setup Photo Setup Calendar Setup Video Setup Music Setup • Use the DOWN...
... the MENU button to access the " COPY / DEL" dialogue box. Off 27 VVD MOVIE FILE C File Manager VVD 2 3FILES 2021/12/25 08:01 4/36 3 1. Selected Folder in memory. Current Memory Device Deleting / Copy a File • To delete a file, select the unwanted file from other memory devices to access the " COPY/DEL" dialogue box. Please refer to the Photo Mode, Music Mode, and Video Mode 26 sections of this manual for all supported digital files of Selected Folder / File 3. System Setup Photo Setup Calendar Setup Video Setup Music Setup • Use the DOWN...
User Manual
Page 15
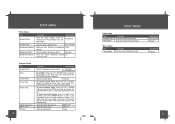
Random Sets the photo slideshow repeat On function on/off Calendar Setup Display Mode Date Clock Mode Clock Time Alarm Time Alarm Frequency Alarm Tone Snooze Sets the Calendar display mode Calendar+ Time+Slideshow To set an Alarm Time: Press the UP / DOWN button to select the Off/On and time and press the LEFT/RIGHT button to select the desired time and On. The alarm timer will then turn it off automatically. Play Mode Sets the Video Playback Mode. SETUP MENU Photo Setup Display Mode Display Ratio Slideshow Duration Slideshow Effect Slideshow Repeat Sets the photo display ...
Random Sets the photo slideshow repeat On function on/off Calendar Setup Display Mode Date Clock Mode Clock Time Alarm Time Alarm Frequency Alarm Tone Snooze Sets the Calendar display mode Calendar+ Time+Slideshow To set an Alarm Time: Press the UP / DOWN button to select the Off/On and time and press the LEFT/RIGHT button to select the desired time and On. The alarm timer will then turn it off automatically. Play Mode Sets the Video Playback Mode. SETUP MENU Photo Setup Display Mode Display Ratio Slideshow Duration Slideshow Effect Slideshow Repeat Sets the photo display ...

User Manual
Page 16
Headphones CONNECTION 2350 Using the Kickstand 1 KICKSTAND Attach the kickstand to the DP frame. 2 Turn the screw to the right to tighten the kickstand. 31
Headphones CONNECTION 2350 Using the Kickstand 1 KICKSTAND Attach the kickstand to the DP frame. 2 Turn the screw to the right to tighten the kickstand. 31
User Manual
Page 17
... player does not turn on. • Make sure the unit has been powered on your photo frame. 32 TROUBLESHOOTING If you have a problem with this DP frame. 33 loading ...add additional features. If these resources do not resolve the problem, please contact Technical Support. The minimum recommended bitrate is poor. • Try playing the file on manually (i.e., the Power Switch has been physically set to the power outlet. If the sound quality is not defective. • Do not use SDHC memory cards. FIRMWARE UPGRADES From time to time, COBY may release firmware updates...
... player does not turn on. • Make sure the unit has been powered on your photo frame. 32 TROUBLESHOOTING If you have a problem with this DP frame. 33 loading ...add additional features. If these resources do not resolve the problem, please contact Technical Support. The minimum recommended bitrate is poor. • Try playing the file on manually (i.e., the Power Switch has been physically set to the power outlet. If the sound quality is not defective. • Do not use SDHC memory cards. FIRMWARE UPGRADES From time to time, COBY may release firmware updates...

User Manual
Page 18
... AC Adapter Supply battery for the clock for about 100 hours after each fully charged. There is set to a compatible format. This player cannot play copy-protected files. The alarm does not work . • Make sure the unit has been powered on manually (i.e., the Power Switch has been physically set to a comfortable listening level by the remote control or the volume buttons on the frame. • Ensure that , turn on the photo frame -- If...
... AC Adapter Supply battery for the clock for about 100 hours after each fully charged. There is set to a compatible format. This player cannot play copy-protected files. The alarm does not work . • Make sure the unit has been powered on manually (i.e., the Power Switch has been physically set to a comfortable listening level by the remote control or the volume buttons on the frame. • Ensure that , turn on the photo frame -- If...


