
User Manual
Page 1
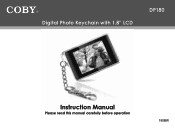
Digital Photo Keychain with 1.8" LCD DP180 Instruction Manual Please read this manual carefully before operation 180BW
Digital Photo Keychain with 1.8" LCD DP180 Instruction Manual Please read this manual carefully before operation 180BW
User Manual
Page 2
DP180 The lightning flash with arrowhead symbol within an equilateral triangle is intended to alert the user to the presence of uninsulated "dangerous voltage" within an equilateral triangle is present inside the enclosure. Do not open the cabinet. Retain this product, please contact your local authorities or the Electronics...expose this device to rain or moisture. Precautions For Customer Use: Enter below the serial number that may be of sufficient magnitude to the presence of important operation and servicing instructions in the literature accompanying the appliance. Model No....
DP180 The lightning flash with arrowhead symbol within an equilateral triangle is intended to alert the user to the presence of uninsulated "dangerous voltage" within an equilateral triangle is present inside the enclosure. Do not open the cabinet. Retain this product, please contact your local authorities or the Electronics...expose this device to rain or moisture. Precautions For Customer Use: Enter below the serial number that may be of sufficient magnitude to the presence of important operation and servicing instructions in the literature accompanying the appliance. Model No....
User Manual
Page 3
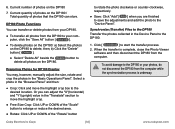
...Glance 5 Charging and Powering the DP180 5 Getting Started 6 Photo Viewer Software for Windows 7 Photo Viewer Software for Macintosh 9 Main Menu Operations 11 Important Safety Instructions 12 Please make sure the following items are missing, contact your local dealer. ●● DP180 Photo Keychain ●● USB Cable ●● Installation Manual Features & Specifications ●● Stores and displays up to 60 photos* ●● Supports JPEG, BMP, and GIF photo files ●● LCD color screen ●● Photo slideshow and digital clock modes ●...
...Glance 5 Charging and Powering the DP180 5 Getting Started 6 Photo Viewer Software for Windows 7 Photo Viewer Software for Macintosh 9 Main Menu Operations 11 Important Safety Instructions 12 Please make sure the following items are missing, contact your local dealer. ●● DP180 Photo Keychain ●● USB Cable ●● Installation Manual Features & Specifications ●● Stores and displays up to 60 photos* ●● Supports JPEG, BMP, and GIF photo files ●● LCD color screen ●● Photo slideshow and digital clock modes ●...
User Manual
Page 4
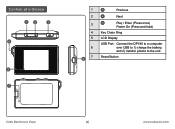
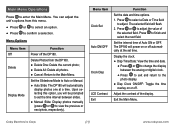
Controls at a Glance 1 Previous 2 Next 3 Play / Enter (Press once) Power On (Press and hold) 4 Key Chain Ring 5 LCD Display USB Port: Connect the DP180 to a computer 6 over USB to 1) charge the battery, and 2) transfer photos to the unit. 7 Reset Button Coby Electronics Corp. [4] www.cobyusa.com
Controls at a Glance 1 Previous 2 Next 3 Play / Enter (Press once) Power On (Press and hold) 4 Key Chain Ring 5 LCD Display USB Port: Connect the DP180 to a computer 6 over USB to 1) charge the battery, and 2) transfer photos to the unit. 7 Reset Button Coby Electronics Corp. [4] www.cobyusa.com

User Manual
Page 5
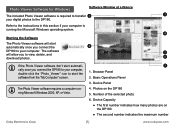
... A new or exhausted battery should be turned on the DP180. This indicator will read "USB Connected". ●● If the DP180 is connected to a USB hub, the hub must be charged fully before initial use to the USB port of a powered-on computer. Display at a Glance 1 2 Photo Indicator: The first number indicates the number of the current photo. 1 The second number indicates the total number of photos loaded on or off in the Setup Menu (Clock...
... A new or exhausted battery should be turned on the DP180. This indicator will read "USB Connected". ●● If the DP180 is connected to a USB hub, the hub must be charged fully before initial use to the USB port of a powered-on computer. Display at a Glance 1 2 Photo Indicator: The first number indicates the number of the current photo. 1 The second number indicates the total number of photos loaded on or off in the Setup Menu (Clock...
User Manual
Page 6
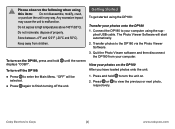
plied USB cable. Press and hold displays "COBY". Do not expose to the DP180 via the Photo Viewer Software. Getting Started To get started using the DP180: Transfer your computer using this item: Do not disassemble, modify, crush, or puncture the unit in any way. The Photo Viewer Software will be selected. ●● Press again to finish turning off the DP180: After you have loaded photos onto the unit: ●● Press to...
plied USB cable. Press and hold displays "COBY". Do not expose to the DP180 via the Photo Viewer Software. Getting Started To get started using the DP180: Transfer your computer using this item: Do not disassemble, modify, crush, or puncture the unit in any way. The Photo Viewer Software will be selected. ●● Press again to finish turning off the DP180: After you have loaded photos onto the unit: ●● Press to...
User Manual
Page 7
... the Microsoft Windows operating system. 4 Starting the Software The Photo Viewer software will allow you to view, delete, and 5 download photos. 6 If the Photo Viewer software don't start automatically once you connect the DP180 to your computer, double-click the "Photo_Viewer" icon to start automatically once you connect the 2 DP180 to the DP180. Number of the selected photo; 6. Photos on the DP180. ●● The second number indicates the maximum number Coby Electronics Corp. [7] www.cobyusa.com Device Capacity ●...
... the Microsoft Windows operating system. 4 Starting the Software The Photo Viewer software will allow you to view, delete, and 5 download photos. 6 If the Photo Viewer software don't start automatically once you connect the DP180 to your computer, double-click the "Photo_Viewer" icon to start automatically once you connect the 2 DP180 to the DP180. Number of the selected photo; 6. Photos on the DP180. ●● The second number indicates the maximum number Coby Electronics Corp. [7] www.cobyusa.com Device Capacity ●...
User Manual
Page 8
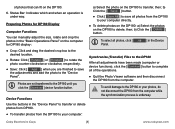
...; To transfer photos from DP180. Device Functions Use the buttons in the "Basic Operations Panel" on the computer for DP180 display : a) Select the photo on the DP180. 6. b) Click the [ ] button. ●● Click [ ] to save the adjustments and add the photo to delete, then; Photos are finished to save all of photos that can manually adjust the size, rotate and crop the photos in the "Device Panel" to transfer or delete photos from the DP180 to your computer directly...
...; To transfer photos from DP180. Device Functions Use the buttons in the "Basic Operations Panel" on the computer for DP180 display : a) Select the photo on the DP180. 6. b) Click the [ ] button. ●● Click [ ] to save the adjustments and add the photo to delete, then; Photos are finished to save all of photos that can manually adjust the size, rotate and crop the photos in the "Device Panel" to transfer or delete photos from the DP180 to your computer directly...
User Manual
Page 9
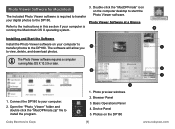
Photo Viewer Software for Macintosh The included Photo Viewer software is running Mac OS X 10.3.9 or later. 2 4 5 6 7 1. The software will allow you 1 to your computer. 2. Connect the DP180 to view, delete, and download photos. Photos on the computer desktop to the DP180. Browser Panel 3. Photo Viewer Software at a Glance Installing and Start the Software Install the Photo Viewer software on your digital photos to start the Photo Viewer software. Open the "Photo_Viewer" folder and double click the "MacDPFmate.zip" file to the DP180. Refer to the instructions in...
Photo Viewer Software for Macintosh The included Photo Viewer software is running Mac OS X 10.3.9 or later. 2 4 5 6 7 1. The software will allow you 1 to your computer. 2. Connect the DP180 to view, delete, and download photos. Photos on the computer desktop to the DP180. Browser Panel 3. Photo Viewer Software at a Glance Installing and Start the Software Install the Photo Viewer software on your digital photos to start the Photo Viewer software. Open the "Photo_Viewer" folder and double click the "MacDPFmate.zip" file to the DP180. Refer to the instructions in...
User Manual
Page 10
... DP180 to the desired location. Coby Electronics Corp. [10] www.cobyusa.com Current number of the "Rotate" button to rotate the photo clockwise or counter-clockwise, respectively. ●● Save: Click "Add"[ ] when you can transfer or delete photos from your com- button to start the transfer process. 2. Select a photo in the "Basic Operations Panel". puter, click the "Save All" button [ ]. ●● To delete photos on the DP180: a) Select the photos on the DP180 7. DP180 Photo...
... DP180 to the desired location. Coby Electronics Corp. [10] www.cobyusa.com Current number of the "Rotate" button to rotate the photo clockwise or counter-clockwise, respectively. ●● Save: Click "Add"[ ] when you can transfer or delete photos from your com- button to start the transfer process. 2. Select a photo in the "Basic Operations Panel". puter, click the "Save All" button [ ]. ●● To delete photos on the DP180: a) Select the photos on the DP180 7. DP180 Photo...
User Manual
Page 11
.... Press or to view the previous or next photo, respectively). Adjust the contrast of Auto ON or OFF. Menu Options Menu Item Off Delete Display Mode Function Power off automatically at a time. Set the Slideshow Mode to finish and select the next field. Menu Item Clock Set Auto ON/OFF Clock Disp LCD Contrast Exit Function Set the date and time options. 1. Press to Auto or Manual. ●● Auto Slide: The DP180 will power on or off...
.... Press or to view the previous or next photo, respectively). Adjust the contrast of Auto ON or OFF. Menu Options Menu Item Off Delete Display Mode Function Power off automatically at a time. Set the Slideshow Mode to finish and select the next field. Menu Item Clock Set Auto ON/OFF Clock Disp LCD Contrast Exit Function Set the date and time options. 1. Press to Auto or Manual. ●● Auto Slide: The DP180 will power on or off...
User Manual
Page 12
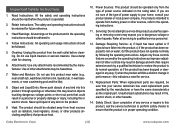
... to restore the product to the operating instructions. 11. Never spill liquid of power source indicated on the product. 9. Unauthorized substitutions may result in damage and will often require extensive work by the operating instructions as opening or removing covers may be followed. 5. Cleaning: Unplug this product from the type of any service or repairs to this product, ask the service technician...
... to restore the product to the operating instructions. 11. Never spill liquid of power source indicated on the product. 9. Unauthorized substitutions may result in damage and will often require extensive work by the operating instructions as opening or removing covers may be followed. 5. Cleaning: Unplug this product from the type of any service or repairs to this product, ask the service technician...
User Manual
Page 13
Technical Support If you have a problem with this device, please check our website at www.cobyusa.com for Frequently Asked Questions (FAQs) and firmware updates. If these resources do not resolve the problem, please contact Coby Technical Support. COBY Electronics Technical Support 56-65 Rust Street Maspeth, NY 11378 Phone 800-727-3592: Weekdays 8:30AM-9:00PM EST Saturdays 9:00 AM-5:30PM EST 718-416-3197: Weekdays 8:00AM-5:30PM EST Email [email protected] Web www.cobyusa.com Coby Electronics Corp. [13] www.cobyusa.com
Technical Support If you have a problem with this device, please check our website at www.cobyusa.com for Frequently Asked Questions (FAQs) and firmware updates. If these resources do not resolve the problem, please contact Coby Technical Support. COBY Electronics Technical Support 56-65 Rust Street Maspeth, NY 11378 Phone 800-727-3592: Weekdays 8:30AM-9:00PM EST Saturdays 9:00 AM-5:30PM EST 718-416-3197: Weekdays 8:00AM-5:30PM EST Email [email protected] Web www.cobyusa.com Coby Electronics Corp. [13] www.cobyusa.com

User Manual
Page 16
Printed in China. Coby Electronics Corporation 1991 Marcus Avenue, Suite 301 Lake Success, NY 11042 www.cobyusa.com Coby is a registered trademark of Coby Electronics Corporation.
Printed in China. Coby Electronics Corporation 1991 Marcus Avenue, Suite 301 Lake Success, NY 11042 www.cobyusa.com Coby is a registered trademark of Coby Electronics Corporation.


