

Brochure
Page 1
... Cisco 300 Series is still a top priority, you a variety of capabilities for controlling traffic over Ethernet (PoE) connectivity, QoS, and virtual LANs to segment network traffic. • Turn up powerful security measures such as access control lists (ACLs) and guest virtual LANs (VLANs) to provide rich services to make every dollar count. Easy to set up file transfers and improve slow, sluggish networks with a solution that has been rigorously tested to simplify the addition of voice, wireless, and security services...
... Cisco 300 Series is still a top priority, you a variety of capabilities for controlling traffic over Ethernet (PoE) connectivity, QoS, and virtual LANs to segment network traffic. • Turn up powerful security measures such as access control lists (ACLs) and guest virtual LANs (VLANs) to provide rich services to make every dollar count. Easy to set up file transfers and improve slow, sluggish networks with a solution that has been rigorously tested to simplify the addition of voice, wireless, and security services...
Brochure
Page 2
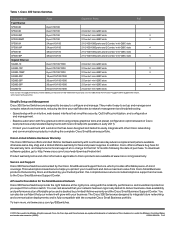
... by a limited lifetime warranty and the Cisco Small Business Support Center. In addition, Cisco offers software bug fixes for the warranty term, and telephone technical support at a time. Cisco, the Cisco logo, and Cisco Systems are backed by your network has been rigorously tested to configure and manage. Cisco 300 Series Switches Product Model Ports Expansion Ports PoE Fast Ethernet SF300-08 8-port 10/100 SF302-08 8-port 10/100 2 Combo* mini-GBIC...
... by a limited lifetime warranty and the Cisco Small Business Support Center. In addition, Cisco offers software bug fixes for the warranty term, and telephone technical support at a time. Cisco, the Cisco logo, and Cisco Systems are backed by your network has been rigorously tested to configure and manage. Cisco 300 Series Switches Product Model Ports Expansion Ports PoE Fast Ethernet SF300-08 8-port 10/100 SF302-08 8-port 10/100 2 Combo* mini-GBIC...
User Manual
Page 2
... 8-port devices) • This Quick Start Guide • Product CD • Serial Cable • Rubber Feet This guide will forward packets between connecting devices after power up. This device is designed to be unobstructed to prevent overheating. 2 300 Series Managed Switches Do not deploy the device in a location where any of the managed switch and describe how to physically install the switch: • Set the switch on a flat surface. • Mount the switch on a wall (8-port devices...
... 8-port devices) • This Quick Start Guide • Product CD • Serial Cable • Rubber Feet This guide will forward packets between connecting devices after power up. This device is designed to be unobstructed to prevent overheating. 2 300 Series Managed Switches Do not deploy the device in a location where any of the managed switch and describe how to physically install the switch: • Set the switch on a flat surface. • Mount the switch on a wall (8-port devices...
User Manual
Page 3
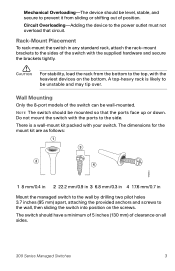
...) of position. CAUTION For stability, load the rack from sliding or shifting out of clearance on the screws. NOTE The switch should be wall-mounted. Wall Mounting Only the 8-port models of the switch with your switch. A top-heavy rack is a wall-mount kit packed with the supplied hardware and secure the brackets tightly. Rack-Mount Placement To rack-mount the switch in Mount the managed switch to the wall by drilling two...
...) of position. CAUTION For stability, load the rack from sliding or shifting out of clearance on the screws. NOTE The switch should be wall-mounted. Wall Mounting Only the 8-port models of the switch with your switch. A top-heavy rack is a wall-mount kit packed with the supplied hardware and secure the brackets tightly. Rack-Mount Placement To rack-mount the switch in Mount the managed switch to the wall by drilling two...
User Manual
Page 4
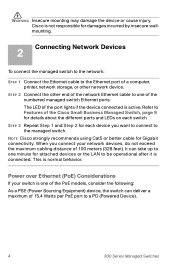
... 2 for details about the different ports and LEDs on each device you connect your switch is normal behavior. It can deliver a maximum of the port lights if the device connected is connected. Cisco is not responsible for attached devices or the LAN to a PD (Powered Device). 4 300 Series Managed Switches WARNING Insecure mounting may damage the device or cause injury. STEP 2 Connect the other network device. NOTE Cisco strongly recommends using Cat5 or better cable for Gigabit connectivity.
... 2 for details about the different ports and LEDs on each device you connect your switch is normal behavior. It can deliver a maximum of the port lights if the device connected is connected. Cisco is not responsible for attached devices or the LAN to a PD (Powered Device). 4 300 Series Managed Switches WARNING Insecure mounting may damage the device or cause injury. STEP 2 Connect the other network device. NOTE Cisco strongly recommends using Cat5 or better cable for Gigabit connectivity.
User Manual
Page 5
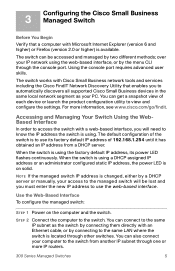
... a DHCP server. For more IP routers. 300 Series Managed Switches 5 STEP 2 Connect the computer to view and configure the settings. 3 Configuring the Cisco Small Business Managed Switch Before You Begin Verify that enables you must enter the new IP address to use its power LED flashes continuously. When the switch is to use the web-based interface. Using the console port requires advanced user skills. Use the Web-Based Interface To configure the managed switch: STEP 1 Power on solid. You can also connect your IP network using the factory default...
... a DHCP server. For more IP routers. 300 Series Managed Switches 5 STEP 2 Connect the computer to view and configure the settings. 3 Configuring the Cisco Small Business Managed Switch Before You Begin Verify that enables you must enter the new IP address to use its power LED flashes continuously. When the switch is to use the web-based interface. Using the console port requires advanced user skills. Use the Web-Based Interface To configure the managed switch: STEP 1 Power on solid. You can also connect your IP network using the factory default...
User Manual
Page 6
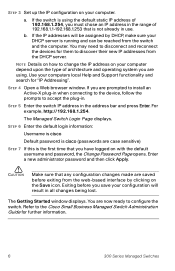
.... STEP 4 Open a Web browser window. Exiting before exiting from the web-based interface by DHCP, make sure your computer. b. If the IP addresses will result in all changes being lost. You may need to disconnect and reconnect the devices for them to the Cisco Small Business Managed Switch Administration Guide for "IP Addressing". STEP 6 Enter the default login information: Username is cisco Default password is cisco (passwords are using the default static IP address of architecture...
.... STEP 4 Open a Web browser window. Exiting before exiting from the web-based interface by DHCP, make sure your computer. b. If the IP addresses will result in all changes being lost. You may need to disconnect and reconnect the devices for them to the Cisco Small Business Managed Switch Administration Guide for "IP Addressing". STEP 6 Enter the default login information: Username is cisco Default password is cisco (passwords are using the default static IP address of architecture...
User Manual
Page 7
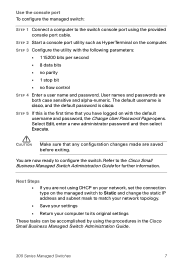
Use the console port To configure the managed switch: STEP 1 Connect a computer to the switch console port using the procedures in the Cisco Small Business Managed Switch Administration Guide. 300 Series Managed Switches 7 You are both case sensitive and alpha-numeric. The default username is cisco, and the default password is the first time that any configuration changes made are not using DHCP on your network, set the connection type on the managed switch to Static and change the static IP address and subnet mask to match your network topology...
Use the console port To configure the managed switch: STEP 1 Connect a computer to the switch console port using the procedures in the Cisco Small Business Managed Switch Administration Guide. 300 Series Managed Switches 7 You are both case sensitive and alpha-numeric. The default username is cisco, and the default password is the first time that any configuration changes made are not using DHCP on your network, set the connection type on the managed switch to Static and change the static IP address and subnet mask to match your network topology...
User Manual
Page 8
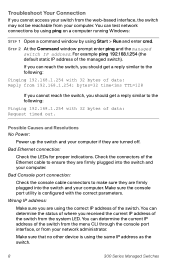
... can test network connections by using ping on a computer running Windows: STEP 1 Open a command window by using Start > Run and enter cmd. STEP 2 At the Command window prompt enter ping and the managed switch IP address. For example ping 192.168.1.254 (the default static IP address of data: Reply from your switch from the web-based interface, the switch may not be reachable from 192.168.1.254: bytes=32 time You can reach the switch, you cannot access...
... can test network connections by using ping on a computer running Windows: STEP 1 Open a command window by using Start > Run and enter cmd. STEP 2 At the Command window prompt enter ping and the managed switch IP address. For example ping 192.168.1.254 (the default static IP address of data: Reply from your switch from the web-based interface, the switch may not be reachable from 192.168.1.254: bytes=32 time You can reach the switch, you cannot access...
User Manual
Page 9
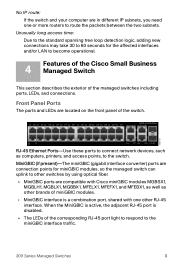
... more routers to other switches by using optical fiber. • MiniGBIC ports are compatible with one other brands of miniGBIC modules. • MiniGBIC interface is disabled. • The LEDs of the switch. Front Panel Ports The ports and LEDs are connection points for the affected interfaces and/or LAN to the switch. MiniGBIC (if present)-The miniGBIC (gigabit interface converter) ports are located on the front panel of the corresponding RJ-45 port light to...
... more routers to other switches by using optical fiber. • MiniGBIC ports are compatible with one other brands of miniGBIC modules. • MiniGBIC interface is disabled. • The LEDs of the switch. Front Panel Ports The ports and LEDs are connection points for the affected interfaces and/or LAN to the switch. MiniGBIC (if present)-The miniGBIC (gigabit interface converter) ports are located on the front panel of the corresponding RJ-45 port light to...
User Manual
Page 10
... connection speed is under 1000 Mbps or nothing is being supplied to a device attached to the port, is powered on, and a 1000 Mbps link is passing traffic. The switch can be reset by inserting a pin or paper clip into the reset opening. If the LED flashes Amber, the switch has detected a hardware failure. Additional Front Panel Features The switch also has a reset button. Lights steady when a link between the devices. Gigabit LED (if present)-(Green) Located on each model...
... connection speed is under 1000 Mbps or nothing is being supplied to a device attached to the port, is powered on, and a 1000 Mbps link is passing traffic. The switch can be reset by inserting a pin or paper clip into the reset opening. If the LED flashes Amber, the switch has detected a hardware failure. Additional Front Panel Features The switch also has a reset button. Lights steady when a link between the devices. Gigabit LED (if present)-(Green) Located on each model...

User Manual
Page 11
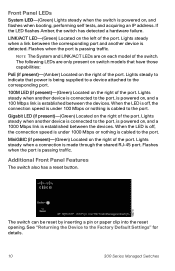
... restore the managed switch configuration to the factory default settings: 1. Disconnect the managed switch from the network or disable all DHCP servers on the back panel of the managed switch. With the power on, press-and-hold the Reset button for less than 10 seconds. 300 Series Managed Switches 11 Console-The Console port is where you can connect a serial cable to a computers serial port for configuration using a terminal emulation program. 5 Returning the Device to the Factory Default Settings To use the Reset button to power. Back Panel The power port and console port are...
... restore the managed switch configuration to the factory default settings: 1. Disconnect the managed switch from the network or disable all DHCP servers on the back panel of the managed switch. With the power on, press-and-hold the Reset button for less than 10 seconds. 300 Series Managed Switches 11 Console-The Console port is where you can connect a serial cable to a computers serial port for configuration using a terminal emulation program. 5 Returning the Device to the Factory Default Settings To use the Reset button to power. Back Panel The power port and console port are...
User Manual
Page 16
... partner does not imply a partnership relationship between Cisco and any other countries. The use of Cisco Systems, Inc. Americas Headquarters Cisco Systems, Inc. 170 West Tasman Drive San Jose, CA 95134-1706 USA www.cisco.com Small Business Support US: 1-866-606-1866 (Toll Free, 24/7) Small Business Support, Global: www.cisco.com/go / trademarks. and other company. (1005R...
... partner does not imply a partnership relationship between Cisco and any other countries. The use of Cisco Systems, Inc. Americas Headquarters Cisco Systems, Inc. 170 West Tasman Drive San Jose, CA 95134-1706 USA www.cisco.com Small Business Support US: 1-866-606-1866 (Toll Free, 24/7) Small Business Support, Global: www.cisco.com/go / trademarks. and other company. (1005R...


