
Brochure
Page 1
...Setup (WPS), and Bluetooth headset support ● Graphics-rich, high-resolution 3.2-inch QVGA 320 x 240 color screen ● Cisco AnyConnect VPN Client: Highly secure Internet phone connection for remote users that is Cisco Public Information. All rights reserved. Cisco SPA525G2 5-Line IP Phone with the Cisco... Unified Communications 500 Series for Small Business Figure 1. Data Sheet Cisco SPA525G2 5-Line IP Phone Cisco Small Business 5-Line Business IP...
...Setup (WPS), and Bluetooth headset support ● Graphics-rich, high-resolution 3.2-inch QVGA 320 x 240 color screen ● Cisco AnyConnect VPN Client: Highly secure Internet phone connection for remote users that is Cisco Public Information. All rights reserved. Cisco SPA525G2 5-Line IP Phone with the Cisco... Unified Communications 500 Series for Small Business Figure 1. Data Sheet Cisco SPA525G2 5-Line IP Phone Cisco Small Business 5-Line Business IP...

Brochure
Page 3
...rights reserved. Can designate separate VLANs (802.1Q) for incoming calls ● Outbound caller ID blocking ● Call transfer - disabled when phone is Cisco Public Information. unconditional, no answer, on busy ● Call blocking - anonymous and selective ● Do not disturb ● Intercom1 ● Group...64 or 128 bit ● Wi-Fi Protected Access (WPA), Personal and Enterprise ● WPA2, Personal and Enterprise ● Wi-Fi Protected Setup (WPS) Ethernet switch 10/100 PC switch port enables LAN connectivity to a co-located PC. per line ● URL (IP) dialing ...
...rights reserved. Can designate separate VLANs (802.1Q) for incoming calls ● Outbound caller ID blocking ● Call transfer - disabled when phone is Cisco Public Information. unconditional, no answer, on busy ● Call blocking - anonymous and selective ● Do not disturb ● Intercom1 ● Group...64 or 128 bit ● Wi-Fi Protected Access (WPA), Personal and Enterprise ● WPA2, Personal and Enterprise ● Wi-Fi Protected Setup (WPS) Ethernet switch 10/100 PC switch port enables LAN connectivity to a co-located PC. per line ● URL (IP) dialing ...

User Manual
Page 5
... Connecting Your Phone to the Wireless Network 29 Determining Your Wireless Router Security Type 30 Using Wi-Fi Protected Setup with the Cisco SPA 525G/525G2 33 Manually Adding a Wireless Profile on the Cisco SPA 525G/525G2 34 Uploading Security Certificates to the Phone 36 Verifying Phone Startup 37 Upgrading Your Phone's Firmware... Viewing and Returning Missed Calls 43 Returning a Missed Call 43 Viewing a List of Missed Calls 43 Turning the Missed Calls Shortcut On and Off 44 Cisco Small Business IP Phone SPA 525G/G2 (SIP) User Guide 2
... Connecting Your Phone to the Wireless Network 29 Determining Your Wireless Router Security Type 30 Using Wi-Fi Protected Setup with the Cisco SPA 525G/525G2 33 Manually Adding a Wireless Profile on the Cisco SPA 525G/525G2 34 Uploading Security Certificates to the Phone 36 Verifying Phone Startup 37 Upgrading Your Phone's Firmware... Viewing and Returning Missed Calls 43 Returning a Missed Call 43 Viewing a List of Missed Calls 43 Turning the Missed Calls Shortcut On and Off 44 Cisco Small Business IP Phone SPA 525G/G2 (SIP) User Guide 2

User Manual
Page 14
Cisco Small Business IP Phone SPA 525G/SPA 525G2 User Guide (SIP) 11 A flashing red mute button indicates that is highlighted on the LCD screen. 9 Messages ... typically, when lit: • Green: Line is idle. • Red (steady): Line is active or in each direction to scroll through items on hold . 11 Setup button Press to access the phone's configuration menu to configure features and preferences (such as your directory and speed dials), access your phone administrator). 10...
Cisco Small Business IP Phone SPA 525G/SPA 525G2 User Guide (SIP) 11 A flashing red mute button indicates that is highlighted on the LCD screen. 9 Messages ... typically, when lit: • Green: Line is idle. • Red (steady): Line is active or in each direction to scroll through items on hold . 11 Setup button Press to access the phone's configuration menu to configure features and preferences (such as your directory and speed dials), access your phone administrator). 10...
User Manual
Page 18
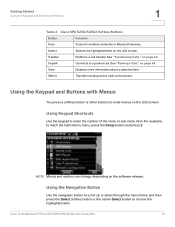
...softkey button or other buttons to a parked call transfer. Transfer Performs a call . Using the Keypad and Buttons with Menus 1 Table 2 Cisco SPA 525G/525G2 Softkey Buttons Button Function Scan Scans for wireless networks or Bluetooth devices. Unpark Connects to enter menus on the LCD screen. View... SPA 525G/SPA 525G2 User Guide (SIP) 15 Using Keypad Shortcuts Use the keypad to reach the Call History menu, press the Setup button and press 2. See "Transferring Calls," on the phone. XferLX Transfers existing active calls on page 42. Using the Navigation Button...
...softkey button or other buttons to a parked call transfer. Transfer Performs a call . Using the Keypad and Buttons with Menus 1 Table 2 Cisco SPA 525G/525G2 Softkey Buttons Button Function Scan Scans for wireless networks or Bluetooth devices. Unpark Connects to enter menus on the LCD screen. View... SPA 525G/SPA 525G2 User Guide (SIP) 15 Using Keypad Shortcuts Use the keypad to reach the Call History menu, press the Setup button and press 2. See "Transferring Calls," on the phone. XferLX Transfers existing active calls on page 42. Using the Navigation Button...

User Manual
Page 21
Getting Started Using Phone Hardware and Accessories 1 • For wired headsets: Connect the 2.5mm connector from the headset into the headset port on the right side of the IP phone as headsets. Cisco Small Business IP Phone SPA 525G/SPA 525G2 User Guide (SIP) 18 STEP 3 Select Bluetooth Configuration. STEP 2 Select User Preferences. To configure the phone to work with Bluetooth devices such as shown in the following graphic: Connecting Bluetooth Headsets Your phone is Bluetooth compatible and works with your headset, first enable Bluetooth: STEP 1 Press the Setup button.
Getting Started Using Phone Hardware and Accessories 1 • For wired headsets: Connect the 2.5mm connector from the headset into the headset port on the right side of the IP phone as headsets. Cisco Small Business IP Phone SPA 525G/SPA 525G2 User Guide (SIP) 18 STEP 3 Select Bluetooth Configuration. STEP 2 Select User Preferences. To configure the phone to work with Bluetooth devices such as shown in the following graphic: Connecting Bluetooth Headsets Your phone is Bluetooth compatible and works with your headset, first enable Bluetooth: STEP 1 Press the Setup button.

User Manual
Page 22
... and press the Right Arrow key to User Preferences and press Select. STEP 3 Scroll to choose one of the following: • Phone-Your Cisco SPA 525G2 will use a Bluetooth headset, or operate with a Bluetooth headset only. Choose this option if you will not use the... 525G2 With Your Bluetooth-Enabled Mobile Phone" on page 65 for your mobile phone.) Cisco Small Business IP Phone SPA 525G/SPA 525G2 User Guide (SIP) 19 STEP 2 Press the Setup button. STEP 4 Scroll to turn Bluetooth On. Getting Started Using Phone Hardware and Accessories 1 STEP 4 With Bluetooth selected, press ...
... and press the Right Arrow key to User Preferences and press Select. STEP 3 Scroll to choose one of the following: • Phone-Your Cisco SPA 525G2 will use a Bluetooth headset, or operate with a Bluetooth headset only. Choose this option if you will not use the... 525G2 With Your Bluetooth-Enabled Mobile Phone" on page 65 for your mobile phone.) Cisco Small Business IP Phone SPA 525G/SPA 525G2 User Guide (SIP) 19 STEP 2 Press the Setup button. STEP 4 Scroll to turn Bluetooth On. Getting Started Using Phone Hardware and Accessories 1 STEP 4 With Bluetooth selected, press ...
User Manual
Page 35
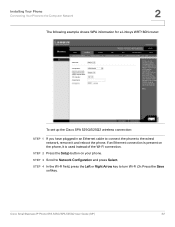
Cisco Small Business IP Phone SPA 525G/SPA 525G2 User Guide (SIP) 32 STEP 4 In the Wi-Fi field, press the Left or Right Arrow key ... softkey. Installing Your Phone Connecting Your Phone to the Computer Network 2 The following example shows WPA information for a Linksys WRT160N router: To set up the Cisco SPA 525G/525G2 wireless connection: STEP 1 If you have plugged in an Ethernet cable to connect the phone to turn Wi-Fi On. STEP 3 Scroll...
Cisco Small Business IP Phone SPA 525G/SPA 525G2 User Guide (SIP) 32 STEP 4 In the Wi-Fi field, press the Left or Right Arrow key ... softkey. Installing Your Phone Connecting Your Phone to the Computer Network 2 The following example shows WPA information for a Linksys WRT160N router: To set up the Cisco SPA 525G/525G2 wireless connection: STEP 1 If you have plugged in an Ethernet cable to connect the phone to turn Wi-Fi On. STEP 3 Scroll...
User Manual
Page 36
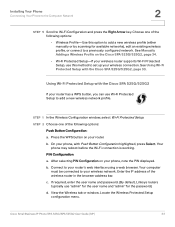
...either manually or by scanning for the password.) d. Your phone may reboot before the Wi-Fi connection is working. Locate the Wireless Protected Setup configuration menu. Cisco Small Business IP Phone SPA 525G/SPA 525G2 User Guide (SIP) 33 STEP 1 In the Wireless Configuration window, select Wi-Fi Protected... Setup. See Using Wi-Fi Protected Setup with the Cisco SPA 525G/525G2 If your router has a WPS button, you can use "admin" for the user name and "admin" ...
...either manually or by scanning for the password.) d. Your phone may reboot before the Wi-Fi connection is working. Locate the Wireless Protected Setup configuration menu. Cisco Small Business IP Phone SPA 525G/SPA 525G2 User Guide (SIP) 33 STEP 1 In the Wireless Configuration window, select Wi-Fi Protected... Setup. See Using Wi-Fi Protected Setup with the Cisco SPA 525G/525G2 If your router has a WPS button, you can use "admin" for the user name and "admin" ...

User Manual
Page 37
...may reboot before the Wi-Fi connection is enabled. STEP 4 Do one of available networks, scroll to the desired network and click Add to setup wireless devices using a PIN. See Scanning for available networks. f. Save your router has SSID (router name) broadcast disabled, it (see Manually ... STEP 2 In the list of the following: • Scan for Available Networks, page 34. • Manually add the network. On the Cisco SPA 525G/525G2, with PIN Configuration highlighted, press Select. See Manually Adding a Network, page 35. Installing Your Phone Connecting Your Phone to Wi-...
...may reboot before the Wi-Fi connection is enabled. STEP 4 Do one of available networks, scroll to the desired network and click Add to setup wireless devices using a PIN. See Scanning for available networks. f. Save your router has SSID (router name) broadcast disabled, it (see Manually ... STEP 2 In the list of the following: • Scan for Available Networks, page 34. • Manually add the network. On the Cisco SPA 525G/525G2, with PIN Configuration highlighted, press Select. See Manually Adding a Network, page 35. Installing Your Phone Connecting Your Phone to Wi-...

User Manual
Page 41
Installing Your Phone Upgrading Your Phone's Firmware 2 There are two ways to upgrade your phone's firmware: • Download the firmware to run the upgrade procedure. Cisco Small Business IP Phone SPA 525G/SPA 525G2 User Guide (SIP) 38 See the Cisco SPA 9000 Voice System Setup Wizard User Guide. See the "Upgrading Firmware" section on page 102. • Upgrade using the Cisco SPA 9000 Voice System Setup Wizard (if your PC and log in to the web interface to your phone is part of a Cisco SPA 9000 Voice System network).
Installing Your Phone Upgrading Your Phone's Firmware 2 There are two ways to upgrade your phone's firmware: • Download the firmware to run the upgrade procedure. Cisco Small Business IP Phone SPA 525G/SPA 525G2 User Guide (SIP) 38 See the Cisco SPA 9000 Voice System Setup Wizard User Guide. See the "Upgrading Firmware" section on page 102. • Upgrade using the Cisco SPA 9000 Voice System Setup Wizard (if your PC and log in to the web interface to your phone is part of a Cisco SPA 9000 Voice System network).
User Manual
Page 47
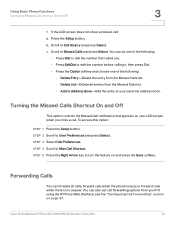
... Call Preferences. Forwarding Calls You can forward all entries from the Missed Calls list. - Press the Setup button. To access this option: STEP 1 Press the Setup button. STEP 2 Scroll to Missed Calls and press Select. Cisco Small Business IP Phone SPA 525G/SPA 525G2 User Guide (SIP) 44 Using Basic Phone Functions Turning...
... Call Preferences. Forwarding Calls You can forward all entries from the Missed Calls list. - Press the Setup button. To access this option: STEP 1 Press the Setup button. STEP 2 Scroll to Missed Calls and press Select. Cisco Small Business IP Phone SPA 525G/SPA 525G2 User Guide (SIP) 44 Using Basic Phone Functions Turning...

User Manual
Page 48
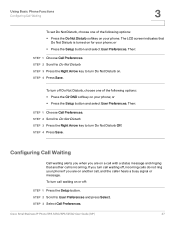
... Preferences screen, scroll to enter a URL, press Option and choose Input IP before entering the call forwarding information. STEP 3 Select Call Preferences. Cisco Small Business IP Phone SPA 525G/SPA 525G2 User Guide (SIP) 45 Using Basic Phone Functions Forwarding Calls 3 To forward calls: STEP 1 Press the... Setup button. for example, another extension, or an outside line. TIP If you need to Forward All Number. If forwarding calls to an outside...
... Preferences screen, scroll to enter a URL, press Option and choose Input IP before entering the call forwarding information. STEP 3 Select Call Preferences. Cisco Small Business IP Phone SPA 525G/SPA 525G2 User Guide (SIP) 45 Using Basic Phone Functions Forwarding Calls 3 To forward calls: STEP 1 Press the... Setup button. for example, another extension, or an outside line. TIP If you need to Forward All Number. If forwarding calls to an outside...
User Manual
Page 50
... on another call is turned on a call with a status message and ringing that Do Not Disturb is incoming. To turn off : STEP 1 Press the Setup button. STEP 2 Scroll to User Preferences and press Select. STEP 3 Select Call Preferences. STEP 3 Press the Right Arrow key to turn Do Not Disturb ... To turn call waiting off, incoming calls do not ring your phone if you turn call , and the caller hears a busy signal or message. Cisco Small Business IP Phone SPA 525G/SPA 525G2 User Guide (SIP) 47 STEP 2 Scroll to turn Do Not Disturb Off. Using Basic Phone Functions Configuring...
... on another call is turned on a call with a status message and ringing that Do Not Disturb is incoming. To turn off : STEP 1 Press the Setup button. STEP 2 Scroll to User Preferences and press Select. STEP 3 Select Call Preferences. STEP 3 Press the Right Arrow key to turn Do Not Disturb ... To turn call waiting off, incoming calls do not ring your phone if you turn call , and the caller hears a busy signal or message. Cisco Small Business IP Phone SPA 525G/SPA 525G2 User Guide (SIP) 47 STEP 2 Scroll to turn Do Not Disturb Off. Using Basic Phone Functions Configuring...

User Manual
Page 52
Cisco Small Business IP Phone SPA 525G/SPA 525G2 User Guide (SIP) 49 The call is picked up on your phone. To unpark a call .") STEP 3 Press ... list. To unpark if you know the park line number), or view a list of parked calls and unpark it from the list): STEP 1 Press the Setup button. STEP 3 You or another person must then "unpark" the call , press the Park button. STEP 2 Enter the number identifier of the park line (for...
Cisco Small Business IP Phone SPA 525G/SPA 525G2 User Guide (SIP) 49 The call is picked up on your phone. To unpark a call .") STEP 3 Press ... list. To unpark if you know the park line number), or view a list of parked calls and unpark it from the list): STEP 1 Press the Setup button. STEP 3 You or another person must then "unpark" the call , press the Park button. STEP 2 Enter the number identifier of the park line (for...
User Manual
Page 54
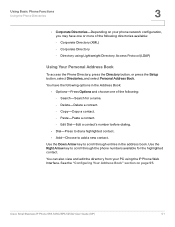
...following options in the address book. Directory using the IP Phone Web Interface. Delete-Delete a contact. - You have one of the following : - Cisco Small Business IP Phone SPA 525G/SPA 525G2 User Guide (SIP) 51 Corporate Directory (XML) - Copy-Copy a contact. - See the "Configuring ...Lightweight Directory Access Protocol (LDAP) Using Your Personal Address Book To access the Phone Directory, press the Directory button, or press the Setup button, select Directories, and select Personal Address Book. Use the Right Arrow key to add a new contact. Using Basic Phone ...
...following options in the address book. Directory using the IP Phone Web Interface. Delete-Delete a contact. - You have one of the following : - Cisco Small Business IP Phone SPA 525G/SPA 525G2 User Guide (SIP) 51 Corporate Directory (XML) - Copy-Copy a contact. - See the "Configuring ...Lightweight Directory Access Protocol (LDAP) Using Your Personal Address Book To access the Phone Directory, press the Directory button, or press the Setup button, select Directories, and select Personal Address Book. Use the Right Arrow key to add a new contact. Using Basic Phone ...

User Manual
Page 57
...required if too many results are found for the last name. • Advanced Search: The fields available in advanced search depend on page 99. Cisco Small Business IP Phone SPA 525G/SPA 525G2 User Guide (SIP) 54 STEP 2 Scroll to Call History and press Select. To use the ...corporate directory: STEP 1 Press the Setup button and select Directories. See the "Viewing Call History Lists" section on your system configuration. STEP 2 Scroll to the Corporate Directory you . Enter ...
...required if too many results are found for the last name. • Advanced Search: The fields available in advanced search depend on page 99. Cisco Small Business IP Phone SPA 525G/SPA 525G2 User Guide (SIP) 54 STEP 2 Scroll to Call History and press Select. To use the ...corporate directory: STEP 1 Press the Setup button and select Directories. See the "Viewing Call History Lists" section on your system configuration. STEP 2 Scroll to the Corporate Directory you . Enter ...
User Manual
Page 58
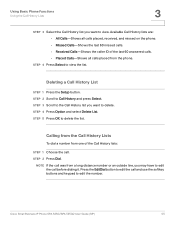
... the phone. STEP 2 Scroll to edit the number. STEP 4 Press Option and select Delete List. STEP 2 Press Dial. Deleting a Call History List STEP 1 Press the Setup button. Press the EditDial button to edit the call before dialing it. STEP 5 Press OK to edit the call and use the softkey buttons and... keypad to Call History and press Select. NOTE If the call . Cisco Small Business IP Phone SPA 525G/SPA 525G2 User Guide (SIP) 55 STEP 3 Scroll to the Call History list you want to view the list...
... the phone. STEP 2 Scroll to edit the number. STEP 4 Press Option and select Delete List. STEP 2 Press Dial. Deleting a Call History List STEP 1 Press the Setup button. Press the EditDial button to edit the call before dialing it. STEP 5 Press OK to edit the call and use the softkey buttons and... keypad to Call History and press Select. NOTE If the call . Cisco Small Business IP Phone SPA 525G/SPA 525G2 User Guide (SIP) 55 STEP 3 Scroll to the Call History list you want to view the list...

User Manual
Page 59
...Re-enter New Password. Press the Down Arrow key to go to prevent unauthorized use. STEP 4 Edit the information (if desired) and press Save again. Cisco Small Business IP Phone SPA 525G/SPA 525G2 User Guide (SIP) 56 To set a password). STEP 4 Enter your old password (leave blank if you ... Down Arrow key to go to Your Directory STEP 1 In the call history list, choose the call . STEP 5 Enter your phone: STEP 1 Press the Setup button. Using Basic Phone Functions Setting or Changing a Phone Password Deleting an Entry from the Call History Lists STEP 1 In the call history list, choose...
...Re-enter New Password. Press the Down Arrow key to go to prevent unauthorized use. STEP 4 Edit the information (if desired) and press Save again. Cisco Small Business IP Phone SPA 525G/SPA 525G2 User Guide (SIP) 56 To set a password). STEP 4 Enter your old password (leave blank if you ... Down Arrow key to go to Your Directory STEP 1 In the call history list, choose the call . STEP 5 Enter your phone: STEP 1 Press the Setup button. Using Basic Phone Functions Setting or Changing a Phone Password Deleting an Entry from the Call History Lists STEP 1 In the call history list, choose...

User Manual
Page 60
... are not logged in and out of Your Phone After you've set a password, you for your phone. STEP 2 Scroll to New Password. Cisco Small Business IP Phone SPA 525G/SPA 525G2 User Guide (SIP) 57 STEP 3 Select Set Password. Press the Down Arrow key to go to ..., user preferences, and other features on your password and press Login. Enter your phone. STEP 6 Press Save. To delete a password: STEP 1 Press the Setup button. STEP 2 Scroll to Login and press Select. Using Basic Phone Functions Setting or Changing a Phone Password 3 STEP 6 Reenter the same password. To log...
... are not logged in and out of Your Phone After you've set a password, you for your phone. STEP 2 Scroll to New Password. Cisco Small Business IP Phone SPA 525G/SPA 525G2 User Guide (SIP) 57 STEP 3 Select Set Password. Press the Down Arrow key to go to ..., user preferences, and other features on your password and press Login. Enter your phone. STEP 6 Press Save. To delete a password: STEP 1 Press the Setup button. STEP 2 Scroll to Login and press Select. Using Basic Phone Functions Setting or Changing a Phone Password 3 STEP 6 Reenter the same password. To log...


