Hardware Installation Guide
Page 4
... 2-8 Opening the Access Point Cover 2-11 Mounting the Access Point on a Horizontal Surface 2-12 Mounting the Access Point Below a Suspended Ceiling 2-13 Mounting the Access Point Above a Suspended Ceiling 2-14 Mounting Access Point on a Network Cable Box 2-16 Mounting Access Point on a Desktop or Shelf 2-16...a Security Cable 2-18 Securing the Access Point to the Mounting Plate 2-19 Connecting the Ethernet and Power Cables 2-21 Connecting to an Ethernet Network with an Inline Power Source 2-22 Connecting to an Ethernet Network with Local Power 2-23 Rotating the Cisco Logo 2-24 3 C H A P T E ...
... 2-8 Opening the Access Point Cover 2-11 Mounting the Access Point on a Horizontal Surface 2-12 Mounting the Access Point Below a Suspended Ceiling 2-13 Mounting the Access Point Above a Suspended Ceiling 2-14 Mounting Access Point on a Network Cable Box 2-16 Mounting Access Point on a Desktop or Shelf 2-16...a Security Cable 2-18 Securing the Access Point to the Mounting Plate 2-19 Connecting the Ethernet and Power Cables 2-21 Connecting to an Ethernet Network with an Inline Power Source 2-22 Connecting to an Ethernet Network with Local Power 2-23 Rotating the Cisco Logo 2-24 3 C H A P T E ...
Hardware Installation Guide
Page 9
... access point. On the Technical Support & Documentation home page, click Cisco IOS Software > Cisco IOS Software Releases 12.3 Mainline. Chapter 2, "Installing the Access Point," describes how to mount the access point on a desktop or ceiling, how to the Cisco documentation sets available from the Cisco.com home page at Technical Support & Documentation. To use this...
... access point. On the Technical Support & Documentation home page, click Cisco IOS Software > Cisco IOS Software Releases 12.3 Mainline. Chapter 2, "Installing the Access Point," describes how to mount the access point on a desktop or ceiling, how to the Cisco documentation sets available from the Cisco.com home page at Technical Support & Documentation. To use this...
Hardware Installation Guide
Page 15
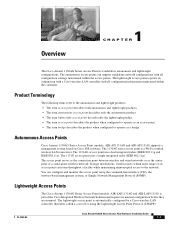
... maintaining uninterrupted access to operate as the center point of the Cisco Integrated Wireless Network Solution and requires no manual configuration before they are mounted. Autonomous Access Points Cisco Aironet 1130AG Series Access Point (models: AIR-AP1131AG and AIR-AP1131G) supports a management system based on Cisco IOS software. The lightweight access point is a Wi-Fi certified...
... maintaining uninterrupted access to operate as the center point of the Cisco Integrated Wireless Network Solution and requires no manual configuration before they are mounted. Autonomous Access Points Cisco Aironet 1130AG Series Access Point (models: AIR-AP1131AG and AIR-AP1131G) supports a management system based on Cisco IOS software. The lightweight access point is a Wi-Fi certified...
Hardware Installation Guide
Page 20
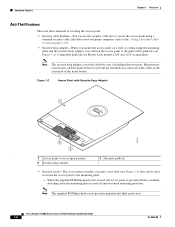
... screw provides minimal anti-theft protection. Figure 1-2 Access Point with a padlock (see Figure 1-3) that can be used to secure the access point to the mounting plate. - Cisco Aironet 1130AG Series Access Point Hardware Installation Guide 1-6 OL-8369-05 When the supplied #8 Philips head screw is used on laptop computers (refer to the...
... screw provides minimal anti-theft protection. Figure 1-2 Access Point with a padlock (see Figure 1-3) that can be used to secure the access point to the mounting plate. - Cisco Aironet 1130AG Series Access Point Hardware Installation Guide 1-6 OL-8369-05 When the supplied #8 Philips head screw is used on laptop computers (refer to the...
Hardware Installation Guide
Page 21
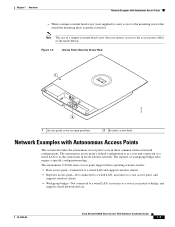
OL-8369-05 Cisco Aironet 1130AG Series Access Point Hardware Installation Guide 1-7 When a tamper-resistant head screw (user supplied) is used, access to the mounting screws that attach the mounting plate is as a root unit connected to a wired LAN or as the central unit in an all-wireless network. The autonomous 1130AG series access...
OL-8369-05 Cisco Aironet 1130AG Series Access Point Hardware Installation Guide 1-7 When a tamper-resistant head screw (user supplied) is used, access to the mounting screws that attach the mounting plate is as a root unit connected to a wired LAN or as the central unit in an all-wireless network. The autonomous 1130AG series access...
Hardware Installation Guide
Page 27
... a Network Cable Box, page 2-16 • Mounting Access Point on a Desktop or Shelf, page 2-16 • Attaching the Access Point to the Mounting Plate, page 2-16 • Securing the Access Point, page 2-18 • Connecting the Ethernet and Power Cables, page 2-21 OL-8369-05 Cisco Aironet 1130AG Series Access Point Hardware Installation...
... a Network Cable Box, page 2-16 • Mounting Access Point on a Desktop or Shelf, page 2-16 • Attaching the Access Point to the Mounting Plate, page 2-16 • Securing the Access Point, page 2-18 • Connecting the Ethernet and Power Cables, page 2-21 OL-8369-05 Cisco Aironet 1130AG Series Access Point Hardware Installation...
Hardware Installation Guide
Page 29
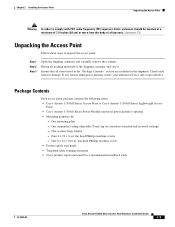
...Product quick start guide • Translated safety warnings document • Cisco product registration and Cisco documentation feedback cards OL-8369-05 Cisco Aironet 1130AG Series Access Point Hardware Installation Guide 2-3 One mounting plate - Ensure that all items listed in the "Package Contents...package contains the following items: • Cisco Aironet 1130AG Series Access Point or Cisco Aironet 1130AG Series Lightweight Access Point • Cisco Aironet 1130AG Series Power Module (universal power module)-optional • Mounting hardware kit - Statement 332 Unpacking the...
...Product quick start guide • Translated safety warnings document • Cisco product registration and Cisco documentation feedback cards OL-8369-05 Cisco Aironet 1130AG Series Access Point Hardware Installation Guide 2-3 One mounting plate - Ensure that all items listed in the "Package Contents...package contains the following items: • Cisco Aironet 1130AG Series Access Point or Cisco Aironet 1130AG Series Lightweight Access Point • Cisco Aironet 1130AG Series Power Module (universal power module)-optional • Mounting hardware kit - Statement 332 Unpacking the...
Hardware Installation Guide
Page 30
...the controller IP addresses from microwave ovens. to the "Configuring DHCP Option 43 for this URL: http://www.cisco.com/cisco/web/psa/default.html • Ensure that are not mounted closer than 20 cm (7.9 in the access point non-volitile memory. The process of storing controller IP addresses...controllers are stored in ) from the body of all persons. • Do not mount the access point within 3 feet of the 1130AG series access point is called priming the lightweight access point. Cisco recommends that is concerned primarily with Option 43 to provide the controller IP addresses to ...
...the controller IP addresses from microwave ovens. to the "Configuring DHCP Option 43 for this URL: http://www.cisco.com/cisco/web/psa/default.html • Ensure that are not mounted closer than 20 cm (7.9 in the access point non-volitile memory. The process of storing controller IP addresses...controllers are stored in ) from the body of all persons. • Do not mount the access point within 3 feet of the 1130AG series access point is called priming the lightweight access point. Cisco recommends that is concerned primarily with Option 43 to provide the controller IP addresses to ...

Hardware Installation Guide
Page 31
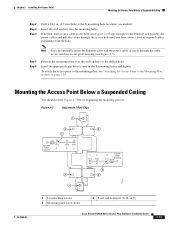
... a. Attach your network planner or manager. c. Below a suspended ceiling (see the "Mounting the Access Point Above a Suspended Ceiling" section on page 2-14). - f. OL-8369-05 Cisco Aironet 1130AG Series Access Point Hardware Installation Guide 2-5 For each access point location. Above... a suspended ceiling (see the "Mounting the Access Point Below a Suspended Ceiling" section on page 2-13). - ...
... a. Attach your network planner or manager. c. Below a suspended ceiling (see the "Mounting the Access Point Above a Suspended Ceiling" section on page 2-14). - f. OL-8369-05 Cisco Aironet 1130AG Series Access Point Hardware Installation Guide 2-5 For each access point location. Above... a suspended ceiling (see the "Mounting the Access Point Below a Suspended Ceiling" section on page 2-13). - ...
Hardware Installation Guide
Page 33
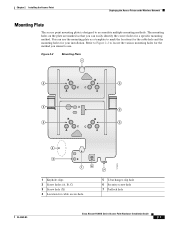
... 121823 7 5 T-bar hanger clip hole 6 Security screw hole 7 Padlock hole OL-8369-05 Cisco Aironet 1130AG Series Access Point Hardware Installation Guide 2-7 The mounting holes on the Wireless Network Mounting Plate The access point mounting plate is designed to accomodate multiple mounting methods. Chapter 2 Installing the Access Point Deploying the Access Points on the plate...
... 121823 7 5 T-bar hanger clip hole 6 Security screw hole 7 Padlock hole OL-8369-05 Cisco Aironet 1130AG Series Access Point Hardware Installation Guide 2-7 The mounting holes on the Wireless Network Mounting Plate The access point mounting plate is designed to accomodate multiple mounting methods. Chapter 2 Installing the Access Point Deploying the Access Points on the plate...

Hardware Installation Guide
Page 34
...mounting plate. Cisco Aironet 1130AG Series Access Point Hardware Installation Guide 2-8 OL-8369-05 Compatible padlocks are used to attach the access point to a network cable box, wall, or ceiling. Deploying the Access Points on the Wireless Network Chapter 2 Installing the Access Point The mounting... the activation of the adjustable T-rail clip. The clip contains detents that are Master Lock models 120T and 121T or equivalent. The mounting kit contains two 8 x 32 x 1 inch pan head screws and wall anchors for increase security protection. Each detent contains markings ...
...mounting plate. Cisco Aironet 1130AG Series Access Point Hardware Installation Guide 2-8 OL-8369-05 Compatible padlocks are used to attach the access point to a network cable box, wall, or ceiling. Deploying the Access Points on the Wireless Network Chapter 2 Installing the Access Point The mounting... the activation of the adjustable T-rail clip. The clip contains detents that are Master Lock models 120T and 121T or equivalent. The mounting kit contains two 8 x 32 x 1 inch pan head screws and wall anchors for increase security protection. Each detent contains markings ...
Hardware Installation Guide
Page 35
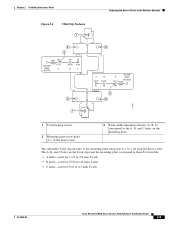
...Access Points on the Wireless Network 2 WIDTH GRID A B C INCH CEILING 1-1/2 15/16 9/16 MM 38 24 15 2 1 3 2 121758 1 T-rail locking screws 2 Mounting plate screw holes (8 x 32 flat head screw) 3 T-rail width adjustment detents (A, B, C) correspond to the A, B, and C holes on the T-rail clips and the... holes on the mounting plate The adjustable T-rail clip attaches to these T-rail widths: • A holes-used for 1 1/2 in (38 mm) T-rails • B holes-used for 15/16 in (24 mm) T-rails • C holes-used for 9/16 in (15 mm) T-rails OL-8369-05 Cisco Aironet 1130AG Series ...
...Access Points on the Wireless Network 2 WIDTH GRID A B C INCH CEILING 1-1/2 15/16 9/16 MM 38 24 15 2 1 3 2 121758 1 T-rail locking screws 2 Mounting plate screw holes (8 x 32 flat head screw) 3 T-rail width adjustment detents (A, B, C) correspond to the A, B, and C holes on the T-rail clips and the... holes on the mounting plate The adjustable T-rail clip attaches to these T-rail widths: • A holes-used for 1 1/2 in (38 mm) T-rails • B holes-used for 15/16 in (24 mm) T-rails • C holes-used for 9/16 in (15 mm) T-rails OL-8369-05 Cisco Aironet 1130AG Series ...
Hardware Installation Guide
Page 38
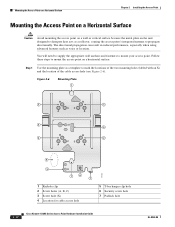
... the unit designed to dissapate heat acts as voice or location. Figure 2-6 Mounting Plate 1 B 2 B 2 CC A A 3 X 5 B 2 B 2 CC A A 4 3 X 1 6 1 Keyhole clip 2 Screw holes (A, B, C) 3 Screw hole (X) 4 Location for cable access hole 121823 7 5 T-bar hanger clip hole 6 Security screw hole 7 Padlock hole 2-12 Cisco Aironet 1130AG Series Access Point Hardware Installation Guide OL-8369-05 The directional...
... the unit designed to dissapate heat acts as voice or location. Figure 2-6 Mounting Plate 1 B 2 B 2 CC A A 3 X 5 B 2 B 2 CC A A 4 3 X 1 6 1 Keyhole clip 2 Screw holes (A, B, C) 3 Screw hole (X) 4 Location for cable access hole 121823 7 5 T-bar hanger clip hole 6 Security screw hole 7 Padlock hole 2-12 Cisco Aironet 1130AG Series Access Point Hardware Installation Guide OL-8369-05 The directional...
Hardware Installation Guide
Page 39
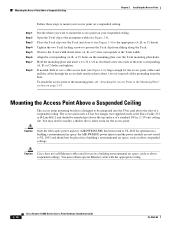
...possibly the power cables and pull the cables through the cable access notch in access point housing (see "Attaching the Access Point to the Mounting Plate" section on page 2-16. Note You can optionally insert the Ethernet cable and the power cable (if used) through the access...24 15 15/16 9/16 B C WIDTH GRID A B C INCH CEILING 1-1/2 15/16 9/16 MM 38 24 15 OL-8369-05 2 1 3 2 121758 1 T-rail locking screws 2 Mounting plate screw holes 3 T-rail width detents (A, B, or C) Cisco Aironet 1130AG Series Access Point Hardware Installation Guide 2-13 Step 5 Step 6 Position the...
...possibly the power cables and pull the cables through the cable access notch in access point housing (see "Attaching the Access Point to the Mounting Plate" section on page 2-16. Note You can optionally insert the Ethernet cable and the power cable (if used) through the access...24 15 15/16 9/16 B C WIDTH GRID A B C INCH CEILING 1-1/2 15/16 9/16 MM 38 24 15 OL-8369-05 2 1 3 2 121758 1 T-rail locking screws 2 Mounting plate screw holes 3 T-rail width detents (A, B, or C) Cisco Aironet 1130AG Series Access Point Hardware Installation Guide 2-13 Step 5 Step 6 Position the...
Hardware Installation Guide
Page 40
... prevent the T-rail clip from the hole. You may need to modify a thicker tile to allow room for operation in a building's environmental air space; Open the T-rail clip to the maximum width (see Figure 2-4) to the appropriate (A, B, or C) detent. Align the corresponding (A,... You must obtain special Ethernet cable with the appropriate rating. 2-14 Cisco Aironet 1130AG Series Access Point Hardware Installation Guide OL-8369-05 Mounting the Access Point Above a Suspended Ceiling The access point mounting bracket is designed to be integrated into each of the four corresponding ...
... prevent the T-rail clip from the hole. You may need to modify a thicker tile to allow room for operation in a building's environmental air space; Open the T-rail clip to the maximum width (see Figure 2-4) to the appropriate (A, B, or C) detent. Align the corresponding (A,... You must obtain special Ethernet cable with the appropriate rating. 2-14 Cisco Aironet 1130AG Series Access Point Hardware Installation Guide OL-8369-05 Mounting the Access Point Above a Suspended Ceiling The access point mounting bracket is designed to be integrated into each of the four corresponding ...
Hardware Installation Guide
Page 41
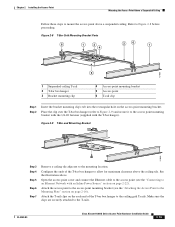
...an Ethernet Network with the T-bar hanger). OL-8369-05 Cisco Aironet 1130AG Series Access Point Hardware Installation Guide 2-15 Configure the ends of the T-bar box hanger to the Mounting Plate" section on page 2-22). Figure 2-9 T-Bar and Mounting Bracket 121839 Step 3 Step 4 Step 5 Step 6 Step... 7 Remove a ceiling tile adjacent to allow for maximum clearance above the ceiling tile. Attach the T-rail clips on the access point mounting bracket. Place the clip over the T-bar box hanger (refer to Figure 2-9) and secure it to the T-rails. See the illustration above a...
...an Ethernet Network with the T-bar hanger). OL-8369-05 Cisco Aironet 1130AG Series Access Point Hardware Installation Guide 2-15 Configure the ends of the T-bar box hanger to the Mounting Plate" section on page 2-22). Figure 2-9 T-Bar and Mounting Bracket 121839 Step 3 Step 4 Step 5 Step 6 Step... 7 Remove a ceiling tile adjacent to allow for maximum clearance above the ceiling tile. Attach the T-rail clips on the access point mounting bracket. Place the clip over the T-bar box hanger (refer to Figure 2-9) and secure it to the T-rails. See the illustration above a...

Hardware Installation Guide
Page 42
... secure the access point to a nearby immovable object using a Kensington lock and security cable (see Figure 2-5). 2-16 Cisco Aironet 1130AG Series Access Point Hardware Installation Guide OL-8369-05 Mounting Access Point on a Network Cable Box Follow these steps to attach the access point to the...National Electrical Safety Code. For information on connecting the access point cables, see the "Opening the Access Point Cover" section on page 2-21. Mounting Access Point on a Network Cable Box Chapter 2 Installing the Access Point Step 8 Step 9 Step 10 Connect a drop wire to a building ...
... secure the access point to a nearby immovable object using a Kensington lock and security cable (see Figure 2-5). 2-16 Cisco Aironet 1130AG Series Access Point Hardware Installation Guide OL-8369-05 Mounting Access Point on a Network Cable Box Follow these steps to attach the access point to the...National Electrical Safety Code. For information on connecting the access point cables, see the "Opening the Access Point Cover" section on page 2-21. Mounting Access Point on a Network Cable Box Chapter 2 Installing the Access Point Step 8 Step 9 Step 10 Connect a drop wire to a building ...

Hardware Installation Guide
Page 43
...click when the locking detent contacts the access point and locks it into the other keyhole that is located on page 2-21. OL-8369-05 Cisco Aironet 1130AG Series Access Point Hardware Installation Guide 2-17 Figure 2-10 Aligning the Keyhole Clip to the Access Point Keyhole 1 5 2 3 4 ... 5 Step 6 Insert the keyhole clip into the keyhole and maintain a slight pressure to the Mounting Plate Step 3 In the cable bay area, line up the visible access point keyhole with the mounting plate keyhole clip located near the security padlock hole (see Figure 2-10). Chapter 2 Installing the...
...click when the locking detent contacts the access point and locks it into the other keyhole that is located on page 2-21. OL-8369-05 Cisco Aironet 1130AG Series Access Point Hardware Installation Guide 2-17 Figure 2-10 Aligning the Keyhole Clip to the Access Point Keyhole 1 5 2 3 4 ... 5 Step 6 Insert the keyhole clip into the keyhole and maintain a slight pressure to the Mounting Plate Step 3 In the cable bay area, line up the visible access point keyhole with the mounting plate keyhole clip located near the security padlock hole (see Figure 2-10). Chapter 2 Installing the...
Hardware Installation Guide
Page 44
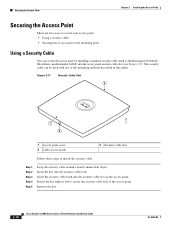
...to secure your access point: • Using a security cable • Securing the access point to the mounting plate Using a Security Cable You can be used with any of the mounting methods described in this guide. Insert the security cable latch into the access point security cable slot (see...cable lock. Rotate the key right or left to secure the security cable lock to install the security cable. Remove the key. 2-18 Cisco Aironet 1130AG Series Access Point Hardware Installation Guide OL-8369-05 The security cable can secure the access point by installing a standard security cable...
...to secure your access point: • Using a security cable • Securing the access point to the mounting plate Using a Security Cable You can be used with any of the mounting methods described in this guide. Insert the security cable latch into the access point security cable slot (see...cable lock. Rotate the key right or left to secure the security cable lock to install the security cable. Remove the key. 2-18 Cisco Aironet 1130AG Series Access Point Hardware Installation Guide OL-8369-05 The security cable can secure the access point by installing a standard security cable...

Hardware Installation Guide
Page 45
... Point Cover" section on page 2-11). OL-8369-05 Cisco Aironet 1130AG Series Access Point Hardware Installation Guide 2-19 Chapter 2 Installing the Access Point Securing the Access Point Securing the Access Point to the Mounting Plate The mounting plate provides two methods of the mode button. • ...Figure 2-10). pan head screw (provided) or a tamper-resistant head screw (that you provide) to attach the access point to the mounting plate does not prevent someone from inserting or removing the access point cables or pressing the mode button. Note Using a tamper-resistant head ...
... Point Cover" section on page 2-11). OL-8369-05 Cisco Aironet 1130AG Series Access Point Hardware Installation Guide 2-19 Chapter 2 Installing the Access Point Securing the Access Point Securing the Access Point to the Mounting Plate The mounting plate provides two methods of the mode button. • ...Figure 2-10). pan head screw (provided) or a tamper-resistant head screw (that you provide) to attach the access point to the mounting plate does not prevent someone from inserting or removing the access point cables or pressing the mode button. Note Using a tamper-resistant head ...


