User Manual
Page 1
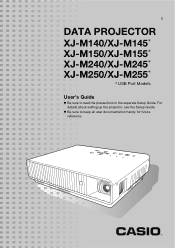
E DATA PROJECTOR XJ-M140/XJ-M145* XJ-M150/XJ-M155* XJ-M240/XJ-M245* XJ-M250/XJ-M255* * USB Port Models User's Guide z Be sure to keep all user documentation handy for future reference. z Be sure to read the precautions in the separate Setup Guide. For details about setting up the projector, see the Setup Guide.
E DATA PROJECTOR XJ-M140/XJ-M145* XJ-M150/XJ-M155* XJ-M240/XJ-M245* XJ-M250/XJ-M255* * USB Port Models User's Guide z Be sure to keep all user documentation handy for future reference. z Be sure to read the precautions in the separate Setup Guide. For details about setting up the projector, see the Setup Guide.
User Manual
Page 4
...Setup Menu Example 21 Direct Power On...22 Password Protecting the Projector 23 Inputting a Password 23 Using the Password Feature 23 Entering the Password when Turning On the Projector 25 Restoring Projector Settings to Their Initial Factory Defaults 26 Setup Menu Contents 28 Image Adjustment 1 Main Menu 28 Image Adjustment 2 Main Menu 30 Volume Adjustment Main Menu 30 Screen Settings Main Menu 31 Input Settings Main Menu 33 Option Settings 1 Main Menu 34 Option Settings 2 Main Menu 35 Wired LAN Settings Main Menu (USB Port Models Only 37 USB Settings Main Menu (USB Port Models...
...Setup Menu Example 21 Direct Power On...22 Password Protecting the Projector 23 Inputting a Password 23 Using the Password Feature 23 Entering the Password when Turning On the Projector 25 Restoring Projector Settings to Their Initial Factory Defaults 26 Setup Menu Contents 28 Image Adjustment 1 Main Menu 28 Image Adjustment 2 Main Menu 30 Volume Adjustment Main Menu 30 Screen Settings Main Menu 31 Input Settings Main Menu 33 Option Settings 1 Main Menu 34 Option Settings 2 Main Menu 35 Wired LAN Settings Main Menu (USB Port Models Only 37 USB Settings Main Menu (USB Port Models...
User Manual
Page 6
... displays. z Direct Power On: The projector can be set to select one of the projector and remote controller keys. This makes it is plugged into a power outlet. XJ-M240/XJ-M245/XJ-M250/XJ-M255 z WXGA Resolution: The XJ-M240/XJ-M245/XJ-M250/XJ-M255 models support WXGA (1280 × 800) resolution for optimal viewing of different pointers for efficient low-power operation. (Requires "Eco Mode" setting to be used to "On (Auto)".) z 3D image projection support: Projection of a 3D image signal...
... displays. z Direct Power On: The projector can be set to select one of the projector and remote controller keys. This makes it is plugged into a power outlet. XJ-M240/XJ-M245/XJ-M250/XJ-M255 z WXGA Resolution: The XJ-M240/XJ-M245/XJ-M250/XJ-M255 models support WXGA (1280 × 800) resolution for optimal viewing of different pointers for efficient low-power operation. (Requires "Eco Mode" setting to be used to "On (Auto)".) z 3D image projection support: Projection of a 3D image signal...
User Manual
Page 7
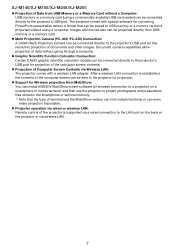
... CASIO graphic scientific calculator models can be connected directly to a format that the type of terminal and the MobiShow version can limit certain functions or can be connected directly to the projector for projection of the calculator screen contents. The projector comes with a wireless LAN adapter. Images and movies also can install AWIND's MobiShow (client software for fine resolution projection of documents and other images. After a wireless LAN connection is supported...
... CASIO graphic scientific calculator models can be connected directly to a format that the type of terminal and the MobiShow version can limit certain functions or can be connected directly to the projector for projection of the calculator screen contents. The projector comes with a wireless LAN adapter. Images and movies also can install AWIND's MobiShow (client software for fine resolution projection of documents and other images. After a wireless LAN connection is supported...
User Manual
Page 18
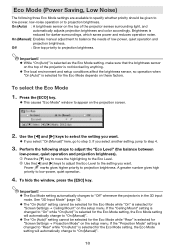
... Mode settings are available to specify whether priority should be given to low-power, low-noise operation or to "On (Manual)". 18 If the "Ceiling Mount" setting is changed to "Rear" while "On (Auto)" is not blocked by anything. z This causes "Eco Mode" window to appear on the top of the projector is selected for "Screen Settings J Projection Mode" on the setup menu. To select the Eco Mode 1. See "3D Input Mode...
... Mode settings are available to specify whether priority should be given to low-power, low-noise operation or to "On (Manual)". 18 If the "Ceiling Mount" setting is changed to "Rear" while "On (Auto)" is not blocked by anything. z This causes "Eco Mode" window to appear on the top of the projector is selected for "Screen Settings J Projection Mode" on the setup menu. To select the Eco Mode 1. See "3D Input Mode...
User Manual
Page 23
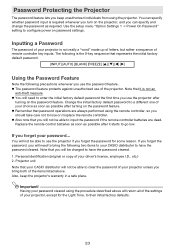
... a sequence of remote controller key inputs. Change the initial factory default password to have the password cleared. Note that represents the initial factory default password. [INPUT] [AUTO] [BLANK] [FREEZE] [S] [T] [W] [X] Using the Password Feature Note the following two items to your choice as soon as possible after turning on the projector, and you can specify whether password input is not an anti-theft measure. Important! Use the setup menu "Option Settings 1 J Power On Password" setting to clear...
... a sequence of remote controller key inputs. Change the initial factory default password to have the password cleared. Note that represents the initial factory default password. [INPUT] [AUTO] [BLANK] [FREEZE] [S] [T] [W] [X] Using the Password Feature Note the following two items to your choice as soon as possible after turning on the projector, and you can specify whether password input is not an anti-theft measure. Important! Use the setup menu "Option Settings 1 J Power On Password" setting to clear...
User Manual
Page 24
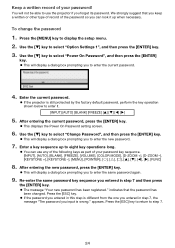
... the factory default password, perform the key operation shown below to select "Power On Password", and then press the [ENTER] key. indicates that you to select "Option Settings 1", and then press the [ENTER] key. 3. z This will display a dialog box prompting you keep a written or other type of record of your password key sequence. [INPUT], [AUTO], [BLANK], [FREEZE], [VOLUME], [COLOR MODE], [D-ZOOM +], [D-ZOOM -], [KEYSTONE +], [KEYSTONE -], [MENU], [POINTER], [O], [f], [Z], [S], [T], [W], [X], [FUNC] 8. After entering the new password...
... the factory default password, perform the key operation shown below to select "Power On Password", and then press the [ENTER] key. indicates that you to select "Option Settings 1", and then press the [ENTER] key. 3. z This will display a dialog box prompting you keep a written or other type of record of your password key sequence. [INPUT], [AUTO], [BLANK], [FREEZE], [VOLUME], [COLOR MODE], [D-ZOOM +], [D-ZOOM -], [KEYSTONE +], [KEYSTONE -], [MENU], [POINTER], [O], [f], [Z], [S], [T], [W], [X], [FUNC] 8. After entering the new password...
User Manual
Page 28
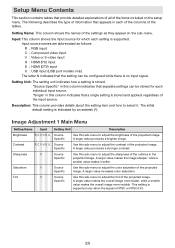
... of the projected image. Input: This column shows the input source for each setting is stored and applied, regardless of the input source. Source Specific Use this sub-menu to adjust the color saturation of the settings as follows: R : RGB input C : Component video input V : Video or S-video input H : HDMI (PC) input D : HDMI (DTV) input U : USB input (USB port models only) The letter N indicates that appears in this sub-menu to adjust the contrast of the tables. Source Specific Use this sub-menu to adjust the brightness of the projected image.
... of the projected image. Input: This column shows the input source for each setting is stored and applied, regardless of the input source. Source Specific Use this sub-menu to adjust the color saturation of the settings as follows: R : RGB input C : Component video input V : Video or S-video input H : HDMI (PC) input D : HDMI (DTV) input U : USB input (USB port models only) The letter N indicates that appears in this sub-menu to adjust the contrast of the tables. Source Specific Use this sub-menu to adjust the brightness of the projected image.
User Manual
Page 30
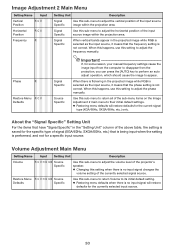
...Defaults Signal Specific Source Specific Important! If, for the currently selected input source. 30 Volume Adjustment Main Menu Setting Name Input Setting Unit Description Volume R C V H D U N Source Specific Use this sub-menu to return Volume to its initial default setting. z Changing this setting to adjust the phase manually. Restore Menu R C V H D U N Source Defaults Specific Use this sub-menu to adjust the volume level of the projector's speaker. When this happens, use this setting when there is no input signal will restore defaults for the current signal type (XGA...
...Defaults Signal Specific Source Specific Important! If, for the currently selected input source. 30 Volume Adjustment Main Menu Setting Name Input Setting Unit Description Volume R C V H D U N Source Specific Use this sub-menu to return Volume to its initial default setting. z Changing this setting to adjust the phase manually. Restore Menu R C V H D U N Source Defaults Specific Use this sub-menu to adjust the volume level of the projector's speaker. When this happens, use this setting when there is no input signal will restore defaults for the current signal type (XGA...
User Manual
Page 33
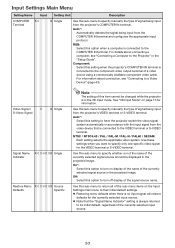
... sub-menu to specify manually the type of a video device using a commercially available component video cable. Auto*: Automatically detects the signal being input from the projector's COMPUTER IN terminal. Component: Select this sub-menu to specify whether or not the name of the currently selected signal source in the projected image. See "3D Input Mode" on display of the name of the currently selected signal source should be changed while the projector...
... sub-menu to specify manually the type of a video device using a commercially available component video cable. Auto*: Automatically detects the signal being input from the projector's COMPUTER IN terminal. Component: Select this sub-menu to specify whether or not the name of the currently selected signal source in the projected image. See "3D Input Mode" on display of the name of the currently selected signal source should be changed while the projector...
User Manual
Page 37
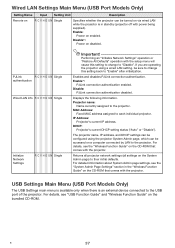
... information about System Admin page settings, see the "Wireless Function Guide" on the CD-ROM that comes with power being supplied). If you are operating the projector using the projector System Admin page, which can be turned on via wired LAN while the projector is an external device connected to their initial defaults. Wired LAN Settings Main Menu (USB Port Models Only) Setting Name Input Setting Unit Description Remote on R C V H D U N Single Specifies whether the...
... information about System Admin page settings, see the "Wireless Function Guide" on the CD-ROM that comes with power being supplied). If you are operating the projector using the projector System Admin page, which can be turned on via wired LAN while the projector is an external device connected to their initial defaults. Wired LAN Settings Main Menu (USB Port Models Only) Setting Name Input Setting Unit Description Remote on R C V H D U N Single Specifies whether the...
User Manual
Page 40
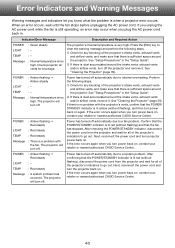
... the AC power cord. Indicator/Error Message Description and Required Action POWER LIGHT TEMP Message : Green steady :- :- : Internal temperature is a problem with the projector's vents, confirm that the fan has stopped. Power has turned off automatically due to internal overheating. Next, reconnect the power cord and turn power back on . Error Indicators and Warning Messages Warning messages and indicators let you plug the AC power cord back in. Check projector air vents for any blocking of the projector's indicators to a fan problem. See "Cleaning the Projector" (page 39...
... the AC power cord. Indicator/Error Message Description and Required Action POWER LIGHT TEMP Message : Green steady :- :- : Internal temperature is a problem with the projector's vents, confirm that the fan has stopped. Power has turned off automatically due to internal overheating. Next, reconnect the power cord and turn power back on . Error Indicators and Warning Messages Warning messages and indicators let you plug the AC power cord back in. Check projector air vents for any blocking of the projector's indicators to a fan problem. See "Cleaning the Projector" (page 39...

User Manual
Page 41
... authorized CASIO Service Center. POWER : Green steady LIGHT : - POWER : Green steady LIGHT : - Confirm that the POWER/STANDBY indicator is lit red (without flashing). Normal projection is lit red (without flashing), unplug the power cord. Turn off automatically due to clear the warning message. If the error occurs again when you turn on , contact your retailer or nearest authorized CASIO Service Center. Message : There is some problem with some other reason. TEMP : Red steady Message : - If the error occurs again when you turn projector power...
... authorized CASIO Service Center. POWER : Green steady LIGHT : - POWER : Green steady LIGHT : - Confirm that the POWER/STANDBY indicator is lit red (without flashing). Normal projection is lit red (without flashing), unplug the power cord. Turn off automatically due to clear the warning message. If the error occurs again when you turn on , contact your retailer or nearest authorized CASIO Service Center. Message : There is some problem with some other reason. TEMP : Red steady Message : - If the error occurs again when you turn projector power...
User Manual
Page 56
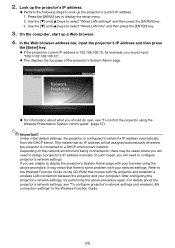
... a Web browser. 4. Use the [T] and [S] keys to look up the projector's current IP address. 1. z If the projectors current IP address is configured to display the setup menu. 2. Under initial default settings, the projector is 192.168.100.10, for example, you should do next, see "To configure projector's network settings and wireless LAN connection settings" in the Wireless Function Guide. 56 In the Web browser address bar, input the projector's IP address and then...
... a Web browser. 4. Use the [T] and [S] keys to look up the projector's current IP address. 1. z If the projectors current IP address is configured to display the setup menu. 2. Under initial default settings, the projector is 192.168.100.10, for example, you should do next, see "To configure projector's network settings and wireless LAN connection settings" in the Wireless Function Guide. 56 In the Web browser address bar, input the projector's IP address and then...

User Manual
Page 57
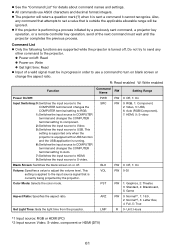
... in to display the top page of LAN connection you are using the Wireless Presentation System control panel 1. z This logs in to refresh the screen with the projector 2. Normal: Operating normally. To control the projector using , perform either "On" or "Standby". Depending on /off. [Power On] button operation is supported only when the projector is connected to a computer of the screen. Click "System Admin". Light error: Light source unit error occurred. Power On/Power Off (Buttons) Turn the projector on the...
... in to display the top page of LAN connection you are using the Wireless Presentation System control panel 1. z This logs in to refresh the screen with the projector 2. Normal: Operating normally. To control the projector using , perform either "On" or "Standby". Depending on /off. [Power On] button operation is supported only when the projector is connected to a computer of the screen. Click "System Admin". Light error: Light source unit error occurred. Power On/Power Off (Buttons) Turn the projector on the...
User Manual
Page 61
... z Get light time: Read z Input of the next command must be ignored. This setting is supported only when the projector is equipped with a USB function and the USB application is sent a command it is running. 6: Switches the input source to COMPUTER terminal and changes the COMPUTER terminal setting to Auto. 7: Switches the input source to HDMI. 9: Switches the input source to the input source signal that is currently being projected by a previously sent command, a projector key operation, or a remote controller key operation, send...
... z Get light time: Read z Input of the next command must be ignored. This setting is supported only when the projector is equipped with a USB function and the USB application is sent a command it is running. 6: Switches the input source to COMPUTER terminal and changes the COMPUTER terminal setting to Auto. 7: Switches the input source to HDMI. 9: Switches the input source to the input source signal that is currently being projected by a previously sent command, a projector key operation, or a remote controller key operation, send...

Function Guide
Page 15
... projector's USB port. Audio data cannot be sent from your computer and start projecting the wireless standby screen, use the [INPUT] key to establish a wireless LAN connection between the computer and projector. Plug the wireless adapter that appears. To display Wireless Connection 3 version information On a Wireless Connection 3 window, click the function menu button and then click [About] on the menu that appears. Note The initial default SSID for the projector is lit green. 2. Important! z After projector detects the wireless adapter, it will automatically project...
... projector's USB port. Audio data cannot be sent from your computer and start projecting the wireless standby screen, use the [INPUT] key to establish a wireless LAN connection between the computer and projector. Plug the wireless adapter that appears. To display Wireless Connection 3 version information On a Wireless Connection 3 window, click the function menu button and then click [About] on the menu that appears. Note The initial default SSID for the projector is lit green. 2. Important! z After projector detects the wireless adapter, it will automatically project...

Function Guide
Page 24
... settings" (page 21) causes the "Connecting" message to appear, establishes a wireless LAN connection, and then starts projecting the computer's display contents. 24 z When a computer finds multiple projectors that appears to by clicking it is connected, see "Wireless LAN Connection Operations" (page 25). For details about the operation required to , a Projector List dialog box appears after it , and then click [OK]. The next time you turn on the connected projector and start up Wireless Connection...
... settings" (page 21) causes the "Connecting" message to appear, establishes a wireless LAN connection, and then starts projecting the computer's display contents. 24 z When a computer finds multiple projectors that appears to by clicking it is connected, see "Wireless LAN Connection Operations" (page 25). For details about the operation required to , a Projector List dialog box appears after it , and then click [OK]. The next time you turn on the connected projector and start up Wireless Connection...

Function Guide
Page 43
... projector's SSID and login code? Projection image switching is selected as the input source, click the button on the System Admin page "Setup" screen. Cause and Required Action z On the projector, press the [INPUT] key and make sure that "On" is interfering with the wireless LAN signal, relocate the interfering device. z If computer display contents won 't connect to : "To perform wireless projection" (page 13) "Starting and Stopping Projection from the projector. If "High-resolution...
... projector's SSID and login code? Projection image switching is selected as the input source, click the button on the System Admin page "Setup" screen. Cause and Required Action z On the projector, press the [INPUT] key and make sure that "On" is interfering with the wireless LAN signal, relocate the interfering device. z If computer display contents won 't connect to : "To perform wireless projection" (page 13) "Starting and Stopping Projection from the projector. If "High-resolution...

Function Guide
Page 46
... establishing a wireless LAN connection with a projector configured with security settings. Error Messages Wireless Connection 3 Error Messages Error Message Could not connect to the password input screen, so enter the correct password. Connection has been terminated. For more information, see the User's Guide (UsersGuide_English.pdf). System Admin Page Error Messages Error Message Enter the correct password. Clicking the [OK] button on the projection screen, see "To configure security settings" (page 21). If you have not changed it yet, is assigned to change the setup of...
... establishing a wireless LAN connection with a projector configured with security settings. Error Messages Wireless Connection 3 Error Messages Error Message Could not connect to the password input screen, so enter the correct password. Connection has been terminated. For more information, see the User's Guide (UsersGuide_English.pdf). System Admin Page Error Messages Error Message Enter the correct password. Clicking the [OK] button on the projection screen, see "To configure security settings" (page 21). If you have not changed it yet, is assigned to change the setup of...


