User Manual
Page 1
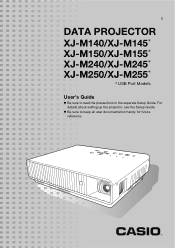
z Be sure to read the precautions in the separate Setup Guide. For details about setting up the projector, see the Setup Guide. E DATA PROJECTOR XJ-M140/XJ-M145* XJ-M150/XJ-M155* XJ-M240/XJ-M245* XJ-M250/XJ-M255* * USB Port Models User's Guide z Be sure to keep all user documentation handy for future reference.
z Be sure to read the precautions in the separate Setup Guide. For details about setting up the projector, see the Setup Guide. E DATA PROJECTOR XJ-M140/XJ-M145* XJ-M150/XJ-M155* XJ-M240/XJ-M245* XJ-M250/XJ-M255* * USB Port Models User's Guide z Be sure to keep all user documentation handy for future reference.
User Manual
Page 4
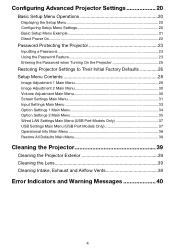
...Setup Menu Example 21 Direct Power On...22 Password Protecting the Projector 23 Inputting a Password 23 Using the Password Feature 23 Entering the Password when Turning On the Projector 25 Restoring Projector Settings to Their Initial Factory Defaults 26 Setup Menu Contents 28 Image Adjustment 1 Main Menu 28 Image Adjustment 2 Main Menu 30 Volume Adjustment Main Menu 30 Screen Settings Main Menu 31 Input Settings Main Menu 33 Option Settings 1 Main Menu 34 Option Settings 2 Main Menu 35 Wired LAN Settings Main Menu (USB Port Models Only 37 USB Settings Main Menu (USB Port Models...
...Setup Menu Example 21 Direct Power On...22 Password Protecting the Projector 23 Inputting a Password 23 Using the Password Feature 23 Entering the Password when Turning On the Projector 25 Restoring Projector Settings to Their Initial Factory Defaults 26 Setup Menu Contents 28 Image Adjustment 1 Main Menu 28 Image Adjustment 2 Main Menu 30 Volume Adjustment Main Menu 30 Screen Settings Main Menu 31 Input Settings Main Menu 33 Option Settings 1 Main Menu 34 Option Settings 2 Main Menu 35 Wired LAN Settings Main Menu (USB Port Models Only 37 USB Settings Main Menu (USB Port Models...
User Manual
Page 6
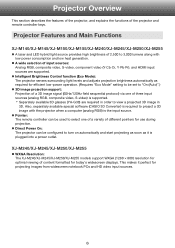
...'s widescreen displays. z Pointer: The remote controller can be configured to turn on automatically and start projecting as soon as required for efficient low-power operation. (Requires "Eco Mode" setting to be used to "On (Auto)".) z 3D image projection support: Projection of a 3D image signal (60Hz/120Hz field sequential protocol) via one of a variety of three input sources (analog RGB, composite video, S-video) is plugged into a power outlet. Also, separately available special software (CASIO 3D Converter...
...'s widescreen displays. z Pointer: The remote controller can be configured to turn on automatically and start projecting as soon as required for efficient low-power operation. (Requires "Eco Mode" setting to be used to "On (Auto)".) z 3D image projection support: Projection of a 3D image signal (60Hz/120Hz field sequential protocol) via one of a variety of three input sources (analog RGB, composite video, S-video) is plugged into a power outlet. Also, separately available special software (CASIO 3D Converter...
User Manual
Page 7
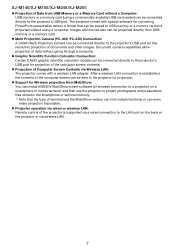
... limit certain functions or can install AWIND's MobiShow (client software for wireless connection to a projector) on the back or the projector or via wireless LAN. 7 After a wireless LAN connection is supported via a wired connection to the projector's USB port. z Projector operation via Wireless LAN: The projector comes with special software for fine resolution projection of documents and other images. The projector comes with a wireless LAN adapter. z Projection of Computer Screen Contents via wired or wireless LAN: Remote control of the projector is established, the contents of...
... limit certain functions or can install AWIND's MobiShow (client software for wireless connection to a projector) on the back or the projector or via wireless LAN. 7 After a wireless LAN connection is supported via a wired connection to the projector's USB port. z Projector operation via Wireless LAN: The projector comes with special software for fine resolution projection of documents and other images. The projector comes with a wireless LAN adapter. z Projection of Computer Screen Contents via wired or wireless LAN: Remote control of the projector is established, the contents of...
User Manual
Page 18
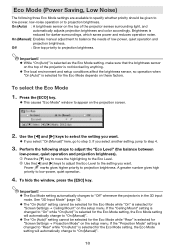
... Mode setting will automatically change to step 4. 3. Brightness is selected for the Eco Mode depends on the setup menu. z The local environment and setup conditions affect the brightness sensor, so operation when "On (Auto)" is in the 3D input mode. A greater number gives high priority to "Off" whenever the projector is selected for "Screen Settings J Ceiling Mount" on these factors. z The Eco Mode setting automatically changes to low-power, quiet operation. 4. On (Manual): Enables manual adjustment...
... Mode setting will automatically change to step 4. 3. Brightness is selected for the Eco Mode depends on the setup menu. z The local environment and setup conditions affect the brightness sensor, so operation when "On (Auto)" is in the 3D input mode. A greater number gives high priority to "Off" whenever the projector is selected for "Screen Settings J Ceiling Mount" on these factors. z The Eco Mode setting automatically changes to low-power, quiet operation. 4. On (Manual): Enables manual adjustment...
User Manual
Page 23
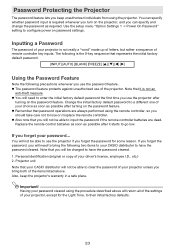
... projector is required whenever you turn on password settings. Personal identification (original or copy of your driver's license, employee I.D., etc.) 2. Password Protecting the Projector The password feature lets you keep the projector's warranty in a safe place. Change the initial factory default password to their initial factory defaults. 23 Replace the remote control batteries as soon as possible after it is the 8-key sequence that password operations are dead. Note that your CASIO...
... projector is required whenever you turn on password settings. Personal identification (original or copy of your driver's license, employee I.D., etc.) 2. Password Protecting the Projector The password feature lets you keep the projector's warranty in a safe place. Change the initial factory default password to their initial factory defaults. 23 Replace the remote control batteries as soon as possible after it is the 8-key sequence that password operations are dead. Note that your CASIO...
User Manual
Page 24
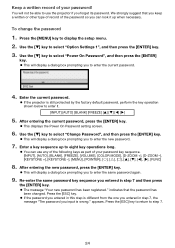
... press the [ENTER] key. Keep a written record of your password key sequence. [INPUT], [AUTO], [BLANK], [FREEZE], [VOLUME], [COLOR MODE], [D-ZOOM +], [D-ZOOM -], [KEYSTONE +], [KEYSTONE -], [MENU], [POINTER], [O], [f], [Z], [S], [T], [W], [X], [FUNC] 8. Press the [MENU] key to select "Option Settings 1", and then press the [ENTER] key. 3. Use the [T] key to display the setup menu. 2. After entering the current password, press the [ENTER] key. You will display a dialog box prompting you input is different from the one...
... press the [ENTER] key. Keep a written record of your password key sequence. [INPUT], [AUTO], [BLANK], [FREEZE], [VOLUME], [COLOR MODE], [D-ZOOM +], [D-ZOOM -], [KEYSTONE +], [KEYSTONE -], [MENU], [POINTER], [O], [f], [Z], [S], [T], [W], [X], [FUNC] 8. Press the [MENU] key to select "Option Settings 1", and then press the [ENTER] key. 3. Use the [T] key to display the setup menu. 2. After entering the current password, press the [ENTER] key. You will display a dialog box prompting you input is different from the one...
User Manual
Page 28
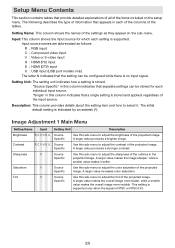
... the input source. Source Specific Use this sub-menu to adjust the color saturation of the projected image. "Source Specific" in this column indicates that a single setting is stored and applied, regardless of the projected image. Setup Menu Contents This section contains tables that the setting can be configured while there is no input signal. Setting Name: This column shows the names of the settings as follows: R : RGB input C : Component video input V : Video or S-video input H : HDMI (PC) input D : HDMI (DTV) input U : USB input (USB port models only...
... the input source. Source Specific Use this sub-menu to adjust the color saturation of the projected image. "Source Specific" in this column indicates that a single setting is stored and applied, regardless of the projected image. Setup Menu Contents This section contains tables that the setting can be configured while there is no input signal. Setting Name: This column shows the names of the settings as follows: R : RGB input C : Component video input V : Video or S-video input H : HDMI (PC) input D : HDMI (DTV) input U : USB input (USB port models only...
User Manual
Page 30
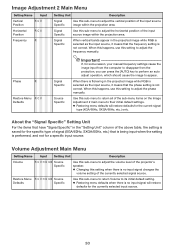
... flickering in the "Setting Unit" column of the above table, the setting is saved for the specific type of the input source image within the projection area. Use this sub-menu to adjust the phase manually. z Changing this setting to adjust the vertical position of signal (XGA/60Hz, SXGA/60Hz, etc.) that the phase setting is not correct. If, for a specific input source. Volume Adjustment Main Menu Setting Name Input Setting Unit Description Volume R C V H D U N Source Specific Use this sub-menu...
... flickering in the "Setting Unit" column of the above table, the setting is saved for the specific type of the input source image within the projection area. Use this sub-menu to adjust the phase manually. z Changing this setting to adjust the vertical position of signal (XGA/60Hz, SXGA/60Hz, etc.) that the phase setting is not correct. If, for a specific input source. Volume Adjustment Main Menu Setting Name Input Setting Unit Description Volume R C V H D U N Source Specific Use this sub-menu...
User Manual
Page 33
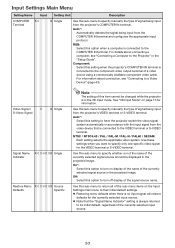
... display of the name of signal being input from the projector's COMPUTER IN terminal. Use this option to specify only one specific video signal for the currently selected input source. Off: Select this sub-menu to specify manually the type of the currently selected signal source in the projected image. Auto*: Automatically detects the signal being input from the video device that the "Signal Name Indicator" setting is no input signal will restore defaults for the VIDEO...
... display of the name of signal being input from the projector's COMPUTER IN terminal. Use this option to specify only one specific video signal for the currently selected input source. Off: Select this sub-menu to specify manually the type of the currently selected signal source in the projected image. Auto*: Automatically detects the signal being input from the video device that the "Signal Name Indicator" setting is no input signal will restore defaults for the VIDEO...
User Manual
Page 37
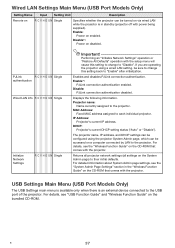
... configured using a wired LAN setting, be turned on via wired LAN while the projector is an external device connected to their initial defaults. Enable*: PJLink connection authentication enabled. Returns all projector network settings (all settings on enabled. Performing an "Initialize Network Settings" operation or "Restore All Defaults" operation with power being supplied). For details, see the "System Admin Page Settings" section in standby (projector off with the setup menu will cause this setting to change this setting back...
... configured using a wired LAN setting, be turned on via wired LAN while the projector is an external device connected to their initial defaults. Enable*: PJLink connection authentication enabled. Returns all projector network settings (all settings on enabled. Performing an "Initialize Network Settings" operation or "Restore All Defaults" operation with power being supplied). For details, see the "System Admin Page Settings" section in standby (projector off with the setup menu will cause this setting to change this setting back...
User Manual
Page 40
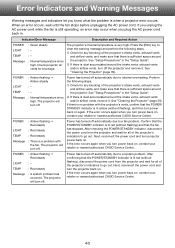
... Action POWER LIGHT TEMP Message : Green steady :- :- : Internal temperature is very high. Next, reconnect the power cord and turn the projector back on , contact your retailer or nearest authorized CASIO Service Center. TEMP : Red steady Message : A system problem has occurred. If there is still operating, an error may occur when you turn power back on . Power has turned off automatically due to a fan problem. See "Cleaning the Projector" (page 39). Confirm that the POWER/STANDBY indicator is lit red (without flashing) and...
... Action POWER LIGHT TEMP Message : Green steady :- :- : Internal temperature is very high. Next, reconnect the power cord and turn the projector back on , contact your retailer or nearest authorized CASIO Service Center. TEMP : Red steady Message : A system problem has occurred. If there is still operating, an error may occur when you turn power back on . Power has turned off automatically due to a fan problem. See "Cleaning the Projector" (page 39). Confirm that the POWER/STANDBY indicator is lit red (without flashing) and...

User Manual
Page 41
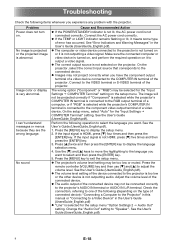
... a problem with the USB port or LAN terminal. Next, reconnect the power cord and turn power back on . Indicator/Error Message Description and Required Action POWER LIGHT TEMP Message : Green steady :- :- : A system problem has occurred. The projector was probably caused by external digital noise or some problem with some functions. Press the [ESC] key to clear the warning message. POWER : Green steady LIGHT : - POWER : Amber flashing J Red steady LIGHT : - Confirm that was turned off automatically due to some problem that the POWER/STANDBY indicator...
... a problem with the USB port or LAN terminal. Next, reconnect the power cord and turn power back on . Indicator/Error Message Description and Required Action POWER LIGHT TEMP Message : Green steady :- :- : A system problem has occurred. The projector was probably caused by external digital noise or some problem with some functions. Press the [ESC] key to clear the warning message. POWER : Green steady LIGHT : - POWER : Amber flashing J Red steady LIGHT : - Confirm that was turned off automatically due to some problem that the POWER/STANDBY indicator...
User Manual
Page 56
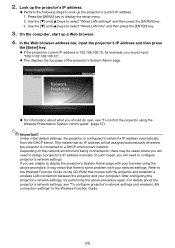
... are unable to a DHCP environment network. If you will need to assign a projector's IP address manually. For details about what you would input: "http://192.168.100.10". Under initial default settings, the projector is some problem with the projector and establish a wireless LAN connection between the projector and your browser using the Wireless Presentation System control panel" (page 57). On the computer, start up a Web browser. 4. Depending on...
... are unable to a DHCP environment network. If you will need to assign a projector's IP address manually. For details about what you would input: "http://192.168.100.10". Under initial default settings, the projector is some problem with the projector and establish a wireless LAN connection between the projector and your browser using the Wireless Presentation System control panel" (page 57). On the computer, start up a Web browser. 4. Depending on...

User Manual
Page 57
.... Light error: Light source unit error occurred. Click "System Admin". To control the projector using , perform either "On" or "Standby". z This will display a control panel screen like the one of the following operations to the projector's System Admin page" of the screen. Normal: Operating normally. Click the [Login] button. Fan error: Fan error occurred. Depending on /off. [Power On] button operation is supported only when the projector is "admin". 3. Power On/Power Off (Buttons) Turn the projector on the type of LAN connection you...
.... Light error: Light source unit error occurred. Click "System Admin". To control the projector using , perform either "On" or "Standby". z This will display a control panel screen like the one of the following operations to the projector's System Admin page" of the screen. Normal: Operating normally. Click the [Login] button. Fan error: Fan error occurred. Depending on /off. [Power On] button operation is supported only when the projector is "admin". 3. Power On/Power Off (Buttons) Turn the projector on the type of LAN connection you...
User Manual
Page 61
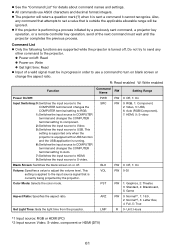
... setting to RGB. 1: Switches the input source to COMPUTER terminal and changes the COMPUTER terminal setting to component. 2: Switches the input source to Video. 5: Switches the input source to adjust the volume level. This setting is supported only when the projector is equipped with a USB function and the USB application is turned off . z All commands use a command to the projector. BLK RW 0: Off, 1: On Volume: Specifies a value to USB. Unit: Hours *1 Input source: RGB or HDMI (PC) *2 Input source: Video, S-video, component or HDMI...
... setting to RGB. 1: Switches the input source to COMPUTER terminal and changes the COMPUTER terminal setting to component. 2: Switches the input source to Video. 5: Switches the input source to adjust the volume level. This setting is supported only when the projector is equipped with a USB function and the USB application is turned off . z All commands use a command to the projector. BLK RW 0: Off, 1: On Volume: Specifies a value to USB. Unit: Hours *1 Input source: RGB or HDMI (PC) *2 Input source: Video, S-video, component or HDMI...
Setup Guide
Page 2
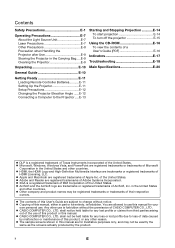
... Projector in the Carrying Bag.....E-9 Cleaning the Projector E-9 Starting and Stopping Projection E-14 To start projection E-14 To turn off the projector E-15 Using the CD-ROM E-16 To view the contents of a User's Guide (PDF E-16 Indicators E-17 Troubleshooting E-18 Unpacking E-10 Main Specifications E-20 General Guide E-10 Getting Ready E-11 Loading Remote Controller Batteries...........E-11 Setting Up the Projector E-11 Setup Precautions E-12 Changing the Projector Elevation Angle ......E-12 Connecting a Computer to the Projector .....E-13 z DLP...
... Projector in the Carrying Bag.....E-9 Cleaning the Projector E-9 Starting and Stopping Projection E-14 To start projection E-14 To turn off the projector E-15 Using the CD-ROM E-16 To view the contents of a User's Guide (PDF E-16 Indicators E-17 Troubleshooting E-18 Unpacking E-10 Main Specifications E-20 General Guide E-10 Getting Ready E-11 Loading Remote Controller Batteries...........E-11 Setting Up the Projector E-11 Setup Precautions E-12 Changing the Projector Elevation Angle ......E-12 Connecting a Computer to the Projector .....E-13 z DLP...
Setup Guide
Page 9
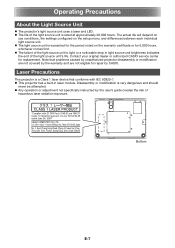
... light source unit is a Class 1 laser device that problems caused by unauthorized projector disassembly or modification are not covered by the user's guide creates the risk of the light source unit's life. Disassembly or modification is rated at approximately 20,000 hours. The actual life will depend on use conditions, the settings configured on the warranty certificate or for repair by CASIO. z Any operation or adjustment not specifically instructed by...
... light source unit is a Class 1 laser device that problems caused by unauthorized projector disassembly or modification are not covered by the user's guide creates the risk of the light source unit's life. Disassembly or modification is rated at approximately 20,000 hours. The actual life will depend on use conditions, the settings configured on the warranty certificate or for repair by CASIO. z Any operation or adjustment not specifically instructed by...
Setup Guide
Page 20
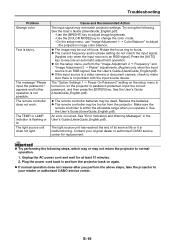
... the User's Guide (UsersGuide_English.pdf). Change the "Audio Out" setting to the connected device. No image is projected or the projected image is not outputting a video signal. Connect the AC power cord correctly. z The computer or video device connected to output a video signal. On the projector, select the correct input source that corresponds to "Speaker". See the User's Guide (UsersGuide_English.pdf). Press the [MENU] key to display the language selection menu. 4. If the input signal is turned on, and perform the required operation...
... the User's Guide (UsersGuide_English.pdf). Change the "Audio Out" setting to the connected device. No image is projected or the projected image is not outputting a video signal. Connect the AC power cord correctly. z The computer or video device connected to output a video signal. On the projector, select the correct input source that corresponds to "Speaker". See the User's Guide (UsersGuide_English.pdf). Press the [MENU] key to display the language selection menu. 4. If the input signal is turned on, and perform the required operation...
Setup Guide
Page 21
... the input signal. (Applies only when the input source is an RGB signal.) Press the [AUTO] key to adjust the projection image color balance. Input the correct password, and then press the [ENTER] key. See the User's Guide (UsersGuide_English.pdf). z The remote controller may not match projector settings. E-19 Troubleshooting Problem Strange color Text is not possible. See the User's Guide (UsersGuide_English.pdf). -Use the [BRIGHT] key to adjust image brightness. -Use the [COLOR MODE] key to change the color mode. -On the setup menu, use "Image Adjustment 1 J Color Balance...
... the input signal. (Applies only when the input source is an RGB signal.) Press the [AUTO] key to adjust the projection image color balance. Input the correct password, and then press the [ENTER] key. See the User's Guide (UsersGuide_English.pdf). z The remote controller may not match projector settings. E-19 Troubleshooting Problem Strange color Text is not possible. See the User's Guide (UsersGuide_English.pdf). -Use the [BRIGHT] key to adjust image brightness. -Use the [COLOR MODE] key to change the color mode. -On the setup menu, use "Image Adjustment 1 J Color Balance...


