
User Guide
Page 2
... of this projector. This manual covers only basic operations, including how to set up the projector, how to connect a computer or video device to a Standard Video Device ......E-17 Turning On the Projector E-18 Turning Off the Projector E-20 Projector Basics E-21 Selecting the Input Source E-21 Adjusting the Projected Image E-21 Keystone Correction (KEYSTONE E-22 Using the Setup Menu E-23 User Maintenance E-24 Cleaning the Projector E-24 About the Lamp E-24 Troubleshooting E-24 Indicators E-24 Projector Troubleshooting E-25 Specifications E-28 DLP is...
... of this projector. This manual covers only basic operations, including how to set up the projector, how to connect a computer or video device to a Standard Video Device ......E-17 Turning On the Projector E-18 Turning Off the Projector E-20 Projector Basics E-21 Selecting the Input Source E-21 Adjusting the Projected Image E-21 Keystone Correction (KEYSTONE E-22 Using the Setup Menu E-23 User Maintenance E-24 Cleaning the Projector E-24 About the Lamp E-24 Troubleshooting E-24 Indicators E-24 Projector Troubleshooting E-25 Specifications E-28 DLP is...
User Guide
Page 5
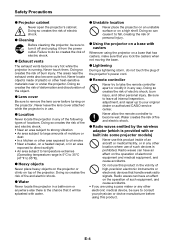
... that handle weak radio signals. Failure to consult your original dealer or authorized CASIO service center. + Never allow the remote controller to remove the lens cover before using a pace maker or any way. Doing so creates the risk of deformation and discoloration of locations. Doing so creates the risk of fire and electric shock. ● Water Never locate the projector in any of...
... that handle weak radio signals. Failure to consult your original dealer or authorized CASIO service center. + Never allow the remote controller to remove the lens cover before using a pace maker or any way. Doing so creates the risk of deformation and discoloration of locations. Doing so creates the risk of fire and electric shock. ● Water Never locate the projector in any of...
User Guide
Page 8
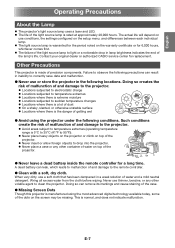
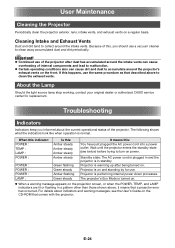
... moisture Locations subjected to sudden temperature changes Locations where there is a lot of dust On a shaky, slanted, or otherwise unstable surface Locations where there is 5°C to 35°C (41°F to the remote controller. ● Clean with a soft, dry cloth. E-7 English Operating Precautions About the Lamp The projector's light source lamp uses a laser and LED. The life of precision components...
... moisture Locations subjected to sudden temperature changes Locations where there is a lot of dust On a shaky, slanted, or otherwise unstable surface Locations where there is 5°C to 35°C (41°F to the remote controller. ● Clean with a soft, dry cloth. E-7 English Operating Precautions About the Lamp The projector's light source lamp uses a laser and LED. The life of precision components...
User Guide
Page 15
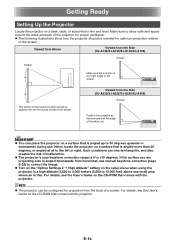
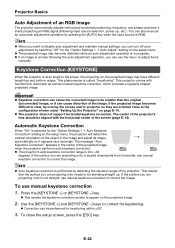
... use manual keystone correction (page E-22) to correct the image. Turn on the "Option Settings 2 High Altitude" setting on the CD-ROM that comes with the horizontal center of malfunction. The projector's auto keystone correction range is 0 to +30 degrees. NOTE The projector can shorten lamp life, and also creates the risk of the screen. Viewed from the Side (XJ-A130/XJ-A135/XJ-A140/XJ...
... use manual keystone correction (page E-22) to correct the image. Turn on the "Option Settings 2 High Altitude" setting on the CD-ROM that comes with the horizontal center of malfunction. The projector's auto keystone correction range is 0 to +30 degrees. NOTE The projector can shorten lamp life, and also creates the risk of the screen. Viewed from the Side (XJ-A130/XJ-A135/XJ-A140/XJ...
User Guide
Page 19
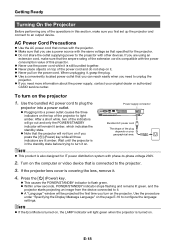
...; This product is connected to the projector. 3. Use the procedure under "Specifying the Display Message Language" on . To turn on your original dealer or authorized CASIO service center. Power supply connector Bundled AC power cord The shape of the plug depends on the projector 1. Turn on if you turn on the power cord. If the projector lens cover is covering the lens, remove it , grasp the plug. Use a conveniently located power outlet that is also...
...; This product is connected to the projector. 3. Use the procedure under "Specifying the Display Message Language" on . To turn on your original dealer or authorized CASIO service center. Power supply connector Bundled AC power cord The shape of the plug depends on the projector 1. Turn on if you turn on the power cord. If the projector lens cover is covering the lens, remove it , grasp the plug. Use a conveniently located power outlet that is also...
User Guide
Page 21
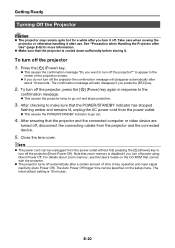
... default setting is disabled if you want to turn off the projector, press the [P] (Power) key again in the center of key operation and input signal inactivity (Auto Power Off). To turn off the projector (Direct Power Off). See "Precaution when Handling the Projector after Use" (page E-8) for a while after about zoom memory, see the User's Guide on the setup menu. to turn it off automatically after use. Close the lens cover. Note that zoom...
... default setting is disabled if you want to turn off the projector, press the [P] (Power) key again in the center of key operation and input signal inactivity (Auto Power Off). To turn off the projector (Direct Power Off). See "Precaution when Handling the Projector after Use" (page E-8) for a while after about zoom memory, see the User's Guide on the setup menu. to turn it off automatically after use. Close the lens cover. Note that zoom...
User Guide
Page 23
... to disable auto adjustment and maintain manual settings, you can also execute an automatic adjustment operation by pressing the [AUTO] key when the input source is projecting on page E-14. The projector does not support horizontal keystone correction. NOTE When you want to the screen it is RGB. Important! Keystone correction can cause the corrected image to appear on the setup menu. The projected image may...
... to disable auto adjustment and maintain manual settings, you can also execute an automatic adjustment operation by pressing the [AUTO] key when the input source is projecting on page E-14. The projector does not support horizontal keystone correction. NOTE When you want to the screen it is RGB. Important! Keystone correction can cause the corrected image to appear on the setup menu. The projected image may...
User Guide
Page 24
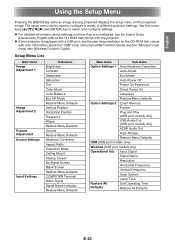
...Terminal Video Signal Signal Name Indicator Restore Menu Defaults Main menu Sub-menu Option Settings 1 Auto Keystone Correction Auto Adjust Eco Mode Auto Power Off Power On Password Direct Power On Language Restore Menu Defaults Option Settings 2 Zoom Memory Pointer Plug and Play (USB port models only) USB Audio Out (USB port models only) HDMI Audio Out High Altitude Restore Menu Defaults USB (USB port models only) Wireless (USB port models only) Operational Info Input Signal Signal Name Resolution Horizontal Frequency Vertical Frequency Scan System Lamp Time Restore...
...Terminal Video Signal Signal Name Indicator Restore Menu Defaults Main menu Sub-menu Option Settings 1 Auto Keystone Correction Auto Adjust Eco Mode Auto Power Off Power On Password Direct Power On Language Restore Menu Defaults Option Settings 2 Zoom Memory Pointer Plug and Play (USB port models only) USB Audio Out (USB port models only) HDMI Audio Out High Altitude Restore Menu Defaults USB (USB port models only) Wireless (USB port models only) Operational Info Input Signal Signal Name Resolution Horizontal Frequency Vertical Frequency Scan System Lamp Time Restore...
User Guide
Page 25
... flashing in standby. About the Lamp Should the light source lamp stop working, contact your original dealer or authorized CASIO service center for use of the projector after being turned on the front. Troubleshooting Indicators Indicators keep you should use the same procedure as that described above , it means that comes with the projector. LAMP : Green steady The projector's Eco Mode is on and standing by for replacement. POWER : Green steady Projector is turned on. When a warning message...
... flashing in standby. About the Lamp Should the light source lamp stop working, contact your original dealer or authorized CASIO service center for use of the projector after being turned on the front. Troubleshooting Indicators Indicators keep you should use the same procedure as that described above , it means that comes with the projector. LAMP : Green steady The projector's Eco Mode is on and standing by for replacement. POWER : Green steady Projector is turned on. When a warning message...
User Guide
Page 26
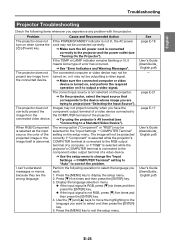
... project (see "Selecting the Input Source"). The correct input source is connected to the component video output terminal of a video device. ➔ Use the setup menu to change the "Input Settings COMPUTER Terminal" setting to "Auto" to correct the problem. connected video device. ➔ Try using the projector's AV terminal (see "Turning On the Projector"). I press the [P] (Power) key. If the TEMP or LAMP indicator remains flashing or lit, it to output a video signal. The image will not be outputting a video signal...
... project (see "Selecting the Input Source"). The correct input source is connected to the component video output terminal of a video device. ➔ Use the setup menu to change the "Input Settings COMPUTER Terminal" setting to "Auto" to correct the problem. connected video device. ➔ Try using the projector's AV terminal (see "Turning On the Projector"). I press the [P] (Power) key. If the TEMP or LAMP indicator remains flashing or lit, it to output a video signal. The image will not be outputting a video signal...
User Guide
Page 27
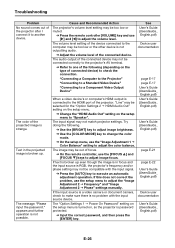
... remote controller, use the setup menu to adjust image focus. If this does not correct the problem, use the [FOCUS ] and [FOCUS ] keys to adjust the "Image Adjustment 2 Frequency" and "Image Adjustment 2 Phase" settings manually. The "Option Settings 1 Power On Password" setting on the setup menu is turned on, so the projector is strange. The color of the projected image is password protected. ➔ Input the correct password, and then press the [ENTER] key. The audio output of the connected...
... remote controller, use the setup menu to adjust image focus. If this does not correct the problem, use the [FOCUS ] and [FOCUS ] keys to adjust the "Image Adjustment 2 Frequency" and "Image Adjustment 2 Phase" settings manually. The "Option Settings 1 Power On Password" setting on the setup menu is turned on, so the projector is strange. The color of the projected image is password protected. ➔ Input the correct password, and then press the [ENTER] key. The audio output of the connected...

User Guide
Page 28
... too far from the projector. ➔ Make sure the remote controller is flashing or lit. Plug the power cord back in and turn the projector back on again. If normal operation does not resume after you operate it. User's Guide (UsersGuide_ English.pdf) ➔ See "Error Indicators and Warning Messages". Unplug the AC power cord and wait for replacement. English Troubleshooting Problem The remote controller does not work. The TEMP or LAMP indicator is within the allowable...
... too far from the projector. ➔ Make sure the remote controller is flashing or lit. Plug the power cord back in and turn the projector back on again. If normal operation does not resume after you operate it. User's Guide (UsersGuide_ English.pdf) ➔ See "Error Indicators and Warning Messages". Unplug the AC power cord and wait for replacement. English Troubleshooting Problem The remote controller does not work. The TEMP or LAMP indicator is within the allowable...
User Guide
Page 29
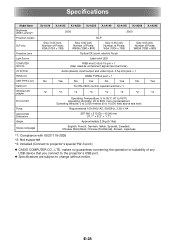
... supported *3: Included (Connect to change without notice. Specifications Model Name Brightness (ANSI Lumens)*1 Projection System DLP chip Projection Lens Light Source COMPUTER terminal AV terminal HDMI port USB TYPE A port Serial port Wireless LAN adapter Environment Power Approximate Dimensions Weight Display Languages XJ-A130 XJ-A135 XJ-A230 XJ-A235 XJ-A140 XJ-A145 XJ-A240 XJ-A245 2000 2500 DLP Size: 0.55 inch, Number of Pixels: XGA (1024 × 768) Size: 0.65 inch, Number of Pixels: WXGA (1280 × 800) Size: 0.55 inch, Number of Pixels: XGA (1024 × 768) Size...
... supported *3: Included (Connect to change without notice. Specifications Model Name Brightness (ANSI Lumens)*1 Projection System DLP chip Projection Lens Light Source COMPUTER terminal AV terminal HDMI port USB TYPE A port Serial port Wireless LAN adapter Environment Power Approximate Dimensions Weight Display Languages XJ-A130 XJ-A135 XJ-A230 XJ-A235 XJ-A140 XJ-A145 XJ-A240 XJ-A245 2000 2500 DLP Size: 0.55 inch, Number of Pixels: XGA (1024 × 768) Size: 0.65 inch, Number of Pixels: WXGA (1280 × 800) Size: 0.55 inch, Number of Pixels: XGA (1024 × 768) Size...

User Manual
Page 1
For details about setting up the projector, see the User's Guide (Basic Operations). Be sure to read the precautions in the separate User's Guide (Basic Operations). E DATA PROJECTOR XJ-A130/XJ-A135* XJ-A140/XJ-A145* XJ-A230/XJ-A235* XJ-A240/XJ-A245* * USB Port Models User's Guide Be sure to keep all user documentation handy for future reference.
For details about setting up the projector, see the User's Guide (Basic Operations). Be sure to read the precautions in the separate User's Guide (Basic Operations). E DATA PROJECTOR XJ-A130/XJ-A135* XJ-A140/XJ-A145* XJ-A230/XJ-A235* XJ-A240/XJ-A245* * USB Port Models User's Guide Be sure to keep all user documentation handy for future reference.
User Manual
Page 4
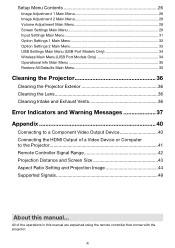
... Settings 2 Main Menu 33 USB Settings Main Menu (USB Port Models Only 34 Wireless Main Menu (USB Port Models Only 34 Operational Info Main Menu 35 Restore All Defaults Main Menu 35 Cleaning the Projector 36 Cleaning the Projector Exterior 36 Cleaning the Lens 36 Cleaning Intake and Exhaust Vents 36 Error Indicators and Warning Messages 37 Appendix 40 Connecting to the Projector 41 Remote Controller Signal Range 42 Projection Distance and Screen Size 43 Aspect Ratio Setting and Projection Image 44 Supported Signals 48 About this manual are explained using the remote controller...
... Settings 2 Main Menu 33 USB Settings Main Menu (USB Port Models Only 34 Wireless Main Menu (USB Port Models Only 34 Operational Info Main Menu 35 Restore All Defaults Main Menu 35 Cleaning the Projector 36 Cleaning the Projector Exterior 36 Cleaning the Lens 36 Cleaning Intake and Exhaust Vents 36 Error Indicators and Warning Messages 37 Appendix 40 Connecting to the Projector 41 Remote Controller Signal Range 42 Projection Distance and Screen Size 43 Aspect Ratio Setting and Projection Image 44 Supported Signals 48 About this manual are explained using the remote controller...
User Manual
Page 26
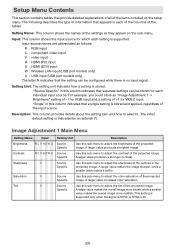
...) input D : HDMI (DTV) input W : Wireless LAN input (USB port models only) U : USB input (USB port models only) The letter N indicates that separate settings can be stored for each setting is supported. Setting Name: This column shows the names of the items included on the sub-menu. Input: This column shows the input source for VIDEO input. A larger value produces a brighter image. This setting is supported only when the signal is indicated by an asterisk (*). For example, you could store an "Image Adjustment...
...) input D : HDMI (DTV) input W : Wireless LAN input (USB port models only) U : USB input (USB port models only) The letter N indicates that separate settings can be stored for each setting is supported. Setting Name: This column shows the names of the items included on the sub-menu. Input: This column shows the input source for VIDEO input. A larger value produces a brighter image. This setting is supported only when the signal is indicated by an asterisk (*). For example, you could store an "Image Adjustment...
User Manual
Page 28
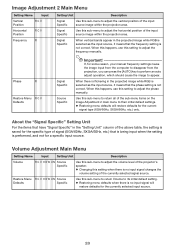
Phase R Restore Menu R C V Defaults Signal Specific Source Specific Important! Use this setting to adjust the phase manually. Volume Adjustment Main Menu Setting Name Input Setting Unit Description Volume R C V H D W U N Source Specific Use this sub-menu to adjust the volume level of the projector's speaker. Changing this setting when there is no input signal will restore defaults for a specific input source. About the "Signal Specific" Setting Unit For the items that have "Signal Specific" in the projected image while RGB is selected as the input source, it...
Phase R Restore Menu R C V Defaults Signal Specific Source Specific Important! Use this setting to adjust the phase manually. Volume Adjustment Main Menu Setting Name Input Setting Unit Description Volume R C V H D W U N Source Specific Use this sub-menu to adjust the volume level of the projector's speaker. Changing this setting when there is no input signal will restore defaults for a specific input source. About the "Signal Specific" Setting Unit For the items that have "Signal Specific" in the projected image while RGB is selected as the input source, it...
User Manual
Page 31
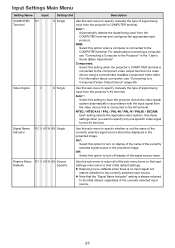
.... Auto*: Select this sub-menu to have the projector switch the video signal system automatically in the "User's Guide (Basic Operations)". Signal Name R C V H D W U N Single Indicator Use this setting to specify whether or not the name of the signal source name. For details about connection, see "Connecting a Computer to turn off display of the currently selected signal source should be displayed in the projected image. Restore Menu R C V H D W U N Source Defaults Specific Use this option to the Projector" in accordance with the input signal from...
.... Auto*: Select this sub-menu to have the projector switch the video signal system automatically in the "User's Guide (Basic Operations)". Signal Name R C V H D W U N Single Indicator Use this setting to specify whether or not the name of the signal source name. For details about connection, see "Connecting a Computer to turn off display of the currently selected signal source should be displayed in the projected image. Restore Menu R C V H D W U N Source Defaults Specific Use this option to the Projector" in accordance with the input signal from...
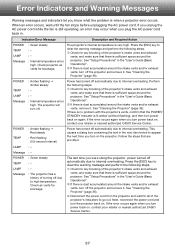
User Manual
Page 37
... the AC power cord while the fan is still operating, an error may occur when you know what the problem is when a projector error occurs. Indicator/Error Message Description and Required Action POWER TEMP LAMP Message : Green steady :- :- : Internal temperature is very high. Perform the following steps. Check for all of the projector's indicators to appear the next time you turn off the projector and remove it. See "Setup Precautions" in the "User's Guide (Basic Operations)". If...
... the AC power cord while the fan is still operating, an error may occur when you know what the problem is when a projector error occurs. Indicator/Error Message Description and Required Action POWER TEMP LAMP Message : Green steady :- :- : Internal temperature is very high. Perform the following steps. Check for all of the projector's indicators to appear the next time you turn off the projector and remove it. See "Setup Precautions" in the "User's Guide (Basic Operations)". If...
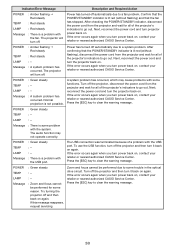
User Manual
Page 38
... authorized CASIO Service Center. POWER TEMP LAMP Message : Green steady :- :- : A system problem has occurred. Next, reconnect the power cord and turn power back on again. If the error occurs again when you turn off the projector, disconnect the power cord from the projector and wait for some problem with the USB port. POWER : Green steady TEMP : - Message : There is lit red (without flashing) and that the fan has stopped. The audio function may cause problems with the fan. To use the USB function, turn power...
... authorized CASIO Service Center. POWER TEMP LAMP Message : Green steady :- :- : A system problem has occurred. Next, reconnect the power cord and turn power back on again. If the error occurs again when you turn off the projector, disconnect the power cord from the projector and wait for some problem with the USB port. POWER : Green steady TEMP : - Message : There is lit red (without flashing) and that the fan has stopped. The audio function may cause problems with the fan. To use the USB function, turn power...


