

User Guide
Page 1
E DATA PROJECTOR XJ-A141/XJ-A146* XJ-A241/XJ-A246* XJ-A251/XJ-A256* * USB Port Models User's Guide z Be sure to keep all user documentation handy for future reference. z Be sure to read the precautions in the separate Setup Guide.
E DATA PROJECTOR XJ-A141/XJ-A146* XJ-A241/XJ-A246* XJ-A251/XJ-A256* * USB Port Models User's Guide z Be sure to keep all user documentation handy for future reference. z Be sure to read the precautions in the separate Setup Guide.
User Guide
Page 3
... the Projector 12 Connecting to a Video Device 13 Connection to a composite video output 13 Connection to a component video output 13 Operation During Projection 14 Selecting the Input Source 14 To select a different input source 14 Resolution ...14 Image Operations During Projection 15 Adjusting Image Brightness 15 To use manual keystone correction 15 Selecting the Color Mode 16 Zooming an Image ...16 Momentarily Blanking the Image and Muting the Audio 17 Freezing an Image...17 Displaying a Pointer in the Projected Image 18 Changing the...
... the Projector 12 Connecting to a Video Device 13 Connection to a composite video output 13 Connection to a component video output 13 Operation During Projection 14 Selecting the Input Source 14 To select a different input source 14 Resolution ...14 Image Operations During Projection 15 Adjusting Image Brightness 15 To use manual keystone correction 15 Selecting the Color Mode 16 Zooming an Image ...16 Momentarily Blanking the Image and Muting the Audio 17 Freezing an Image...17 Displaying a Pointer in the Projected Image 18 Changing the...

User Guide
Page 4
...Factory Defaults 31 Setup Menu Contents 33 Image Adjustment 1 Main Menu 33 Image Adjustment 2 Main Menu 35 Volume Adjustment Main Menu 35 Screen Settings Main Menu 36 Input Settings Main Menu 38 Option Settings 1 Main Menu 39 Option Settings 2 Main Menu 40 USB Settings Main Menu (USB Port Models Only 42 Wireless Main Menu (USB Port Models Only 42 Operational Info Main Menu 42 Restore All Defaults Main Menu 42 Cleaning the Projector 43 Cleaning the Projector Exterior 43 Cleaning the Lens 43 Cleaning Intake and Exhaust Vents 43 Troubleshooting 44 Indicators 44 Error Indicators...
...Factory Defaults 31 Setup Menu Contents 33 Image Adjustment 1 Main Menu 33 Image Adjustment 2 Main Menu 35 Volume Adjustment Main Menu 35 Screen Settings Main Menu 36 Input Settings Main Menu 38 Option Settings 1 Main Menu 39 Option Settings 2 Main Menu 40 USB Settings Main Menu (USB Port Models Only 42 Wireless Main Menu (USB Port Models Only 42 Operational Info Main Menu 42 Restore All Defaults Main Menu 42 Cleaning the Projector 43 Cleaning the Projector Exterior 43 Cleaning the Lens 43 Cleaning Intake and Exhaust Vents 43 Troubleshooting 44 Indicators 44 Error Indicators...
User Guide
Page 6
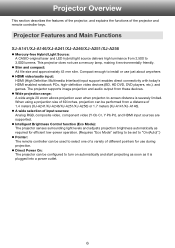
.... The projector supports image projection and audio output from 2,500 to install or use a mercury lamp, making it is severely limited. z HDMI video/audio input: HDMI (High Definition Multimedia Interface) input support enables direct connectivity with today's HDMI enabled notebook PCs, high-definition video devices (BD, HD DVD, DVD players, etc.), and games. z Intelligent Brightness Control function (Eco Mode): The projector senses surrounding light levels and adjusts projection brightness automatically as it environmentally friendly. When using a projection size of 60...
.... The projector supports image projection and audio output from 2,500 to install or use a mercury lamp, making it is severely limited. z HDMI video/audio input: HDMI (High Definition Multimedia Interface) input support enables direct connectivity with today's HDMI enabled notebook PCs, high-definition video devices (BD, HD DVD, DVD players, etc.), and games. z Intelligent Brightness Control function (Eco Mode): The projector senses surrounding light levels and adjusts projection brightness automatically as it environmentally friendly. When using a projection size of 60...
User Guide
Page 7
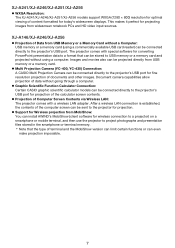
...: USB memory or a memory card (using a computer. z Projection of the calculator screen contents. XJ-A146/XJ-A246/XJ-A256 z Projection of documents and other images. z Multi Projection Camera (YC-400, YC-430) Connection: A CASIO Multi Projection Camera can be connected directly to the projector's USB port for fine resolution projection of Data from MobiShow: You can install AWIND's MobiShow (client software for wireless connection to a projector) on a smartphone or mobile terminal, and then use the projector to project...
...: USB memory or a memory card (using a computer. z Projection of the calculator screen contents. XJ-A146/XJ-A246/XJ-A256 z Projection of documents and other images. z Multi Projection Camera (YC-400, YC-430) Connection: A CASIO Multi Projection Camera can be connected directly to the projector's USB port for fine resolution projection of Data from MobiShow: You can install AWIND's MobiShow (client software for wireless connection to a projector) on a smartphone or mobile terminal, and then use the projector to project...
User Guide
Page 8
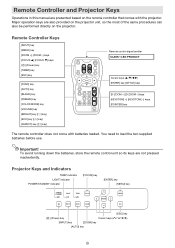
... TEMP indicator LIGHT indicator POWER/STANDBY indicator [FOCUS] key [ENTER] key [MENU] key [ESC] key [P] (Power) key Cursor keys (q/w/U/I) [INPUT] key [ZOOM] key [AUTO] key 8 Remote Controller Keys [INPUT] key [MENU] key [ZOOM +] [ZOOM -] keys [FOCUS S] [FOCUS T] keys [P] (Power) key [TIMER] key [ESC] key [FUNC] key [AUTO] key [BLANK] key [FREEZE] key [COLOR MODE] key [VOLUME] key [BRIGHT] key ([O] key) [ECO] key ([f] key) [ASPECT] key ([Z] key) Remote control signal emitter CLASS 1 LED PRODUCT Cursor keys (S/T/W/X) [ENTER] key ([STYLE] key) [D-ZOOM +] [D-ZOOM -] keys [KEYSTONE...
... TEMP indicator LIGHT indicator POWER/STANDBY indicator [FOCUS] key [ENTER] key [MENU] key [ESC] key [P] (Power) key Cursor keys (q/w/U/I) [INPUT] key [ZOOM] key [AUTO] key 8 Remote Controller Keys [INPUT] key [MENU] key [ZOOM +] [ZOOM -] keys [FOCUS S] [FOCUS T] keys [P] (Power) key [TIMER] key [ESC] key [FUNC] key [AUTO] key [BLANK] key [FREEZE] key [COLOR MODE] key [VOLUME] key [BRIGHT] key ([O] key) [ECO] key ([f] key) [ASPECT] key ([Z] key) Remote control signal emitter CLASS 1 LED PRODUCT Cursor keys (S/T/W/X) [ENTER] key ([STYLE] key) [D-ZOOM +] [D-ZOOM -] keys [KEYSTONE...
User Guide
Page 15
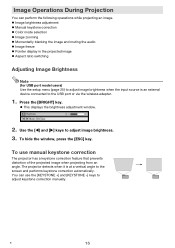
...manual keystone correction The projector has a keystone correction feature that prevents distortion of the projected image when projecting from an angle. z Image brightness adjustment z Manual keystone correction z Color mode selection z Image zooming z Momentarily blanking the image and muting the audio z Image freeze z Pointer display in the projected image z Aspect ratio switching Adjusting Image Brightness Note (for USB port model users) Use the setup menu (page 25) to adjust image brightness when the input source is at a vertical angle to adjust image brightness. 3. To hide the window...
...manual keystone correction The projector has a keystone correction feature that prevents distortion of the projected image when projecting from an angle. z Image brightness adjustment z Manual keystone correction z Color mode selection z Image zooming z Momentarily blanking the image and muting the audio z Image freeze z Pointer display in the projected image z Aspect ratio switching Adjusting Image Brightness Note (for USB port model users) Use the setup menu (page 25) to adjust image brightness when the input source is at a vertical angle to adjust image brightness. 3. To hide the window...
User Guide
Page 23
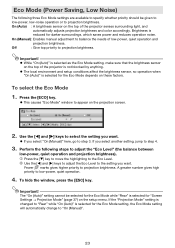
... (Manual): Enables manual adjustment to projection brightness. Off : Give top priority to appear on the top of low-power, quiet operation and projection brightness. Important! z This causes "Eco Mode" window to projection brightness. The "On (Auto)" setting cannot be given to low-power, low-noise operation or to balance the needs of the projector senses surrounding light, and automatically adjusts projection brightness and color accordingly. If the "Projection Mode" setting is changed to...
... (Manual): Enables manual adjustment to projection brightness. Off : Give top priority to appear on the top of low-power, quiet operation and projection brightness. Important! z This causes "Eco Mode" window to projection brightness. The "On (Auto)" setting cannot be given to low-power, low-noise operation or to balance the needs of the projector senses surrounding light, and automatically adjusts projection brightness and color accordingly. If the "Projection Mode" setting is changed to...
User Guide
Page 28
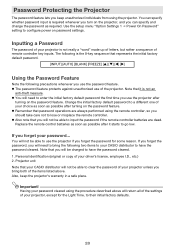
... the projector. z Also note that password operations are dead. Change the initial factory default password to use the projector after it is required whenever you bring the following two items to your CASIO distributor to configure power on the password feature. You will not be charged to input the password if the remote controller batteries are always performed using the projector. z Remember that you use of remote controller key inputs. Replace the remote control batteries...
... the projector. z Also note that password operations are dead. Change the initial factory default password to use the projector after it is required whenever you bring the following two items to your CASIO distributor to configure power on the password feature. You will not be charged to input the password if the remote controller batteries are always performed using the projector. z Remember that you use of remote controller key inputs. Replace the remote control batteries...
User Guide
Page 29
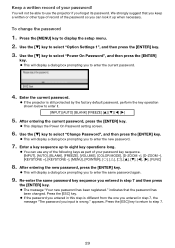
... [ENTER] key. Keep a written record of your password! Press the [ESC] key. Use the [T] key to step 7. 29 After entering the new password, press the [ENTER] key. z The message "Your new password has been registered." Press the [MENU] key to use any of the following keys as part of your password key sequence. [INPUT], [AUTO], [BLANK], [FREEZE], [VOLUME], [COLOR MODE], [D-ZOOM +], [D-ZOOM -], [KEYSTONE +], [KEYSTONE -], [MENU], [POINTER], [O], [f], [Z], [S], [T], [W], [X], [FUNC] 8. You will display a dialog box...
... [ENTER] key. Keep a written record of your password! Press the [ESC] key. Use the [T] key to step 7. 29 After entering the new password, press the [ENTER] key. z The message "Your new password has been registered." Press the [MENU] key to use any of the following keys as part of your password key sequence. [INPUT], [AUTO], [BLANK], [FREEZE], [VOLUME], [COLOR MODE], [D-ZOOM +], [D-ZOOM -], [KEYSTONE +], [KEYSTONE -], [MENU], [POINTER], [O], [f], [Z], [S], [T], [W], [X], [FUNC] 8. You will display a dialog box...
User Guide
Page 33
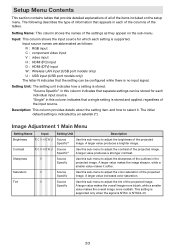
... input C : component video input V : video input H : HDMI (PC) input D : HDMI (DTV) input W : Wireless LAN input (USB port models only) U : USB input (USB port models only) The letter N indicates that appears in this column indicates that a single setting is no input signal. "Single" in the projected image. A larger value makes the overall image more bluish, while a smaller value makes the overall image more reddish. Input: This column shows the input source for each setting is NTSC or NTSC4.43. 33 Source Specific*1 Use this sub-menu to adjust the...
... input C : component video input V : video input H : HDMI (PC) input D : HDMI (DTV) input W : Wireless LAN input (USB port models only) U : USB input (USB port models only) The letter N indicates that appears in this column indicates that a single setting is no input signal. "Single" in the projected image. A larger value makes the overall image more bluish, while a smaller value makes the overall image more reddish. Input: This column shows the input source for each setting is NTSC or NTSC4.43. 33 Source Specific*1 Use this sub-menu to adjust the...
User Guide
Page 35
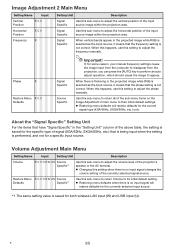
... initial default setting. Image Adjustment 2 Main Menu Setting Name Input Vertical Position RCV Horizontal Position RCV Frequency R Setting Unit Description Signal Specific Use this sub-menu to adjust the horizontal position of the input source image within the projection area. Signal Specific Use this setting when there is not correct. z Changing this sub-menu to adjust the vertical position of signal (XGA/60Hz, SXGA/60Hz, etc.) that the phase setting is no input signal will restore defaults for both wireless LAN input (W) and USB input (U).
... initial default setting. Image Adjustment 2 Main Menu Setting Name Input Vertical Position RCV Horizontal Position RCV Frequency R Setting Unit Description Signal Specific Use this sub-menu to adjust the horizontal position of the input source image within the projection area. Signal Specific Use this setting when there is not correct. z Changing this sub-menu to adjust the vertical position of signal (XGA/60Hz, SXGA/60Hz, etc.) that the phase setting is no input signal will restore defaults for both wireless LAN input (W) and USB input (U).
User Guide
Page 38
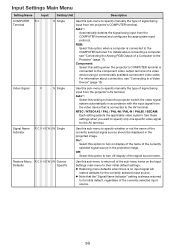
... projector switch the video signal system automatically in the projected image. Auto*: Select this setting to the Projector" (page 11). Use these settings when you want to specify manually the type of signal being input from the projector's AV terminal. RGB: Select this sub-menu to specify only one specific video signal for the currently selected input source. For information about connecting a computer, see "Connecting to specify manually the type of signal being input from the video...
... projector switch the video signal system automatically in the projected image. Auto*: Select this setting to the Projector" (page 11). Use these settings when you want to specify manually the type of signal being input from the projector's AV terminal. RGB: Select this sub-menu to specify only one specific video signal for the currently selected input source. For information about connecting a computer, see "Connecting to specify manually the type of signal being input from the video...
User Guide
Page 40
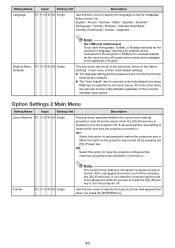
... "Auto Adjust" item is pressed to turn the projector off by unplugging the power cord without pressing the [P] (Power) key. A saved projection size setting is restored the next time the projector is selected for USB port model users) If you want the current projection size to be saved and restored, be displayed in effect the last time the projector was turned off . On*: Select this sub-menu to specify the language to use for messages, setup...
... "Auto Adjust" item is pressed to turn the projector off by unplugging the power cord without pressing the [P] (Power) key. A saved projection size setting is restored the next time the projector is selected for USB port model users) If you want the current projection size to be saved and restored, be displayed in effect the last time the projector was turned off . On*: Select this sub-menu to specify the language to use for messages, setup...
User Guide
Page 42
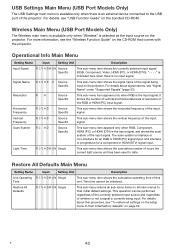
... Guide" on the CD-ROM that comes with the projector. Resolution RH Source Specific This sub-menu item appears only when RGB is the input signal, and shows the scan system of the input signal. USB Settings Main Menu (USB Port Models Only) The USB Settings main menu is available only when there is no input signal. Operational Info Main Menu Setting Name Input Setting Unit Description Input Signal R C V H D W U N Source Specific This sub-menu item shows the currently selected input signal (RGB, Component, Video, HDMI...
... Guide" on the CD-ROM that comes with the projector. Resolution RH Source Specific This sub-menu item appears only when RGB is the input signal, and shows the scan system of the input signal. USB Settings Main Menu (USB Port Models Only) The USB Settings main menu is available only when there is no input signal. Operational Info Main Menu Setting Name Input Setting Unit Description Input Signal R C V H D W U N Source Specific This sub-menu item shows the currently selected input signal (RGB, Component, Video, HDMI...
User Guide
Page 44
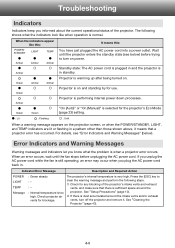
... Action POWER LIGHT TEMP Message : Green steady :- :- : Internal temperature is performing internal power down processes. Troubleshooting Indicators Indicators keep you plug the AC power cord back in. Projector is sufficient space around the intake vents and/or exhaust vents, turn on the projection screen, or when the POWER/STANDBY, LIGHT, and TEMP indicators are lit or flashing in standby. Check projector air vents for use. The following steps. 1 Check for the projector's Eco Mode (page 23) setting. When the indicators appear like when operation...
... Action POWER LIGHT TEMP Message : Green steady :- :- : Internal temperature is performing internal power down processes. Troubleshooting Indicators Indicators keep you plug the AC power cord back in. Projector is sufficient space around the intake vents and/or exhaust vents, turn on the projection screen, or when the POWER/STANDBY, LIGHT, and TEMP indicators are lit or flashing in standby. Check projector air vents for use. The following steps. 1 Check for the projector's Eco Mode (page 23) setting. When the indicators appear like when operation...
User Guide
Page 45
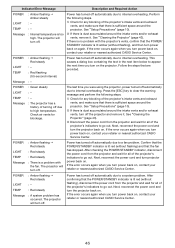
... internal overheating. See "Cleaning the Projector" (page 43). If there is no problem with the fan. This causes a dialog box containing the text in the next item below to high temperature. Follow the steps that the fan has stopped. POWER : Green steady LIGHT : - POWER : Amber flashing J Red steady LIGHT : - Press the [ESC] key to clear the warning message and perform the following steps. 1 Check for all of turning off...
... internal overheating. See "Cleaning the Projector" (page 43). If there is no problem with the fan. This causes a dialog box containing the text in the next item below to high temperature. Follow the steps that the fan has stopped. POWER : Green steady LIGHT : - POWER : Amber flashing J Red steady LIGHT : - Press the [ESC] key to clear the warning message and perform the following steps. 1 Check for all of turning off...
User Guide
Page 46
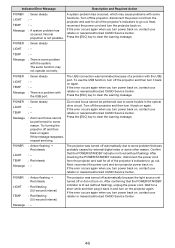
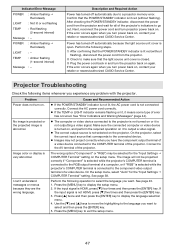
... POWER/STANDBY indicator is a problem with some problem that the POWER/STANDBY indicator is lit red (without flashing). If the error occurs again when you turn power back on . The USB connection was terminated because of the projector's indicators to go out. Indicator/Error Message Description and Required Action POWER LIGHT TEMP Message : Green steady :- :- : A system problem has occurred. TEMP : - If this message reappears, request servicing. Next, reconnect the power cord and turn it back in the optical drive circuit. POWER : Green steady LIGHT : - To use...
... POWER/STANDBY indicator is a problem with some problem that the POWER/STANDBY indicator is lit red (without flashing). If the error occurs again when you turn power back on . The USB connection was terminated because of the projector's indicators to go out. Indicator/Error Message Description and Required Action POWER LIGHT TEMP Message : Green steady :- :- : A system problem has occurred. TEMP : - If this message reappears, request servicing. Next, reconnect the power cord and turn it back in the optical drive circuit. POWER : Green steady LIGHT : - To use...
User Guide
Page 47
... the light source unit cover is turned on, and perform the required operation on the projector. Image color or display is not connected correctly. The image will not be selected for the "Input Settings J COMPUTER Terminal" setting. Connect the AC power cord correctly. The wrong option ("Component" or "RGB") may not project correctly when you want . Projector Troubleshooting Check the following operation to exit the setup menu. 47 Connect to output a video signal. TEMP : Amber flashing (1-second interval) Message : - Make...
... the light source unit cover is turned on, and perform the required operation on the projector. Image color or display is not connected correctly. The image will not be selected for the "Input Settings J COMPUTER Terminal" setting. Connect the AC power cord correctly. The wrong option ("Component" or "RGB") may not project correctly when you want . Projector Troubleshooting Check the following operation to exit the setup menu. 47 Connect to output a video signal. TEMP : Amber flashing (1-second interval) Message : - Make...

User Guide
Page 48
... Settings 2 J HDMI Audio Out" setting on again. Strange color The input signal may not be connected correctly to adjust the projection image color balance. Try doing the following steps, which may or may be too low or muted. On the setup menu, use the [FOCUS S] and [FOCUS T] keys to normal operation. 1. z If the input source is a video camera or document camera, check to adjust image brightness. - z The remote controller may be dead. See "Error Indicators and Warning Messages" (page 44). indicator...
... Settings 2 J HDMI Audio Out" setting on again. Strange color The input signal may not be connected correctly to adjust the projection image color balance. Try doing the following steps, which may or may be too low or muted. On the setup menu, use the [FOCUS S] and [FOCUS T] keys to normal operation. 1. z If the input source is a video camera or document camera, check to adjust image brightness. - z The remote controller may be dead. See "Error Indicators and Warning Messages" (page 44). indicator...


