
User Guide
Page 4
... recall a setup from registration memory ..... E-13 To turn on Digital Keyboard power E-13 Listening to Play E-9 Preparing the Music Stand E-9 Power Supply E-9 Connections E-11 Connecting Headphones E-11 Connecting a Pedal E-11 Connecting a Microphone (WK-6500 only).......E-11 Connecting Audio Equipment or an Amplifier E-12 Bundled and Optional Accessories E-12 Selecting and Playing a Tone .. E-96...
... recall a setup from registration memory ..... E-13 To turn on Digital Keyboard power E-13 Listening to Play E-9 Preparing the Music Stand E-9 Power Supply E-9 Connections E-11 Connecting Headphones E-11 Connecting a Pedal E-11 Connecting a Microphone (WK-6500 only).......E-11 Connecting Audio Equipment or an Amplifier E-12 Bundled and Optional Accessories E-12 Selecting and Playing a Tone .. E-96...
User Guide
Page 11
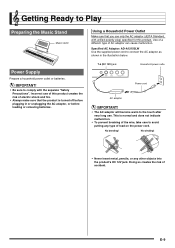
Getting Ready to Play Preparing the Music Stand Music stand Power Supply Prepare a household power outlet or batteries. • Be sure to comply with unified polarity plug) specified for this product creates the risk of ...
Getting Ready to Play Preparing the Music Stand Music stand Power Supply Prepare a household power outlet or batteries. • Be sure to comply with unified polarity plug) specified for this product creates the risk of ...

User Guide
Page 27
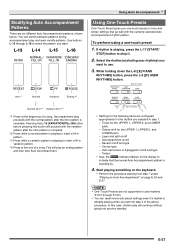
...chord area of the split point make up the chord keyboard. • The chord root and type that the normal Auto Accompaniment pattern is standing by using the split feature to intro or variation pattern standby. You also can change to move the split point (page E-17). Play ...keys). • Auto Accompaniment will play an ending pattern before stopping Auto Accompaniment play a chord), with your right hand. • You can use "CASIO Chord" or other chords with your left of the display. 9. For details, see "Modifying Auto Accompaniment Patterns" (page E-27).
...chord area of the split point make up the chord keyboard. • The chord root and type that the normal Auto Accompaniment pattern is standing by using the split feature to intro or variation pattern standby. You also can change to move the split point (page E-17). Play ...keys). • Auto Accompaniment will play an ending pattern before stopping Auto Accompaniment play a chord), with your right hand. • You can use "CASIO Chord" or other chords with your left of the display. 9. For details, see "Modifying Auto Accompaniment Patterns" (page E-27).
User Guide
Page 29
... want . In this button will proceed with the currently selected Auto Accompaniment rhythm pattern. To perform using a one -touch preset settings even if a rhythm is standing by. 4. Intro *1 Normal Variation Ending *4 Normal fill-in *2 Variation fill-in *3 *1 Press at the end of a song. This will continue without going into synchro standby...
... want . In this button will proceed with the currently selected Auto Accompaniment rhythm pattern. To perform using a one -touch preset settings even if a rhythm is standing by. 4. Intro *1 Normal Variation Ending *4 Normal fill-in *2 Variation fill-in *3 *1 Press at the end of a song. This will continue without going into synchro standby...
User Guide
Page 84
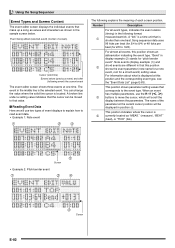
... this position shows an abbreviation indicating the event type. This position shows parameter setting values that is located. You can be displayed in display example (2) stands for 2/8 to that the cursor can change the value where the solid-line cursor is shorter than one time. Event being edited (selected event) (Center...
... this position shows an abbreviation indicating the event type. This position shows parameter setting values that is located. You can be displayed in display example (2) stands for 2/8 to that the cursor can change the value where the solid-line cursor is shorter than one time. Event being edited (selected event) (Center...
User Guide
Page 95
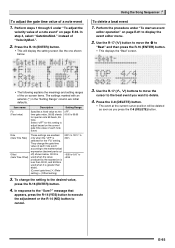
Press the R-16 (ENTER) button. • This will be deleted as soon as the time gate value. 99:95 stands for quarter note 99 beats, 95 ticks. Use the R-17 (y) button to move the cursor to 99:95 Rate (Gate Time Rate) Offset (Gate Time ...
Press the R-16 (ENTER) button. • This will be deleted as soon as the time gate value. 99:95 stands for quarter note 99 beats, 95 ticks. Use the R-17 (y) button to move the cursor to 99:95 Rate (Gate Time Rate) Offset (Gate Time ...


